- Switch between languages using the Language bar
- Using the Language bar to Switch Keyboard Layouts
- I don’t see the Language bar
- How to Switch Default Language in Windows 10
- Switch Default Language in Windows 10
- Add a Language
- 1. Change Display Language
- 2. Change Language of Welcome Screen and New User Accounts
- 3. Change Keyboard Language
- Conclusion
- Windows 10 switches keyboard language on its own [QUICK GUIDE]
- How do I disable keyboard language switch in Windows 10?
- 1. Preliminary fixes
- 2. Set a different input method
- 3. Make the keyboard layout as default
- Run a System Scan to discover potential errors
- 4. Choose only one input language and keyboard layout
- 5. Disable keyboard actions
- 6. Use Registry Editor to disable the keyboard layout toggle hotkeys
- 7. Change the region settings
- 8. Change registry settings through policy or login script
Switch between languages using the Language bar
After you enable the keyboard layout for two or more languages in the Windows operating system, you can use the Language bar to switch between languages that use different keyboard layouts.
Note: If you just want to insert a few symbols or foreign characters, and you only type in languages with a Latin alphabet, such as English or Spanish, you can insert symbols without switching to a different keyboard layout.
For more information about adding additional editing languages and keyboard layouts see Change the language Office uses in its menus and proofing tools.
Using the Language bar to Switch Keyboard Layouts
When you switch a language by using the Language bar, the keyboard layout changes to the keyboard for that language.
Use the Language bar when you:
Want to switch between languages with a Latin alphabet, such as English, Spanish, or French, and a language with a non-Latin alphabet, such as Arabic or Chinese.
Want to switch between languages with a non-Latin alphabet, such as Greek or Russian.
Prefer to use native keyboard layouts when you type in different languages that have a Latin alphabet.
After you have enabled the keyboard language that you want, open your document and place the cursor in the document where you want to start to type text in a different language.
Click the language icon  on the Language bar, which should appear on your task bar near where the clock is, and then click the language that you want to use.
Keyboard shortcut: To switch between keyboard layouts, press Alt+Shift.
Note: The icon is just an example; it shows that English is the language of the active keyboard layout. The actual icon shown on your computer depends on the language of the active keyboard layout and version of Windows.
If you have set up more than one keyboard layout for a single language, you can switch between layouts by clicking the keyboard layout icon on the Language bar and then clicking the keyboard layout that you want to use. The name on the indicator changes to reflect the active keyboard layout.
Repeat steps 1 and 2 to switch between different languages.
I don’t see the Language bar
In most cases, the Language bar automatically appears on your desktop or in the taskbar after you enable two or more keyboard layouts in the Windows operating system. You cannot see the Language bar if it is hidden or only one keyboard layout is enabled in the Windows operating system.
If you don’t see the Language bar, do the following to check to see if the Language bar is hidden:
In Windows 10 and Windows 8
Press the Windows logo key and type Control to search for the Control Panel app.
Click Control Panel.
Under Clock, Language, and Region, click Change input methods.
Click Advanced settings.
Under Switching input methods, select the Use the desktop language bar when it’s available check box, and then click Options.

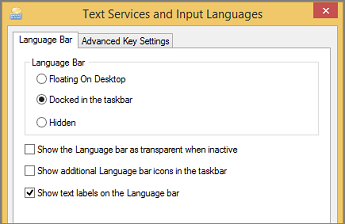
In the Text Services and Input Languages dialog box, click the Language Bar tab, and make sure that either the Floating On Desktop or the Docked in the taskbar option is selected.
Click Start, and then click Control Panel.
Under Clock, Language, and Region, click Change keyboard or other input methods.
In the Region and Language dialog box, click Change keyboards.
In the Text Services and Input Languages dialog box, click the Language Bar tab.
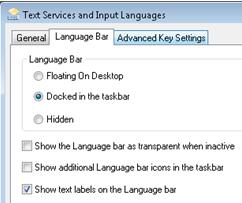
Under Language Bar, check if the Hidden option is selected. If it is, select either Floating on Desktop or Docked in the taskbar.
In Windows Vista
Click Start, and then click Control Panel.
Under Clock, Language, and Regional Options, click Change keyboard or other input methods.
In the Regional and Language Options dialog box, click Change keyboards.
In the Text Services and Input Languages dialog box, click the Language Bar tab.
Under Language Bar, check if the Hidden option is clicked. If it is, click either Floating on Desktop or Docked in the taskbar.
How to Switch Default Language in Windows 10
Methods to Switch Default Language on Windows 10 with steps. – Are you using a Windows 10 computer with the OS running only one language across the system? So, do you want to use another language such as Hindi, Chinese, Italian, German, Thai, and so on for your PC? If it’s true then Microsoft offers various languages for you to download and install in this latest operating system. An article of the same settings section How to Set a Language as Default in Windows 10 can help you.
This guide to Switch Default Language in Windows 10 is specifically useful when multiple users access the same computer and each user prefers a different language.
Let us now begin the steps and see how to grab and display a new language in Windows 10.
Switch Default Language in Windows 10
Add a Language
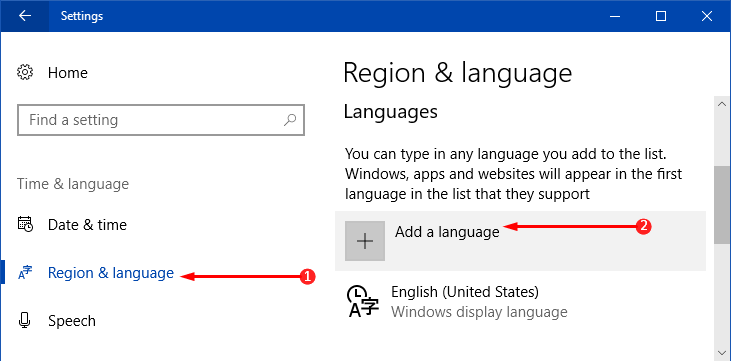
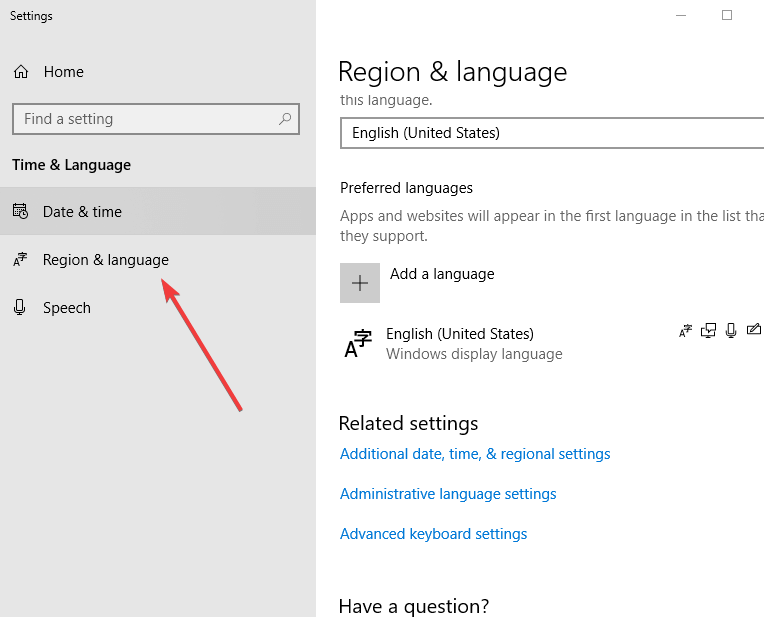
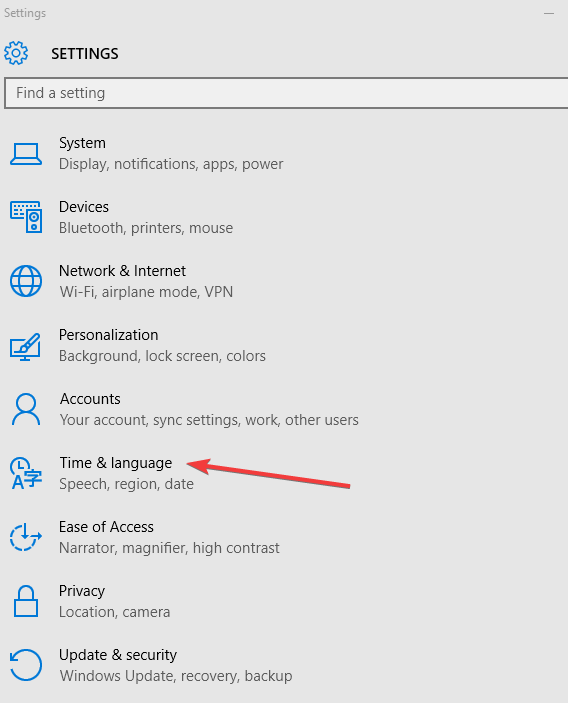
Step 1 – Press the key combinations of Win&I and when the Settings application comes into view, click Time & language. Instead, you can use any other method to launch the Settings program.
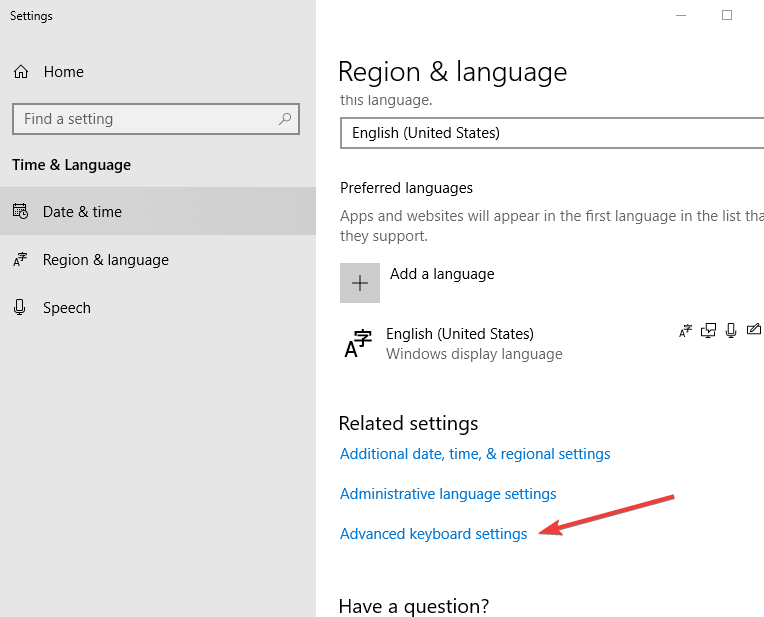
Step 2 – On the left sidebar, various sections are visible, click Region & language.
Step 3 – Moving ahead, click Add a language button on the right panel. You will find this button underneath the title Language.
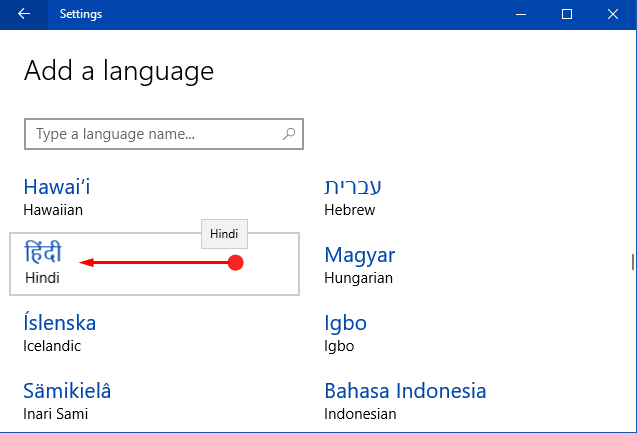
Step 4 – The following page displays several languages for you to install on your PC. The languages are listed in the alphabetical order, so locate select the one you wish to add. For example – Hindi.
Step 5 – Head back to Region & language page and click on that specific language that you added in the above step. The selected language will show up three buttons, click Options.
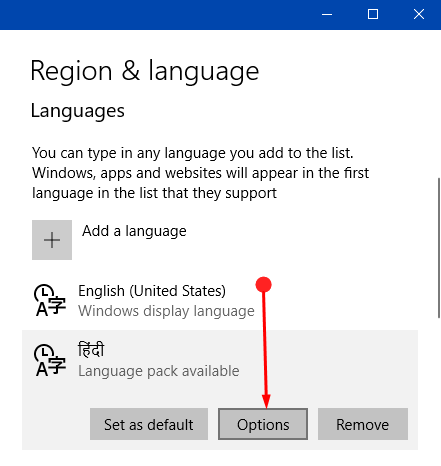
Step 6 – Click Download button that is visible right below Download language pack.
Note – Depending upon your requirement, you can add the number of languages accordingly.
First of all, the most important task you have to perform is to add and install a language. After adding it, the OS offers you three distinct locations where you can Switch Default Language in Windows 10. These are –
1. Display Language
2. Language of Welcome Screen and New User Accounts
3. Keyboard Language
1. Change Display Language
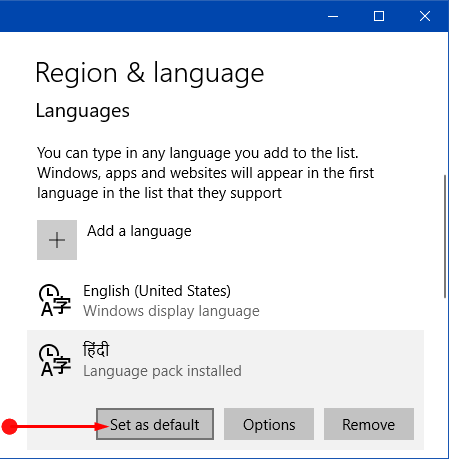
Step 1 – Stay in the Region & language page and on the right pane you will notice the language you have added. Select that particular language and click the button namely Set as default.
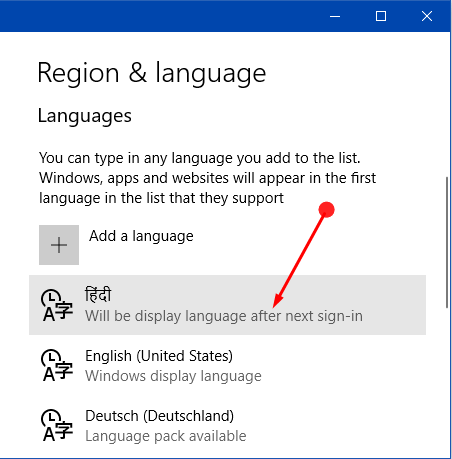
Step 2 – It will immediately show a notification as Will be display language after next sign-in.
Step 3 – So, sign out and again log in to switch display language.
2. Change Language of Welcome Screen and New User Accounts
Adding and installing a language to a user account does not switch the default system language that is used in Sign in, Start Menu, Welcome, Shutdown and so on.
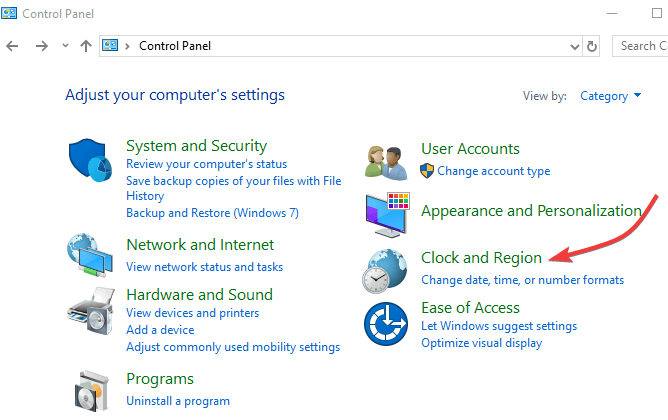
Step 1 – Type control on taskbar search field and press Enter when she displays Control Panel as the result.
Step 2 – Switch the icons into small view, then find and click Region.
Step 3 – Region wizard will open up, shift to the Administrative tab. Click Copy settings button that is visible in the first section.
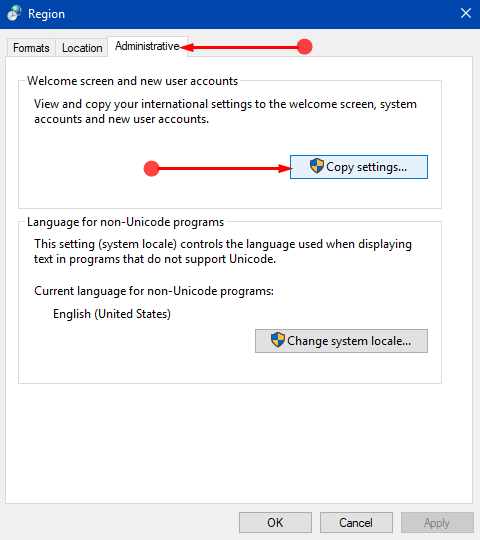
Step 4 – On the next pop-up, click the two options namely Welcome screen and system accounts and New user accounts.
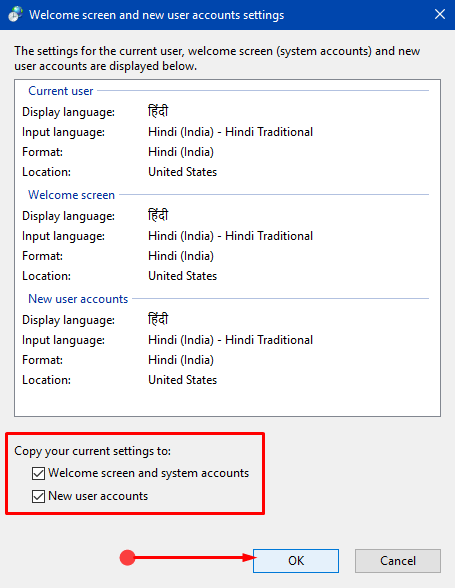
Step 5 – Click OK on the wizards to Switch Default Language in Windows 10. This will change the language on Welcome, Start Menu, Shutdown and so on.
3. Change Keyboard Language
Step 1 – To switch the keyboard input language, jointly press Win&Spacebar keys.
Step 2 – Alternatively, on the system tray click the current language. When you see other installed languages, pick up one of your choices.
Conclusion
Hopefully, after pursuing the above instructions, you will be able to Switch Default Language in Windows 10 quite effortlessly. Moreover, you can also apply it to the PC. If you have any problem following the steps or have more tips on this topic, write to us.
Windows 10 switches keyboard language on its own [QUICK GUIDE]

- If Windows 10 switches the keyboard language automatically it can be extremely annoying and counterproductive.
- First, you should set a different input method and make a keyboard layout as default.
- If the keyboard language keeps changing choose only one input language and keyboard layout.
- You may disable language switching in Windows 10 by changing the registry settings.

- Download Restoro PC Repair Tool that comes with Patented Technologies (patent available here).
- Click Start Scan to find Windows issues that could be causing PC problems.
- Click Repair All to fix issues affecting your computer’s security and performance
- Restoro has been downloaded by 0 readers this month.
Many users reported that Windows 10 changes keyboard language on its own. If you’re experiencing the same problem, read this guide to learn why it occurs and how you can quickly fix it.
Here’s an example to better understand this problem:
If you work on an English version of Windows, but you get Korean as a working language, your input language is set to Korean by default.
Sometimes, Windows will change this setting automatically when you switch between apps, thus a different keyboard layout too. So the keyboard layout changed suddenly in Windows 10.
This affects all Windows versions regardless, and consequently, all apps running under Windows – including Sign In and MS Office.
Why this happens is because the Input Language can be programmed to be maintained per app or per window through an API that changes the input locale to a different or defaults keyboard layout is enabled for the user.
Some apps like Office try to decipher the language you use when typing a document, email, or presentation and change the input language accordingly (including keyboard layout).
Check out some solutions below to disable the keyboard language switch in Windows 10.
How do I disable keyboard language switch in Windows 10?
- Preliminary fixes
- Set a different input method
- Make the keyboard layout as default
- Choose only one input language and keyboard layout
- Disable keyboard actions
- Use Registry Editor to disable the keyboard layout toggle hotkeys
- Change the region settings
- Change registry settings through policy or login script
1. Preliminary fixes

- Press CTRL+SHIFT to switch to another language.
- Change the default language to one of the others you get, and reboot your computer, then change it back to the language you want to use and reboot again.
- Remove all other languages so that you’re left with only the one you want Windows to load with – the system language.
- Open that language and check the input method, then you can remove the one you don’t want and keep what you want (The default language will not switch back when using certain programs, but you can switch between them without problems).
- Avoid clicking SHIFT+ALT while using your computer as this creates a hotkey and can cause the Windows 10 switches keyboard language on its own error.
- Watch the language questions carefully when you install Windows 10 initially.
2. Set a different input method
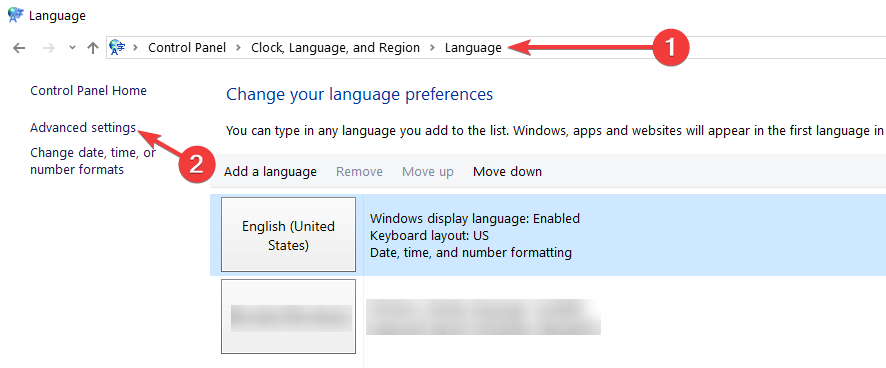
- Type control panel in the Search box and select the app from results.
- Select Clock, language and region.

- Click on Advanced settings.
- Under the Switching input methods section, put a checkmark for Let me set a different input method for each app windows.
- Click on Save and see if the problem persists.
3. Make the keyboard layout as default
- Click Start and select Settings.
- Choose Change PC settings.
- Click on Time and language, then select Region and Language.
- Select the language that you want to see Windows in.
- Click Set as primary. The Will be display language after next sign-in message will appear under the language.
- Click Set as primary to move the language to the top. If it can become your Windows display language, the Will be display language after next sign-in will appear under the language.
- Sign out and then sign back in.
Note: When you change your primary language, your keyboard layout may change. When signing back into Windows, use the right keyboard layout for entering your password. Otherwise, you might not sign in.
You can also change your keyboard layout on the sign-in screen by clicking the language abbreviation button.
Run a System Scan to discover potential errors


Your keyboard freezes as soon as you sign-in? Don’t worry, we’ve got the right solution for you.
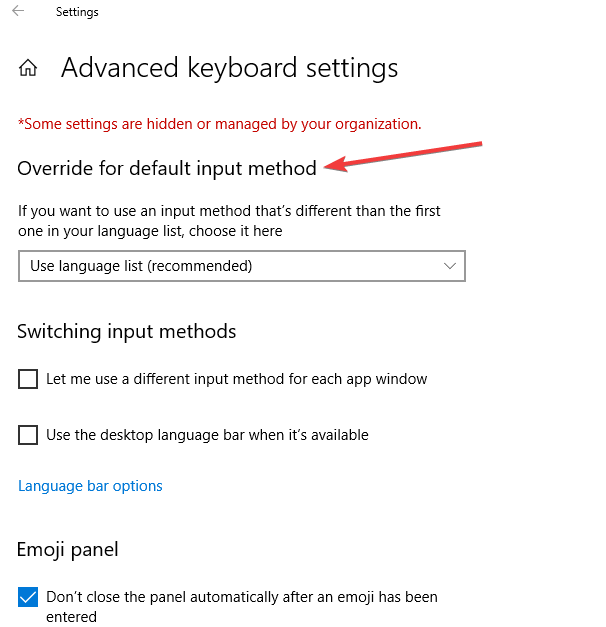
4. Choose only one input language and keyboard layout
- Click Start and choose Settings.
- Click Time and Language.
- Go to Region and Language and select Advanced Keyboard settings.
- Under Override for different input methods, select from the drop-down menu the language you want to use.
- Close the window.
5. Disable keyboard actions
- Click Start and select Control Panel.
- Click Clock, Language, and Region.
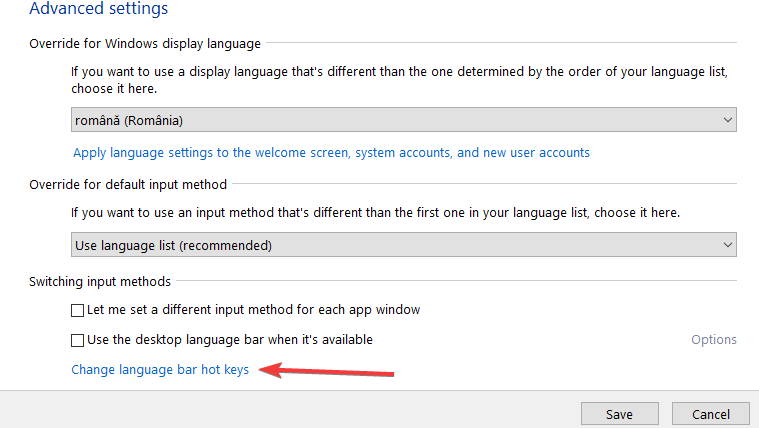
- Select Language and click on Advanced Settings.
- Click on Switching input methods and select Change language bar hotkeys.
- Select the Change key sequence.
- Click Switch keyboard layout.
- Click Not Assigned.
By default, pressing CTRL+SHIFT or ALT+SHIFT will cycle through any keyboard layouts you may have mapped and it is possible to do this by mistake.
If you keep pressing any of these combinations, you can go back to the correct setting.
6. Use Registry Editor to disable the keyboard layout toggle hotkeys
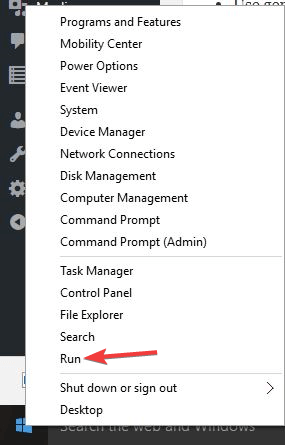
- Right-click Start and select Run.
- Type regedit.
- Navigate to the following path: HKCU\Keyboard LayoutToggle” /v “Layout Hotkey” /d 3
You might also want to use:
reg add «HKCU\Keyboard LayoutToggle» /v «Language Hotkey» /d 3reg add «HKCU\Keyboard LayoutToggle» /v «Hotkey» /d 3
And for new users, try this (in an elevated Command prompt):
reg load HKEY_USER\Stemp «%USERPROFILE%..DefaultNTUSER.DAT»reg add «HKEY_USERStempKeyboard LayoutToggle» /v «Layout Hotkey» /d 3reg unload HKEY_USERStemp
If you can’t access the Registry Editor, don’t panic because we’ve got a perfectly good guide on fixing this issue.
7. Change the region settings
- Go to Control Panel.
- Click on Clock, Language, and Region.
- Select Region.
- Click on the Location
- Under Home location, select Japan so that it won’t add any English keyboard layout.
- Click Apply, and then OK.
- Restart your computer.

8. Change registry settings through policy or login script
- Right-click Start and select Run.
- Type regedit and press Enter.
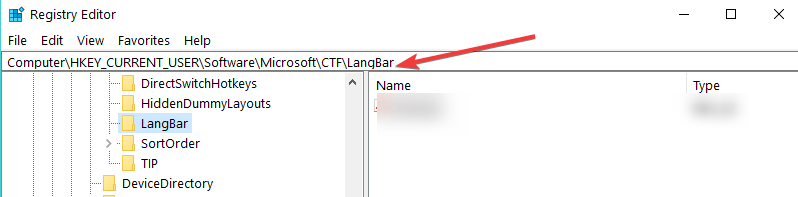
- Find this key to disable auto-detect keyboard layout: [HKEY_LOCAL_MACHINE\SYSTEM\CurrentControlSet\Control\Keyboard Layout]
“IgnoreRemoteKeyboardLayout”=dword:00000001 - To hide the language bar, use this key: [HKEY_CURRENT_USER\Software\Microsoft\CTF\LangBar]
“ShowStatus”=dword:00000003 - Exit registry editor once you’re done
If you can’t edit your registry, follow the steps in this dedicated guide and learn how you can do it like a pro.
Were you able to resolve the Windows 10 switches keyboard language on its own error using any of these solutions? Let us know in the comments section below.
As always, leave there any other suggestions or questions you may have and we’ll check them out.


