- How to use multiple monitors in Windows 10
- Video: Connecting a monitor
- Before you start
- Rearrange your displays
- Identify a display
- Detect a display
- Arrange your displays
- Change display options
- Change orientation
- Choose a display option
- Related topics
- Windows computer keeps switching screens.
- Replies (1)
- How to split your screen in Windows 10
- See more
- Snap Assist
- Use the keyboard shortcut
- Snapping more than two windows
- Further reading
- Turning off Snap Assist and adjusting settings
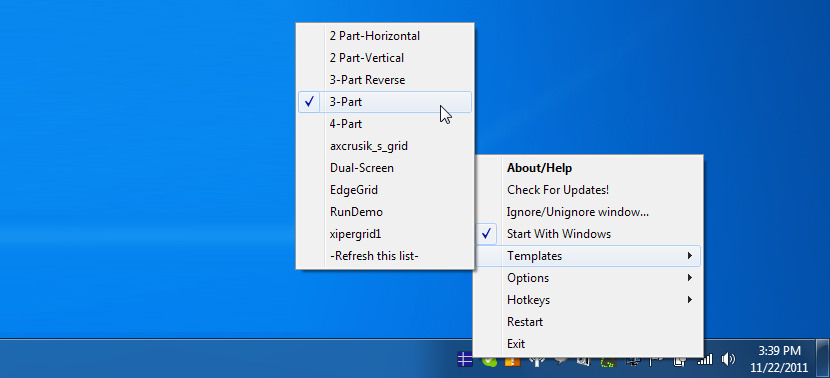
- Customize grids with a third-party app
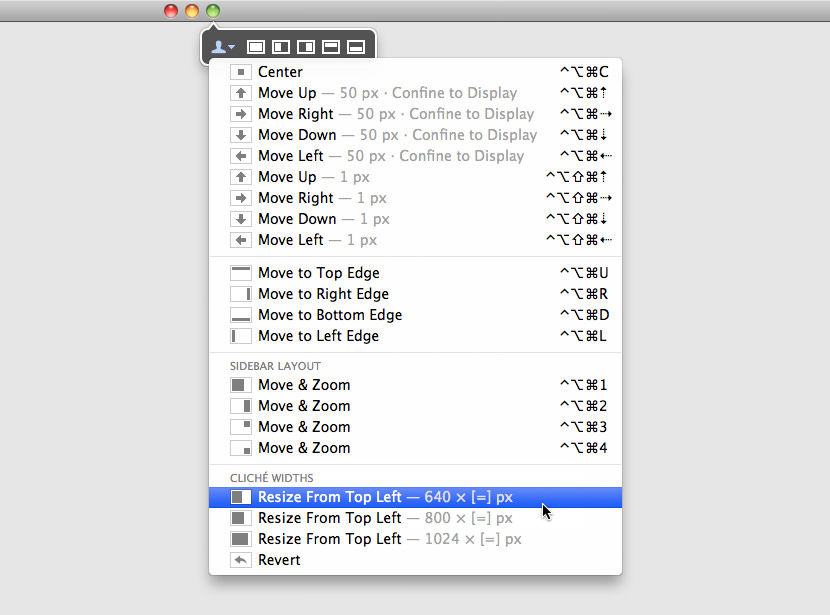
- 15 Tools To Split Your Monitor’s Screen In Windows And macOS
- ↓ 01 – WindowsGrid | Free | Windows
- ↓ 02 – GridMove | Free | Windows
- ↓ 03 – AltDrag | Free | Windows
- ↓ 04 – Spectacle | Free | macOS
- ↓ 05 – Microsoft PowerToys | Free | Windows
- ↓ 06 – Aquasnap | Free Personal | USD18 Pro
- ↓ 07 – Divvy | USD14 | Windows | macOS
- ↓ 08 – BetterSnapTool | €3.49 | macOS
- ↓ 09 – Magnet (Windows Manager) | USD1 | macOSX
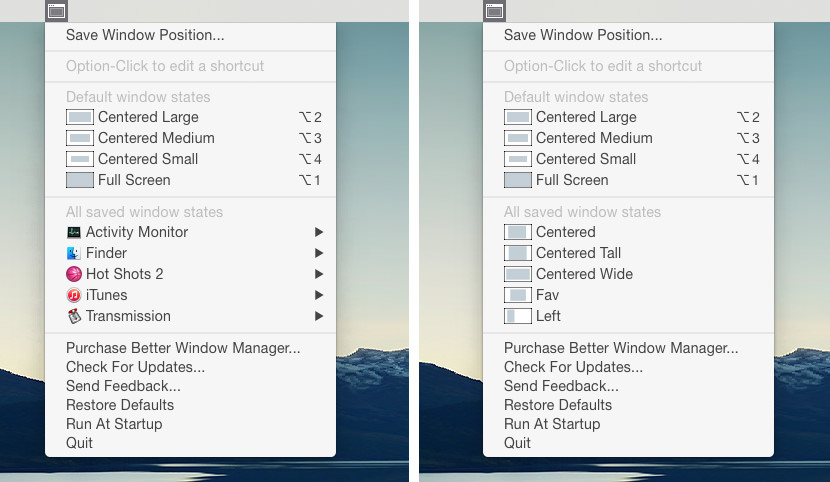
- ↓ 10 – Moom | USD10 | macOSX
- ↓ 11 – Better Window Manager | USD5 | macOSX
- ↓ 12 – MaxSnap | USD6 | macOSX
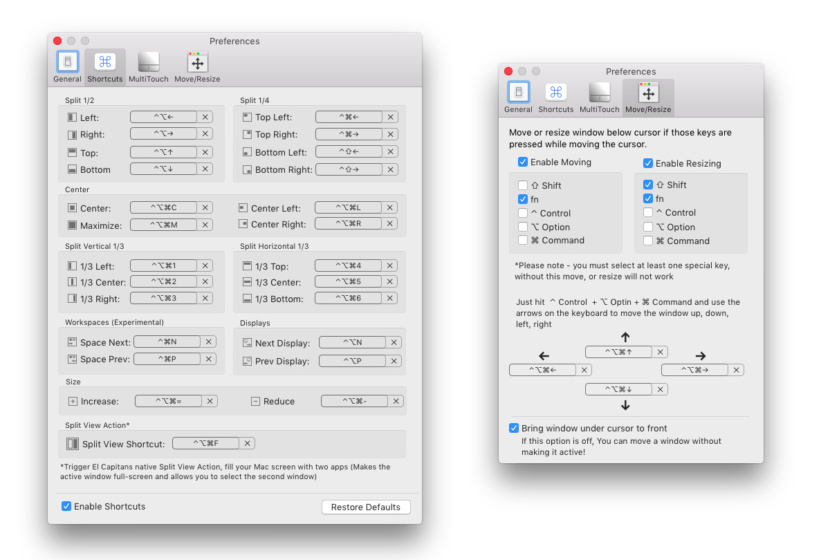
- ↓ 13 – MaxTo | USD20/30 | Windows
- ↓ 14 – Shutter Split Screen | USD15 | Windows
- ↓ 15 – UltraView Desktop Manager | USD99 | Windows
- ↓ 16 – KDE Mover-Sizer [ Discontinued ] | Free Open Source | Windows
How to use multiple monitors in Windows 10
After you’ve connected your Windows 10 PC to external displays, you can adjust the settings for each one.
Video: Connecting a monitor
Here’s a video on the basics of connecting to an external monitor.

Before you start
Before changing settings for your external displays, make sure everything is connected properly. Here’s what you can do:
Make sure your cables are properly connected to your PC or dock.
Check for Windows updates. To check for updates, select Start > Settings > Updates & Security > Windows Update > Check for updates.
Tip: If you’re using a wireless display adapter, connect to an HDMI port on newer TVs, then wirelessly connect your PC to it. After connecting your wireless display adapter to your TV, go to your Windows 10 PC and select Start > Settings > System > Display, then select Connect to a wireless display.
Rearrange your displays
You’ll see this option when Windows detects more than one display. Each display will be numbered to help you identify them more easily.
Identify a display
To see which number corresponds to a display, select Start > Settings > System > Display > Rearrange your displays, then select Identify. A number appears on the screen of the display it’s assigned to.
Detect a display
If you connected another display and it isn’t showing in Settings, select Start > Settings > System > Display > Rearrange your displays, then select Detect.
Arrange your displays
If you have multiple displays, you can change how they’re arranged. This is helpful if you want your displays to match how they’re set up in your home or office. In Display settings, select and drag the display to where you want. Do this with all the displays you want to move. When you’re happy with the layout, select Apply. Test your new layout by moving your mouse pointer across the different displays to make sure it works like you expect.
Change display options
After you’re connected to your external displays, you can change settings like your resolution, screen layout, and more. To see available options, select Start > Settings > System > Display.
Change orientation
Windows will recommend an orientation for your screen. To change it in Display settings, go to Scale and Layout, then choose your preferred Display orientation. If you change the orientation of a monitor, you’ll also need to physically rotate the screen. For example, you’d rotate your external display to use it in portrait instead of landscape.
Choose a display option
To change what shows on your displays, press Windows logo key + P. Here’s what you can choose.
See things on one display only.
See the same thing on all your displays.
See your desktop across multiple screens. When you have displays extended, you can move items between the two screens.
See everything on the second display only.
Second screen only
Related topics
Simply Windows on Youtube — These videos are only available in English
Windows computer keeps switching screens.
Replies (1)
![]()
I can understand the inconvenience caused to you. I will certainly help you with this issue. However, there are few more steps that we can try to diagnose the root cause.
I would like to know;
- Which Windows update were recently installed? Check Windows history for the same.
- What is the make and model of your computer?
To check the same follow the steps:
- Press Windows + R key on the keyboard.
- Type Msinfo32 and press enter. This will show you the system information please check for computer model.
Please try these methods below and check the status of the issue.
Method 1: Check in safe mode and clean boot mode of the computer.
Step 1 : Check in Safe mode
Safe mode is a troubleshooting option for Windows that starts your computer in a limited state. Only the basic files and drivers necessary to run Windows are started. The words Safe Mode appear in the corners of your monitor to identify which Windows mode you’re using.
Refer the link below:
You can restart the computer to put it back in normal mode.
If the issue doesn’t occur in safe mode, follow step 2.
Step 2: Perform Clean Boot
Placing your system in Clean Boot state helps in identifying if any third party applications or startup items are causing the issue. You need to follow the steps from the article mentioned below to perform a Clean Boot.
Note: Refer «How to reset the computer to start normally after clean boot troubleshooting» to reset the computer to start as normal after troubleshooting.
Try to reboot the system and check if it helps.
If the issue still persist, follow method 2.
Method 2: Perform System Maintenance troubleshooter.
I would suggest you to perform System Maintenance troubleshooter on the computer and check if it fixes the issue.
Please follow the steps to perform System maintenance check to improve performance of the computer:
- Press Windows and x key together and select Control Panel.
- Click on Troubleshooting.
- Click on View all on the left side panel.
- Click on System Maintenance and follow the onscreen instructions.
If the issue still persist, follow method 3.
Method 3: Check the settings.
- Press Windows key + I and click on PC settings.
- Select the option “General”.
- Look to where it says app switching and turn off When I swipe from the left edge, switch directly to my most recent app.
Please post back with the results and the information asked, We will be glad to assist you further.
How to split your screen in Windows 10
Windows has always been a great environment for multitasking, with the ability to run multiple applications at once and to switch between them with relative ease.
In Windows 10, Microsoft tightened up the snapping mechanism and expanded its functionality. Today, the latest version of Windows 10 offers a number of ways to split your screen into multiple windows and get real work done, with better support for higher-resolution displays and multiple monitors.
See more
Snap Assist
One of Windows 10’s most important contributions to split-screen multitasking is Snap Assist, which makes it easier to select an open application window when you are choosing which applications to arrange on your screen. Here’s how to use it:
Step 1: Choose the window you want to snap to one half of the screen, then drag it to the edge.

Step 2: A translucent outline of where it will snap to will appear. If you’re happy with it, let go, and your window will snap into that position.
Alternatively, press and hold the Windows key and the Left or Right Arrow key to snap the last selected window to one side of the screen.
Step 3: If you have other windows or applications open, when you snap your chosen window, you’ll also see a number of options that can fill the second half. Click on one, and it will automatically snap into place opposite the first window. If you don’t and the selection grid disappears, drag your second window to the edge of the empty space.

Step 4: To resize the two windows, hover the cursor over the dividing line until it becomes two arrows. Click and hold on the divider to adjust the two windows accordingly. However, there’s a limit to how narrow a window can be.
Note: Is Snap Assist refusing to work or acting strangely? Check your startup programs, the apps that automatically launch when you log into Windows. Sometimes these can interfere with Snap Assist, and disabling them will fix the problem. Our guide on managing startup programs is a great place to start.
Use the keyboard shortcut
Want a faster way to do this on your keyboard? There is a shortcut to split windows that are really useful. In an active window, press and hold the Windows key and then press either the Left or Right Arrow key.
This should automatically snap the active window to the left or right. Select another window to fill the second empty space.
Snapping more than two windows
If you have a large or high-resolution display, you can take advantage of all of that extra screen real estate by snapping up to four windows on a single screen using Corner Snap.
Step 1: Drag and drop your first window into any corner.
Note: To use the keyboard shortcut, press and hold the Windows key followed by the Left or Right Arrow key to snap the active window to the left or right. Next, press and hold the Windows key followed by the Up or Down Arrow key to move the snapped window into the top or bottom corner.

Step 2: With the first active window in a corner, drag and drop your second window into any other available corner. You are not required to pick a specific corner.

Step 3: Repeat Step 2 to fill in the other two corners as needed.
Note that a 2020 update to Windows 10 updated this four-window design and made all the snapped windows act as a single window. This may not sound important, but it’s really handy when you have to do something else, like open an additional app or file while working with your snapped windows — they will now stay together, waiting for you to get back.
Further reading
Turning off Snap Assist and adjusting settings
Snap Assist is easy to disable if it becomes troublesome. Here’s how:
Step 1: Open the Settings app. It’s the gear icon on the Start Menu.
Step 2: Select System.
Step 3: Select Multitasking listed on the left.

Step 4: Click the Toggle displayed under Snap Windows to toggle this feature off.
If you’d rather disable specific Snap Assist features rather than toggling it completely off, there are three settings you can disable instead. Just ignore Step 4 and uncheck the boxes next to each setting as needed:
- When I snap a window, automatically size it to fill available space
- When I snap a window, show what I can snap next to it
- When I resize a snapped window, simultaneously resize any adjacent snapped window
Customize grids with a third-party app
We’ll be the first to point out that the native Windows 10 option is impressive; however, there are a variety of third-party apps that give you a bit more. With these apps, you can enjoy more definitive, grid-like changes to your windows so you can obtain all the tools you love so much (in the perfect size) and place them wherever you desire. Our recommendation is AquaSnap .
AquaSnap lets its users develop and change as many split windows as necessary with a neat snap function that operates similarly to Windows 10. That being said, it’s slightly more flexible and consists of a few cool, extra tools such as snapping small windows together and other sweet gimmicks.
You can download and start using the Personal version of AquaSnap for free. With it, you’ll have access to basic features like docking, snapping, stretching, various keyboard shortcuts, and a whole lot more. If you’re ready to step it up, you can opt for the Professional edition, which comes in two different versions: Standard and Site. You can pay $18 for the Standard version and $600 for the Site version. These special editions allow you to acquire licenses, add convenient mouse shortcuts, benefit from multi-monitor support, and relish three other premium features.
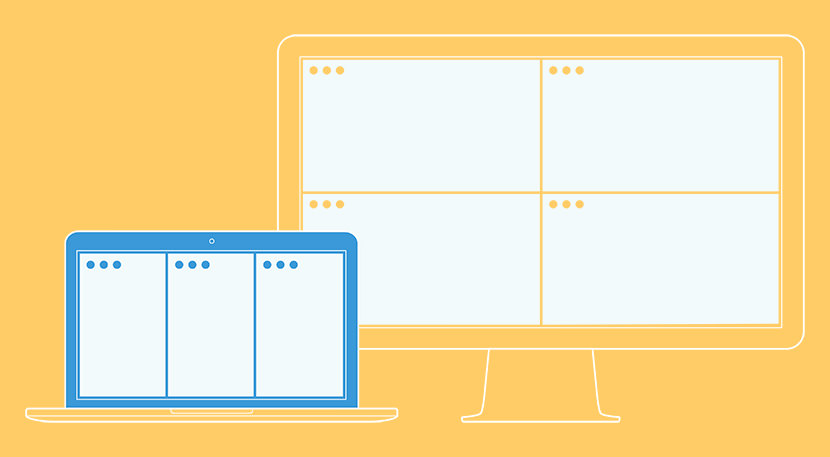
15 Tools To Split Your Monitor’s Screen In Windows And macOS
How to split your laptop or desktop PC Screen / 4K Monitor in Windows or macOS for better productivity? Microsoft Windows 10 and Apple macOSX already have this feature build into them, just drag your window the any corner of the screen and it will automatically snap, resize and fit half of the screen. The only problem is, what if you need to fit 5 or 6 windows into a screen?
How to split your Laptop or PC Screen/Monitor in Windows? Here’s a complete list of software that enables you to split your computer screen monitor into two or more so that they can view two applications side-by-side. This split screen software works across dual monitors too, it will also split your wallpapers so you can have a different wallpaper on each monitor.
Above is a short video showing how to take advantage of the new Apple’s macOS El Capitan feature called “Spilt Screen” where you can have 2 windows placed side by side automatically.
↓ 01 – WindowsGrid | Free | Windows

WindowGrid is a modern window management program that allows the user to quickly and easily layout their windows on a dynamic grid. WindowGrid gives functionality to the normally useless right mouse button when moving a window. Doing this will enable the grid snap mode.
↓ 02 – GridMove | Free | Windows
GridMove is a program that aims at making windows management easier. It helps you with this task by defining a visual grid on your desktop, to which you can easily snap windows. This program comes bundled with some predefined grid templates, that can be easily swaped, but also has ways of creating custom grids or sharing grids made by others.
GridMove makes moving windows, resizing windows, displaying them on cascade or on mosaic, making them on top or anything you can think of as easy as drag and drop.
↓ 03 – AltDrag | Free | Windows
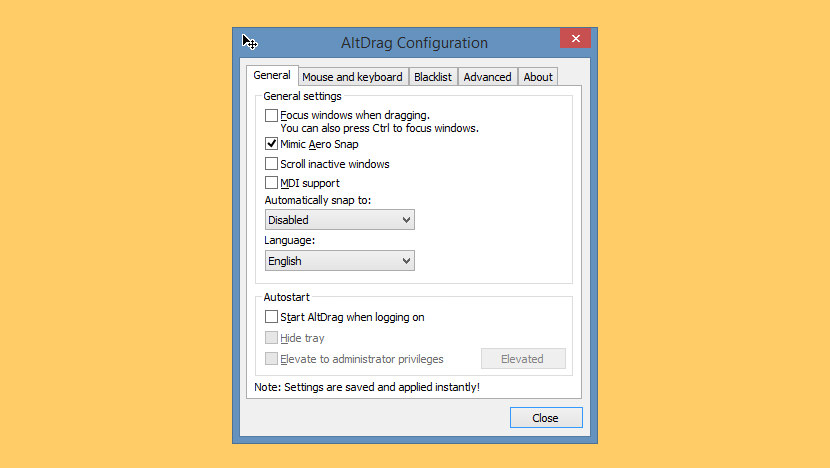
AltDrag gives you the ability to move and resize windows in a new way. After starting AltDrag, you can simply hold down the Alt key and then click and drag any window. This behavior already exists in Linux, macOS and Windows 10 operating systems, and AltDrag was made with the mission to copy that behavior to the older Windows platform, and then to further expand it with new intuitive functionality.
↓ 04 – Spectacle | Free | macOS
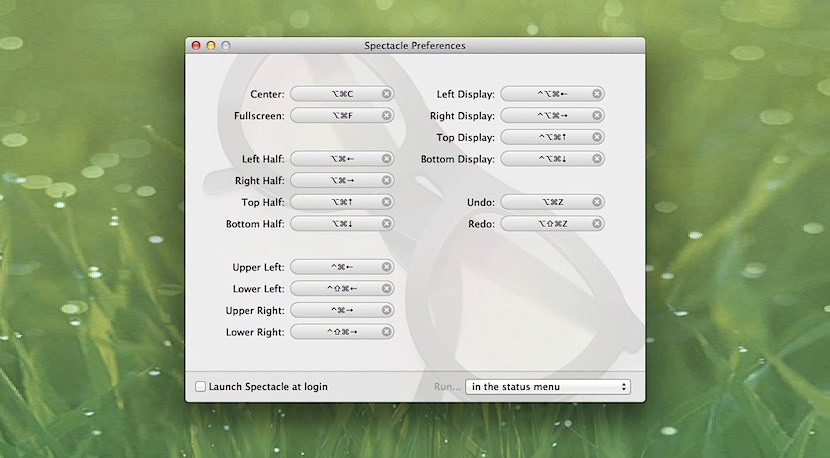
Using Spectacle you can view multiple documents side-by-side, move windows to other displays, or even focus your full attention to a single task. Move and resize windows with ease. Window control with simple and customizable keyboard shortcuts
↓ 05 – Microsoft PowerToys | Free | Windows
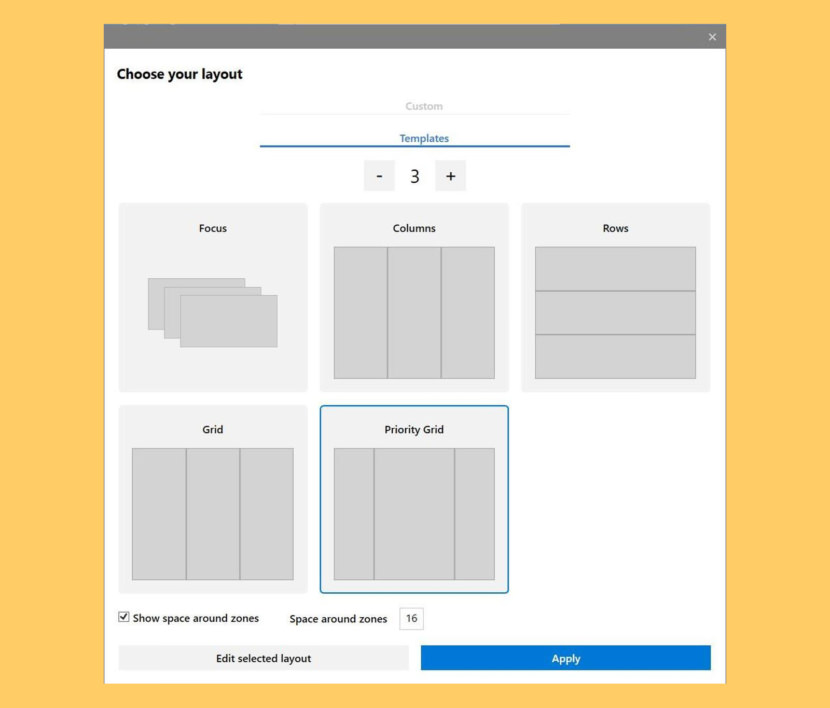
Windows 10 received PowerToys four years after its release. On May 8, 2019, Microsoft relaunched PowerToys and made them open-source on Github. Users can add their own additions and customizations to PowerToys. The first preview release was in September 2019, which included FancyZones and the Windows key shortcut guide. PowerToys for Windows 10 comes with the following utilities:
↓ 06 – Aquasnap | Free Personal | USD18 Pro
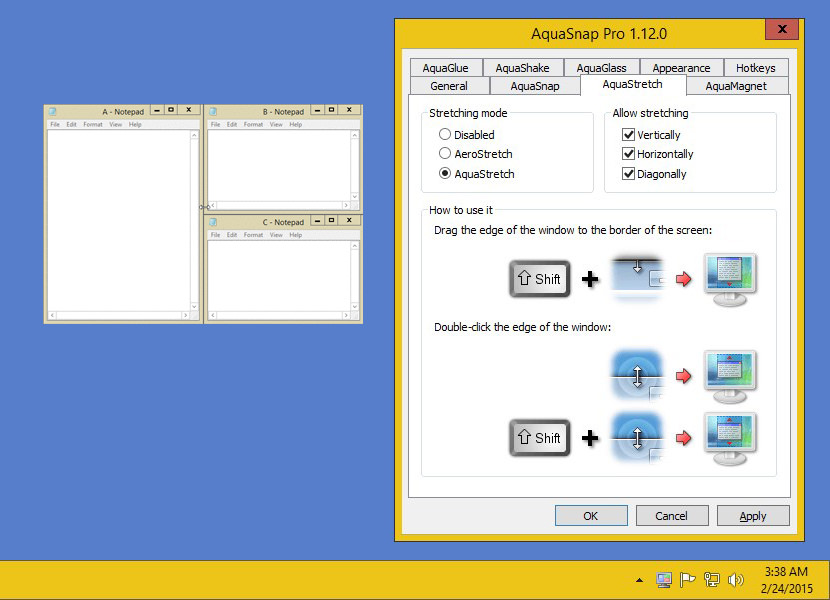
Aquasnap is a powerful window manager that helps you arrange and organize multiple applications on your desktop with minimum effort. It allows you to achieve maximum multitasking, especially if you own a high-resolution monitor or a multi-monitor setup.
Drag and drop your windows to the sides or corners of the screen, and they’ll automatically be resized to fit one half or one quarter of the screen. This feature is just like the built-in Aero Snap function of Windows 10, but with more possibilities! This is especially useful on either a 4K monitor or multiple monitors.
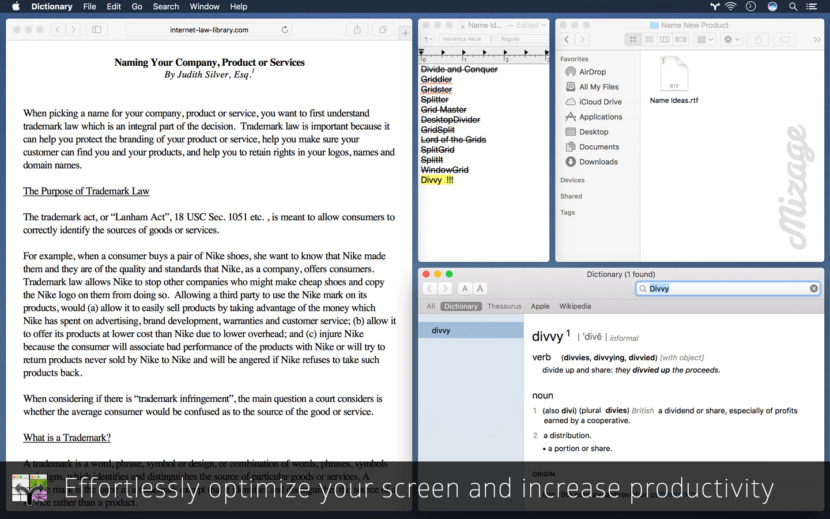
↓ 07 – Divvy | USD14 | Windows | macOS
Divvy is an entirely new way of managing your workspace. It allows you to quickly and efficiently “divvy up” your screen into exact portions. With Divvy, it is as simple as calling up the interface, clicking and dragging. When you let go, your window will be resized and moved to the relative position on the screen. If that seems like too much work, you can go ahead and create as many different shortcuts as youd like that resize and move your windows in exactly the same way. Works great on Microsoft’s Windows 10 and Apple’s macOS.
↓ 08 – BetterSnapTool | €3.49 | macOS
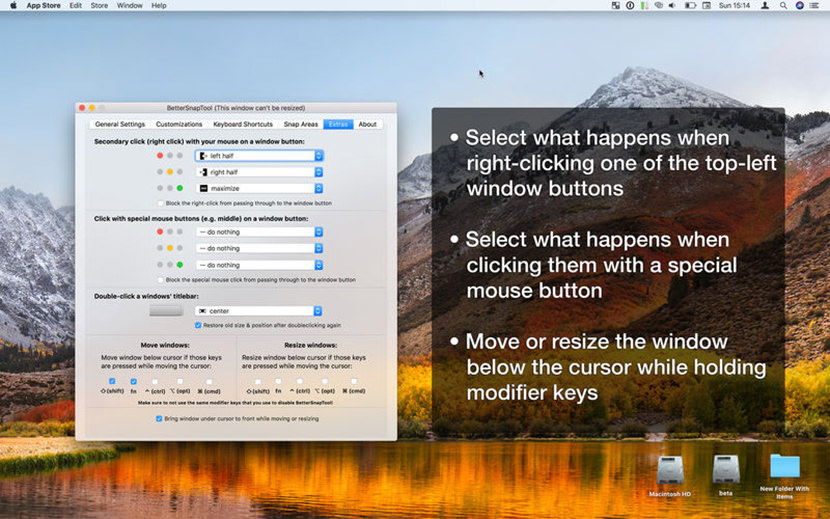
As the name implies, it is a better snap tool than the default window snapping feature in macOSX. BetterSnapTool is a utility that mimics Windows 7 Aero snap, allowing you to easily manage your window positions and sizes by either dragging them to one of your screens corners or to the top, left or right side of your screen. This lets you easily maximize your windows or position them side by side. BetterSnapTool supports multiple monitors, hidden dock etc. You can change the design of the preview window and even set application specific snapping sizes!
↓ 09 – Magnet (Windows Manager) | USD1 | macOSX
Every time you want to copy content from one app to the other, compare files side by side or multitask in any other way, you need all the windows arranged accordingly. Magnet makes this process clean and simple. In just one drag to the edge, you snap any window into left, right, top or bottom half of your screen. And by dragging windows to the corners, you snap them into quarters. Taking advantage of such arrangements eliminates app switching and greatly enhances workspace efficiency. Magnet supports keyboard shortcuts as well, for every command it has to offer. There is that little icon sitting in the Menu Bar where you can find a predefined set or create yours. Features:
- Left/Right/Top/Bottom Halves of the screen supported
- Left/Center/Right Thirds of the screen supported
- Left Two Thirds & Right Two Thirds of the screen supported
- Fullscreen & all four Quarters of the screen supported
- Runs both on Retina and regular displays
- Up to six external displays supported
- Built to run on all macOS versions since 10.9 Mavericks
- macOS 10.12 Sierra optimized
↓ 10 – Moom | USD10 | macOSX
Do you spend a lot of time moving and zooming windows, so you can better see and work with all the content on your Mac? Instead of doing that work yourself, let Moom handle the task for you. When used via the mouse, all you need to do is hover over the green resize button in any Mac OS X window. Moom’s panel appears, and you then click the desired action.
When used via the keyboard, a hot key displays the Moom bezel, and you can then use the arrow and modifier keys to move and resize the windows. You can also save window layouts, create custom controls with shortcuts that work globally or work only when Moom’s keyboard bezel is onscreen.
↓ 11 – Better Window Manager | USD5 | macOSX
A tiny window management app for the Mac. Better window manager allows you to put windows where you want, save their positions, and restore them with a keyboard shortcut.
↓ 12 – MaxSnap | USD6 | macOSX
Typically, in macOS, you use the window title to move and the lower right corner to resize the window. MaxSnap allows you to re-arrange windows by using its entire surface – just click fn or Fn+Shift. and start changing window size or location. It is very convenient. You won’t be able to survive without it. Those who used Linux before probably remember Alt-Drag function.
↓ 13 – MaxTo | USD20/30 | Windows
The window manager you didn’t know you missed. Divide your screen, increase your productivity. You can keep a different set of regions open on each virtual desktop. Use our handy setting to choose if you want each virtual desktop to have its own set of profiles. Only works on Windows 10. Because only Windows 10 has virtual desktops.
↓ 14 – Shutter Split Screen | USD15 | Windows
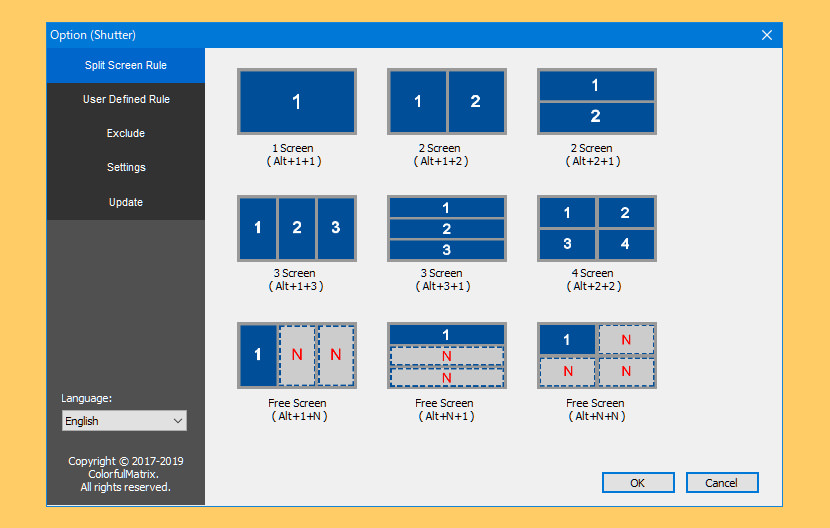
With widescreen, multi-screen, Ultra HD screen (4K, 5K and 8K) use increasing, you often switch back and forth between browser, or between your browser and a text document.
Sometimes you also need to move or resize the window and wished there was some way you could just fast and look at multiple at the same time. When you focus only on a portion of the area on the screen, you do not take full advantage of every area in the screen.
↓ 15 – UltraView Desktop Manager
| USD99 | Windows
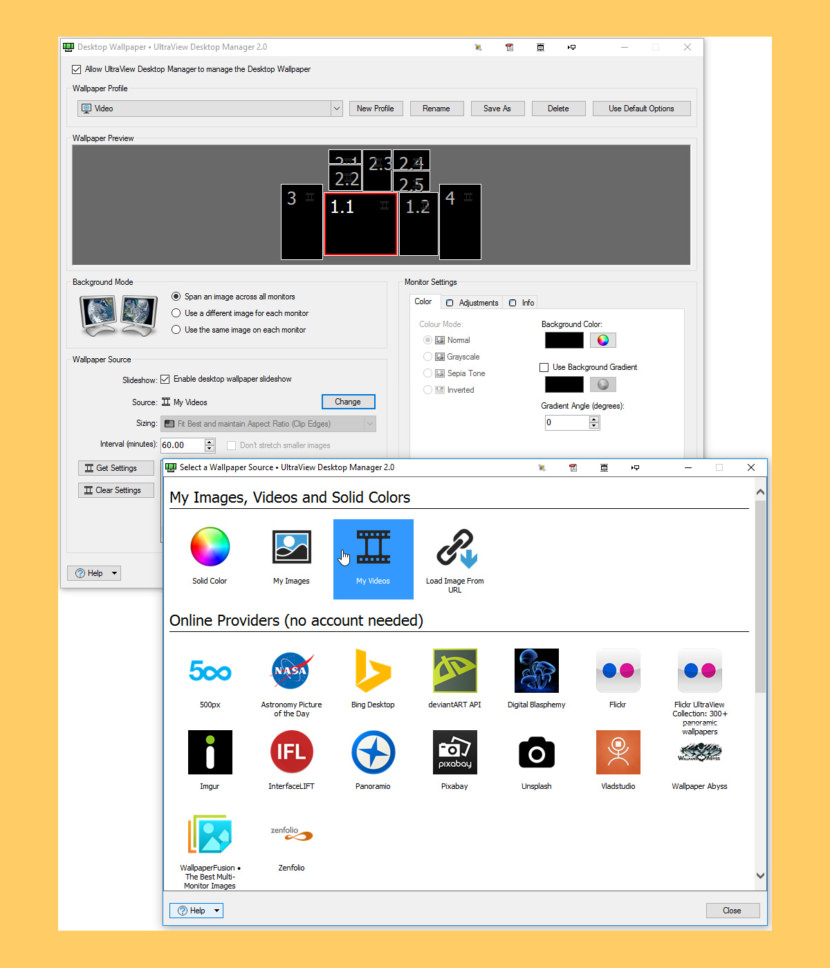
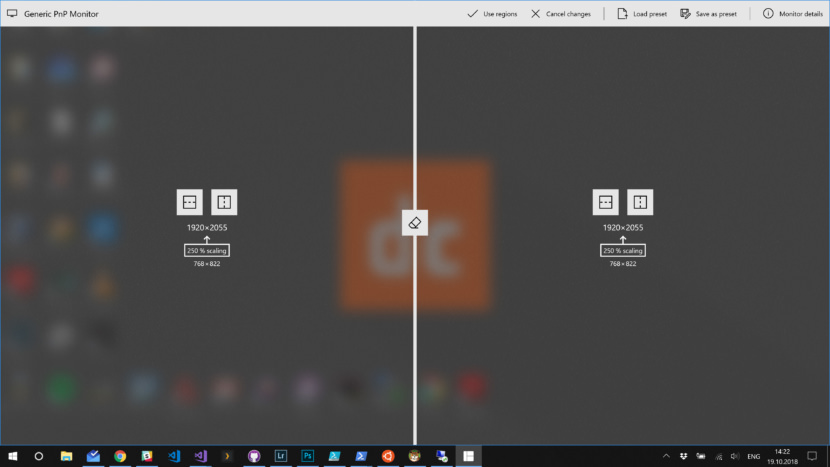
UltraView Desktop Manager 2.0 now brings the productivity benefits of multiple monitors to large, high-resolution monitors, especially 4K UHD, QHD and ultrawide monitors.
Today’s massive LED monitors and 4K TVs are exciting to look at but can be difficult to work with productively. Key info and apps can get buried under other windows, causing you to miss deadlines or important alerts as you struggle to task-switch and multitask across a variety of work obligations, personal obligations and personal interests, little of which is visible to you at any one time.
Now you can split those giant monitors and 4K TVs into any number of virtual monitors, including micro monitors dedicated to time tracking, task managers, personal email, instant messaging, social media, live financial TV news, streaming music and video, newsfeeds and security cameras. Now you’ll never miss anything important because you lacked timely awareness.
↓ 16 – KDE Mover-Sizer [ Discontinued ] | Free Open Source | Windows

An essential add-on for Windows XP, 2K, Windows Server, Windows 7 and Windows 8/8.1. It is a background application that emulates the behaviour of KDE, which is a rather good Linux desktop environment. Essentially, you hold down the Alt key, and Left-click to move a window, Right-click to resize it; and from anywhere inside the window.


