- LAN/WLAN Switching in Windows 10
- Understanding Windows 10 Wireless Projection
- The Windows 10 Wireless Projection User Interface
- Wireless Projection using Miracast
- Wireless Projection over an existing Wi-Fi network
- Wi-Fi adapter not working in Windows 10? Here’s a quick fix
- What can I do if WiFi adapter stops working?
- 1. Update network drivers
- Update drivers automatically with DriverFix
- DriverFix
- 2. Use the Network troubleshooter
- 3. Reset TCP/IP stack
- 4. Perform a registry tweak with Command Prompt
- So here’s what to do, if you receive this error code:
- 5. Change the adapter settings
- 6. Reinstall the network adapter
- 7. Reset your adapter
- 8. Update the router firmware
- 9. Switch to the Maximum Performance Mode
- 10. Make sure nothing disrupts the Wi-Fi signal
- Frequently Asked Questions
- How do I fix network adapter problems?
- Why does my WiFi adapter need to be reset?
- How do I fix my wireless adapter on Windows 10?
LAN/WLAN Switching in Windows 10
03-23-2016 03:39 AM
- Mark as New
- Bookmark
- Subscribe
- Permalink
- Email to a Friend
- Flag Post
I want to enable LAN/WLAN switching in our company. We have mutliple sites with local internet breakout which are connected to an Access Point where clients can connect to.
We have several issues with notebooks connected to LAN & WLAN at the same time. I thought I could tackle this issue with the lan/wlan switching feature in the BIOS. I tested this on a Windows7 laptop and this works perfect.
I enabled this feature for 3 testusers all having a recent HP elitebook running Windows10. I received feedback from these users this LAN/WLAN Switching isn’t working. They are still able to connect to wireless when the cable is inserted.
I suspect this is because of the Windows 10 OS.
Anyone having similar issues? I would love to use this built-in bios feature instead of using a 3rd party application to solve this issue.
08-02-2016 01:18 AM
- Mark as New
- Bookmark
- Subscribe
- Permalink
- Email to a Friend
- Flag Post
I’m having the same issue. We are currently testing Windows 10 in our organization, but I cannot find a way to get LAN/WLAN switching working. The setting is enabled in BIOS, and it works like a charm in Windows 7.
Windows 8 and 8.1 has a built-in feature which delays the switching between LAN/WLAN with 40 seconds in order to not interrupt file transfers or other processes. Unfortunately this is not the subject in Windows 10. On my laptops the switching never happens on Windows 10. I have tested this on several HP laptops. (Elitebook 8560P, Elitebook 850 G1, Elitebook 850 G2, ProBook 640 G2)
We have also seen a lot of user issues due to the fact that they are connected to both LAN and WLAN at the same time.
I though that maybe installingthe HP Connection Manager would solve the issue, but it seems that the HP Connection Manager is not possible to install on Windows 10.
Is there any plans for fixing this, HP? Have someone found a workaround (eg. 3rd party software)?
11-17-2016 01:37 PM
- Mark as New
- Bookmark
- Subscribe
- Permalink
- Email to a Friend
- Flag Post
12-06-2016 08:34 AM
- Mark as New
- Bookmark
- Subscribe
- Permalink
- Email to a Friend
- Flag Post
PLS, is there any Update? we have the same problem. if not we have to script some PS to realize the action
12-13-2016 03:18 AM
- Mark as New
- Bookmark
- Subscribe
- Permalink
- Email to a Friend
- Flag Post
I do have the same issues here with our Windows 10 laptops (Probook 6570b, Probook 650 G1-3, EliteBook 820 G1 & G2, EliteBook 850 G1-G3).
It would be VERY helpfull if the LAN/WLAN switch would start working again in Windows 10!
03-03-2017 11:05 AM — edited 03-03-2017 11:06 AM
- Mark as New
- Bookmark
- Subscribe
- Permalink
- Email to a Friend
- Flag Post
I am having an issue with this feature myself on all of our EliteBook 840 G3’s with Windows 10. It is breaking our Cisco AnyConnect VPN connections. This actually used to work for us very well in Windows 10 however with the latest WLAN Drivers and HP Hotkey Support software it no longer works.
When on a wireless network, and connecting to the VPN, the VPN network shows up as a wired network, so then Autoswitching kicks in and drops the wireless network, which then drops the VPN connection. This didn’t used to happen, and worked fine.
I have gotten the run around from HP support so far. My first experience was when i was asked to update the already up to date BIOS, and update the already up to date WLAN driver. once that didn’t work the technician told me to contact my internal IT and Cisco and that they would help me resolve this. 1. I am the internal IT, 2. I already indicated that i worked with Cisco on this. As soon as i requested an escalation the chat window coincidently disappeared, and the page stopped working.
Then i called in for support to pick this back up. I was then asked to install the latest HP Hotkey Support software 6.2.32.1. Installed it an still the same issue.
I called support again today to get an update and i was told the following.
«Windows 10 handles Auto Switching the LAN/WLAN, so you should disable it in the BIOS.»
I know this is not true, but in order to give them time to come up with something else i agreed to «make that change and test it» and get off the phone with them.
If Windows 10 handles Auto Switching, then why is it that in the change log for HP Hotkey Support 6.2.32.1 does it say;
Understanding Windows 10 Wireless Projection
Windows 10 provides a seamless wireless projection experience. As you are building your part of the wireless projection solution it is important to understand what that functionality includes.
The Windows 10 Wireless Projection User Interface
First and foremost, Windows provides a native connection experience that allows a user to connect to a wireless receiver. A connection to a wireless receiver can be made in several ways:
Through the Action Center. In the Action Center (Figure 1), click the Connect Quick Action.
Using a hotkey. Select the Windows logo key+ K (Figure 2).
With the Device Picker UI. Windows Apps that support casting contain a device picker UI, such as the Cast to device feature in the Windows Movie & TV App (Figure 3) or the Edge browser.
| В | В | В |
|---|---|---|
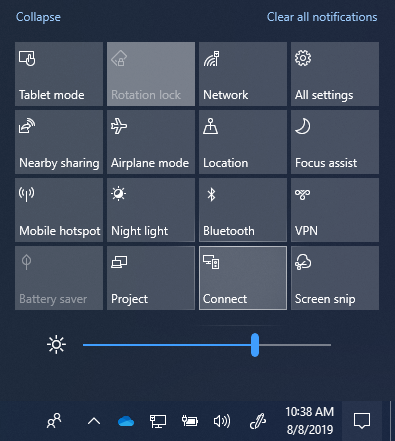 | 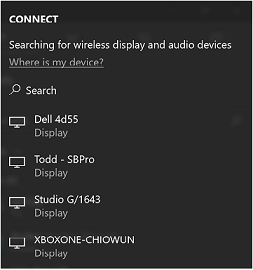 | 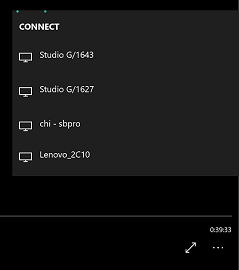 |
| Figure 1: Connect Quick Action | Figure 2: Connect UI | Figure 3: Device Picker UI |
Windows 10 supports and manages two different methods for creating a wireless projection stream. Both methods are handled behind the scenes by Windows and leverage the exact same UI shown above.
Wireless Projection using Miracast
Support for Miracast has been present since the first Windows 10 version, and since that time Windows investments in Miracast as a projection experience have only increased.
Wireless Projection over Miracast offers several benefits:
A simple connection experience that allows a user to find and connect to Miracast receivers.
Implementation of the Miracast standard to ensure interoperability with hundreds of millions of Miracast devices.
A native RTSP stack fine-tuned to work for Miracast, requiring no additional software is required outside the Windows 10 OS.
Support for UIBC (User Input Back Channel), which allows inputs from the Miracast receiver (touch, stylus, mouse, keyboard and gamepad) to control the Miracast sender, if—and only if—the user explicitly allows this.
High quality interoperability with industry leading Microsoft Miracast receivers (Microsoft Wireless Display Adapter) as well as leading 3rd party Miracast receivers.
Support for the projection of Protected Content (if HDCP keys are present).
Support for the use of a PIN based pairing when connecting to a Miracast receiver.
Persistent profiles, remembering if you have connected to a specific Miracast receiver in the past. The ability to remember a profile for reconnecting to a Miracast receiver reduces the time it takes to connect on subsequent connections.
Support for Miracast extensions that enable additional capabilities, dramatically improving the Miracast experience.
Wireless Projection over an existing Wi-Fi network
It has been observed that in 90% of cases, when a User starts a Wireless Projection stream, the device they are using is already connected to an existing Wi-Fi network, either in a home or a business. In response to this, Microsoft has extended the ability to send a Miracast stream over a local network rather than over a direct wireless link in the Windows 10 Creators Update.
Wireless Projection over an existing Wi-Fi network offers several benefits:
This solution leverages an existing connection which can significantly reduce the time it takes to project content.
The PC does not need to manage two simultaneous connections (a Wi-Fi connection and a Wi-Fi Direct connection to the receiver), each of which would only get half the maximum bandwidth.
Using an existing connection simplifies the work that the wireless device needs to perform, which both increases reliability and provides a very stable stream.
The user does not have to change how they connect to a receiver because they use the same UX (as is shown in Figures 2-4).
Windows will only choose to project over an existing connection if the connection is trusted, either over an Ethernet or a secure Wi-Fi network.
There are no required changes to the wireless drivers or hardware on a PC.
This also works well with older wireless hardware that is not optimized for Miracast over Wi-Fi Direct.
Windows automatically detects when a receiver supports this functionality and will send the video stream over the existing network path when applicable.
Wi-Fi adapter not working in Windows 10? Here’s a quick fix

- Windows Update is an essential component of your OS and you do not want to miss a single piece of valuable upgrade Microsoft has to offer.
- Nevertheless, the process is not always as smooth as intended. If your Wi-Fi adapter went berserk after an update, here’s how to fix it.
- Take a look at our WI-FI Guides as well for more tested solutions.
- Explore our Peripherals Hub and take your troubleshooting skills to the next level.
Various software and hardware-related problems may occur after the upgrade to Windows 10. One of these problems is the WiFi adapter not working afterwards for some users.
Namely, some users reported that their computers weren’t even able to detect and recognize the Wireless network adapter, which worked fine in Windows 8 or Windows 7. Don’t worry, we have a solution for you.
But first, here are some similar issues you can also resolve with the fixes presented below:
- Windows 10 no WiFi option – Sometimes, the WiFi button in the taskbar may not even be there. Nevertheless, you can still use the same solutions to resolve this problem.
- Windows 10 WiFi adapter missing – If your computer fails to recognize the adapter, you won’t be able to see it in the Device Manager.
- My Windows 10 WiFi disconnects frequently
- Windows 10 no WiFi option in settings – Just like it’s the case with the taskbar, the WiFi option may also disappear from its Settings page.
- Windows 10 WiFi connected but no internet – This one’s the worst. When everything seems right, but you just can’t connect to the internet. But don’t worry, you’ll be able to resolve this with the solutions presented below.
What can I do if WiFi adapter stops working?
Table of contents:
1. Update network drivers

Since you can’t download anything using your current internet connection, go and download the necessary drivers from another computer or using another network.
To get the most suitable drivers, go to your network adapter manufacturer’s website, and search for the drivers for your network adapter.
Now download the drivers, move them to your computer, and begin the installation process. Hopefully, a fresh set of network drivers will resolve the problem.
Update drivers automatically with DriverFix

If you don’t want the hassle of searching for drivers on your own, you can use a tool that will do this for you automatically.
Of course, as you’re not able to connect to the internet at the moment, this tool won’t be useful. However, once you get online, it will help you to keep all your drivers up to date, so you won’t be in this situation anymore.
DriverFix will help you update drivers automatically and prevent PC damage caused by installing the wrong driver versions. After several tests, our team concluded that this is the best-automatized solution.
Let’s quickly look at its key features:
- A detailed report of all of your up-to-date and out-of-date device drivers
- Scanning speed improved by up to 100%
- Download the latest device drivers (printer, mouse, controller, modem, monitor, and more)
- Beautiful design
DriverFix
2. Use the Network troubleshooter

The first thing we’re going to do is also the easiest one. We’re simply going to run the network troubleshooter and let it do the job for us. Here’s how to run the network troubleshooter in Windows 10:
- Go to Settings.
- Head over to Updates & Security >Troubleshoot.
- Select Internet Connections, and go to Run the Troubleshooter.

- Follow further on-screen instructions and let the process finish.
- Restart your computer.
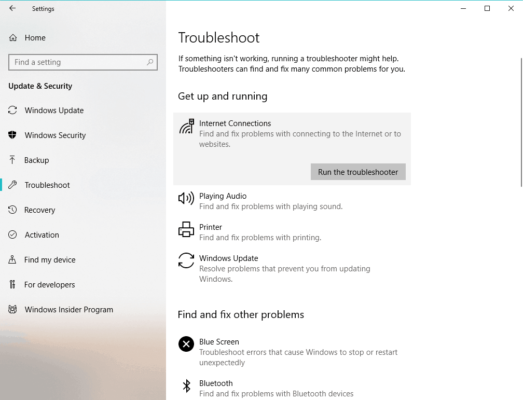
If the network troubleshooter failed to resolve the problem, move on to another workaround.
3. Reset TCP/IP stack

If the previous two solutions didn’t get the job done, you can try resetting the TCP/IP stack. To do that, you’ll also need to enter a few command lines into the Command prompt.
Here’s exactly what you need to do:
- Right-click on the Start Menu button and choose Command Prompt (Admin)
- Enter the following lines into Command Prompt and press Enter after each one:
- netsh int ip reset
- netsh int tcp set heuristics disabled
- netsh int tcp set global autotuninglevel=disabled
- netsh int tcp set global rss=enabled
- Restart your computer and see if you’re able to connect to WiFi now
4. Perform a registry tweak with Command Prompt

- Right-click on the Start Menu button and choose Command Prompt (Admin)
- Enter the following line and press Enter:
- netcfg –s n
- This command will show a list of network protocols, drivers and services. Check if DNI_DNE is in the list, if it is, then you have a problem.
- If DNI_DNE is listed, in the same command prompt window enter the following line and press Enter:
- reg delete HKCRCLSID <988248f3-a1ad-49bf-9170-676cbbc36ba3>/fnetcfg -v -u dni_dne
This should solve the issue, but if you receive an error 0x80004002 after entering the command then this value is either not in the registry, or need to be deleted slightly differently.
So here’s what to do, if you receive this error code:
- Go to Search, type regedit and open Registry Editor
- Navigate to the following path:
- HKEY_CLASSES_ROOTCLSID
- Delete DNI_DNE if it still exists
5. Change the adapter settings

The next thing we’re going to do is changing the adapter settings (read: disable the TCP/IPv6 protocol). Here’s how to do that:
- Go to Properties of the Network Adapter and look for a wireless adapter that is currently running.
- Search for the Internet Protocol Version 6 (TCP/IPv6) under the options that show up and uncheck IPv6 to disable it.
- Click on OK and restart the computer to enforce the changes you made.

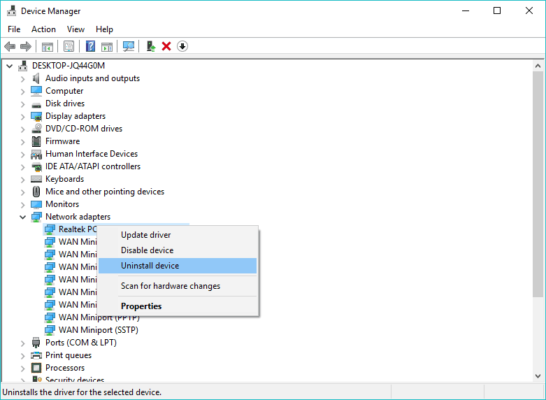
6. Reinstall the network adapter

If installing the right driver didn’t get the job done, let’s try to uninstall the network adapter first. Here’s how to uninstall the network adapter in Windows 10:
- Go to Search, type devm, and open Device Manager.
- Find your network adapter.
- Right-click your network adapter, and go to Uninstall.
- Follow further on-screen instructions.
- Restart your computer.
- Now, go on and install the network adapter driver once again, as shown above.
7. Reset your adapter

Resetting your network adapter can do wonders. As cliche as it sounds. So, find that little button on the back of your adapter, and press and hold it.
Wait for a couple of minutes for the signal to get back, and try to connect to the internet once again.
8. Update the router firmware

This one’s tricky. Yes, updating your router firmware may resolve the problem, but it’s by no means a simple procedure.
So, your best bet is to check your router’s user manual for additional instructions on how to update it.
Just bear in mind that if you don’t update the router properly, you can damage it permanently. So, proceed with extra care.
9. Switch to the Maximum Performance Mode

- Go to Search, type power management, and open Power & Sleep.
- Under Related Settings, go to Additional Power Settings.
- Once the Power Options window opens, locate your current plan and click Change plan settings.
- Go to Change advanced power settings.
- Locate Wireless Adapter Settings and set the Power Saving Mode to Maximum Performance.
- Click Apply and OK to save changes.
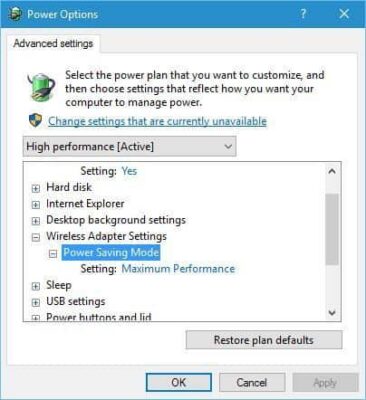
Just keep in mind that the Maximum performance mode will put some extra pressure on your device, so your laptop battery might last shorter.
10. Make sure nothing disrupts the Wi-Fi signal
Some appliances and hardware not related to your computer can disrupt the Wi-Fi signal.
For example, it’s known that microwave weakens the signal. So, make sure you don’t have any appliances that can possibly disrupt the signal near your router.
If you didn’t manage to solve the problem after performing all of these solutions, check our article about internet problems in Windows 10 , and you’ll maybe find the solution there.
In case you have any comments, questions or suggestions, just let us know in the comments down below.
Frequently Asked Questions
How do I fix network adapter problems?
You can tweak its settings (TCP/IPv6) or completely reinstall the adapter. For a clean install, make sure you remove all leftovers by using a specialized uninstaller tool.
Why does my WiFi adapter need to be reset?
The WiFi adapter usually causes issues after a major Windows update. You can reset it via Command Prompt. If you’re unable to run the command prompt as admin, here’s what you need to do.
How do I fix my wireless adapter on Windows 10?
Start by running the Network Troubleshooter on your Windows 10 running device. Check out the entire procedure and additional testes solutions in this complete guide.


