- Features
- Download
- Changelog
- Building synaptic
- Менеджер пакетов Synaptic
- Содержание
- Установка
- Запуск и внешний вид
- Управление ПО
- Установка
- Удаление
- Обновление
- Обновление всей системы
- Как исправить сломанные пакеты
- Горячие клавиши в Synaptic
- Настройка кэширования пакетов
- Using the Lightweight Apt Package Manager Synaptic in Ubuntu and Other Debian-based Linux Distributions
- What is Synaptic package manager?
- Why would you use an ‘ancient’ software like Synaptic package manager?
- Synaptic package manager features
- How to install Synaptic package manager on Ubuntu
- How to use Synaptic package manager
- Synaptic is not for everyone
- Ubuntu Documentation
- Note for 11.10 release and above
- Installing with software-center
- Installing with CLI
- Getting Started
- Browsing the package database
- How to apply filters
- Repositories
- Managing Repositories
- Updating the Package List
- Adding or Removing Software
- Adding Packages
- Mark the Chosen Packages
- Installing Packages
- Without an Internet Connection
- With a Broadband Connection
- How to force the installation of a package version
- How to Install, but not every recommended package
- Remove or Uninstall Packages
- To Upgrade a Package
- How to keep your system up-to-date, including the Kernel
- Information Gathering
- Locating software on your system
- View the Changelog of a Package
- View History
- Status Icons
- Keyboard shortcuts for Synaptic
- Troubleshooting
- How to fix broken packages
- How to free disk space
- Broken Upgrade or Installation
- Browser works, Synaptic will not
- See also
Features
(as of version 0.62)
- Install, remove, upgrade and downgrade single and multiple packages.
- Upgrade your whole system.
- Manage package repositories (sources.list).
- Find packages by name, description and several other attributes.
- Select packages by status, section, name or a custom filter.
- Sort packages by name, status, size or version.
- Browse all available online documentation related to a package.
- Download the latest changelog of a package.
- Lock packages to the current version.
- Force the installation of a specifc package version.
- Undo/Redo of selections.
- Built-in terminal emulator for the package manager.
- Debian/Ubuntu only: Configure packages through the debconf system.
- Debian/Ubuntu only: Xapain based fast search (thanks to Enrico Zini)
- Debian/Ubuntu only: Get screenshots from screenshots.debian.net
Download
Source code and Debian binaries:
Savannah.nongnu.org project page.
Debian packages:
can be found in unstable and testing, add either one to your sources and do apt-get install synaptic .
See the Debian package page.
Latest version (bzr): Synaptic uses the bazaar-ng version control system (bzr), which is available at:
launchpad.
Changelog
The changelog is available in the repository with bzr log. You can also view it in the repository.
Building synaptic
To compile you will need Gtk+ 2.4 (or later) There is optional support for output into libvte.
Источник
Менеджер пакетов Synaptic
Содержание
Synaptic — это графическая программа, позволяющая управлять пакетами в Ubuntu. Она совмещает в себе все возможности консольной системы управления пакетами apt и удобство графического интерфейса. С помощью Synaptic вы можете устанавливать, удалять, настраивать и обновлять пакеты в вашей системе, просматривать списки доступных и установленных пакетов, управлять репозиториями и обновлять систему до новой версии.
Установка
Начиная с Ubuntu 11.10 Synaptic не распостраняется в комплекте стандартных программ. Установить его можно нажав на ссылку слева или введя в терминале команду:
Запуск и внешний вид
Перед запуском программы вы увидите окно, в которое вам нужно будет ввести свой пароль, для дальнейшей работы с приложением.
Для запуска Synaptic откройте Главное меню 1) и наберите в поиске synaptic . Также Synaptic можно запустить введя в терминале команду:
При запуске вы увидите главное окно программы: 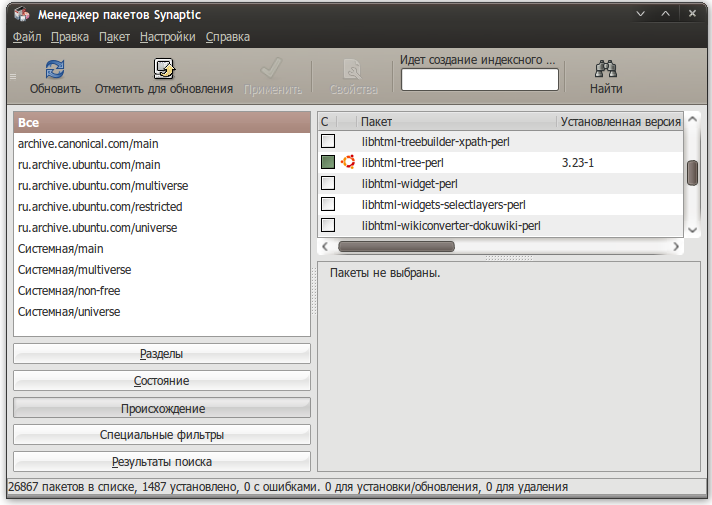 Главное меню вверху, панель с несколькими кнопками, роль которых станет ясна чуть позже.
В левой части экрана внизу есть пять кнопок, которые определяют, что будет показываться в списке над ними, так что вы можете выбирать пакеты в списке, группируя их по статусу.
Если вы выберите «Все», вы увидите полный список доступных и установленных пакетов. При нажатии «Установленные» будут показываться лишь установленные пакеты и так далее. Правая часть окна разделена на верхнюю и нижнюю части. В верхней части выводится список пакетов, и при выбора пакета из этого списка в нижней части отображаются сведения о нем и его описание.
Пакеты могут быть сгруппированы по функциональности (текстовые редакторы, документация, почтовые клиенты и т.д.). Для этого используется кнопка «Разделы». После нажатия на нее вы сможете выбирать пакеты из различных секций.
Управление ПО
Установка
Удаление
Обновление
Обновление всей системы
Synaptic предоставляет два варианта обновления системы
Умное обновления (рекомендуется)
Умное обновление попытается разрешить конфликты пакетов перед обновлением системы. Действие умного обновления аналогично действию команды apt-get dist-upgrade .
Стандартное обновление обновит только те пакеты, которые не требуют установки дополнительных зависимостей.
По умолчанию ynaptic использует умное обновление. Для того чтобы изменить метод обновления системы откройте Настройки→Параметры→Основные и выберите требуемый способ в Обновление системы.
Как исправить сломанные пакеты
«Сломанные пакеты» — это пакеты которые имеют неудовлетворённые зависимости. Если сломанные пакеты обнаружены, то Synaptic не позволит проводить ни каких изменений в системе с пакетами до тех пор пока все сломанные пакеты не будут исправлены.
Для исправления сломанных пакетов
Горячие клавиши в Synaptic
| Команда | Сочетание клавиш |
|---|---|
| Обновить список доступных пакетов | Ctrl + R |
| Открыть диалоговое окно поиска | Ctrl + F |
| Показать окно с свойствами выбранного пакета | Ctrl + O |
| Отметить выбранный(е) пакет(ы) для установки | Ctrl + I |
| Отметить выбранный(е) пакет(ы) для обновления | Ctrl + U |
| Отметить выбранный(е) пакет(ы) для удаления | Delete |
| Отметить выбранный(е) пакет(ы) для полного удаления | Shift + Delete |
| Снять какие-либо изменения в пакетах | Ctrl + N |
| Отметить все возможные обновления | Ctrl + G |
| Быстрая установка специфической версии для пакета | Ctrl + E |
| Отменить последнее изменение | Ctrl + Z |
| Повторить последнее изменение | Ctrl + Shift + Z |
| Применить все выбранные действия | Ctrl + P |
| Выйти из Synaptic | Ctrl + Q |
Настройка кэширования пакетов
Настройки кэширования пакетов находятся в двух местах. Первое – в самом synaptic, окно с настройками кэширования вызывается через меню Настройки→Параметры→Файлы.
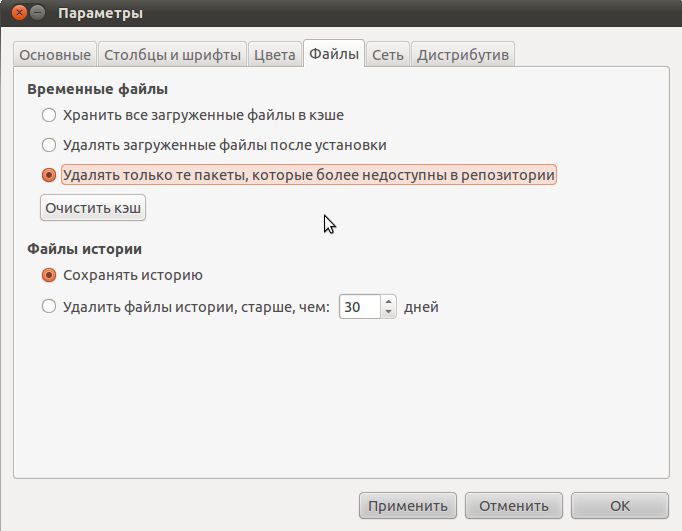
Кэш хранится в папке /var/cache/apt/archives/
В разделе Файлы истории устанавливаются настройки времени хранения истории установок, либо отключается удаление этой истории вообще.
Второе место в котором хранятся настройки кэширования устанавливает правила хранения пакетов в кэше. Для того чтобы получить доступ к этим настройкам необходимо в терминале выполнить следующую команду:
Эти настройки имеют следующий вид:
Здесь отображаются максимальный, минимальный срок хранения пакета в днях и максимальный размер кеша в мегабайтах. В данном случае все пакеты старше 30 дней будут удалены, даже если размер кэша менее 500 мб, и ни один пакет младше 2 дней удален не будет, даже если размер кэша превысит 500 мб.
Источник
Using the Lightweight Apt Package Manager Synaptic in Ubuntu and Other Debian-based Linux Distributions
This week’s open source software highlight is Synaptic. Learn what this good old package manager can do that the modern software managers cannot.
What is Synaptic package manager?
Synaptic is a lightweight GUI front end to apt package management system used in Debian, Ubuntu, Linux Mint and many other Debian/Ubuntu based distributions.
Basically, everything that you can do using the apt-get commands in the terminal can be achieved with Synaptic.

There was a time when Synaptic was the default graphical software manager on almost all Debian-based Linux distributions. It was considered to be a user-friendly, easy to use way of managing applications.
Things changed as modern software manager tools like GNOME Software and KDE Discover came up with more modern and intuitive UI. These software managers have better interface, display the package information in a more friendly way with thumbnails, ratings and reviews.
Why would you use an ‘ancient’ software like Synaptic package manager?
You don’t have to. Not most of the time, of course.
But Synaptic is still a lot versatile than the likes of GNOME Software. Remember, it is basically GUI front end to apt which means it can do (almost) everything you do with apt commands in the terminal.
For example, if you want to prevent the update of a specific package in Ubuntu, you can do that in Synaptic but not in GNOME/Ubuntu Software Center.

Also, I have noticed some issues with the Software Center in Ubuntu 20.04. It’s slow to load, it’s slow when searching for software and it is full of snap application (that not everyone prefers).
Synaptic is also one of the lightweight applications you can use in Ubuntu to speed up your system a bit.
Synaptic package manager features
Here is a summary of what you can do with Synaptic:
- Update the package cache
- Upgrade the entire system
- Manage package repositories
- Search for packages by name, description, maintainer, version, dependencies etc
- List packages by section, status (installed), origin or more
- Sort packages by name, status, size or version
- Get information related to a package
- Lock package version
- Install specific version of a package
There are more features that you may explore on your own.
How to install Synaptic package manager on Ubuntu
Synaptic package manager is available in the Universe repository in Ubuntu. If it is enabled, you may find it in the Software Center:
You may also install Synaptic via command line. Make sure to enable universe repository first:
And then update the cache (not required in Ubuntu 18.04 and higher versions):
Now, use the command below to install synaptic package manager:
How to use Synaptic package manager
Once installed, you can search for Synaptic in the menu and start it from there:

You can see that the interface is not among the best-looking ones here. Note the color of the checkboxes. White means the package is not installed, green means it is installed.
You can search for an application and click on the checkbox to mark it for installation. It will also highlight packages (in green) that will be installed as dependencies. Hit apply to install the selected packages:

You can see all the installed packages in Ubuntu using Synaptic. You can also choose to remove packages from this view.

You can see packages available in individual repositories by displaying them based on Origin. Good way to see which PPA offers what packages. You can install or remove packages as described above.

Usually, when you update Ubuntu, all the packages are updated at once. With Synaptic, you can easily choose which packages you want to update/upgrade to a newer version.

You can also lock the version of packages so that they don’t get updated along with the system updates.
You can also search for packages using Synaptic. This is like searching for packages using apt-cache search command.

If you think you made the wrong selection, you can click Undo from the Edit menu.
There are plenty more you can do with Synaptic and I cannot cover all the possible usages. I have covered the most common ones here and I leave you to explore it, if you are going to use Synaptic.
Synaptic is not for everyone
If you don’t like Synaptic, you can remove it from the Software Center or using this command in terminal:
There was another lightweight software manager for Ubuntu called AppGrid. It hasn’t been updated in recent times as far as I know.
Synaptic is certainly not for everyone. It lists libraries and packages that you won’t otherwise see in the regular Software Center. If you removed a library that you were not aware of, it may cause issues.
I think that Synaptic is suitable for intermediate to advanced users who want better control over the package management without going the command line way.
What do you say? Have you ever used Synaptic for package management? Do you rely on software center or you just dive into the terminal? Do share your preference in the comment section.
Like what you read? Please share it with others.
Источник
Ubuntu Documentation
Synaptic is a graphical front-end to apt, the package management system in Ubuntu. It combines the point-and-click simplicity of the graphical user interface with the power of the apt-get command line tool. You can install, remove, configure, or upgrade software packages, browse, sort and search the list of available software packages, manage repositories, or upgrade the whole system. You can queue up a number of actions before you execute them. Synaptic will inform you about dependencies (additional packages required by the software package you have chosen) as well as conflicts with other packages that are already installed on your system.
Synaptic’s sibling on the Kubuntu desktop is Adept. If you prefer to use the command line instead of a graphical user interface, apt-get and aptitude are available. For information on these alternatives see InstallingSoftware.
Note for 11.10 release and above
Synaptic is no longer installed by default in Ubuntu 11.10, however it is still useful in some situations.
Installing with software-center
You can install it by searching in the software-center for synaptic and clicking on Synaptic Package Manager
Installing with CLI
Or, alternatively, open a terminal, and enter:
Getting Started
To launch Synaptic, choose
System >Administration > «Synaptic Package Manager»
Or if you are using the Unity interface, open the dash and search for synaptic.
The main window is divided into three sections: a package browser on the left, the package list on the upper right, and package details on the lower right. The status bar shows you the system state at a glance.

And if you would like to see more details about a package, use a mouse right-click on a package and choose Properties

Browsing the package database
To browse the (very large) list of available packages by category, section, package status, custom filters, or recent searches. Click on the corresponding button at the bottom of the left window pane. You can also create your own filters. See the Filters section for details.
To search for packages by name or description, click on the Search button in the toolbar:

or use the «Quick search» field in the toolbar:

You can examine a number of package details in the lower right window pane such as its size, its dependencies, recommended or suggested additional packages, and a short description.
How to apply filters
Repositories
Repositories are like shops (currently almost always free), warehouses or archives full of almost all the software, drivers, codecs, libraries and other packages that are available for the release of Ubuntu (or whichever distro) you are using.
It is up to the package project’s team to get their package into the repositories for the various releases of the various distros. Also it is up to the team developing a release to make sure that the repositories have plenty of the right sort of packages to meet people’s needs. Think of a shop. Companies need to get their product onto shelves and shops need to show they have plenty to sell. This saves individual users from having to identify the ‘correct’ website for a product and assess whether or not the site has been compromised and whether they are getting a genuine product or something stuffed full of malware.
The standard repositories are all free as are the Medibuntu repositories and most others that are easily found and added. Theoretically there is nothing stopping a games manufacturer (for example) setting up a one-off or monthly charge for accessing a specialist repository. The ethics and licensing agreements would have to be looked into if people or companies chose this route.
Adding or removing repositories is fairly easy.
Managing Repositories
Either from the top taskbar
System — Administrator — «Software Sources»
or from inside Synaptic using the Settings menu, select Repositories
The first tab of the pop-up is where Cd/Dvds can be added (or removed) as repositories to search. Usually the various online «repos» are already included so you might be installing a more recent version of something that is listed on the Cd/dvd and also in the online repos. The package manager will automatically choose the most recent by default although one of the other tabs in the pop-up can change the priorities, or in the Preferences pop-up from the Setttings menu.
As a front-end to apt, Synaptic uses the system-wide list of software repositories file located at
For more on managing software repositories, see the Repositories wiki page.
Updating the Package List
Click Reload or press Ctrl + R to make Synaptic aware of the latest updates and any changes to the list of repositories.
Although this is done automatically when you open Synaptic it can be a good idea to update the database from time to time while running Synaptic. The database is a list of packages on your system to keep track of installed software. All the package managers share the same list and the same list of repositories but each one presents the information slightly differently. The main time you will need to update the lists is when/if you have made changes to the list of software channels or if you have made changes to Synaptic’s configuration.
Adding or Removing Software
Adding Packages
Mark the Chosen Packages
Right-click on each chosen package and choose Mark for Installation from the context menu, or press Ctrl + I. If the package requires the installation of another package, a dialog box appears:

Synaptic will warn you if your choices conflict with packages that are already installed on your system. If this is the case, the dialog box will show you any packages that need to be removed. If you are not sure you don’t need the package(s) that will be removed, make sure you look up its function and use before you apply the changes you’ve made.
Click Mark to allow the installation of the additional package(s).
Installing Packages
Without an Internet Connection
Search for and «Mark» all the applications that you want to install/upgrade in the usual way but don’t click the «Apply» button. Instead use the File menu to «Generate a download Script«.
With no internet connection at all of course you wont be able to Update the Package List and so packages may be older versions. An intermittent, occasional or slow connection could usefully update the list and then use the Script method to get updates via a 2nd machine which would not have to be running Ubuntu. The Script is designed to work on Windows or Mac machines too.
There are a few guides
or use apt-get instead of Synaptic
or an alternative approach, ‘simply’ download the entire repository!
With a Broadband Connection
Once you are satisfied with your choices, click on Apply in the toolbar or press Ctrl + P.
A dialog box appears with a summary of changes that will be made.

Confirm the changes by clicking on Apply.
How to force the installation of a package version
To be added: Why you would (and would not) want to force a specific version
- To force the installation of a package different from the one chosen by Synaptic, do the following:
Click Reload or press Ctrl + R to make Synaptic aware of the latest updates.
Select the package. Choose Force Version from the Package menu.
Select the version you would like to use. To confirm your decision, click Force.
Click Apply on the toolbar or press Ctrl + P. A dialog appears with a summary of the changes that will be made to your system. To confirm, press Apply.
How to Install, but not every recommended package
- Open Preferences from the menu
- On the General tab, unmark «Consider recommended packages as dependencies»
- Restart Synaptic, and Install the package normally.
Remove or Uninstall Packages
To remove or ‘completely remove’ a package
Right-click on the package and choose Mark for Removal from the context menu
Once you’re satisfied with your choices, click on Apply in the toolbar or press Ctrl + P.
A dialog box appears with a summary of changes that will be made. Confirm the changes by clicking on Apply.
The Mark for Complete Removal option instructs Synaptic to remove any configuration files associated with the package as well.
To Upgrade a Package
Click Reload or press Ctrl + R to make Synaptic aware of the latest updates.
Right-click on the package and choose Mark for Upgrade from the context menu, or press Ctrl + U.
Once you’re satisfied with your choices, click on Apply in the toolbar or press Ctrl + P. If the machine has no internet access then generate a download script instead of using «Apply»
A dialog box appears with a summary of changes that will be made. Confirm the changes by clicking on Apply.
How to keep your system up-to-date, including the Kernel
Synaptic provides two methods for upgrading your system:
Smart Upgrade (Dist-Upgrade) — recommended
The smart upgrade method tries to resolve package conflicts. This includes installing additional dependencies (required packages) if needed and preferring packages with higher priority. Smart Upgrade has the same effect as the apt-get dist-upgrade tool on the command line.
Default Upgrade
The default upgrade method marks upgrades of installed packages only. If the new version of a package depends on not installed packages or coflicts with an already installed package, it will not be upgraded.
Dist-upgrade is the default upgrade method used by Synaptic. To change the upgrade method, choose Preferences from the Settings menu, then click on the General tab and adjust the System upgrade entry.
To upgrade your system with Synaptic:
Click Reload or press Ctrl + R to make Synaptic aware of the latest updates.
Click Mark all Upgrades or press Ctrl + G.
Click Apply on the toolbar or press Ctrl + P. A dialog appears with a summary of the changes that will be made to your system.
Click Apply to confirm the changes and go ahead with the upgrade.
Synaptic works hand-in-hand with Update-Notifier and Update-Manager to inform you about updates to the software installed on your system.
Update-Notifier displays an icon in the notification area when updates are available. It will display a pop-up message and an icon in the notification area on your GNOME desktop.

If you right click on the icon you see all the functions available, including what I think is a sensible default, Show Updates. This option runs another new program, Upgrade-Manager. The upgrade manager shows what packages the system wants to upgrade, which you can deselect from being upgraded if you wish.
To update your system, click on the notification icon, enter your password and click OK.
Once all the packages are downloaded, the dpkg system installs the packages in the hidden terminal. Questions that previously required interaction with the terminal now provide a Debconf interface using the GNOME frontend. The upgrade process never requires the user to access a terminal, which helps new users become comfortable with upgrading their system.
Ubuntu also makes basic APT configuration much easier for new users. It offers an interface to add or edit the entries in /etc/apt/sources.list which can be accessed through Synaptic or the preferences menu of the update-notifier. It shows the repositories that are currently listed, and provides an interface to edit them or add new repositories.
You can change the frequency of update checks in the Software Preferences panel. Choose Repositories from the Settings menu, then click on the Internet Updates tab and adjust the Check for updates entry.

The only function that is somewhat lacking with the new Synaptic frontend is application installation. There is a new program called gnome-app-install that shows a simple list of common GNOME programs with a checkbox for installation or removal. gnome-app-install will list every package that provides a .desktop icon in the GNOME application menu. In other words, basically every major gui program will be listed.
Information Gathering
Locating software on your system
Synaptic can tell you about every file that belongs to a software package it knows about and show you where it is located on your system. Search the database for the software package you are interested in and select it in Synaptic’s main window. Next, click on the Installed Files tab to see a list of all files and where they are.
View the Changelog of a Package
Applies to native Debian (.deb) packages only
You can view the changelog of a package with Synaptic. Select a package, then choose Download Changelog from the Package menu.
View History
You can easily keep track of all changes made to your system’s software configuration. To view the history log file, choose History from the File menu.
The history log only shows changes made with Synaptic.
Status Icons
The following icons are used to indicate the status of a package in the package list:
Keyboard shortcuts for Synaptic
Command
Key Combination
Update the list of available packages
Ctrl + R
Open the package search dialog
Ctrl + F
Show the Properties window for the selected package
Ctrl + O
Mark the selected package(s) for installation
Ctrl + I
Mark the selected package(s) for upgrade
Ctrl + U
Mark the selected package(s) for removal
Delete
Mark the selected package(s) for complete removal
Shift + Delete
Unmark any changes to packages
Ctrl + N
Mark all possible upgrades
Ctrl + G
Force the installation of a specific version of the package
Ctrl + E
Undo the last change
Ctrl + Z
Redo the last change
Ctrl + Shift + Z
Apply all marked changes
Ctrl + P
Quit Synaptic
Ctrl + Q
Troubleshooting
How to fix broken packages
‘Broken packages’ are packages that have unsatisfied dependencies. If broken packages are detected, Synaptic will not allow any further changes to the system until all broken packages have been fixed.
To fix broken packages
Choose Edit >Fix Broken Packages from the menu.
Choose Apply Marked Changes from the Edit menu or press Ctrl + P.
Confirm the summary of changes and click Apply.
If that does not help, then please follow this procedure:
How to free disk space
Settings -> Preferences -> Files -> Delete downloaded packages after installation then click Delete Cached Package Files.
Broken Upgrade or Installation
- What to do if an installation process fails and you find it is no longer possible to install or remove packages:
Open a Terminal and type the following commands, pressing the Return or Enter key after each (you may have to type in your password):
Browser works, Synaptic will not
(note: probably inaccurate or outdated)
If the router is set to auto discover DNS then Synaptic will fail. Resolve this by setting up a static ip address and manually set DNS ip in router. Now Ubuntu (system-administration-networking) config static ip and enter your ISP dns ip and delete router DNS ip which will look something like 192.168.1.1
See also
A Synaptic tutorial based on Ubuntu 5.10 (Breezy Badger)
Источник


