- Как использовать Центр синхронизации в Windows 10
- Как настроить файлы с помощью Windows Sync Center в Windows 10
- Настройка файлов в Центре синхронизации Windows 10
- How to Use the Sync Center in Windows 10 Pro
- Get offline access to your network files
- Why Use Sync Center on Windows 10 Pro?
- How to Enable Offline Files to Use Sync Center
- How to Use Sync Center in Windows 10
- Windows 10 – What is Sync Center and How to Use It
- What is Sync Center in Windows 10?
- How to Access Sync Center in Windows 10
- How to Enable Offline Files in Windows 10 Sync Center
- How to Configure Offline Files in Windows 10 Sync Center
- Disk Usage
- Encryption
- Network
- Conclusion
- 5 Ways to Access Sync Center in Windows 10
- 5 ways to access Sync Center in Windows 10:
Как использовать Центр синхронизации в Windows 10
Центр синхронизации — это функция Windows 10, представленная в Windows Vista, и с тех пор она поддерживается во всех версиях Windows. Основная цель Sync Center состояла в том, чтобы иметь возможность синхронизировать ваши файлы с нескольких устройств, чтобы у вас всегда была самая обновленная копия, когда вам это нужно.

Зачем использовать Центр синхронизации в Windows 10?
Общая идея заключается в том, что теперь вы используете Sync Center в сочетании с автономными файлами, чтобы иметь доступ к общим сетевым файлам и папкам в любое время, даже если они не подключены к сети. Это прекрасно работает для мобильных / портативных устройств и для людей, постоянно путешествующих между локациями.
Как включить автономные файлы для использования Sync Center
Прежде чем вы сможете использовать Sync Center для синхронизации любых сетевых файлов с вашим устройством, вы должны включить автономные файлы.
1. Выберите меню «Пуск», введите в строке поиска «Панель управления», затем выберите «Панель управления», чтобы запустить ее.

2. Введите «Центр синхронизации» в поле поиска в верхнем правом углу окна и выберите Центр синхронизации.

3. Выберите «Управление автономными файлами» в боковом меню слева.

4. Выберите «Включить автономные файлы».

Перезагрузите компьютер и повторите первые 3 шага, чтобы получить доступ к настройкам автономного файла.
Как использовать Sync Center в Windows 10
После перезагрузки компьютера и повторного запуска Sync Center вы увидите вкладки «Использование диска», «Шифрование» и «Сеть» в настройках автономных файлов.

Использование диска: позволяет определить объем дискового пространства, которое разрешено использовать автономным файлам. По умолчанию автономные файлы будут иметь все свободное место на вашем жестком диске. Чтобы изменить это, выберите вкладку «Использование диска», затем выберите «Изменить ограничения».
Шифрование: центр синхронизации позволяет повысить безопасность автономных файлов, предоставив возможность настроить шифрование автономных файлов с помощью встроенного программного обеспечения на устройствах Windows, BitLocker. Чтобы зашифровать ваши файлы, просто выберите «Зашифровать».
Сеть: на вкладке «Сеть» вы можете выбрать автоматическую работу с файлами в автономном режиме, если сетевое соединение слишком медленное. Вы также можете установить, как часто вы хотите проверять скорость соединение.
Как настроить файлы с помощью Windows Sync Center в Windows 10
Если ваш компьютер с Windows 10 настроен на синхронизацию файлов с сетевым сервером, Центр синхронизации Windows 10 позволит вам проверить результаты вашей недавней активности по синхронизации. Это инструмент для предоставления вам доступа к копиям ваших сетевых файлов, даже если ваш компьютер не подключен к сети.
Центр синхронизации позволяет вам синхронизировать информацию между вашим компьютером и файлами, хранящимися в папках на сетевых серверах. Они называются автономными файлами, потому что вы можете получить к ним доступ, даже если ваш компьютер или сервер не подключены к сети. Для получения дополнительной информации см. Работа с сетевыми файлами в автономном режиме. Это позволяет синхронизировать между вашим ПК и определенными мобильными устройствами, которые совместимы с Sync Center.
Настройка файлов в Центре синхронизации Windows 10
Первый шаг, который пользователь должен выполнить для синхронизации папок по сети, – это «Включить» автономные файлы. Для этого нажмите комбинацию Win + X, выберите «Панель управления» из списка параметров, введите «Центр синхронизации» в поле поиска и нажмите «Ввод».

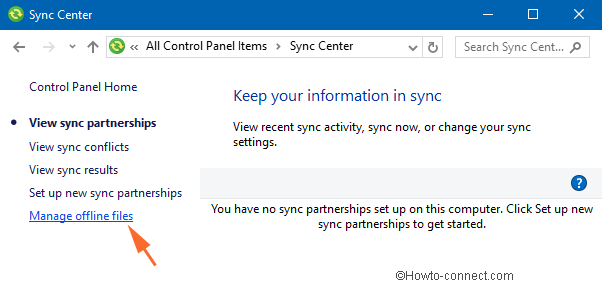
После этого нажмите ссылку «Управление автономными файлами», выделенную синим цветом в левом столбце экрана компьютера.
После этого вы увидите окно Автономные файлы , которое появится на вашем экране. По умолчанию вы переключаетесь на вкладку «Общие». Здесь проверьте, включены ли автономные файлы или нет. Если нет, нажмите Включить автономные файлы и нажмите ОК.
Когда вы закончите, ваш компьютер перезагрузится. Теперь перейдите к автономным файлам, как описано выше. В окне «Автономные файлы» будут доступны другие вкладки.
Для настройки файлов в Центре синхронизации Windows 10 перейдите на вкладки Использование диска в разделе «Автономные файлы». Он покажет вам объем дискового пространства, занятого в настоящее время, а также доступное пространство для хранения автономных файлов на вашем компьютере.
Чтобы изменить предел данных, нажмите кнопки Изменить ограничения . Мгновенно должно появиться окно «Ограничения использования диска с автономными файлами», предлагающее 2 варианта
- Автономные файлы
- Временные файлы.
Чтобы установить необходимый предел, отрегулируйте ползунок. Используйте ползунок и установите необходимый предел. Затем нажмите ОК.
В дополнение к этому, если вы хотите обеспечить уровень безопасности для автономных файлов, зашифруйте их.
How to Use the Sync Center in Windows 10 Pro
Get offline access to your network files
:max_bytes(150000):strip_icc()/LuisChavez-0d2ec73a2f994c4b81237c40fe44c473.jpg)
Sync Center is a feature that was introduced in Windows Vista, and it has been supported in many subsequent versions of Windows including Windows 10 Pro. The main purpose of Sync Center is to synchronize your files with a network server so that you always have the most updated copies when you need them.
Instructions in this article apply exclusively to Windows 10 Pro Edition. Offline network syncing is not available for Windows 10 Home Edition.
Why Use Sync Center on Windows 10 Pro?
You can use Sync Center to access shared files and folder on your network at any time, even when not connected to the network. Changes you make offline will automatically be reflected on the server the next time you connect.
Sync Center is not the same as OneDrive. Sync Center is optimized for Microsoft Office files. In some situations, Sync Center and OneDrive conflict when open Office files sync at different times with Sync Center and OneDrive.
How to Enable Offline Files to Use Sync Center
Before Sync Center can sync any network files to your device, you must enable offline files:
Type control panel in the Windows search box and select the Control Panel app.
You must use the legacy Control Panel utility, not the current Windows Settings app, to configure Sync Center.
:max_bytes(150000):strip_icc()/SyncCenter01-fabe9d2243d44ef1ba2ca263c5ed0919.png)
Type sync center in the search box at the top-right corner of the Control panel window, and then select Sync Center.
:max_bytes(150000):strip_icc()/SyncCenter02-83acf10b20bc4402a6c1e72ec306819d-ea484ca19b934d39a37166e2f251d39f-cd26bc581e7746f087788f1731a28d77.jpg)
Select Manage offline files on the left side.
:max_bytes(150000):strip_icc()/SyncCenter03-e6d5cd72531e4389ac33372e5730f322-839231166ba449928f4f88cf3511adeb-5bd4df130a67421c958f2491063e3dd4.jpg)
Select Enable offline files.
You’ll need administrative rights to enable this feature.
:max_bytes(150000):strip_icc()/SyncCenter04-55f1a9e0f0e84dfcbc8d1ccd18fda6c4-b3ff63f659cc4ddc883ddc3e30a2b258-2e55176c3c244049931c42fa485cd264.jpg)
Restart your computer and repeat steps 1-3 to access the new Offline Files settings.
How to Use Sync Center in Windows 10
Once you’ve restarted your computer and launched Sync Center again, you’ll have three new tabs in your Offline Files settings:
Windows 10 – What is Sync Center and How to Use It
There is one feature in Windows 10 (though it was present in the previous version also) called Sync Center and Offline Files. Many users are still unaware of this feature. But nothing to worry about, we will share this piece of information with you. In this tutorial, we will drop down the details of Sync Center and Offline Files.
You may like to Read:
What is Sync Center in Windows 10?
Sync Center is the feature of Windows 10 which allows you to sync the information between your PC and offline files which are saved in the folders of the network servers. You can obtain them even when your server or your PC is not linked with the network and thus they are termed as Offline Files. Here, it does not permit you to sync the information between your PC and other supportable gadgets.
How to Access Sync Center in Windows 10
Launch the Control Panel of Windows 10 on your screen. Make the items into small icons because the Sync Center is not obtainable via Categories view. Look for the Sync Center icon. Open it.

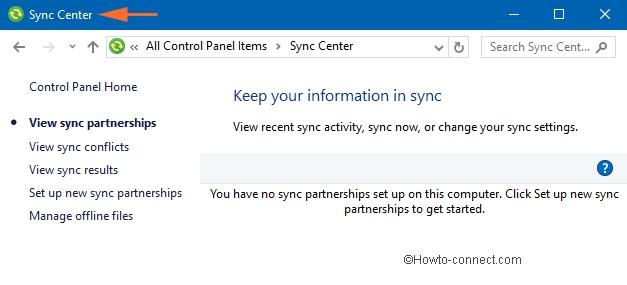
This is how Sync Center looks when opened for the first time.
How to Enable Offline Files in Windows 10 Sync Center
The first thing that you have to carry out before syncing the folders over the network is to Enable the Offline Files. And to make it happen, click on the Manage offline files link on the left side column.
You will see an Offline Files window on your screen. In the General tab, see if it is enabled or not. In any case, it is not, click Enable Offline Files and click Ok. You will be asked to restart the computer.
After restarting the computer, navigate to the Offline Files as described above. Now you will have other tabs available on the Offline Files window.
How to Configure Offline Files in Windows 10 Sync Center
You can easily configure the Offline Files on your Windows 10 computer. The Disk Usage, Encryption, and Network tabs will help you in configuring the Offline Files.
Disk Usage
The Disk Usage tab will display you the amount of disk space that is presently being used and available for keeping the offline files on your PC.
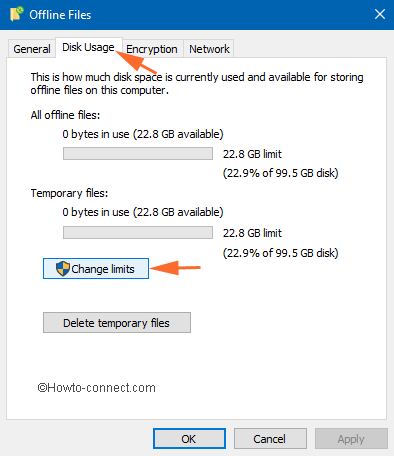
To change the data limit, click on Change limits buttons.
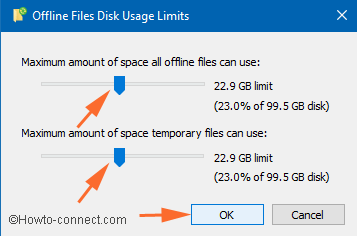
An Offline Files Disk Usage Limits window will pop up in front of you. You will see two options: one for offline files and the other for temporary files. Use the slider and set your required limit. After changing the limits, click Ok.
Encryption
To provide more security to your offline files, you can encrypt them. Click on Encrypt option to encrypt your files.
You can also read our article on encryption by following this link:
Network
The description of this tab is clearly explained in the tab. You can choose and set your preferred time for checking the slow connectivity. If a slow connection occurs, Windows will start working offline by itself and on the same hand saves the copies that you are using in network files.
Conclusion
This tutorial will help you when you wish to work with the files and the network. If there are any queries disturbing you, free to share with us.
5 Ways to Access Sync Center in Windows 10
There are five methods you can use to open Sync Center on Windows 10 computer.
Video guide on how to access Sync Center in Windows 10:
5 ways to access Sync Center in Windows 10:
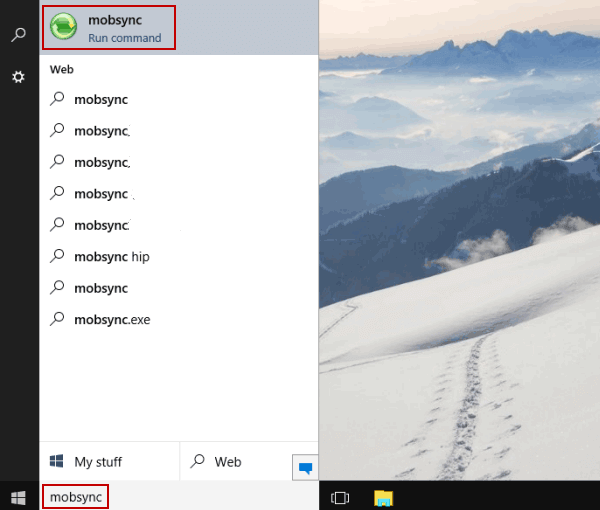
Way 1: Access it through searching.
Type mobsync in the search box on taskbar, and choose mobsync on the top of the list.
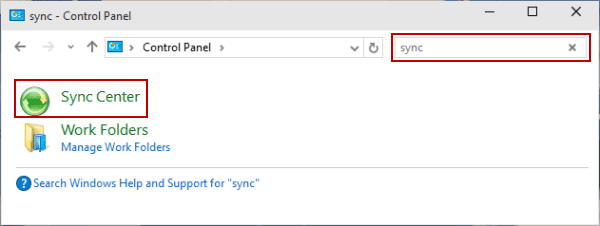
Way 2: Open it in Control Panel.
Step 2: Input sync in the top-right empty box, and click Sync Center in the result.
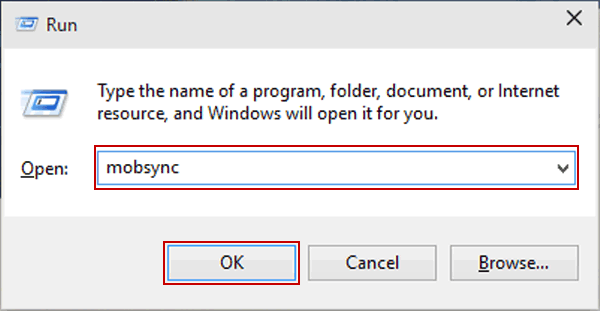
Way 3: Access it via Run.
Display Run with Windows+R, type mobsync in the box and tap OK.
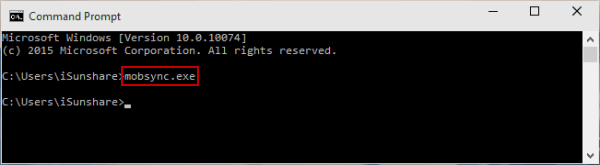
Way 4: Open it by Command Prompt.
Step 2: Input mobsync.exe and press Enter.
Way 5: Access it via Windows PowerShell.
Step 2: Type mobsync and hit Enter.


