- Choose which OneDrive folders to sync to your computer
- Productivity apps, 1 TB of OneDrive, and advanced security.
- Learn more
- Need more help?
- Sync Folders between Drives in Windows 10/8/7 (with Video)
- Need to sync folders between drives in Windows
- Windows sync files between folders using SyncToy
- How to sync two folders in Windows 10/8/7 in easier way?
- Summary
- Windows 10: How to Mirror/Sync Folders Automatically
Choose which OneDrive folders to sync to your computer
Productivity apps, 1 TB of OneDrive, and advanced security.
If you don’t want to sync all of your folders in OneDrive to your computer, you can specify which folders you’d like to sync.
You can choose which folders to sync only if you are using the new OneDrive sync client. Which OneDrive app?
Got Windows 10 or Mac 10.14? Then what are you waiting for? Save space with Files On-Demand for Windows or for Mac today!
Select the white or blue OneDrive cloud icon in the Windows taskbar notification area.

Note: You might need to select the Show hidden icons arrow  next to the notification area to see the OneDrive icon.
Select  Help & Settings > Settings.
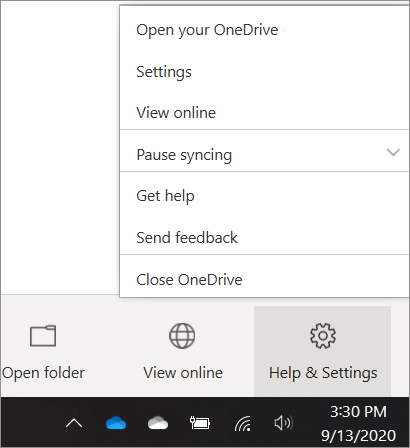
Select the Account tab, and select Choose folders.
In the Sync your OneDrive files to this PC dialog box, uncheck any folders you don’t want to sync to your computer and select OK.

Note: You cannot add non-OneDrive folders (such as C: and D:).
Select the OneDrive cloud icon in the Mac taskbar notification area.

Select Help & Settings > Preferences.
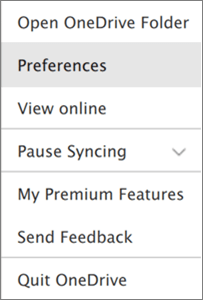
Select the Account tab, and select Choose folders.
In the Sync files from your OneDrive dialog box, uncheck any folders you don’t want to sync to your computer and select OK.
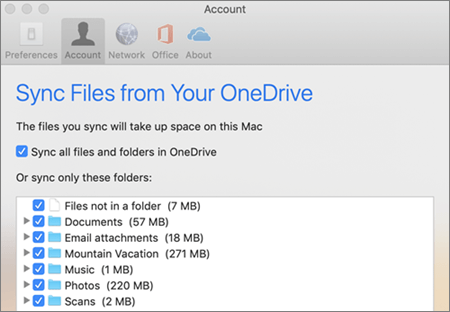
Note: You cannot add non-OneDrive folders (such as C: and D:).
If you uncheck a folder you are syncing to your computer, the folder will be removed from your computer. The folder and its contents will still be available online.
The sync settings you choose are unique to each computer unless you’re syncing everything everywhere. Also, if you’re choosing folders on two computers and you create a new folder on computer A that you want to sync to computer B, you’ll need to go to computer B and select the new folder there.
Learn more
Need more help?

Get online help
See more support pages for OneDrive and OneDrive for work or school.
For the OneDrive mobile app, see Troubleshoot OneDrive mobile app problems.

Contact Support
If you still need help, contact support through your browser or shake your mobile device while you’re in the OneDrive app.

Got feedback?
OneDrive UserVoice is your place to suggest the features you’d like to see us add to OneDrive. While we can’t guarantee any specific features or timelines, we will respond to every suggestion that gets at least 500 votes.
Sync Folders between Drives in Windows 10/8/7 (with Video)
This article tells users like you how to sync folders between drives in Windows 7, 8, 10. Here are tuturial and video for you.
![]()
By Teresa  / Last Updated February 26, 2021
Need to sync folders between drives in Windows
I’d like to sync my Library and desktop folders with an external hard drive. These files change every day and are important to me. I have purchased an external hard drive which is 1 TB in size and should be sufficient. Here is the thing, I want to create a folder in the external drive to store files that be synced from my computer, because I also want to place other data on that drive. I want a fast, secure, user-friendly and free tool for that. What sync tool in Windows should I use to make Windows sync between folders on different drives? Thanks.
There are some situations that you need to perform file or folder synchronization between different data locations. One of the most common ones is sync files to external hard drive to keep data safe. Surely, some users want to sync files to Cloud drives or sync external drive to Cloud to protect data or share files with others. No matter choosing which method, the purpose is to ensure data safe. Then, how do you sync files and folders in Windows 10/7 in simple and secure way?
Windows sync files between folders using SyncToy
SyncToy is a free sync tool that is designed by Microsoft. It helps you sync files and folders between different data locations or devices. SyncToy is a good tool for less experienced computer users due to its graphical user interface. Let’s get to know how to make Windows 10 sync folders between drives with this free tool.
1. Download and install SyncToy as instructed. Launch it.
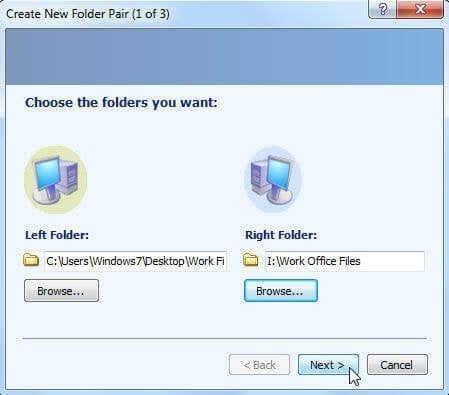
2. Click on Create New Folder Pair beneath.

3. Choose the folders you want to sync, the Left Folder for the source folder and the Right Folder for the destination folder. Click Browse to select.
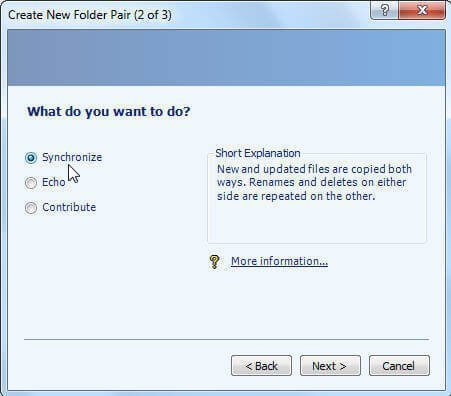
4. Select sync mode in “What do you want to do?” step. Here are three options available, Synchronize, Echo and Contribute. Get to know them and choose the right one for yourself. For your information, Echo is the most common used one.
5. Now, name the folder pair to distinguish. Click Finish to exit the wizard and you’ve done.
Tips:
• You can rename and delete existing folder pair.
• You can create another new folder pair by repeating above steps if the need ever arises.
• You can schedule SyncToy in Windows 10 or Windows 7 with the help of Task Scheduler.
It is very easy to keep Windows sync folders between different drives or on the same drive. Nevertheless, you need to turn to other sync tools in some cases.В
For example, you find SyncToy not copying all files or not syncing subfolders during the process. Or, you want to perform a real-time sync task, not just regular sync mode in Task Scheduler. Further, if you want to sync more than one folder to the same place, you need to create more than one folder pair. Fortunately, you can remedy those regrets in another way.
How to sync two folders in Windows 10/8/7 in easier way?
AOMEI Backupper Standard is free backup & restore tool that embeds with powerful File Sync feature. The feature allows you to synchronize files and folders from one drive to another drive, even on different disks. You have choices to sync files to external hard drive in Windows 10 or Windows 7 with Daily, Weekly, Monthly modes. The Event-trigger and Real-time modes are also available in Professional editions.
In addition, you can sync folders to Cloud drives (see: sync local folder to OneDrive), NAS and network share folders with the help of this software. Also, syncing files between desktop and laptop is supported. You may want to give it a shot.
1. Free download and install AOMEI Backupper. Start it to get in the main console.
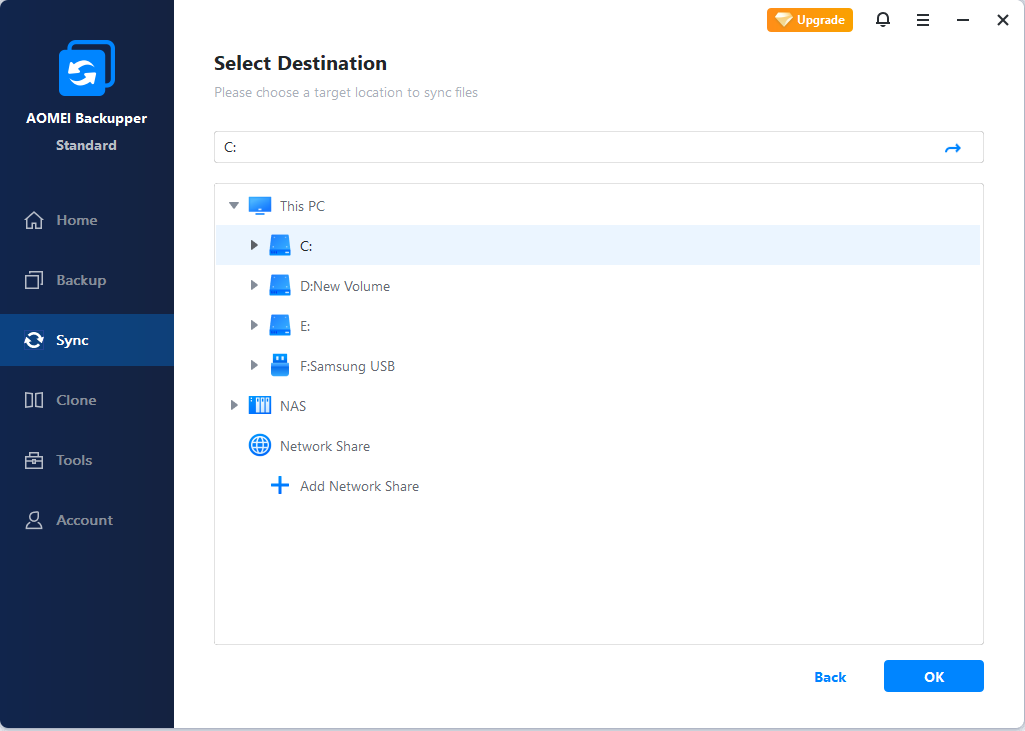
2. Click Sync and then Basic Sync.

3. Click on Add Folder to add the source folder (i.e. the Left Folder in SyncToy). All subfolders will be synced by default.

4. Click the second column to add the destination folder (i.e. the Right FolderВ in SyncToy). Or, click the inverted triangle at the end of the second column to add network locations.
5. Click Schedule to set Daily, Weekly, or Monthly mode.

6. Click Start Sync to sync files right now or at the next schedule time.
Tips:
• Click Options to set email notification if you want to.
• You are allowed to manage all sync tasks in Home tab.
•  It is not allowed to sync files or folders to CD/DVD/Blue-Ray.
• To sync files to network location in real-time mode, please upgrade to Professional edition.
Summary
Two easy ways are provided to make Windows sync folders between drives in Windows 10 and Windows 7. Syncing files to external hard drive can be achieved easily as well. AOMEI Backupper also allows you to backup laptop to Cloud in simple and secure way.
Windows 10: How to Mirror/Sync Folders Automatically
Posted on April 23, 2020 by Mel Hawthorne 1 Comment
Backing up your data regularly is an important measure to protect against data loss. For some things like photos, it can make sense to back up files whenever you upload a new set from your camera. However, for important things such as work documents, it’s key that backups happen regularly, or better, in real-time. A good way to do that is to configure an important folder to be automatically synchronised or mirrored. This guide will detail how to configure automatic folder mirroring and syncing using “FreeFileSync”.
Tip: If instead of syncing your files to another hard drive, you want to keep a copy of them in a cloud storage solution, we recommend services like OneDrive, Dropbox and Google Drive which all allow automated cloud syncing.
FreeFileSync is a free and open-source tool designed to manage file synchronisation. It is available for download here. To install, double-click the installer EXE after downloading it. You may receive a “User Access Control” (UAC) prompt about allowing it to make changes to your computer, if so click “Yes” to continue. The first page of the installer is a licence agreement, select “I accept the agreement” then click “Next”.
The second option in the installer is the install location, configure where you want FreeFileSync to install (or leave it set to the default), then click “Next”. The third page allows you to choose a number of components. It’s recommended that you keep all of them enabled as is the default, then click “Next”. Continue past the page with the cute animal picture, then, when the installation has finished, click “Finish”. Making an optional donation to the developer can get you a few extra features and is a good way to thank them for their work – but it is optional.
To open FreeFileSync, double-click the icon on your desktop, or press the Windows key, type FreeFileSync and hit enter. Below are instructions on how to use the different services available with this program.
Mirror sync
A mirror sync copies files in one direction only, this is will leave the source folder unchanged and match the destination to it.
Tip: If there are any files in the destination that are not present in the source, they will be deleted. Similarly, if a newer version of a document is in the destination, it will be overwritten with the older version from the source folder, so make sure you have things in the right place before you start.
The first step is to start a new configuration by pressing Control+N. Next, you need to add the folder you want to back up as the source folder on the left. You can do so by clicking and dragging the folder from file explorer, or by browsing to the folder with the left “Browse” button. You also need to add the backup folder as the destination on the right. Again, you can drag and drop or browse to select which folder you want to use.
 Select your source and destination folders on the left and right columns, respectively.
Next, click the “Compare” button to see the differences between the two folders. You also need to configure the synchronisation variant to be “Mirror”. To do so, click on the arrow next to the green cogwheel icon and select “Mirror” from the drop-down list.
 Click compare to view the differences between source and destination, then configure the sync variant to be “Mirror”.
Click “Synchronise” to start the process. A small popup will appear to confirm that you want to start the synchronisation now. Click “Start” to continue. When the process is complete, a confirmation window will appear, click “Close” to finish.
Tip: If there are a lot of large files or the hard drive is slow, the synchronisation process may take some time.
Two-way sync
A two-way sync matches both the source and destination folders to each other, copying files in both directions. If a file is not present on one side, it will be copied across. If a newer version of a file is available on either side, the older version will be overwritten with the newer.
Tip: By default, FreeFileSync determines which version of a file is newer by comparing the modification time of the file. You can also manually change which version will overwrite the other, by right-clicking on the file and setting an update direction manually.
You configure a two-way sync almost exactly the same way as you would a mirror sync. You need to specify which folders you want to be the source and destination, compare the files. However, you need to leave the synchronisation method at the default “Two way”.
Now you can click “Synchronise” to start the process. A small popup will appear to confirm that you want to start the synchronisation now. Click “Start” to continue. When the process is complete, a confirmation window will appear, click “Close” to finish.
Filtering
If there is a file you don’t want to be synchronised, you can add a filter. If you want to filter the file only this one time, you can right-click on it and select “Exclude temporarily”. This will remove the file from the list of files to be synchronised. If you click “Compare” again, the file will be added to the list again.
If you want to permanently filter an item, right-click on the file and move the cursor over “Exclude via filter”. There are three filter options. The top option allows you to filter all files with the file extension of that file. In the case of a word document, the filter would be “*.docx”. This way, no Word document will be synced.
The middle option allows you to filter any file with that exact filename, in any subdirectory, while the last option will only filter that exact file.
Tip: The asterisk (*) acts as a “wildcard”, it means it will match anything. So *.docx will match any filename that ends in “.docx”. Similarly, the filter “*/example.docx” will match every document called “example.docx” in any subdirectory. So, if you have an example.docx in six different folders, all of them will be excluded!
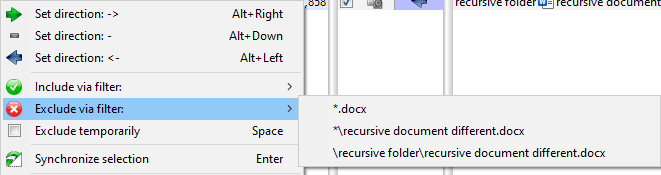 Filter a file via the right-click menu.
Saving a configuration
To save a configuration to re-run it at a later date, press Control+S, set a file name, then click “Save”.
Tip: Filters will be saved in your configuration files. If you only want to filter something one time, make sure to only filter it once, and not to set up a permanent filter.
If you double-click on the save file with FreeFileSync closed, it will open and automatically import the configuration. Alternatively, you can import a configuration file by pressing Control+O and selecting the configuration file.
Real-time synchronisation
Automatic synchronisation is managed by a separate app, RealTimeSync, that installs at the same time as FreeFileSync. It’s designed to automate the synchronisation process and to run silently in the background. To use it though, you need to save a FreeFileSync configuration as a “Batch job”.
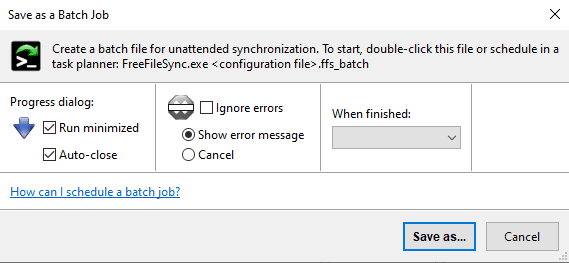
To save a FreeFileSync configuration as a batch job, open the configuration file in FreeFileSync. Next, you need to click “File” in the top-left corner of the window, then select “Save as batch job…” from the drop-down list. In the new window, you should enable “Run minimised” and “Auto-close” so that the automatic synchronisation process, runs silently in the background. It’s recommended that you leave “Show error message” enabled, so you can be alerted if any errors occur. Leave “When finished” blank, the two other options will turn off the computer after running. That can be useful for a nightly backup, but not so much for a real-time backup. Click “Save as” and configure a file name to save the batch job to disk.
 Save your configuration file as a batch job to run minimised.
Once you have a batch job saved, you can import it into RealTimeSync. To do so, open RealTimeSync by pressing the Windows key, typing “RealTimeSync” then press enter. You can import the batch job by clicking and dragging it into the RealTimeSync window, or by pressing Control+O and opening the batch job file. Importing the batch job will include all of the settings you need to set up the synchronisation to run in the background.
The only setting you may want to modify is the “Idle time”. The Idle timer starts as soon as a change is made to a file in a watched folder, if another file changes during the timer, the timer will reset. If no other files change during the idle timer, then the synchronisation process will occur.
Tip: You shouldn’t set the idle timer value too high, as that could lead to a scenario where the timer can never expire before a new change is made. This could prevent any synchronisation from happening.
 Import a batch job to automate the monitoring and synchronising process.
Press “Start” to launch the real-time monitoring. A red double arrow icon will appear in the task tray, indicating that the monitoring and synchronisation process is happening in the background. Now, depending on what type of synchronisation you enabled, any changes you make in one folder will be copied to the other folder after the idle timer has expired.
Automating the real-time synchronisation
If you want the real-time synchronisation process to automatically start whenever you log in, you can import the RealTimeSync save file into your user’s “start-up” folder.
To save the RealTimeSync configuration, open RealTimeSync and import the batch job you want to automatically run, if it is not already loaded. Next click “File” in the top left corner of the window, select “Save as” from the dropdown menu and save the file to your hard drive.
To open your start-up folder, open File Explorer and type “shell:startup” into the main bar. Finally, move, copy, or create a shortcut to your RealTimeSync save file in the start-up folder.
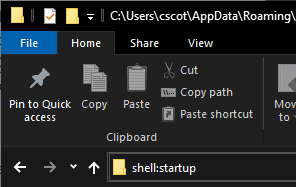 Type “shell:startup” into File Explorer to access your start-up folder.
The start-up folder runs any programs in it whenever you log in. So RealTimeSync will now launch and run in the background whenever you log in.


