- Управление синхронизацией профилей пользователей в SharePoint Server Manage user profile synchronization in SharePoint Server
- Silently configure user accounts
- Prerequisites
- Enable silent configuration
- Windows Image Prep requirements
- Verify SilentAccountConfig
- Instructions for SharePoint in Microsoft 365:
- Instructions for SharePoint Server 2019
- To prevent Silent Business Config:
- Verify that Single Sign On (SSO) is working
- Синхронизация параметров на устройствах с Windows 10
- Запуск синхронизации профилей вручную в SharePoint Server Start profile synchronization manually in SharePoint Server
- Запуск синхронизации профилей вручную Start profile synchronization manually
Управление синхронизацией профилей пользователей в SharePoint Server Manage user profile synchronization in SharePoint Server
ПРИМЕНИМО К:  2013 2016 2019
  SharePoint in Microsoft 365 APPLIES TO: 2013 2016 2019 SharePoint in Microsoft 365
Синхронизация профилей в SharePoint Server позволяет администраторам службы профилей пользователей синхронизировать данные профилей пользователей и групп, хранимые в хранилище профилей SharePoint Server, с данными профилей, которые хранятся в службах каталогов и бизнес-системах предприятия. Profile Synchronization in SharePoint Server enables User Profile service administrators to synchronize user and group profile information that is stored in the SharePoint Server profile store with profile information that is stored in directory services and business systems across the enterprise.
Следующие статьи содержат сведения о настройке и выполнении синхронизации профилей. Эти статьи относятся к сценариям с использованием SharePoint Active Directory Import. Если вы используете Microsoft Identity Manager 2016 (MIM), см. документацию к MIM. The following articles provide information about how to configure and perform profile synchronization. These articles refer to scenarios using SharePoint Active Directory Import. If you’re using Microsoft Identity Manager 2016 (MIM), see the MIM documentation.
Silently configure user accounts
This article is for IT admins who would like to silently configure user accounts when deploying the new OneDrive sync app (OneDrive.exe) to managed Windows computers in their enterprise. This feature works for computers that are joined to Azure Active Directory (Azure AD).
If you enable this feature, OneDrive.exe will attempt to silently (without user interaction) sign-in to the work or school user account that was used to sign into Windows (known as the Windows Primary Account). That Windows account must be an Azure Active Directory (AAD) account or be linked to an AAD account through a hybrid authentication configuration (see Prerequisites below).
Before OneDrive.exe begins syncing, it will check the available disk space. If syncing the user’s entire OneDrive would cause the available space to drop below 1 GB or if the size exceeds the threshold you set (on devices that don’t have Files On-Demand enabled), OneDrive will prompt the user to choose folders to sync. For info about setting this threshold using Group Policy, see Set the maximum size of a user’s OneDrive that can download automatically. 
When the user is configured in the sync app, if the same user account is syncing files with the previous OneDrive for Business sync app (Groove.exe), the new sync app (OneDrive.exe) will attempt to take over syncing those files.
We recommend enabling silent account configuration when you configure the sync app. See all our recommendations for configuring the sync app
Prerequisites
Before you can enable silent account configuration, you need to join your devices to Azure AD. You can join devices running Windows 10 and Windows Server 2016 directly to Azure AD. To learn how, see Join your work device to your organization’s network.
If you have an on-premises environment that uses Active Directory, you can enable hybrid Azure AD joined devices to join devices on your domain to Azure AD. Devices must be running one of the following operating systems:
- Windows 10 
- Windows 8.1 
- Windows 7 
- Windows Server 2019
- Windows Server 2016 
- Windows Server 2012 R2 
- Windows Server 2012 
- Windows Server 2008 R2
If you federate your on-premises Active Directory with Azure AD, you must use AD FS to enable this feature. For info about using Azure AD Connect, see Getting started with Azure AD Connect using express settings.
Enable silent configuration
If the computers on your network are joined to Active Directory on-premises, you can use domain group policy to configure silent account configuration.
Using Group Policy:
Optionally, specify the maximum OneDrive size that will download automatically in silent configuration. For info, see Set the maximum size of a user’s OneDrive that can download automatically. If you enable Files On-Demand, OneDrive will ignore the maximum size value.
Optionally, set the default location for the OneDrive folder. For info, see Set the default location for the OneDrive folder.
See the Verify SilentAccountConfig section below to verify and troubleshoot your configuration.
Silent account configuration won’t work on devices for users who require multi-factor authentication. Select third-party identity providers (IdPs) are supported, but there are caveats. For more information, make sure to check out the Azure AD federation compatibility list.
If the computers on your network aren’t connected to Active Directory on-premises, but only to Azure AD, we recommend using Intune and a Microsoft PowerShell script to set the registry keys required to enable silent account configuration. Be sure you have automatic enrollment set up for Windows 10 devices.
Windows Image Prep requirements
SilentAccountConfig creates a SilentBusinessConfigCompleted registry entry once SilentAccountConfig has successfully provisioned the user in OneDrive.exe. This prevents SilentAccountConfig from reprovisioning the user in OneDrive.exe if the user manually stops syncing.
If SilentAccountConfig has successfully completed on a computer you’re going to use as your master for building a Windows deployment image (for example, SysPrep), you need to ensure this registry key is removed before you prepare your image. You can do so by running the following command:
Verify SilentAccountConfig
Instructions for SharePoint in Microsoft 365:
Unlink all pre-existing Business instances in OneDrive.
Clear the registry of any previous successful Silent Business Config runs:
Set the Silent Config policy registry entry (must be run from an administrator CMD window):
Sign out of Windows (Ctrl+Alt+Delete Sign out).
Sign in to Windows.
Shortly you should see a blue cloud icon in the notification area of the taskbar. Selecting the icon should show the activity center pop-up showing ongoing/recent activity from the first sync. If so, SilentAccountConfig has worked correctly.
If instead you see the «Set up OneDrive» screen, SilentAccountConfig couldn’t silently sign in or failed for another reason. Verify you completed these steps correctly by repeating them again. Follow the Verify Single Sign On (SSO) steps later in this article to confirm that SSO is not a problem. Gather sync app logs to send to the engineering team for further help. В
Instructions for SharePoint Server 2019
Ensure you can manually get the OneDrive sync app to sync content with your on-premises SharePoint Server 2019 before proceeding. See Configure sync app for syncing with SharePoint Server for details.
Set the SharePointOnPremPrioritization reg key value to 1 (this ensures that SharePoint Server takes precedence over SharePoint in Microsoft 365, deleting the registry key to revert to SharePoint in Microsoft 365):
Follow steps 1 through 6 in the previous procedure for SharePoint in Microsoft 365.
If instead, you see the «Set up OneDrive» screen, SilentAccountConfig was unable to silently sign in or failed for another reason. Verify you’ve completed these steps correctly by repeating them again. Gather sync app logs to send to the engineering team for further help.
To prevent Silent Business Config:
Verify that Single Sign On (SSO) is working
The most common reason for SilentAccountConfig to fail is the credentials aren’t available to OneDrive.exe without user interaction. Follow these steps to determine if this is a problem in your case.
If you have a computer, you think should work with SilentAccountConfig, you can manually verify that SSO is working correctly to ensure that the environment is configured correctly.
Temporarily force ADAL on by running this command:
Shut down any running OneDrive.exe processes (verify in the Task Manager Details tab — Ctrl+Shift+Esc).
Start menu — OneDrive, you should see the Set up OneDrive screen (if not unlink/stop syncing any business accounts and start over).
Enter the same email address that the user used to sign into Windows (try alias@domain and domain\alias forms).
Select the Sign in button.
The dialog should switch to a «signing in» page with a spinning icon for a few seconds.В It should then continue to the next part of the wizard without asking for a password.
If a password prompt doesn’t appear, your auth environment is properly configured and SilentAccountConfig should work for your users.
If you do see a password prompt, the environment isn’t configured properly for silent sign-on.В This could be due to a problem with how the computer is domain joined (for example, a trust relationship problem), a problem with ADFS configuration, an Azure AD conditional access policy requiring user interaction, you didn’t provide the same user email address as the one used to sign into Windows, or some other reason. You will need to resolve whatever is blocking silent sign-on before SilentAccountConfig will work for you.
Remove the EnableADAL key you added in step 1:
When using SilentAccountConfig, you do not need to specify EnableADAL=1. This is only necessary when manually testing SSO in the above steps where we manually sign in (instead of using SilentAccountConfig to sign in). However, if you want users who manually set up OneDrive sync to benefit from SSO to minimize how often they need to enter a password in sync, you can deploy the EnableADAL key on your users’ computers.
Синхронизация параметров на устройствах с Windows 10
Когда параметр Синхронизация включен, Windows синхронизирует выбранные вами параметры на всех устройствах с Windows 10, в которые вы вошли с учетной записью Майкрософт.
Вы также можете синхронизировать параметры для рабочей или учебной учетной записи (если это разрешено вашей организацией). Дополнительные сведения о том, как Azure Active Directory и в состоянии предприятия для синхронизации параметров пользователей и приложений в облаке, смотрите Общие сведения о роуминге в корпоративном состоянии.
Чтобы найти параметры синхронизации, нажмите кнопку » Пуск «. и выберите Параметры Учетные записи > > синхронизировать параметры .
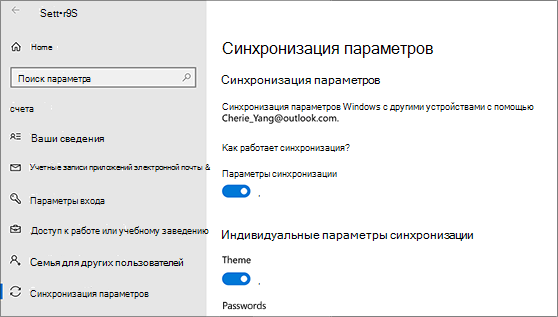
Чтобы остановить синхронизацию параметров и удалить их из облака, отключите параметры синхронизации на всех устройствах, подключенных к учетной записи Майкрософт. После этого вам потребуется удалить ее из своей учетной записи. Для этого выполните следующие действия.
Прокрутите страницу вниз до конца и выберите очистить синхронизированные параметры.
Например, можно синхронизировать настройки языка, пароли и цветовые темы. Если включить параметр «Другие параметры Windows», Windows также будет синхронизировать некоторые параметры устройств (например, настройки принтера и мыши), параметры проводника и настройки уведомлений. Полный список параметров, которые можно синхронизировать с Windows, приведены в разделе Параметры роуминга в Windows 10.
Запуск синхронизации профилей вручную в SharePoint Server Start profile synchronization manually in SharePoint Server
ПРИМЕНИМО К: 2013 2016 2019 SharePoint in Microsoft 365 APPLIES TO: 2013 2016 2019 SharePoint in Microsoft 365
В этой статье описано, как запустить синхронизацию профилей для SharePoint Server вручную. Вы можете запустить полную или добавочную синхронизацию сведений профилей. Запуск синхронизации профилей вручную может потребоваться, если вы внесли значительные изменения в профили пользователей и не хотите ждать следующей запланированной синхронизации. This article describes how to start profile synchronization for SharePoint Server manually. You can start a full synchronization or an incremental synchronization of profile information. You might want to consider starting profile synchronization manually if you have made considerable changes to user profiles, and you don’t want to wait for the next scheduled synchronization.
Обратите внимание на то, что эта процедура подходит только для ферм SharePoint Server, в которых используется функция импорта данных Active Directory в SharePoint. Если вы используете внешний диспетчер удостоверений, просмотрите соответствующую документацию. Note that this procedure is only for SharePoint Server farms that are using SharePoint Active Directory Import. If you are using an external identity manager, see the documentation for your identity manager.
Запуск синхронизации профилей вручную Start profile synchronization manually
Можно вручную запускать полную или добавочную синхронизацию сведений профилей. Для выполнения этой процедуры нужно быть администратором фермы или приложения службы профилей пользователей. You can manually start a full synchronization or an incremental synchronization of profile information. You need to be a farm administrator or an administrator of the User Profile service application to perform this procedure.
Как правило, добавочная синхронизация — отличный вариант. Но если выполняется одно из указанных ниже условий, применяйте полную синхронизацию. Usually, an incremental synchronization is fine, but you should use a full synchronization if any of the following are true.
Изменилось сопоставленное свойство. Пример: сопоставлено новое свойство, а также добавлено или изменено сопоставление, связанное со свойством. A mapped property has changed. For example, you mapped a new property, or added or changed a mapping associated with a property.
Вы изменили контейнеры, используемые при подключении для синхронизации с AD DS. You changed the containers that a connection uses to synchronize with AD DS.
Вы добавили или удалили подключение для синхронизации. You added or deleted a synchronization connection.
Помните, что длительность полной синхронизации зависит от размера каталога. Keep in mind that a full synchronization can take a long time, depending on the size of your directory.
Запуск синхронизации профилей вручную To start profile synchronization manually
В разделе Управление приложениями веб-сайта Веб-сайт центра администрирования SharePoint щелкните Управление приложениями-службами. On the SharePoint Central Administration website, in the Application Management section, click Manage service applications.
На странице Управление приложениями-службами выберите ссылку приложения службы профилей пользователей. On the Manage Service Applications page, click the link for the User Profile service application.
В разделе Синхронизация страницы управления службой профилей щелкните пункт Запуск синхронизации профилей. On the Manage Profile Service page, in the Synchronization section, click Start Profile Synchronization.
На странице запуска синхронизации профилей выберите элемент Начать добавочную синхронизацию, чтобы синхронизировать только профили, которые были изменены с момента последней синхронизации, или элемент Начать полную синхронизацию, чтобы синхронизировать все профили. On the Start Profile Synchronization page, select Start Incremental Synchronization to synchronize only profiles that have changed since the last synchronization, or select Start Full Synchronization to synchronize all profiles.
Нажмите кнопку ОК. Click OK.
Обновите страницу Управление службой профилей, чтобы увидеть состояние синхронизации профилей. Refresh the Manage Profile Service page to view the profile synchronization status.


