Windows 10: How to Mirror/Sync Folders Automatically
Posted on April 23, 2020 by Mel Hawthorne 1 Comment
Backing up your data regularly is an important measure to protect against data loss. For some things like photos, it can make sense to back up files whenever you upload a new set from your camera. However, for important things such as work documents, it’s key that backups happen regularly, or better, in real-time. A good way to do that is to configure an important folder to be automatically synchronised or mirrored. This guide will detail how to configure automatic folder mirroring and syncing using “FreeFileSync”.
Tip: If instead of syncing your files to another hard drive, you want to keep a copy of them in a cloud storage solution, we recommend services like OneDrive, Dropbox and Google Drive which all allow automated cloud syncing.
FreeFileSync is a free and open-source tool designed to manage file synchronisation. It is available for download here. To install, double-click the installer EXE after downloading it. You may receive a “User Access Control” (UAC) prompt about allowing it to make changes to your computer, if so click “Yes” to continue. The first page of the installer is a licence agreement, select “I accept the agreement” then click “Next”.
The second option in the installer is the install location, configure where you want FreeFileSync to install (or leave it set to the default), then click “Next”. The third page allows you to choose a number of components. It’s recommended that you keep all of them enabled as is the default, then click “Next”. Continue past the page with the cute animal picture, then, when the installation has finished, click “Finish”. Making an optional donation to the developer can get you a few extra features and is a good way to thank them for their work – but it is optional.
To open FreeFileSync, double-click the icon on your desktop, or press the Windows key, type FreeFileSync and hit enter. Below are instructions on how to use the different services available with this program.
Mirror sync
A mirror sync copies files in one direction only, this is will leave the source folder unchanged and match the destination to it.
Tip: If there are any files in the destination that are not present in the source, they will be deleted. Similarly, if a newer version of a document is in the destination, it will be overwritten with the older version from the source folder, so make sure you have things in the right place before you start.
The first step is to start a new configuration by pressing Control+N. Next, you need to add the folder you want to back up as the source folder on the left. You can do so by clicking and dragging the folder from file explorer, or by browsing to the folder with the left “Browse” button. You also need to add the backup folder as the destination on the right. Again, you can drag and drop or browse to select which folder you want to use.
 Select your source and destination folders on the left and right columns, respectively.
Next, click the “Compare” button to see the differences between the two folders. You also need to configure the synchronisation variant to be “Mirror”. To do so, click on the arrow next to the green cogwheel icon and select “Mirror” from the drop-down list.
 Click compare to view the differences between source and destination, then configure the sync variant to be “Mirror”.
Click “Synchronise” to start the process. A small popup will appear to confirm that you want to start the synchronisation now. Click “Start” to continue. When the process is complete, a confirmation window will appear, click “Close” to finish.
Tip: If there are a lot of large files or the hard drive is slow, the synchronisation process may take some time.
Two-way sync
A two-way sync matches both the source and destination folders to each other, copying files in both directions. If a file is not present on one side, it will be copied across. If a newer version of a file is available on either side, the older version will be overwritten with the newer.
Tip: By default, FreeFileSync determines which version of a file is newer by comparing the modification time of the file. You can also manually change which version will overwrite the other, by right-clicking on the file and setting an update direction manually.
You configure a two-way sync almost exactly the same way as you would a mirror sync. You need to specify which folders you want to be the source and destination, compare the files. However, you need to leave the synchronisation method at the default “Two way”.
Now you can click “Synchronise” to start the process. A small popup will appear to confirm that you want to start the synchronisation now. Click “Start” to continue. When the process is complete, a confirmation window will appear, click “Close” to finish.
Filtering
If there is a file you don’t want to be synchronised, you can add a filter. If you want to filter the file only this one time, you can right-click on it and select “Exclude temporarily”. This will remove the file from the list of files to be synchronised. If you click “Compare” again, the file will be added to the list again.
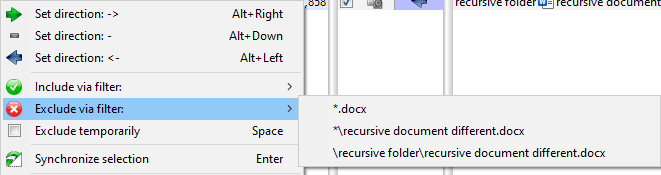
If you want to permanently filter an item, right-click on the file and move the cursor over “Exclude via filter”. There are three filter options. The top option allows you to filter all files with the file extension of that file. In the case of a word document, the filter would be “*.docx”. This way, no Word document will be synced.
The middle option allows you to filter any file with that exact filename, in any subdirectory, while the last option will only filter that exact file.
Tip: The asterisk (*) acts as a “wildcard”, it means it will match anything. So *.docx will match any filename that ends in “.docx”. Similarly, the filter “*/example.docx” will match every document called “example.docx” in any subdirectory. So, if you have an example.docx in six different folders, all of them will be excluded!
 Filter a file via the right-click menu.
Saving a configuration
To save a configuration to re-run it at a later date, press Control+S, set a file name, then click “Save”.
Tip: Filters will be saved in your configuration files. If you only want to filter something one time, make sure to only filter it once, and not to set up a permanent filter.
If you double-click on the save file with FreeFileSync closed, it will open and automatically import the configuration. Alternatively, you can import a configuration file by pressing Control+O and selecting the configuration file.
Real-time synchronisation
Automatic synchronisation is managed by a separate app, RealTimeSync, that installs at the same time as FreeFileSync. It’s designed to automate the synchronisation process and to run silently in the background. To use it though, you need to save a FreeFileSync configuration as a “Batch job”.
To save a FreeFileSync configuration as a batch job, open the configuration file in FreeFileSync. Next, you need to click “File” in the top-left corner of the window, then select “Save as batch job…” from the drop-down list. In the new window, you should enable “Run minimised” and “Auto-close” so that the automatic synchronisation process, runs silently in the background. It’s recommended that you leave “Show error message” enabled, so you can be alerted if any errors occur. Leave “When finished” blank, the two other options will turn off the computer after running. That can be useful for a nightly backup, but not so much for a real-time backup. Click “Save as” and configure a file name to save the batch job to disk.
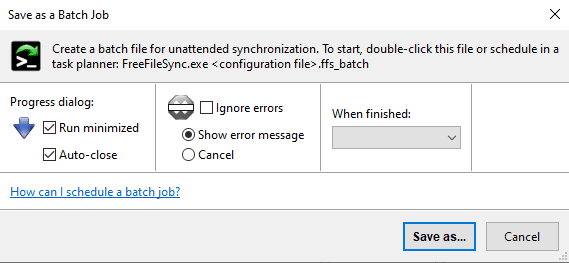 Save your configuration file as a batch job to run minimised.
Once you have a batch job saved, you can import it into RealTimeSync. To do so, open RealTimeSync by pressing the Windows key, typing “RealTimeSync” then press enter. You can import the batch job by clicking and dragging it into the RealTimeSync window, or by pressing Control+O and opening the batch job file. Importing the batch job will include all of the settings you need to set up the synchronisation to run in the background.
The only setting you may want to modify is the “Idle time”. The Idle timer starts as soon as a change is made to a file in a watched folder, if another file changes during the timer, the timer will reset. If no other files change during the idle timer, then the synchronisation process will occur.
Tip: You shouldn’t set the idle timer value too high, as that could lead to a scenario where the timer can never expire before a new change is made. This could prevent any synchronisation from happening.
 Import a batch job to automate the monitoring and synchronising process.
Press “Start” to launch the real-time monitoring. A red double arrow icon will appear in the task tray, indicating that the monitoring and synchronisation process is happening in the background. Now, depending on what type of synchronisation you enabled, any changes you make in one folder will be copied to the other folder after the idle timer has expired.
Automating the real-time synchronisation
If you want the real-time synchronisation process to automatically start whenever you log in, you can import the RealTimeSync save file into your user’s “start-up” folder.
To save the RealTimeSync configuration, open RealTimeSync and import the batch job you want to automatically run, if it is not already loaded. Next click “File” in the top left corner of the window, select “Save as” from the dropdown menu and save the file to your hard drive.
To open your start-up folder, open File Explorer and type “shell:startup” into the main bar. Finally, move, copy, or create a shortcut to your RealTimeSync save file in the start-up folder.
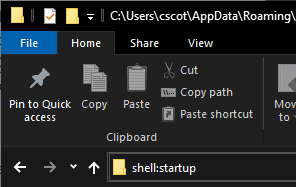 Type “shell:startup” into File Explorer to access your start-up folder.
The start-up folder runs any programs in it whenever you log in. So RealTimeSync will now launch and run in the background whenever you log in.
How to Sync Two Folders in Windows 10
Have you always wanted two folders in two different locations to be synchronized in real time? Maybe you have a folder on your desktop or laptop computer and you want to synchronize it with another PC at home or with an external storage device such as a USB hard drive or NAS (Network Attached Storage Device)?
There are many free software programs that can help you synchronize two folders, but very few of them do a good job of synchronizing folders in real time. What I mean by real time is that the user doesn’t have to open the program manually and run the synchronization or wait for the program to run regularly.
Why do I need to synchronize folders in Windows 10?
Your computer may contain important data in different folders, including financial documents, documents, videos, photos, music, etc. It would be a great loss if these files or folders were lost.
To prevent data loss, you can create a backup by copying and pasting important folders to another location. However, traditional copy and paste is a time-consuming process, especially for some large folders. In addition, some special folders may not copy properly.
In this case, you can choose to synchronize files or folders located in different locations. One of the most common situations is synchronizing data to an external hard drive. Of course, you can also synchronize files or folders to a cloud drive or network drive. In short, the goal is to protect data wherever you choose to store it.
SyncToys

Download SyncToys from Microsoft Install and run it. Click on the Create a new folder pair option.
SyncToys does not mark folders as source or destination. It gives them much simpler names: left folder and right folder. Select the two folders you want to synchronize and remember which is the left folder and which is the right folder.
April 2021 Update:
We now recommend using this tool for your error. Additionally, this tool fixes common computer errors, protects you against file loss, malware, hardware failures and optimizes your PC for maximum performance. You can fix your PC problems quickly and prevent others from happening with this software:
- Step 1 : Download PC Repair & Optimizer Tool (Windows 10, 8, 7, XP, Vista – Microsoft Gold Certified).
- Step 2 : Click “Start Scan” to find Windows registry issues that could be causing PC problems.
- Step 3 : Click “Repair All” to fix all issues.

You have three different synchronization options: Sync, Echo and Contribute. When you select each of these options you will see a description that will tell you how each sync works.
- During synchronization, all files and folders are synchronized between two folders. If you delete something in one of the two folders, it is also deleted in the other folder.
- Echo copies all new and updated files from the folder on the left to the folder on the right. If you delete or rename a file in the left folder, it will also be deleted and/or renamed in the right folder.
- Contribute copies of new and updated files and folders from the left folder to the right folder. Files renamed in the left folder are also renamed in the right folder. No files or folders are deleted in either direction. For example, if you delete a file from the left folder, it is not deleted from the right folder.
Finish creating the pair and click Run to synchronize the files and folders.
Dsynchronize

Dsynchronize is free software written by a developer in Poland, whose website seems to date back to the 1990s! But don’t judge a book by its cover, because the programs he writes are excellent.
If you visit the link above, you have to scroll down a bit to get to the right program. At first I thought I was on the wrong website because I kept reading about his first program called Dspeech. Scroll down and past Dshutdown and you’ll see Dsynchronize.
As mentioned before, it’s a pretty ugly website. Luckily, the software is clean and contains no junkware, malware, advertising, etc. Once you have downloaded the ZIP file, extract all the files and run the request file.
AOMEI Backupper

AOMEI Backupper Standard is a powerful and free backup tool that works well on all Windows PCs. It can help you synchronize folders between computers running Windows 7/8/10 without any problems.
You can synchronize folders from different storage devices such as hard disk, external hard drive or USB flash drive with the network. You can also define a scheduled backup job, and the folders will then synchronize daily, weekly, or monthly. So you won’t worry about forgetting to synchronize folders one day. Here are the steps to synchronize Windows files between computers with AOMEI Backupper
- Download, install and start AOMEI Backupper > Click Backup and then select File Sync.
- Name the task > Click Add Folder to browse the computer and select the desired folder.
- Click the field to select the destination.
- Click Share/NAS > Add Network Location and fill in the fields with detailed information > Click OK > Select the destination path, then click OK to continue.
- Click Schedule to define the schedule task > Click Start Synchronization to confirm. (There are three other functions called Event Trigger, USB Connector, and Real-time Synchronization in Schedule.

CCNA, Web Developer, PC Troubleshooter
I am a computer enthusiast and a practicing IT Professional. I have years of experience behind me in computer programming, hardware troubleshooting and repair. I specialise in Web Development and Database Design. I also have a CCNA certification for Network Design and Troubleshooting.


