- How to Run Syncthing 24/7 as a Windows Service with AlwaysUp
- Automatically start Syncthing in the background when your PC boots, without having to log on. Survive accidental shutdowns when you log off and other potential problems.
- Syncthing
- Synopsis
- Description
- Options
- Exit Codes
- Proxies
- Development Settings
- See Also
- Getting Started
- Installing
- Syncthing
- Configuring
How to Run Syncthing 24/7 as a Windows Service with AlwaysUp
Automatically start Syncthing in the background when your PC boots, without having to log on. Survive accidental shutdowns when you log off and other potential problems.
Syncthing keeps files synchronized between two or more machines. It is ideally suited for running «headless» in the background as the GUI is accessible from any web browser.
To configure Syncthing as a Windows Service with AlwaysUp:
If you don’t have Syncthing installed, download the latest zip file from GitHub and expand it to a new folder on your hard drive. We have installed version 0.10.11 in C:\Syncthing for this tutorial and that folder will show up throughout this tutorial.
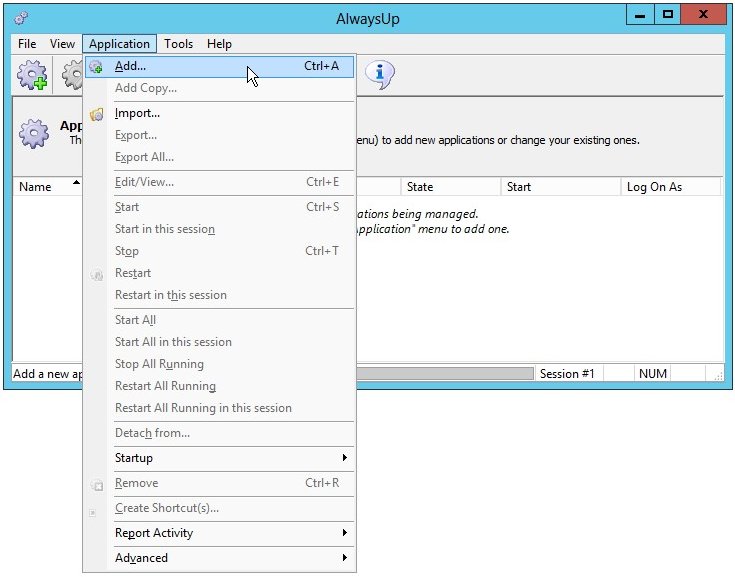
Next, start AlwaysUp.
Select Application > Add to open the Add Application window:
On the General tab:
In the Application field, enter the full path to the Syncthing executable, syncthing.exe. Since we placed Syncthing in C:\Syncthing, this is C:\Syncthing\syncthing.exe. Your path may be different.
In the Name field, enter the name that you will call the application in AlwaysUp. We have used Syncthing (the default) but you can specify another name you like.

Click over to the Logon tab and enter the user name and password of the account in which you have configured and run Syncthing. By default, Syncthing stores its settings in the user-specific %AppData% folder and running it in the same account will ensure that Syncthing will find its configuration.
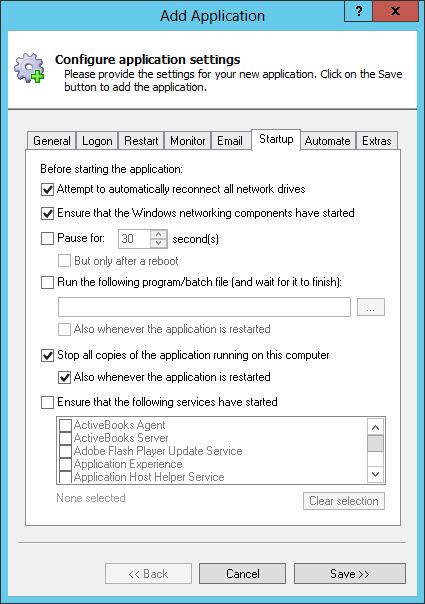
Click over to the Startup tab:
Check the Ensure that the Windows Networking components have started box. This tells AlwaysUp that Syncthing needs the TCP/IP networking stack to do its work.
Because only a single copy of Syncthing can run at any time (due to the use of a single network port), check the Stop all copies of the application running on this computer box, and the Also whenever the application is restarted setting below. This will ensure that other instances of Syncthing don’t prevent the copy launched by AlwaysUp (as a windows service) from starting properly.
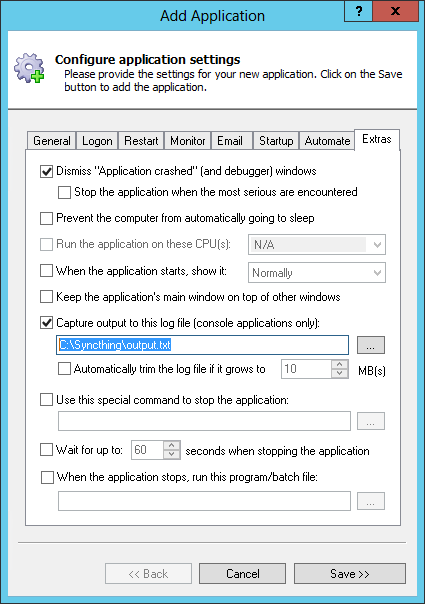
Since Syncthing will no longer be visible on your desktop, you may want to capture the messages from the console to a file. To do so, switch to the Extras tab, check the Capture output to this log file box and enter the full path to a text file.
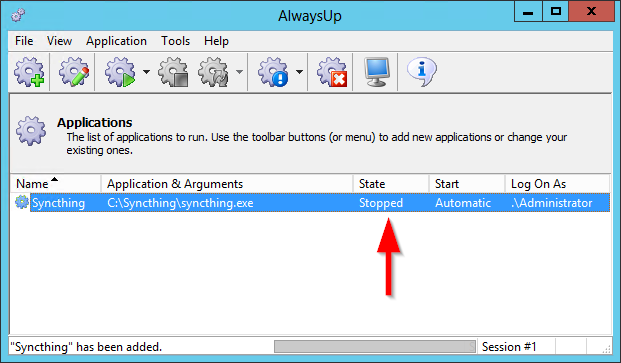
Click the Save button. In a couple of seconds, an entry called Syncthing will show up in the AlwaysUp window. It is not yet running though.
And now that we are ready to start Syncthing as a windows service, let’s configure the software to avoid launching the browser when it starts (since you won’t be able to see it any more). To do so:
Open the web GUI in your browser (probably at http://127.0.0.1:8080/)
Click the gear at the top right and select Settings from the menu that appears:
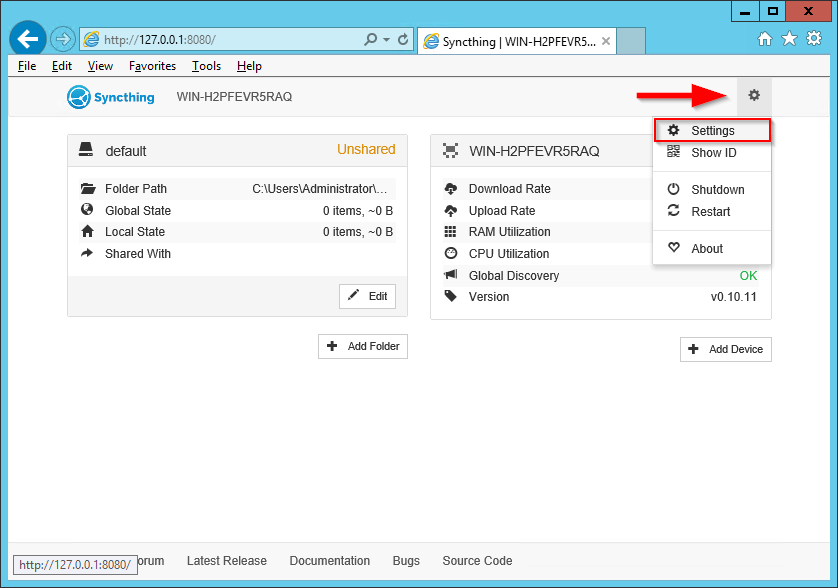
Uncheck the Start Browser box:

Save your settings
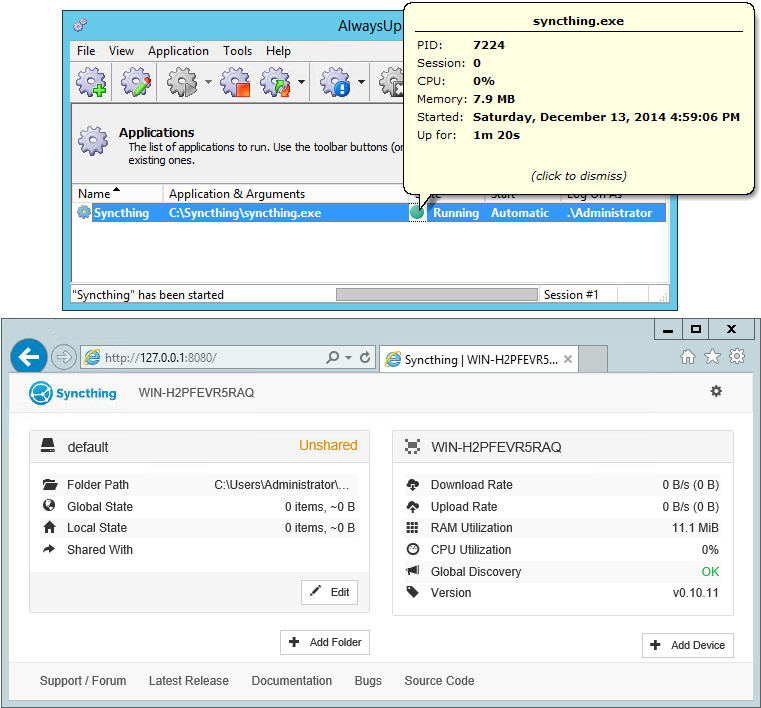
To start Syncthing from AlwaysUp, choose Application > Start «Syncthing». After a few seconds, the state should transition to Running and Syncthing will be working in the background. Open your browser and confirm that things work as expected:
That’s it! Next time your computer boots, Syncthing will start up immediately, before anyone logs on. We encourage you to edit Syncthing in AlwaysUp and check out the many other settings that may be appropriate for your environment.
For example, to completely hide Syncthing’s console (and prevent the annoying Interactive Services Detection window from winking at you constantly), return to the Logon tab and check the When the user logs on, don’t show the application’s windows and tray icons box at the bottom.
Syncthing
Synopsis
Description
Syncthing lets you synchronize your files bidirectionally across multiple devices. This means the creation, modification or deletion of files on one machine will automatically be replicated to your other devices. We believe your data is your data alone and you deserve to choose where it is stored. Therefore Syncthing does not upload your data to the cloud but exchanges your data across your machines as soon as they are online at the same time.
Options
Write events to timestamped file audit-YYYYMMDD-HHMMSS.log .
Use specified file or stream ( «-» for stdout, «—» for stderr) for audit events, rather than the timestamped default file name.
Open the web UI in a browser for an already running Syncthing instance.
Print device ID to command line.
Generate key and config in specified dir, then exit.
Override GUI listen address. Set this to an address ( 0.0.0.0:8384 ) or file path ( /var/run/st.sock , for UNIX sockets).
Set common configuration and data directory. The default configuration directory is $HOME/.config/syncthing (Unix-like), $HOME/Library/Application Support/Syncthing (Mac) and %LOCALAPPDATA%\Syncthing (Windows).
Set configuration directory. Alternative to -home and must be used together with -data .
Set data (e.g. database) directory. Alternative to -home and must be used together with -config .
Set destination filename for logging (use «-» for stdout, which is the default option).
Select information in log line prefix. The -logflags value is a sum of the following:
4: Microsecond time
8: Long filename
16: Short filename
To prefix each log line with date and time, set -logflags=3 (1 + 2 from above). The value 0 is used to disable all of the above. The default is to show time only (2).
Do not start a browser.
Hide the console window. (On Windows only)
Do not restart Syncthing when it exits. The monitor process will still run to handle crashes and writing to logfiles (if configured to).
Print the paths used for configuration, keys, database, GUI overrides, default sync folder and the log file.
Start with all devices and folders paused.
Reset the database, forcing a full rescan and resync. Create .stfolder folders in each sync folder if they do not already exist. Caution: Ensure that all sync folders which are mountpoints are already mounted. Inconsistent versions may result if the mountpoint is later mounted and contains older versions.
Reset delta index IDs, forcing a full index exchange.
Start with all devices and folders unpaused.
Check for available upgrade.
Force upgrade directly from specified URL.
Print verbose log output.
Exit Codes
Upgrade not available
Exit codes over 125 are usually returned by the shell/binary loader/default signal handler. Exit codes over 128+N on Unix usually represent the signal which caused the process to exit. For example, 128 + 9 (SIGKILL) = 137 .
Proxies
Syncthing can use a SOCKS, HTTP, or HTTPS proxy to talk to the outside world. The proxy is used for outgoing connections only — it is not possible to accept incoming connections through the proxy. The proxy is configured through the environment variable all_proxy . Somewhat unusually, this variable must be named in lower case — it is not “ ALL_PROXY ”. For example:
Development Settings
The following environment variables modify Syncthing’s behavior in ways that are mostly useful for developers. Use with care. If you start Syncthing from within service managers like systemd or supervisor, path expansion may not be supported.
Used to increase the debugging verbosity in specific or all facilities, generally mapping to a Go package. Enabling any of these also enables microsecond timestamps, file names plus line numbers. Enter a comma-separated string of facilities to trace. syncthing -help always outputs an up-to-date list. The valid facility strings are:
Main and operational facilities: config
Configuration loading and saving.
The database layer.
The root hub; the largest chunk of the system. File pulling, index transmission and requests for chunks.
File change detection and hashing.
Networking facilities: beacon
Multicast and broadcast UDP discovery packets: Selected interfaces and addresses.
Remote device discovery requests, replies and registration of devices.
NAT discovery and port mapping.
NAT-PMP discovery and port mapping.
The BEP protocol.
Relay interaction ( strelaysrv ).
UPnP discovery and port mapping.
Other facilities: fs
Event generation and logging.
SHA256 hashing package (this facility currently unused).
Persistent device and folder statistics.
Mutexes. Used for debugging race conditions and deadlocks.
Filesystem access while walking.
All of the above.
Write block profiles to block-$pid-$timestamp.pprof every 20 seconds.
Write a CPU profile to cpu-$pid.pprof on exit.
Used for debugging internal deadlocks; sets debug sensitivity. Use only under direction of a developer.
Used for debugging internal deadlocks; sets debug sensitivity. Use only under direction of a developer.
Directory to load GUI assets from. Overrides compiled in assets. Useful for developing webgui, commonly use STGUIASSETS=gui bin/syncthing .
Specify which hashing package to use. Defaults to automatic based on performance. Specify “minio” (compatibility) or “standard” for the default Go implementation.
Write heap profiles to heap-$pid-$timestamp.pprof each time heap usage increases.
Don’t create a default folder when starting for the first time. This variable will be ignored anytime after the first run.
Equivalent to the -no-restart flag
Disable automatic upgrades.
Set to a listen address such as “127.0.0.1:9090” to start the profiler with HTTP access, which then can be reached at http://localhost:9090/debug/pprof. See go tool pprof for more information.
Write running performance statistics to perf-$pid.csv . Not supported on Windows.
Time before folder statistics (file, dir, … counts) are recalculated from scratch. The given duration must be parseable by Go’s time.ParseDuration. If missing or not parseable, the default value of 1 month is used. To force recalculation on every startup, set it to 1s .
Set the maximum number of CPU cores to use. Defaults to all available CPU cores.
Percentage of heap growth at which to trigger GC. Default is 100. Lower numbers keep peak memory usage down, at the price of CPU usage (i.e. performance).
See Also
syncthing-config(5), syncthing-stignore(5), syncthing-device-ids(7), syncthing-security(7), syncthing-networking(7), syncthing-versioning(7), syncthing-faq(7)
Getting Started
For this guide let’s assume you have two machines between which you want to synchronise files. In keeping with Syncthing terminology they are going to be called “devices” in the rest of the documentation. The “local device” is the one you are configuring, viewing status for, etc., while the “remote device” is the other machine.
The best way to follow this guide is to do the install on both machines and configure them in parallel. If both machines aren’t accessible simultaneously that’s fine, the results will just be a little less immediately obvious.
A film version of this transcript is available on YouTube (contributed by @theincogtion). This video shows how to install Syncthing on Ubuntu/Debian/Mint using PPA, also available in German. This video shows how to install Syncthing on Windows, also available in German.
Installing
We suggest you have a look at the Community Contributions which let you pick a flavor of Syncthing that best fits your scenario. For example, if you are interested in a cross-platform GUI application you can check out Syncthing-GTK. The community has also developed Windows, Android and many more specific flavors that help you run Syncthing on your devices. Currently all community flavors run the same Syncthing core underneath, so don’t worry about changing your flavor at a later point in time. The remainder of this page will explain how to set up two devices with the core Syncthing flavor.
Syncthing
Grab the latest release of Syncthing for your operating system and unpack it (if you use Debian/Ubuntu you may want to use Debian repository). There will be a binary called syncthing (or syncthing.exe on Windows). Start this in whatever way you are most comfortable with; double-clicking should work in any graphical environment, but I’ll use the command line to better illustrate what happens. At first start Syncthing will generate a configuration file, some keys and then start the admin GUI in your browser. Something like the following will be printed in the command line:
At this point Syncthing will also have set up a folder called Default Folder for you, in a directory called Sync in your home directory. You can use this as a starting point, then remove it or add more folders later.
Configuring
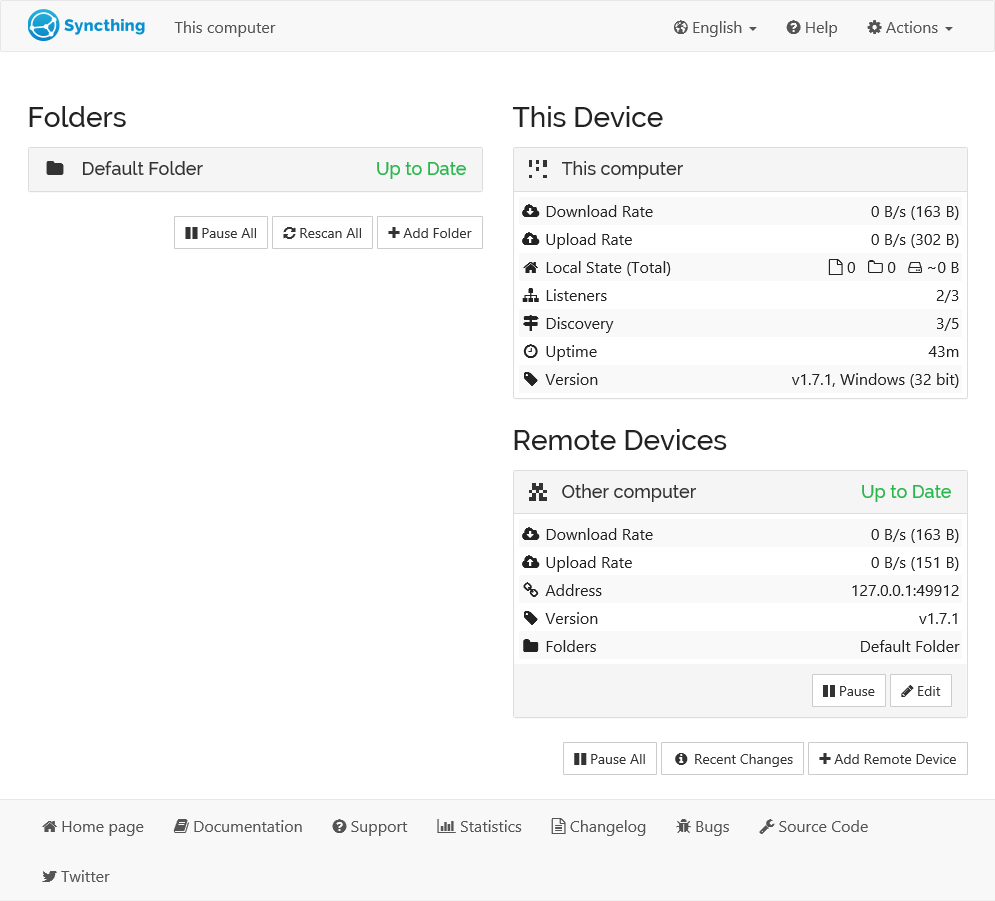
The admin GUI starts automatically and remains available on http://localhost:8384/ . Cookies are essential to the correct functioning of the GUI; please ensure your browser accepts them. It should look something like this:
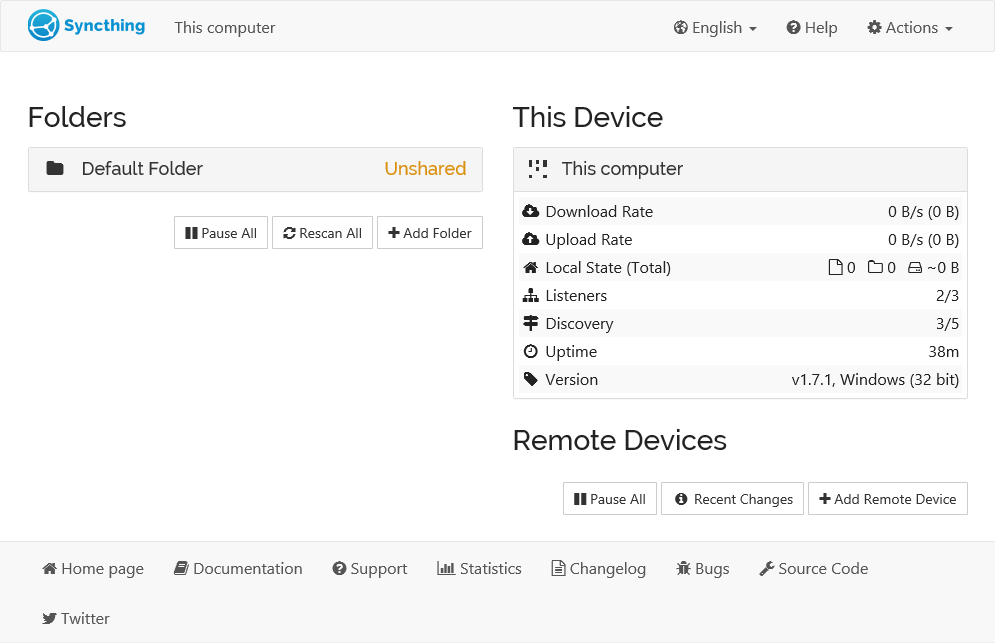
On the left is the list of “folders”, or directories to synchronize. You can see the Default Folder was created for you, and it’s currently marked “Unshared” since it’s not yet shared with any other device. On the right is the list of devices. Currently there is only one device: the computer you are running this on.
For Syncthing to be able to synchronize files with another device, it must be told about that device. This is accomplished by exchanging “device IDs”. A device ID is a unique, cryptographically-secure identifier that is generated as part of the key generation the first time you start Syncthing. It is printed in the log above, and you can see it in the web GUI by selecting “Actions” (top right) and “Show ID”.
Two devices will only connect and talk to each other if they are both configured with each other’s device ID. Since the configuration must be mutual for a connection to happen, device IDs don’t need to be kept secret. They are essentially part of the public key.
To get your two devices to talk to each other click “Add Remote Device” at the bottom right on both, and enter the device ID of the other side. You should also select the folder(s) that you want to share. The device name is optional and purely cosmetic. It can be changed later if required.
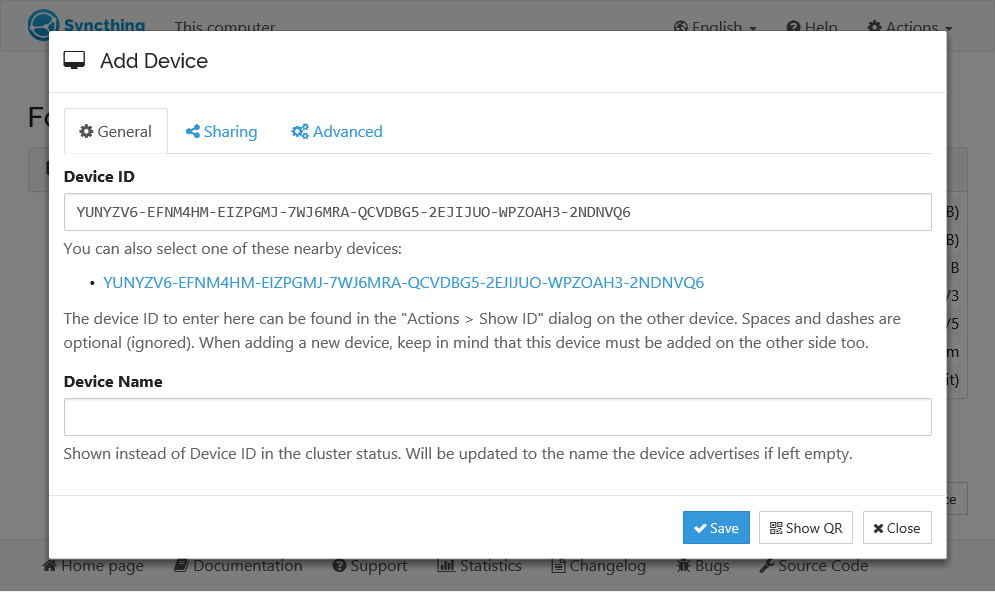
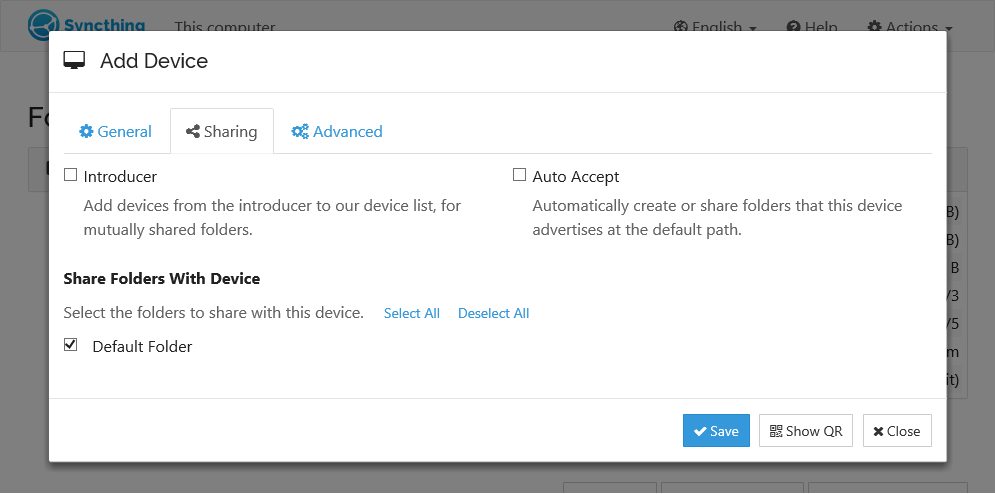
Once you click “Save” the new device will appear on right side of the GUI (although disconnected) and then connect to the new device after a minute or so. Remember to repeat this step for the other device.
At this point the two devices share an empty directory. Adding files to the shared directory on either device will synchronize those files to the other side.
If you are using a Syncthing flavor that adds OS specific functionality (e.g. the Android app), you may need to access the Web GUI to enable syncing folders, and other configuration options.
Good luck and have fun! There is more documentation and if you run into trouble feel free to post a question in the support forum. If you have problems getting devices to connect, first take a look at Firewall Setup , then look at any error messages in the GUI or on the console. Don’t forget that configuration changes will not be reflected instantly — give Syncthing a little time, especially after a restart.


