- CopyProfile
- Values
- Valid configuration passes
- Parent hierarchy
- Applies to
- XML example
- Customize the default user profile by using CopyProfile
- Create an answer file that includes the CopyProfile setting
- Configure the default user profile settings
- Test the user profile customizations
- Troubleshooting CopyProfile
- Sysprep – штатная утилита адаптации Windows к новому железу
- Что такое Sysprep
- Области использования
- Запуск утилиты
- Отвязка от комплектующих
- Режим аудита
- Решение проблем с запуском Sysprep
CopyProfile
CopyProfile enables you to customize a user profile and use the customized profile as the default user profile. Windows uses the default user profile as a template to assign a profile to each new user.
CopyProfile runs during the specialize configuration pass. It should be used after customize the built-in administrator profile. Using the CopyProfile setting often requires that you use a separate answer file you generalize a computer by running sysprep.
Be aware of the following considerations when you use CopyProfile :
On the reference computer, use only the built-in administrator account. Creating multiple accounts might cause you to copy the wrong user profile as the default profile.
Do not use a domain account. This is because the CopyProfile setting runs after the computer is removed from the domain during sysprep. Therefore, settings that are configured in a domain account will be lost. If you make changes to the default user profile, and then join the computer to a domain, the customizations that you made to the default user profile will appear on new domain accounts.
Be aware that some customizations to the default user profile are not copied, such as items that are pinned to the task bar. Some settings are reset by the new user logon process. To configure these user settings, use Group Policy settings or create scripts to define them.
Some user profile settings, including the Default Apps settings, are encrypted by using a hash that is specific to the user. If you copy these settings to another user profile, Windows treats them as invalid and resets them the first time that the user signs in. Windows does not support using CopyProfile to copy these settings.
Serious problems might occur if you modify the registry incorrectly. Before you modify it, back up the registry for restoration in case problems occur.
After you run CopyProfile , you must delete some registry entries from the default user to prevent reset issues. Here’s how to procced:
Locate and select this subtree:
HKEY_USERS
On the File menu, select Load Hive.
The default user hive isn’t present by default. It must be loaded, edited, and then unloaded manually.
Type C:\Users\Default\NTUSER.DAT in the File name box and select Open.
In the Load Hive dialog box, type a temporary name in the Key Name box and press Enter.
Delete these registry entries:
- HKEY_USERS\ \Software\Microsoft\Windows\Shell\Associations\FileAssociationsUpdateVersion
- HKEY_USERS\ \Software\Microsoft\Windows\Shell\Associations\UrlAssociations
- HKEY_USERS\ \Software\Microsoft\Windows\CurrentVersion\Explorer\FileExts
These registry entries are present only after running CopyProfile .
Go to HKEY_USERS\ .
On the File menu, select UnLoad Hive.
Close Registry Editor.
Now Windows will load the usual Default Applications settings from the oemdefaultassociations.xml file when a user signs in to Windows for the first time.
For more information about how to use CopyProfile , see Customize the Default User Profile by Using CopyProfile.
Values
| Value | Description |
|---|---|
| True | Changes the default user profile to include customized settings. Set this value to True only if you have made user profile customizations that you have to apply to all new users. |
| False | Does not change the default user profile. This is the default value. |
Valid configuration passes
Parent hierarchy
Applies to
For a list of the Windows editions and architectures that this component supports, see Microsoft-Windows-Shell-Setup.
XML example
The following XML output specifies that Sysprep copies the customized user profile settings from the built-in administrator account to the default user profile.
Customize the default user profile by using CopyProfile
Windows uses the default user profile as a template to assign a profile to each new user. By customizing the default user profile, you can configure settings for all user accounts that are created on the computer.
You can use the CopyProfile setting to customize a user profile and then copy that profile to the default user profile. By using CopyProfile , you can customize installed applications, drivers, desktop backgrounds, Internet Explorer settings, and other configurations. Be aware that some settings are not preserved by using CopyProfile .
Using CopyProfile to customize the Start menu isn’t supported. Instead, you can use the following methods to manage custom Start layouts in Windows 10:
- OEMs can use layoutmodification.xml . For more information, see Customize the Start layout.
- IT pros can use the following resources learn about how to manage the Windows 10 Start menu:
- Customize Windows 10 Start and taskbar with Group Policy
- Windows 10 Start Layout Customization
Some user profile settings, including Default Apps, are encrypted by using a hash that is specific to the user. If you copy these settings to another user profile, Windows treats them as invalid and resets them the first time that the user signs in. Windows does not support using CopyProfile to copy these settings.
Serious problems might occur if you modify the registry incorrectly. Before you modify it, back up the registry for restoration in case problems occur.
After you run CopyProfile , you must delete some registry entries from the default user to prevent reset issues. Here’s how to procced:
Locate and select this subtree:
HKEY_USERS
On the File menu, select Load Hive.
The default user hive isn’t present by default. It must be loaded, edited, and then unloaded manually.
Type C:\Users\Default\NTUSER.DAT in the File name box and select Open.
In the Load Hive dialog box, type a temporary name in the Key Name box and press Enter.
Delete these registry entries:
- HKEY_USERS\ \Software\Microsoft\Windows\Shell\Associations\FileAssociationsUpdateVersion
- HKEY_USERS\ \Software\Microsoft\Windows\Shell\Associations\UrlAssociations
- HKEY_USERS\ \Software\Microsoft\Windows\CurrentVersion\Explorer\FileExts
These registry entries are present only after running CopyProfile .
Go to HKEY_USERS\ .
On the File menu, select UnLoad Hive.
Close Registry Editor.
Now Windows will load the usual Default Applications settings from the oemdefaultassociations.xml file when a user signs in to Windows for the first time.
Create an answer file that includes the CopyProfile setting
In Windows SIM, create an answer file that has amd64_Microsoft-Windows-Shell-Setup_neutral\ added to Pass 4 — Specialize, and set CopyProfile to True . Save this answer file as copyprofile.xml . You’ll use this answer file when you run Sysprep.
Configure the default user profile settings
Configure user settings in audit mode, and then generalize the Windows installation by using an answer file that has CopyProfile set to True . If you install Windows by using another answer file, make sure that answer file doesn’t have CopyProfile or any settings that create additional user accounts.
Install Windows on a reference computer and start the computer in audit mode. For more information, see Boot Windows to Audit Mode or OOBE.
Don’t use a domain account to start the computer. This is because the CopyProfile setting runs after the computer is removed from the domain when you run Sysprep. Therefore, you’ll lose any settings that you configured in a domain. If you change the default user profile and then join the computer to a domain, the customizations that you made to the default user profile appear on new domain accounts.
Customize the built-in administrator account by installing applications, desktop shortcuts, and other settings.
The number of provisioned Windows runtime-based apps that you can install is limited. However, you can create scripts to install additional non-provisioned apps. For more information, see Sideload Apps with DISM.
After you complete the customizations, insert the media that contains the CopyProfile answer file in the reference computer. For example, you can copy the answer file to a USB drive.
On the reference computer, open an elevated command prompt, and then type this command:
In this command, F is the letter of the USB flash drive or other removable media. The Sysprep tool removes computer-specific information from the image, while it preserves the user profile settings that you configured. For more information, see Sysprep (Generalize) a Windows installation.
After you generalize the image and the computer shuts down, capture the image. To do this, start the computer in the WindowsВ PE environment. Use DISM to capture and then deploy the Windows installation. For more information, see Create bootable WinPE media and Capture and apply a Windows image using a single .WIM file.
Test the user profile customizations
After you deploy the customized image to a destination computer, you can use that computer to test the user profile customizations. You can go through Out-Of-Box Experience (OOBE) to test the user experience, or you can test the user customizations in audit mode.
Apps that are based on the Windows runtime won’t start in audit mode because audit mode uses the built-in administrator account. To run Windows runtime-based apps in audit mode, you must modify a registry entry.
To test the user profile customizations after OOBE
Install Windows to a test computer.
After Windows installs, go through OOBE and specify the computer name, user account name, and other items. After you complete OOBE, the Windows start screen appears.
Sign in to the computer by using the user account that was specified during OOBE, and verify that your apps and customizations appear.
To test the user profile customizations in audit mode
Start the computer in audit mode by using an answer file or by pressing Ctrl+Shift+F3 when OOBE starts. For more information, see Boot Windows to Audit Mode or OOBE.
Verify that your customizations work as intended. To test Windows Runtime-based apps, modify the registry as follows:
From an elevated command prompt, run Regedit.exe.
Browse to the following registry entry: HKEY_LOCAL_MACHINE\SOFTWARE\Microsoft\Windows\CurrentVersion\Policies\System\FilterAdministratorToken
Select FilterAdministrationToken, and then type 1 as the value data.
Sign off from the computer.
Sign back on to the computer, and start the Windows runtime-based apps to verify that your customizations work as intended.
After you validate your Windows runtime-based apps, reset the FilterAdministrationToken registry entry to 0.
Troubleshooting CopyProfile
If the user profile settings aren’t successfully copied, follow these steps:
Make sure that you set the CopyProfile setting only one time during the deployment process.
When you customize user settings, use only the built-in administrator account on the computer to avoid accidentally copying settings from the wrong profile.
Verify that you didn’t use a domain account.
Verify that there are no additional user accounts other than the built-in administrator account that you configured. To do this, follow these steps:
Select Start, and then type Control Panel.
Select Control Panel > Add or remove user accounts.
Select any additional user account other than the built-in administrator account that you configured, and then delete that account.
Delete all other user accounts on the computer before you customize the built-in administrator account.
To preserve the tile layout on the Start screen for non-provisioned Windows runtime-based apps that register after the user signs in, make sure that the apps install within two hours of the user signing in.
Some settings can be configured only by using the CopyProfile unattend setting, and other settings can be configured by using Group Policy. To do this, use either of the following methods:
Use Group Policy to configure settings that are reset by the new user signin process. You can also create scripts to define these user settings.
Use the CopyProfile unattend setting. For more information, see Unattended Windows Setup Reference.
Sysprep – штатная утилита адаптации Windows к новому железу

Sysprep – это штатный инструмент развёртывания Windows, утилита, предназначенная преимущественно для OEM-производителей и корпоративных IT-специалистов. Используется для подготовки брендовых и, соответственно, корпоративных сборок Windows. OEM-сборщики и IT-специалисты на компьютере или виртуальной машине подготавливают эталонный образ Виндовс: в установленную из официального дистрибутива систему внедряют обновления.
А также корпоративный, брендовый или партнёрский софт, удаляют или отключают встроенный в систему функционал, проводят нужные системные настройки. Затем уже настроенную систему отвязывают от комплектующих того компьютерного устройства, на котором проводилась работа, убирают идентифицирующие данные. И, наконец, запаковывают всё это в образ для развёртывания на конечных устройствах пользователей или сотрудников компании. Это может быть либо установочный ISO -файл, либо резервная копия. В этой цепочке действий Sysprep играет роль механизма отвязки от железа и идентифицирующих данных. В каких случаях эта утилита может пригодиться обычному пользователю, как она работает, какие у неё есть ограничения, и как с ними справиться – об этом всём ниже.
Что такое Sysprep
Утилита Sysprep удаляет драйверы комплектующих, обнуляет SID , чистит системный журнал событий и папки «Temp» , сбрасывает активацию (до трёх раз) , уничтожает точки восстановления. В общем, заботится о том, чтобы при новом запуске мы получили чистую операционную систему, только с определёнными предустановками.
Области использования
Создание эталонных образов модифицированных сборок Виндовс для развёртывания на множестве клиентских компьютеров – главная задача Sysprep. Но утилиту также могут использовать обычные пользователи на своих домашних устройствах. К её помощи можно прибегнуть в случае нестабильной работы Windows после замены комплектующих. А ещё лучше – применить её перед тем, как менять эти комплектующие.
Sysprep – это ещё и инструмент, с помощью которого можно перенести рабочую систему на другое компьютерное устройство с отличными комплектующими. Бэкап-софт профессионального уровня для таких случаев предусматривает функции типа Universal Restore , Adaptive Restore и т.п. Эти функции делают, по сути, то же, что и Sysprep, только на этапе восстановления. Благодаря чему в эталонный образ можно превратить любой старый бэкап Windows. Но такого рода функции редко когда встретишь на борту бесплатных бэкаперов. К примеру, они есть на борту изначально платного ПО от Acronis и Paragon , а также поставляются только в платных редакциях ПО от AOMEI и EaseUS . Если Windows отвязать от комплектующих с помощью Sysprep, её можно перенести на другой компьютер с использованием загрузочных носителей бесплатных бэкаперов, например, от тех же разработчиков AOMEI и EaseUS.
Запуск утилиты
Запуск Sysprep проще всего осуществить с помощью команды Win + R .
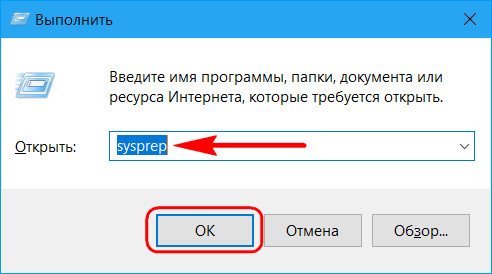
Таким образом в проводнике получим непосредственный доступ к файлу её запуска.

Отвязка от комплектующих
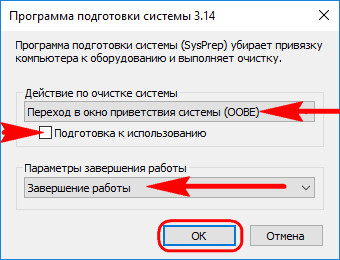
Чтобы отвязать Windows от текущих комплектующих перед их заменой или созданием бэкапа системы для переноса на другое устройство, используем «Переход в окно OOBE» и выбираем завершение работы.
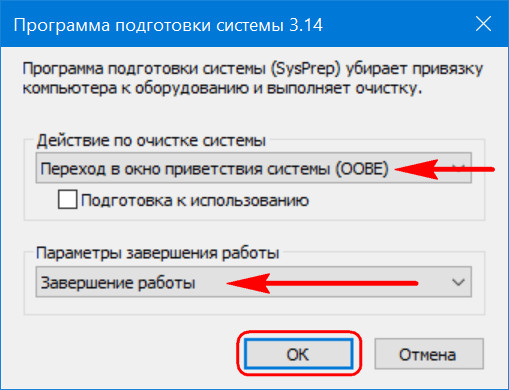
При таком раскладе утилита осуществит только сброс драйверов комплектующих. Если же выставить галочку опции «Подготовка к использованию», будет проведён ряд мероприятий для передачи системы новому пользователю — чистка системного журнала и временных файлов, удаление точек восстановления, обнуление SID , сброс активации и т.п.
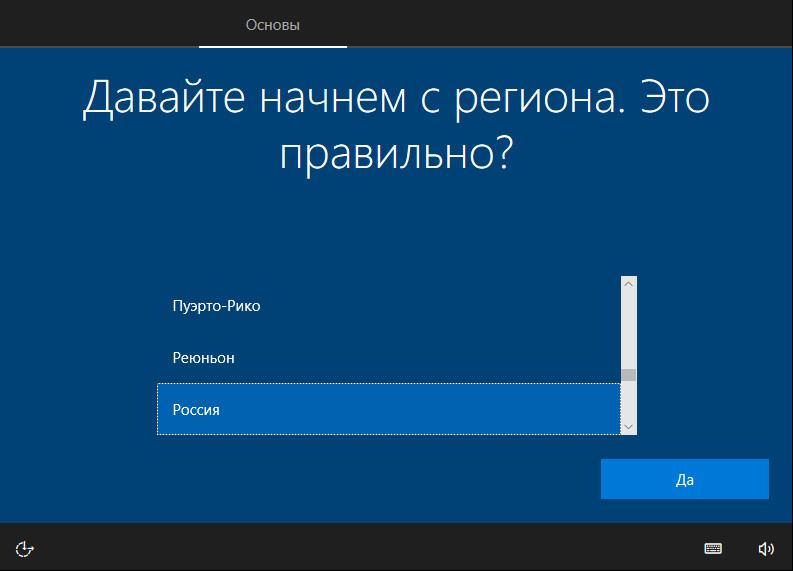
Утилита выполнит свою работу, и компьютер выключится. Далее можно приступать к тем или иным действиям – менять комплектующие, бэкапить систему с загрузочного носителя. С новым включением – как на исходном устройстве, так и на том, куда система переносилась с помощью восстановления из бэкапа – сначала будем лицезреть, как устанавливаются драйверы на новые комплектующие, а затем попадём в окно OOBE . Окно OOBE — это не что иное, как экран приветствия системы, который мы обычно видим на завершающем этапе установки Windows, где нужно указать региональные данные и создать свою учётную запись.
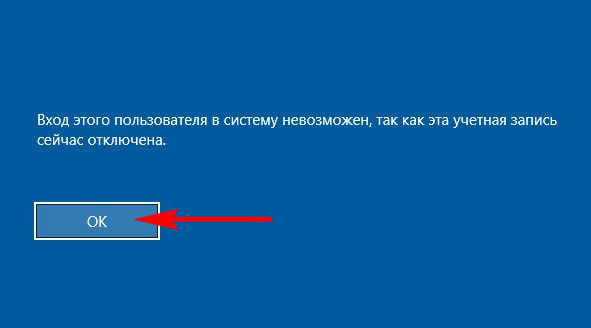
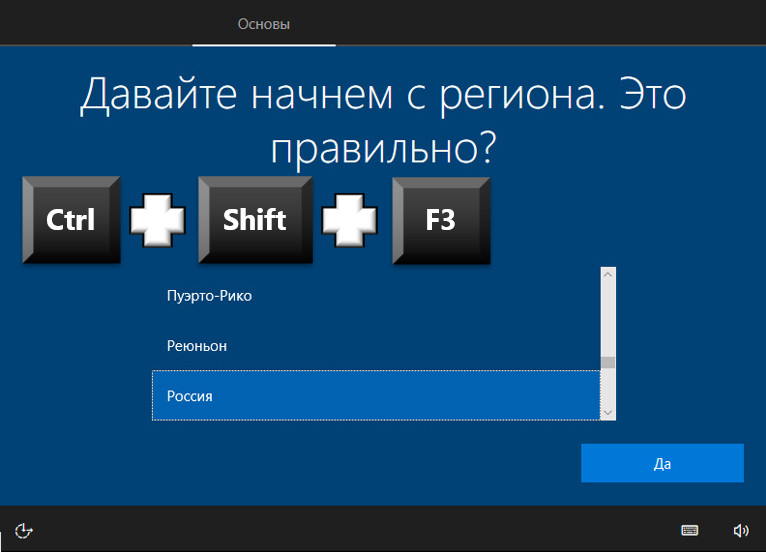
И поскольку при замене комплектующих или восстановлении Windows на других компьютерах в создании новой учётной записи нужды нет, спокойно можем сбросить этот процесс клавишами Ctrl + Shift + F3 . Это клавиши входа в скрытую учётную запись администратора. Система попробует подгрузить её, но в доступе откажет. Жмём «Ок».
И после перезапуска увидим привычный экран блокировки со всеми существующими учётными записями.
Режим аудита
Режим аудита предоставляет возможность получить доступ к среде Виндовс без создания учётной записи конкретного пользователя, в режиме упомянутой учётной записи администратора.

В этом режиме, собственно, и проводится OEM-производителями и IT-специалистами компаний настройка эталонного образа системы с нужными драйверами, параметрами и внедрённым софтом. Первичный вход в режим аудита выполняется на этапе установки Windows — той, что впоследствии должна стать эталонным образом, и на которой не должно существовать никаких пользовательских учётных записей и идентифицирующих данных. После этапа подготовки устройств попадём на завершающий этап установки системы, начинающийся с задания региональных настроек. И здесь жмём клавиши Ctrl + Shift + F3 .
После перезагрузки попадём в режим аудита. Последний загружается с по умолчанию запущенным окном Sysprep для удобства. Вот, собственно, в таком режиме и можно приступать к модификации Windows. Если в процессе внесения правок в систему, например, при установке определённого софта потребуется перезагрузка, всё, что нужно сделать – это закрыть окно утилиты. И осуществить перезагрузку привычным образом. После перезагрузки система вновь запустится в режиме аудита. Завершается работа в этом режиме так, как было рассмотрено в предыдущем пункте статьи – выбором в окне Sysprep экрана OOBE . И обычно с применением опции подготовки к использованию.
Эталонную модифицированную Windows обычно делают с чистой, только что установленной системы. Но возможен вариант создания эталона на базе наработанной системы. Для этого внутри рабочей Виндовс необходимо запустить Sysprep и выбрать в её окне переход в режим аудита. Завершающий работу параметр — перезагрузка.
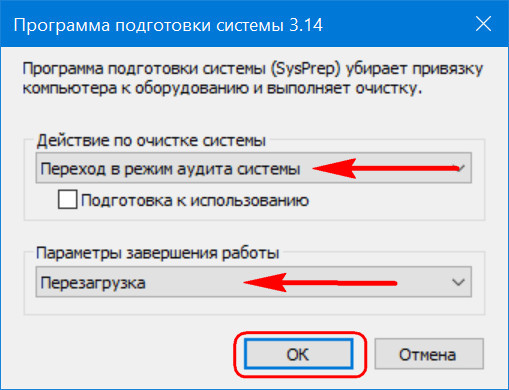
Войдя в режим аудита, можем удалить учётные записи тех пользователей, которые доселе работали с системой, донастроить что нужно, а затем выполнить отвязку от комплектующих (и при необходимости от идентифицирующих данных) с переходом в окно OOBE .
Вот только не с каждой рабочей системы удастся сделать эталонный образ. У этого механизма есть свои ограничения.
Решение проблем с запуском Sysprep
Sysprep, увы, не сработает, если Windows была не установлена начисто, а обновлена с предыдущей версии, клонирована или восстановлена из бэкапа, созданного на другом железе. В таких случаях при запуске утилиты обычно получим такое вот уведомление.
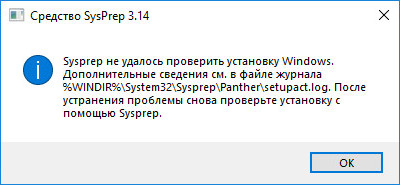
В таком случае можно кое-что предпринять, правда, без гарантированного успеха во всех 100% случаев.
Создаём бэкап системы или хотя бы запасаемся точкой восстановления, поскольку далее будем работать с системным реестром.
HKEY_LOCAL_MACHINE\SYSTEM\Setup
Если система обновлялась с предыдущей версии, в первую очередь в самом каталоге «Setup» удаляем параметр «Upgrade» .
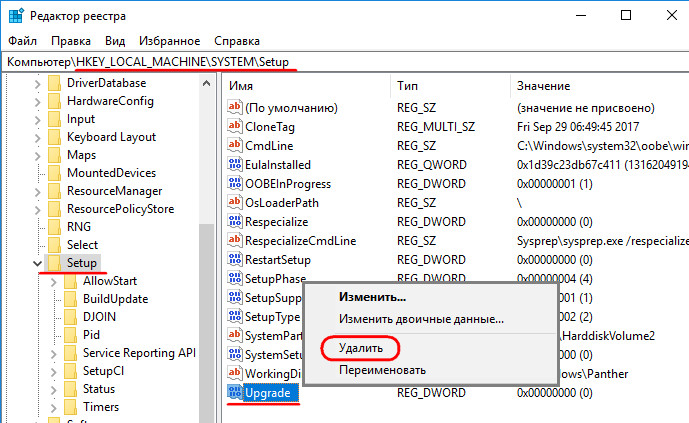
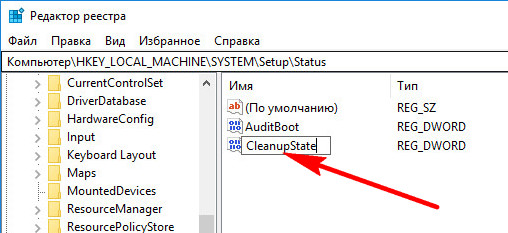
Затем раскрываем каталог «Setup», кликаем подкаталог «Status», здесь нам нужен параметр «CleanupState». Устанавливаем его значение 7.
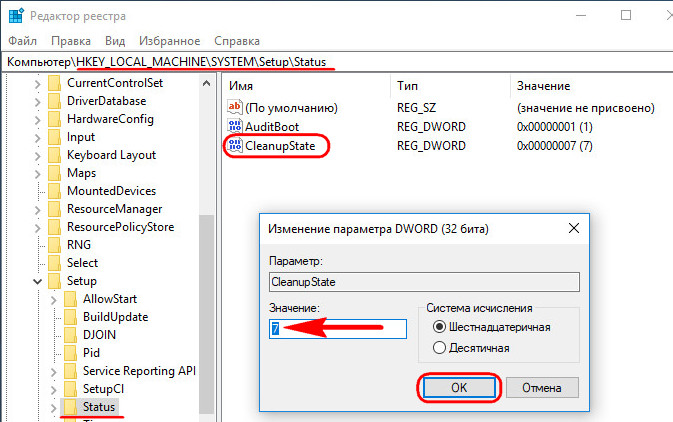
Если такого параметра нет, создаём его. В контекстном меню окна реестра жмём «Создать», затем – «Параметр DWORD (32 бита)».

Даём имя параметру «CleanupState».
Устанавливаем его значение 7. После перезагрузки снова пробуем запустить Sysprep.


