- About System Information on your Mac
- Получение информации о системе Вашего компьютера Mac
- Просмотр отчета о системе
- Печать, сохранение или отправка отчета о системе
- Просмотр сведений о системе в приложении «Об этом Mac»
- Использование профилей конфигурации для стандартизации настроек Mac
- Установка профилей конфигурации
- Просмотр установленного профиля конфигурации
- Удаление профиля конфигурации с компьютера Mac
- macOS System Configuration Guide
- Introduction
- 0. Environment Tools
- 1. Enable Apache
- 2. Enable and Configure PHP
- Enable PHP for Apache
- Customize the PHP .ini File
- 3. Install MySQL
- Install MySQL and Friends
- Configure the Path
- Connect PHP and MySQL
- MySQL Security
- 4. Create VirtualHosts for Friendly URLs
- Create the VirtualHosts File
- Enable Your New Domain
- Set the Permissions on the Projects Folder
- 5. Install PHPMyAdmin
- 6. Install MongoDB
- 7. Install CouchDB
- 8. Install Redis
- 9. Install PHP Extensions
- Dependencies
- Mongo PHP Extension
- Redis PHP Extension
- 10. Install Related Software
- Composer
- Bower
- Phalcon
- 11. Configurations after a macOS update
- Re-install XCode Developer Tools
- Update MacPorts (if necessary)
- Adding back your Apache configurations
- Adding PHP extensions back
- Conclusion
- Apache/PHP
- MySQL
About System Information on your Mac
Use the System Information app to see a summary of information about your Mac hardware, software, and network.
The System Information app provides detailed specifications and other information about your Mac hardware and software, including your network and external devices. In some versions of OS X, this app is called System Profiler.
Choose Apple menu > About This Mac. This opens an overview of your Mac, including your Mac model, processor, memory, serial number, and version of macOS. To see the greater detail provided by the System Information app, click the System Report button.

To open System Information directly, press and hold the Option key and choose Apple menu > System Information. You can also use Spotlight to find System Information, or open it from the Utilities folder of your Applications folder.
System Information opens to a system report for your Mac:
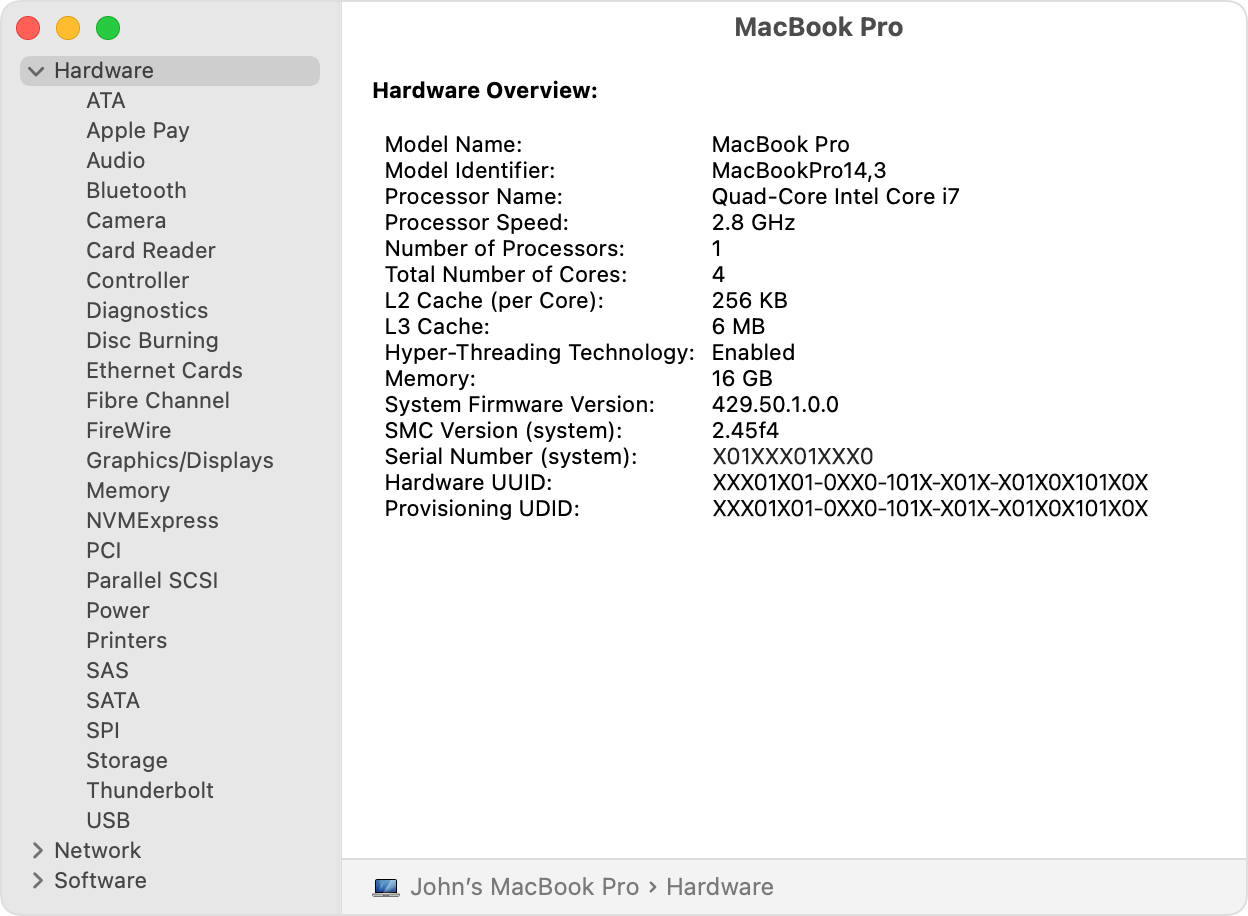
Select items in the sidebar to see information about each item. For example:
- The Hardware section shows your Mac serial number
- The Memory section shows how much RAM is installed in each internal memory slot.
- The Software section shows which startup disk (boot volume) your Mac is using.
- The Network section shows details such as your IP address, the connections allowed by your macOS firewall, the signal strength of nearby Wi-Fi networks, and more.
Источник
Получение информации о системе Вашего компьютера Mac

В приложении «Информация о системе» Вы увидите отчет о системе, содержащий подробную информацию о Вашем компьютере Mac, включая следующее.
Оборудование, которое установлено или подключено к нему.
Сетевые подключения компьютера, включая активные службы, их IP-адреса, а также тип и скорость сетевого подключения.
Программное обеспечение компьютера, включая операционную систему, приложения и количество ядер. (Можно просмотреть версии, даты изменения и местонахождение каждого элемента программного обеспечения.)
Спросите Siri. Произнесите, например: «Открой Информацию о системе». Узнайте, как спросить Siri.
Просмотр отчета о системе
Чтобы открыть отчет о системе, выберите меню Apple

> «Об этом Mac», затем нажмите «Отчет о системе».
Совет. Либо нажмите клавишу Option, и, удерживая ее, выберите меню Apple
> «Информация о системе».
Чтобы изменить внешний вид отчета, выполните одно из следующих действий.
Просмотр подробного отчета. Выберите меню «Файл» > «Показать больше информации». Размер файла отчета может достигать нескольких мегабайт.
Просмотр краткого отчета. Выберите меню «Файл» > «Показать меньше информации». Отчет будет включать большую часть информации об оборудовании и сети, но информация о программном обеспечении будет в нем отсутствовать.
Печать, сохранение или отправка отчета о системе
Чтобы открыть отчет о системе, выберите меню Apple
> «Об этом Mac», затем нажмите «Отчет о системе».
Выполните одно из следующих действий:
Печать отчета о системе. Выберите команду меню «Файл» > «Напечатать».
Сохранение отчета о системе. Выберите «Файл» > «Сохранить», введите имя файла и выберите местоположение для сохранения отчета.
Отправка отчета в компанию Apple. Выберите «Файл» > «Отправить в Apple». Если Вы позвоните в Службу поддержки Apple, то можете предоставить специалисту копию данных о конфигурации системы.
Просмотр сведений о системе в приложении «Об этом Mac»
Вы можете просмотреть информацию о своем компьютере Mac, включая название модели, используемую версию системы macOS и другие сведения.
Чтобы открыть раздел «Об этом Mac», выберите меню Apple
Нажмите любой из следующих пунктов.
Общие сведения. Просмотрите спецификацию компьютера Mac.
Мониторы. Получите сведения о мониторах, подключенных к Вашему Mac.
Накопители. Узнайте, какой объем накопителей задействован на Вашем устройстве и какие типы файлов на нем хранятся. См. раздел Просмотр сведений о доступном пространстве на диске.
Память. Узнайте, какой объем памяти установлен на Вашем Mac и сколько слотов доступно для расширения памяти. (Для некоторых моделей Mac панель «Память» может отсутствовать.)
Поддержка. Получите доступ к ресурсам поддержки программного обеспечения macOS и оборудования Mac.
Сервис. Узнайте о вариантах обслуживания, технической поддержки и ремонта для Вашего Mac.
С помощью приложения «Мониторинг системы» можно получить информацию о памяти компьютера.
Источник
Использование профилей конфигурации для стандартизации настроек Mac
Профили конфигурации позволяют стандартизировать настройки компьютеров Mac. Например, администратор может создать профили для настройки компьютеров Mac для взаимодействия с серверами в школьной или рабочей сети.
Профиль конфигурации может включать в себя настройки учетной записи пользователя в приложении «Почта», параметры Wi-Fi, параметры VPN и другие настройки. Профили конфигурации можно использовать на Mac, устройствах iOS, iPadOS, Apple Watch и Apple TV.
Ваш сетевой администратор может попросить Вас установить один или несколько профилей, или может предложить Вам установить профиль, который позволит администратору устанавливать дополнительные профили конфигурации.
Если у Вас компьютер Mac с процессором Apple и Вы получили профиль регистрации, рекомендуется обратиться к сетевому администратору для получения инструкций по установке профиля. Сведения для сетевых администраторов по настройке управляемых компьютеров и установке профилей регистрации см. в Справочнике по развертыванию Mac.
О политике конфиденциальности Apple см. на странице Политика конфиденциальности Apple.
Установка профилей конфигурации
Чтобы открыть профиль на панели «Профили» для просмотра информации о нем на Mac, выполните одно из следующих действий:
Если профиль вложен в почтовое сообщение, откройте вложение.
Если профиль размещен на веб-сайте, загрузите профиль и откройте его.
Нажмите на профиль, чтобы установить его на Ваш Mac.
Возможно, во время установки потребуется ввести пароль или другую информацию.
Если на Вашем Mac была установлена более ранняя версия профиля, настройки из обновленной версии профиля перезапишут предыдущие настройки.
Просмотр установленного профиля конфигурации
На Mac выберите меню Apple

> «Системные настройки», затем нажмите «Профили».
Если Вы еще не устанавливали профили конфигурации, панель «Профили» будет недоступна.
Выберите профиль в списке «Профили», чтобы просмотреть информацию о нем.
Удаление профиля конфигурации с компьютера Mac
На Mac выберите меню Apple
> «Системные настройки», затем нажмите «Профили».
Если Вы еще не устанавливали профили конфигурации, панель «Профили» будет недоступна.
Выберите профиль в списке «Профили» и нажмите кнопку «Удалить»  .
.
При удалении профиля удаляются все его настройки и информация о нем. Например, если Вы настроили учетную запись электронной почты с помощью профиля, при удалении профиля с Вашего Mac также удаляется информация об учетной записи.
Если Вы не можете удалить профиль конфигурации, обратитесь за помощью к тому, кто предоставил Вам этот профиль.
Если Вы разрабатываете приложения для компьютеров Mac и Вам нужны сведения о профилях обеспечения, см. раздел справки, посвященный созданию профиля обеспечения разработчика.
Источник
macOS System Configuration Guide

Configuring a PHP, MySQL, Apache, and friends stack on macOS

Introduction
This guide will walk through the steps (and common issues/workarounds) to installing PHP, Apache, MySQL, Redis, Mongo DB, and Couch DB, as well as all necessary dependencies and their configuration with PHP and the OS X/macOS system.
It is important to remember Mac OS X/macOS runs atop UNIX, so all of these technologies install easily on your OS. Furthermore, Apache and PHP are included by default. In the end, you only install MySQL and the other databases and then simply “turn everything on.”
Important notes on updating OS X/macOS : with every update of OS X (Yosemite, El Capitan, etc) and now macOS Sierra, your Apache configuration file will be overwritten to httpd.conf.pre-update and a stock file will be added. Your virtual hosts file, /extras/httpd-vhosts.conf will also be overwritten and not backed up automatically. You need to diff httpd.conf and your backed up version, add your virtual host configuration from your own backup, and re-apply your modifications below 😡
More importantly, starting with 10.11 El Capitan, “System Integrity Protection” will remove all of your PHP extensions . You can install a separate version and change your path to that, or boot into recovery mode (Cmd+R), open Terminal, run csrutil disable, restart, move your existing extensions from quarantine or rebuild them, reboot into recovery and re-enable SIP with csrutil enable, then restart as normal again.
You can jump to section 11 below on updating macOS.
0. Environment Tools
First, open Terminal and switch to root to avoid permission issues while running these commands.
Next install XCode via the App Store if you haven’t already done this or if it isn’t already pre-installed on your machine. After XCode is ready, install the Command Line Tools by entering the following in Terminal:
This will open up a dialog prompt and ask if you want to install the tools. It should take about a minute to install.
1. Enable Apache
Apache comes pre-installed on OS X/macOS (hereinafter only referred to as “macOS” for simplicity) and just needs to be turned on. To turn on Apache, run:
To verify that Apache is running navigate to http://localhost and check to see that “It works!” is displayed. Success!
2. Enable and Configure PHP
Enable PHP for Apache
PHP also comes pre-installed in macOS but needs to be enabled and configured. First, make a backup of the default Apache configuration. This is good practice and serves as a comparison against future versions of macOS.
Now edit the Apache configuration file. We’re going to do this in vi (review any vi cheat sheet for a list of commands and how to edit text); you can also use any regular text editor but you may need to enable hidden files and sometimes edits may not save if the editor does not have correct permissions. Open up the file:
Enter insert mode (press i) and uncomment the following lines by removing the pound signs (#). The first adds the php module, the second makes sure the rewrite module is enabled:
We’re going to come back to this file when we enable virtual hosts (which is optional and why we’re not addressing it here). If you’re not interested in turning on virtual hosts, make a backup of this file now for when you update macOS in the future:
I added .sierra as that’s my system’s current version of macOS. Restart Apache to see the changes take effect:
Customize the PHP .ini File
The default location for the php.ini file is /etc. Importantly, there is no .ini file in here; there is instead a php.ini.default file that contains the default settings PHP runs with. You cannot edit this file and see changes however, you need to copy it to a php.ini file in this folder and PHP will then use this new file when it starts.
Copy and create the new php.ini file as root in the Terminal:
You can then edit this .ini file to change some settings (like max_execution_time, post_max_size, and upload_max_filesize) to something more realistic. You will also need to edit this later to add PHP extensions for software you’ll run.
3. Install MySQL
MySQL “Community Server” comes prepackaged with a few convenient tools in a DMG archive. Step through the following steps to install everything. After that we’ll connect PHP with MySQL.
Install MySQL and Friends
- Download the MySQL DMG for macOS
- Install MySQL
- Install the Preference Pane
- Open System Preferences → MySQL (the Preference Pane)
- Ensure the MySQL Server is running (the status is in red or green)
- Enable MySQL to start automatically with macOS by checking off that option
Configure the Path
Next we need to make sure the MySQL binaries are available in your path. We’re going to be doing this for other important software as well so it’s best to create a .bash_profile file now in the user directory to handle this and other terminal tasks. This file gets called first by the Terminal when you open it up.
Now add the following lines at the top to edit the path (we’re also adding two important functions to show/hide hidden files in Finder as well):
Note: You will need to open a new Terminal window for the path to update. Close out the window/tab you’re working in and open a new tab with cmd t.
Connect PHP and MySQL
We need to ensure PHP and MySQL can communicate with one another. There are several options to do so but we will create a socket for programs to connect with as well as a symbolic link to it:
MySQL Security
The default MySQL username is root with a blank password. You can change this to be more secure if you’d like. To view the current MySQL users and check whether their passwords are empty, use the following:
Note: the $> indicates a command into Terminal from your shell account and mysql>indicates executing a command while mysql is running. Now, to set the root password, run the following commands to set it for all root accounts:
We’ll be running through this guide assuming that the password is still blank, however.
4. Create VirtualHosts for Friendly URLs
Congratulations! PHP, MySQL, and Apache are all playing nicely together. This is great but all of your sites now have URLs like http://localhost/application/pointing to /Library/WebServer/Documents/application. I don’t like this for my development environment and neither should you! 😜
Create the VirtualHosts File
To run sites individually on a friendly domain you need to enable VirtualHosts in Apache. To do so, edit the Apache configuration again after you’ve authenticated as root for this session:
Uncomment the following line:
Now Apache will load httpd-vhosts.conf. Edit this file to add new virtual hosts:
Here is an example VirtualHosts file that utilizes a /Projects folder in the system root. Create this folder (or something like it) to house all of your applications, then create a subfolder called /_live in which to create the symbolic links pointing to their application’s root folder. These are my recommendations and you’re free to use any naming/directory convention you like.
Note: the below configuration has been revised for Apache 2.4, which altered the way directory permissions are handled. For more information on the update, read (Apache’s upgrade document)[http://httpd.apache.org/docs/2.4/upgrading.html].
The first VirtualHost points to /Library/WebServer/Documents. This first one is important as it behaves like the default Apache configuration and is used when no others match. This is where you go when you point to http://localhost as well, which we will use for database connections, among other things.
The second VirtualHost points to your development workspace and you can access it directly from http://
Important: Back up this file now to preserve your configurations in the event of any OS update. This file will get overwritten when you update macOS and it will notautomatically back it up. Copy it to a backup version now to make sure nothing gets lost (I add the current OS version to the end), and do this every time you make changes to this file:
Note: Change lorien.local to your computer name using the .local tld. Macs use this tld via the Bonjour service and the domain is accessible on your network via any other Mac/Apple device. This is nice for cross-platform testing which would be impossible on an iPad whose hosts file you cannot edit. This also avoids conflicts with any real tlds and reminds you that you are working locally.
Enable Your New Domain
First let’s restart Apache:
In order to access http://
Add the following line to the bottom:
Run the following to clear the local DNS cache:
Now you can access http://
The /Projects/Athena folder is that application’s parent folder, within which will be local files, documentation, and the root project/source controlled directory. The /Projects/_live/athena symlink will point to Athena’s root application folder, which might be /Projects/Athena/athena/public. This creates a friendly URL to the Athena project accessible on any networked device: http://lorien.local/athena.
Another advantage is that your projects can live in different places on your machine while all of the symbolic links are in one place for Apache.
If you need to access the Apache root www folder, use localhost which still points to it.
Set the Permissions on the Projects Folder
You’ll probably get a 403 Forbidden when attempting to access lorien.local. To fix this, set the permissions on the Projects folder to 755:
5. Install PHPMyAdmin
While you can administer MySQL from the command line, PHPMyAdmin is a much easier everyday method to create and administer your databases. Install utility applications like this in the default web directory so that they can be accessed via localhost.
Download the latest version of PHPMyAdmin from their website. Then run the following commands to unpack it and install it:
This is now accessible via http://localhost/phpmyadmin. Edit the config.inc.php file to use the following authentication settings so that you don’t have to login everytime.
6. Install MongoDB
Before you install Mongo you need to create two necessary folders: the data folder where the database is stored and a folder to hold the binaries. This later folder will be used to store all other optional software not in /usr/local/bin so we’ll make it generally accessible and memorable.
Make two folders in the root directory called /Data and /Software. Inside /Datamake a folder called /db for Mongo (this is the default database location for Mongo):
Set the permissions on the database folders to 755.
Now download the binaries from Mongo’s website. Extract the files and copy them to where Mongo will run:
Now update your path variable again in .bash_profile to include the location of these new mongodb binaries. Add this line the path section:
To run mongo, just execute mongod from the Terminal. If you created a folder different than the default /Data/db folder for mongo, you can run mongo with a flag for it: mongod — dbpath /path/to/db.
7. Install CouchDB
CouchDb couldn’t be any easier! Just grab the prepacked .app file from Couch’s websiteand it runs like any other Mac application by double clicking it. You’ll see a new menubar item for Couch from which you can stop and start the service.
8. Install Redis
Download Redis from their website. The following commands will first extract the tarball, then move into the folder, test the build, and then make it:
After the compilation, the src directory inside the Redis distribution is populated with the different executables that are part of Redis. The only two we care about are redis-server and redis-cli. You need to move these to your local binaries folder:
Now you can run Redis via Terminal with redis-server and it will start. You can terminate it by pressing ctrl c (like all other running processes).
9. Install PHP Extensions
In order to wire these previous database applications with PHP we need to download and connect their PHP extensions.
Dependencies
The only dependency you will need before installing these extensions is autoconf. Download it from their downloads page (the direct link to the latest build is: http://ftp.gnu.org/gnu/autoconf/autoconf-latest.tar.gz). Unpack the tarball and make it:
This final command will place autoconf into the /usr/local/bin directory so there is no need to update the path. Autoconf is required by phpize and the XCode Command Line Tools, which will be used below.
Mongo PHP Extension
Old version of Mongo (mongo.so)
Download the old Mongo PHP Extension from their Github source. Then unpack the zip file, move into the new folder, and “phpize”/install it with the following commands:
The phpize command prepares the PHP extension for compiling and make all and make install do the compiling and copy the extension to the right place, respectively. You’ll get a notice in the Terminal that the extension was installed to your extensions directory. It will look something like this:
If this is not the correct extensions directory reported with php -i or by phpinfo();change the extension_dir in php.ini or move mongo.so. After the extension is installed to your extensions directory you need to add a reference to it in the php.inifile (remember this is located in /etc and we copied it from the default file earlier). Edit the file and add this line to the extensions section:
This extension is built from the old, supported version of mongo’s PHP extension (“mongo”). They have since moved to a new project called “mongodb.” The extension that builds from this is called “mongo.so”.
Note: You can find the extensions section in the php.ini file if editing this file in vi by using the /
New version of mongo (mongodb.so)
The new, supported version of mongo’s PHP extension builds a file called mongodb.so. To build this we must use PECL/Pear. This process is extremely simple. First, download Pear:
Then configure it using the numbered instructions in the terminal that now appear. Follow these steps:
Pear is now installed, which you can verify by running pear version. To install mongodb, just run:
This will install the latest version of mongodb’s driver into your PHP extensions directory. Now edit php.ini to reference this new driver:
Restart Apache again
In all cases, restart Apache to load the extension.
Note: If you run phpinfo(); from lorien.local you will now see a new section called “Mongo.” If this is not there, it means the extension isn’t loaded correctly.
Redis PHP Extension
The steps to install the Redis PHP extension are similar to Mongo’s. Download the source files from Redis’ Github source. Then unpack the zip file, move into the new folder, and “phpize”/install it with the following commands:
As with Mongo, make install copies the .so extension to the appropriate extensions folder so make sure it went to the right place.
Edit the php.ini file and add this line to the extensions section:
Restart Apache to load the extension.
Once you’ve done so, go ahead and pull up phpinfo(); again and you should see a new section labeled “Redis.”
10. Install Related Software
There are a number of other PHP and database tools that you will run, including Composer and Bower. Let’s install these.
Composer
To install Composer, we need to download the package, move it to our local binaries folder, and then set up an alias so we only need to call “composer” to run it. Download Composer via the Terminal:
Now move the resulting file composer.phar to /usr/local/bin:
Open up .bash_profile to add an alias for composer so that we don’t need to call php to run this tool everytime via the command line:
Now, relaunch your terminal and you’ll be able to access Composer simply by calling composer. Bam!
Bower
To install Bower, a Node package, run the following command as the root user just like for all Node packages installed on your system:
The -g flag installs the package globally.
Phalcon
Phalcon! You were not meant to be installed from source on macOS! You may try but you will fail. The only way to reliably install Phalcon for PHP is to use either Homebrew or MacPorts. We’re using MacPorts, and you can install it by downloading the package installer from MacPort’s downloads page.
Make sure when installing Phalcon that you use the correct PHP version installed on your system along with it; we installed PHP 5.6 so we’re using the php56 prefix:
This will install Phalcon and all of its dependencies (including another PHP installation…) into /opt/local/lib. The phalcon.so extension is what you’re looking for, and it’s installed into the new PHP extensions folder that was just installed. Copy it out of their and into your real PHP extension’s folder, then edit your php.inifile to call this extension:
Restart Apache to see the changes:
11. Configurations after a macOS update
Upgrading to the next point release of macOS will unfortunately overwrite some of the settings and configurations you made. You’ll need to:
- Re-install the XCode Developer Tools and most likely run through the MacPorts [system migration](https://trac.macports.org/wiki/Migration) steps.
- Add back your configurations to Apache’s `httpd.conf` file; Apache will have backed up your version to `httpd.conf.pre-update` and overwritten your `httpd.conf` file to the new default one.
- Re-install your PHP extensions or move them from the location that the OS update quarantined them to. To do this you’ll need to disable System Integrity Protection («SIP,» introduced in El Capitan), make the changes, then re-enable SIP.
Re-install XCode Developer Tools
You’ll need to install these again after an update. This is as easy as running xcode-select — install in Terminal. A popup will ask you to confirm install, just click OK. Once this installs you also need to open XCode as it will finish some things there.
Update MacPorts (if necessary)
If you’re using MacPorts (we used it for the Phalcon extension above) then you’ll most likely need to run through their system migration steps. This requires installing the latest MacPorts .pkg installer and then exporting the list of your ports, uninstalling them, then reinstalling that list.
Adding back your Apache configurations
Navigate to Apache’s configuration folder at /etc/apache2/ and locate the new (and now default) httpd.conf file and your backed up one, usually named httpd.conf.pre-update. Copy httpd.conf and re-name it httpd.conf.sierra (or whatever your current version of OS X/maxOS is) to back it up:
Open the base configuration file (sudo vi httpd.conf) and uncomment the following lines that we uncommented back during initial configuration:
Now we need to copy our previous virtual hosts configuration into the newly overwritten httpd-vhosts.conf file as well. Unfortunately OS X/maxOS did not automatically back this file up. If you created a backup version previously as recommended, copy those configurations to the main file now; otherwise add in your virtual host configuration or use the stock one above:
Restart Apache with sudo apachectl restart. Your custom URLs should now be working and pointing to your www directory, and PHP should now be working save for any extensions you’ve installed. Let’s do that now.
Adding PHP extensions back
When macOS updates it quarantines your installed PHP extensions (here, Mongo, Phalcon, and Redis). You can find these quarantined extensions within your system’s “SystemMigration” directory:
The extensions directory here will have subdirectory named for your previous PHP extensions one; for instance: no-debug-non-zts-20121212.
We need to either move these extension files from this quarantine to your current active PHP extensions directory or build new ones using the instructions above. Before we do either of these options, though, we have to restart the system and disable System Integrity Protection:
- Reboot into recovery mode by holding down cmd+R while rebooting
- Access the Terminal from the “Utilities” menu at the top
- Run the command: csrutil disable
- Reboot normally
Now that SIP is disabled, we can either move the extensions or install new ones. It is highly recommended that you install new ones use the instructions above for each extension. It’s the cleanest way and there is an exceedingly high chance that your old extensions will not work, especially if PHP was updated. If you still want to move them you can use the instructions below.
[Risky] Moving quarantined PHP extensions to your current directory:
First run php -i to view your PHP install’s settings. Look for the extension_dirkey under “Core”, which will contain the path for your current extensions directory. It will look something like
Copy that path. Now navigate to the quarantined location that we previously found and copy each .so file over (after authenticating as root):
Finishing the extension update:
After you rebuilt your extensions (or moved them) just restart Apache by running sudo apachectl restart. Everything should be working fine again, the last step is to boot back into recovery mode and re-enable SIP:
- Reboot into recovery mode by holding down cmd+R while rebooting
- Access the Terminal from the dropdown menu at the top
- Run the command csrutil enable
- Reboot normally
You’re all set with PHP and Apache. Huzzah!
Conclusion
Congratulations! You’re Mac OSX development environment is configured and running correctly. Here are some references to starting/stopping the services you’ll need and how to access your projects.
Apache/PHP
- Start Apache/PHP: sudo apachectl start
- Restart Apache/PHP: sudo apachectl restart
- Stop Apache/PHP: sudo apachectl stop
- Error log: cat /private/var/log/apache2/lorien.local-error_log
- Common log: cat /private/var/log/apache2/lorien.local-access_log
MySQL
- Start MySQL: sudo /usr/local/mysql/support-files/mysql.server start
- Stop MySQL: sudo /usr/local/mysql/support-files/mysql.server stop
Note: You should have MySQL start with your system startup, which can be enabled via the MySQL Preference Pane in Settings.
Источник


