- SYSTEM_INFO structure (sysinfoapi.h)
- Syntax
- Members
- PROCESSOR_INTEL_386 (386)
- PROCESSOR_INTEL_486 (486)
- PROCESSOR_INTEL_PENTIUM (586)
- PROCESSOR_INTEL_IA64 (2200)
- PROCESSOR_AMD_X8664 (8664)
- PROCESSOR_ARM (Reserved)
- System info: Find out when your Windows 10 was installed and other system information
- System Info tool
- Desktop Info is a customizable system monitoring widget for Windows
- Advanced Options
- BgInfo v4.28
- Introduction
- Installation and Use
- Using BgInfo
- Appearance Buttons
- Configuration Menu Items
- Command Line Options
SYSTEM_INFO structure (sysinfoapi.h)
Contains information about the current computer system. This includes the architecture and type of the processor, the number of processors in the system, the page size, and other such information.
Syntax
Members
An obsolete member that is retained for compatibility. Applications should use the wProcessorArchitecture branch of the union.
The processor architecture of the installed operating system. This member can be one of the following values.
| Value | Meaning |
|---|---|
| PROCESSOR_ARCHITECTURE_AMD64 9 | x64 (AMD or Intel) |
| PROCESSOR_ARCHITECTURE_ARM 5 | ARM |
| PROCESSOR_ARCHITECTURE_ARM64 12 | ARM64 |
| PROCESSOR_ARCHITECTURE_IA64 6 | Intel Itanium-based |
| PROCESSOR_ARCHITECTURE_INTEL 0 | x86 |
| PROCESSOR_ARCHITECTURE_UNKNOWN 0xffff | Unknown architecture. |
This member is reserved for future use.
The page size and the granularity of page protection and commitment. This is the page size used by the VirtualAlloc function.
A pointer to the lowest memory address accessible to applications and dynamic-link libraries (DLLs).
A pointer to the highest memory address accessible to applications and DLLs.
A mask representing the set of processors configured into the system. Bit 0 is processor 0; bit 31 is processor 31.
The number of logical processors in the current group. To retrieve this value, use the GetLogicalProcessorInformation function.
An obsolete member that is retained for compatibility. Use the wProcessorArchitecture, wProcessorLevel, and wProcessorRevision members to determine the type of processor.
PROCESSOR_INTEL_386 (386)
PROCESSOR_INTEL_486 (486)
PROCESSOR_INTEL_PENTIUM (586)
PROCESSOR_INTEL_IA64 (2200)
PROCESSOR_AMD_X8664 (8664)
PROCESSOR_ARM (Reserved)
The granularity for the starting address at which virtual memory can be allocated. For more information, see VirtualAlloc.
The architecture-dependent processor level. It should be used only for display purposes. To determine the feature set of a processor, use the IsProcessorFeaturePresent function.
If wProcessorArchitecture is PROCESSOR_ARCHITECTURE_INTEL, wProcessorLevel is defined by the CPU vendor.
If wProcessorArchitecture is PROCESSOR_ARCHITECTURE_IA64, wProcessorLevel is set to 1.
The architecture-dependent processor revision. The following table shows how the revision value is assembled for each type of processor architecture.
| Processor | Value | |
|---|---|---|
| Intel Pentium, Cyrix, or NextGen 586 | The high byte is the model and the low byte is the stepping. For example, if the value is xxyy, the model number and stepping can be displayed as follows: Model xx, Stepping yy | |
| Intel 80386 or 80486 | A value of the form xxyz. If xx is equal to 0xFF, y — 0xA is the model number, and z is the stepping identifier. If xx is not equal to 0xFF, xx + ‘A’ is the stepping letter and yz is the minor stepping. System info: Find out when your Windows 10 was installed and other system informationSystemInfo or System Info command tool in Windows will tell you all you need to know about your computer system. If you would like to know when your Windows was installed and plenty other information about your system, this built-in tool comes pretty handy. System Info tool
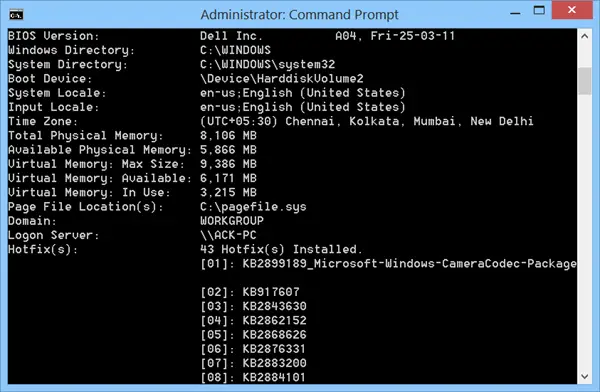
To run the System Info Tool, you have to open an elevated command prompt window. You can do it in Windows 8, using the WinX Menu. In Windows 7 or Windows Vista, type cmd in start menu search bar. In the ‘cmd’ result which appears, right-click on it and select Run as Administrator. Next, type systeminfo in the command prompt and hit Enter. This will display detailed configuration information about a computer and its operating system, including operating system configuration, security information, product ID, and hardware properties, such as RAM, disk space, and network card, including System Boot Time, Bios version, Processor details, Memory details, Page file information, Hotfixes installed, etc. Some parameters or switches mentioned on TechNet:
Tomorrow we will read about the four built-in System Information Tools in Windows 10. Desktop Info is a customizable system monitoring widget for WindowsTools like Thilmera7 and the popular Linux app Conky are popular not just because they can monitor the system’s components, but also because they’re very customizable. Desktop Info is quite comparable to them and a free application, too.
The program is portable which means that you can extract its archive and run it; you won’t see it on the taskbar or the tray or in the program switcher (alt-tab): it’s a desktop widget. Note: Using the Show Desktop option hides the widget (the developer says this is the operating system’s fault), so you’ll need to minimize your applications. Here’s how I used it: Click on Show Desktop then switch to any other program and minimize it. The application has a transparent background on which various data is displayed. The current date and time are displayed at the top of the widget, below that is the CPU usage which is displayed as text and a graph that is updated in real-time. Next is the RAM section which is only displayed in text. You can see the used/total amount of RAM, the top memory, i.e., the program that’s using the most memory, along with a counter for page faults/sec. The widget also lists every drive connected to the computer, with the free/total storage space, percentage of used space and a bar that indicates the used/free space. The read/write speeds of each drive is displayed under its drive bar. So, how do you access the program’s options or exit the widget? Desktop Info’s transparent background makes it difficult, you’ll need to right click on a visual element in the interface. Try doing this on any of the text that’s displayed and a lot of times it just won’t work. The simplest way to access the context menu is to right-click on the navigation button (the square button at the bottom) or on one of the drive usage bars, it worked every time for me.
Advanced OptionsSelect the «Configuration» from the context menu, or just open the desktopinfo.ini from the application’s directory. This is the only way to edit the program’s options. The widget is a floating panel, use the same trick (click and hold on the drive bar) and move it around the screen. It will not remember the position though, so you’ll need to set the position manually using the INI file. Desktop Info can be started from the command-line, use the /f parameter to open it as a windowed application, and this one does stay put.
You can edit the font type and size of the text displayed. Each section that you see on the widget is an item, and a set of items form a «Page». You can add up to 9 pages using the configuration INI file. The program’s folder also has an advanced.ini which has more pages pre-built, if you want to use this one, just rename it to desktopinfo.ini and delete the other one. There are many more options you can add, like setting a background image as the header, change the colors of the bars, display different metrics, etc. You can read the manual (PDF) for more information on how to customize the widget.
The memory footprint of Desktop Info is negligible, which makes it very useful for monitoring the system’s hardware. This tool isn’t meant to monitor your system’s thermals, hence not something gamers may need. The application was created by Glenn Delahoy, the developer of Snappy Driver Installer Origin. BgInfo v4.28By Mark Russinovich Published: September 20, 2019
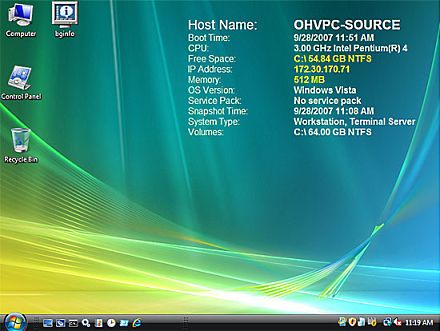
IntroductionHow many times have you walked up to a system in your office and needed to click through several diagnostic windows to remind yourself of important aspects of its configuration, such as its name, IP address, or operating system version? If you manage multiple computers you probably need BGInfo. It automatically displays relevant information about a Windows computer on the desktop’s background, such as the computer name, IP address, service pack version, and more. You can edit any field as well as the font and background colors, and can place it in your startup folder so that it runs every boot, or even configure it to display as the background for the logon screen. Because BGInfo simply writes a new desktop bitmap and exits, you don’t have to worry about it consuming system resources or interfering with other applications. Sysinternals BgInfo
Installation and UseSee Mark’s Windows IT Pro MagazineВ Power Tools article for a primer on using BgInfo. If you have questions or problems, please visit the Sysinternals BgInfo Forum. By placing BGInfo in your Startup folder, you can ensure that the system information being displayed is up to date each time you boot. Once you’ve settled on the information to be displayed, use the command-line option /timer:0 to update the display without showing the dialog box. You can also use the Windows Scheduler to run BGInfo on a regular basis to ensure long-running systems are kept up to date. If you create a BGInfo configuration file (using the File|Save Settings menu item) you can automatically import and use those settings on other systems by adding the /I command line option.
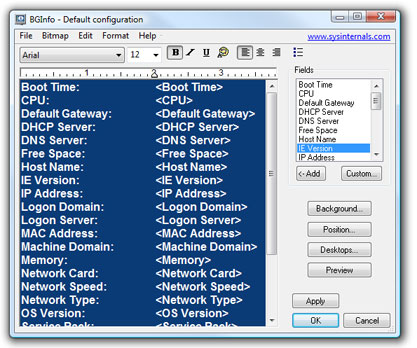
Using BgInfoWhen you run BGInfo it shows you the appearance and content of its default desktop background. If left untouched it will automatically apply these settings and exit after its 10 second count-down timer expires. Selecting any button or menu item will disable the timer, allowing you to customize the layout and content of the background information. If you want BGInfo to edit or use a configuration stored in a file (instead of the default configuration which is stored in the registry) specify the name of the file on the command line: Appearance ButtonsFields: Selects what information appears on the desktop, and the order in which it is displayed. For networking fields (NIC, IP, MAC, etc.) a separate entry is created for each network card on the system. Use the Custom button to add special information you define yourself. Background: Selects the color and/or wallpaper to use for the background. If you select the Copy existing settings option then BGInfo will use whatever information is currently selected by the logged on user. This option allows end users to personalize their desktop while still displaying the BGInfo information. Position: Selects the location on the screen at which to place the text. If some items are very long (for example some network card names) you can use the Limit Lines to item to wrap them. The Compensate for Taskbar position checkbox adjusts the position of the text to ensure that it is not covered by the Taskbar. The Multiple Monitor Configuration button allows you to specify how multiple monitors attached to a single console should be handled. Desktops: Selects which desktops are updated when the configuration is applied. By default only the User Desktop wallpaper is changed. Enabling the Logon Desktop for Console users option specifies that the wallpaper should be displayed on the logon desktop that is presented before anyone has logged onto the system. On Windows 95/98/ME systems the same desktop is used for users and the login screen, so this option has no effect. Enabling the Logon Desktop for Terminal Services users option specifies that the wallpaper should be displayed on the Terminal Services login screen. This option is useful only on servers running Terminal Services. Preview: Displays the background as it will appear when applied to your system. Configuration Menu ItemsThese are options that control how the bitmap is produced, where it is located and how to import/export settings. File | Open: Opens a BGInfo configuration file. File | Save As: Saves a copy of the current BGInfo configuration to a new file. Once created, you can have BGInfo use the file later by simply specifying it on the command line, or by using File|Open menu option. File|Reset Default Settings: Removes all configuration information and resets BGInfo to its default (install-time) state. Use this if you can’t determine how to undo a change, or if BGInfo becomes confused about the current state of the bitmap. File|Database: Specifies a .XLS, .MDB or .TXT file or a connection string to an SQL database that BGInfo should use to store the information it generates. Use this to collect a history of one or more systems on your network. You must ensure that all systems that access the file have the same version of MDAC and JET database support installed. It is recommended you use at least MDAC 2.5 and JET 4.0. If specifying an XLS file the file must already exist. If you prefer to have BGInfo update the database without modifying the user’s wallpaper you can unselect all desktops in the Desktops dialog; BGInfo will still update the database. Bitmap|256 Colors: Limits the bitmap to 256 colors. This option produces a smaller bitmap. Bitmap|High Color/True Color: Creates a 16-bit or 24-bit color bitmap. Bitmap|Match Display: Creates a bitmap with color depth matching that of the display. Because the bitmap generated by BGInfo is not updated when a user changes the display’s color depth you may see unexpected results (especially dithering of the text and background) with some combinations of bitmap and display depth. Bitmap|Location: Specifies the location to place the output bitmap file. On Terminal Services servers the bitmap should be placed in a location that is unique to each user. Edit|Insert Image: Allows you to insert a bitmap image into the output. Because BGInfo‘s configuration information is stored in the registry and Windows limits the size of registry values you may encounter errors when inserting larger images. On Windows 9x/Me systems the limit is 16K, while on NT/2000/XP systems the limit is 64K. Command Line OptionsВ В В В В В В | Specifies the name of a configuration file to use for the current session. Changes to the configuration are automatically saved back to the file when OK or Apply is pressed. If this parameter is not present BGInfo uses the default configuration information which is stored in the registry under the current user («HKEY_CURRENT_USER\Software\Winternals\BGInfo«). |
| /timer | Specifies the timeout value for the countdown timer, in seconds. Specifying zero will update the display without displaying the configuration dialog. Specifying 300 seconds or longer disables the timer altogether. | |
| /popup | Causes BGInfo to create a popup window containing the configured information without updating the desktop. The information is formatted exactly as it would if displayed on the desktop, but resides in a fitted window instead. When using this option the history database is not updated. | |
| /silent | Suppresses error messages. | |
| /taskbar | Causes BGInfo to place an icon in the taskbar’s status area without updating the desktop. Clicking the icon causes the configured information to appear in a popup window. When using this option the history database is not updated. | |
| /all | Specifies that BGInfo should change the wallpaper for any and all users currently logged in to the system. This option is useful within a Terminal Services environment, or when BGInfo is scheduled to run periodically on a system used by more than one person (see Using a Schedule below). | |
| /log | Causes BGInfo to write errors to the specified log file instead of generating a warning dialog box. This is useful for tracking down errors that occur when BGInfo is run under the scheduler. | |
| /rtf | Causes BGInfo to write its output text to an RTF file. All formatting information and colors are included. |


 Download BgInfo] (3.4 MB)
Run now from Sysinternals Live.
Runs on:
- Client: Windows Vista and higher.
- Server: Windows Server 2008 and higher.
—>


