- About System Information on your Mac
- Mac Administration: A Closer Look at System Information
- Launching System Information
- The System Information App
- System Reports
- System Information Via the Command-Line
- Generating Reports
- Saving a System Report
- Full Report Detail Level
- Opening Reports in System Information
- Wrapping Up
- С использованием Apple System Profiler в Mac OS X — манекены — Бизнес 2021
- Table of Contents:
- Команда system_profiler: опции, ключи и примеры использования
- sysctl
- systemsetup
- Как установить PostgreSQL на Linux и создать базу и пользователя
- Как скопировать вывод команды из терминала в буфер обмена Linux и MacOS
- Как создать неизменяемый файл в Linux / MacOS / FreeBSD
- Как удалить все Docker образы и контейнеры
- Bash вывода && управляющие конструкции || коротко о главном
- Так ли безопасен Linux? Несколько коммитов с уязвимосятми в stable
- Microsoft открывает исходники, а её IDE супер-популярна
- Пример своей консольной команды в Django проекте
- Как на Bash посчитать число строк в проекте (директории)
- Как на Bash получить файлы, изменённые за сегодняшний день
- Как установить часовой пояс в Linux
- Как найти самые большие папки и файлы в Linux
- Команда grep – полезные ключи и примеры использования
About System Information on your Mac
Use the System Information app to see a summary of information about your Mac hardware, software, and network.
The System Information app provides detailed specifications and other information about your Mac hardware and software, including your network and external devices. In some versions of OS X, this app is called System Profiler.
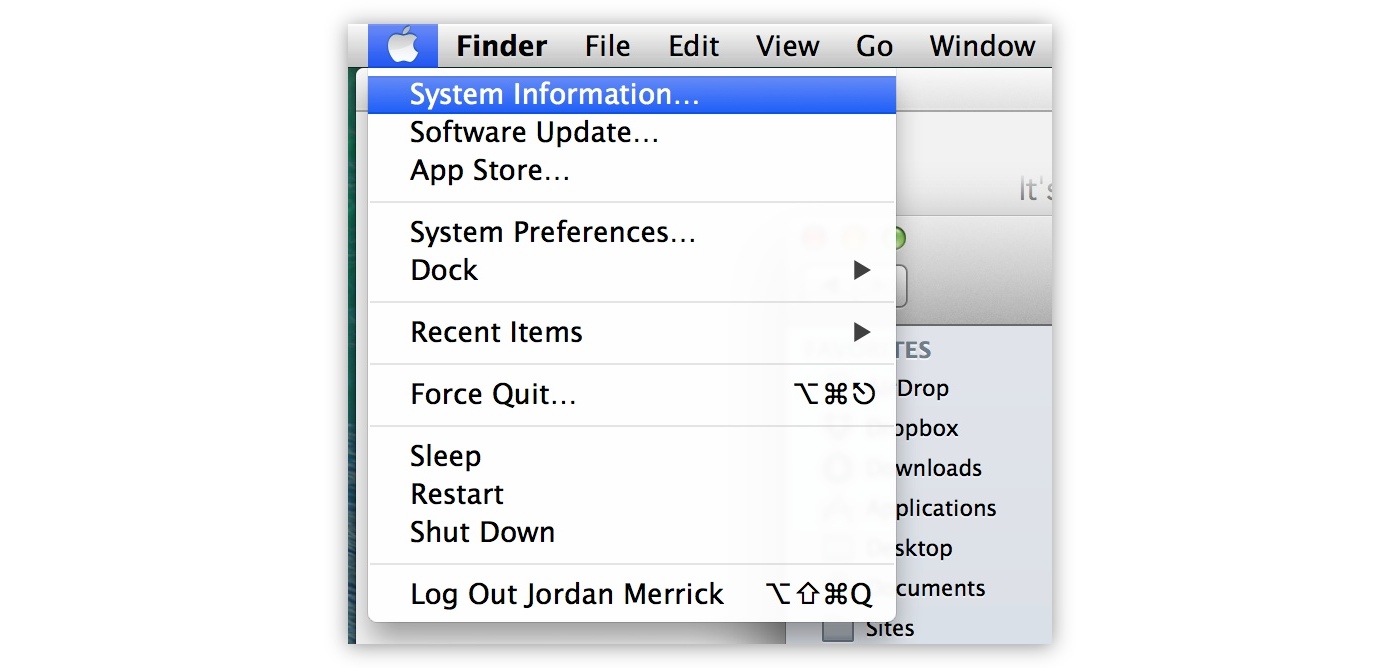
Choose Apple menu > About This Mac. This opens an overview of your Mac, including your Mac model, processor, memory, serial number, and version of macOS. To see the greater detail provided by the System Information app, click the System Report button.

To open System Information directly, press and hold the Option key and choose Apple menu > System Information. You can also use Spotlight to find System Information, or open it from the Utilities folder of your Applications folder.
System Information opens to a system report for your Mac:
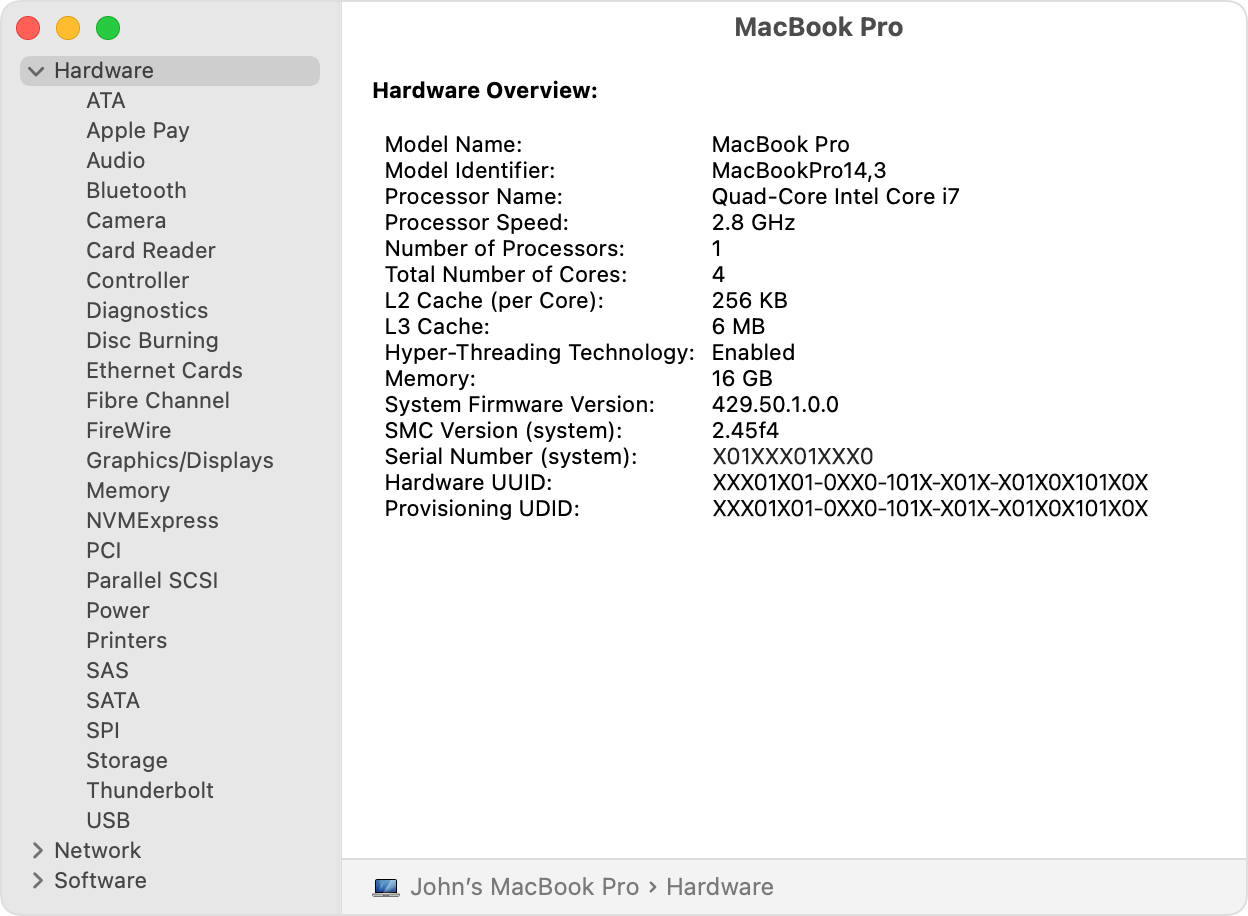
Select items in the sidebar to see information about each item. For example:
- The Hardware section shows your Mac serial number
- The Memory section shows how much RAM is installed in each internal memory slot.
- The Software section shows which startup disk (boot volume) your Mac is using.
- The Network section shows details such as your IP address, the connections allowed by your macOS firewall, the signal strength of nearby Wi-Fi networks, and more.
Источник


Mac Administration: A Closer Look at System Information
System Information (formerly System Profiler) in OS X provides a detailed breakdown of the hardware and software configuration of a Mac, from Bluetooth information and attached USB devices to installed software and extensions.
While most of us have used System Information at one time or another, it’s an often overlooked and undervalued tool. To get the most out of it, we’ll exploring the app, and its lesser-known command-line options, in further detail.
Launching System Information
There are a number of ways you can access System Information as it has a number of shortcuts in different places, the most common way is from the About This Mac pane.

Click on More Info to reveal some additional information about the Mac and then click System Report…

You can bypass this process completely by holding down the Alt key when in the Apple menu. This will swap About This Mac to System Information… and allow you to launch it directly.
Finally, you can simply launch the app from where it resides: within /Applications/Utilities.

The System Information App
The System Information app is nothing more than a tweaked XML viewer. It doesn’t do anything itself, instead relying upon the system_profiler command (which we’ll come to later) to generate hardware and software configuration reports.

The report that the command generates is then opened by System Information and formatted in a way that’s easy to view. System Information also views a report that has already been created, though it can be refreshed at any time by selecting File > Refresh Information.
Each section is broken down into its respective categories, such as Hardware, Network and Software, and their related reports are separated into subcategories.
Within the app’s menu are a few options that can alter the output of the report. If you’d prefer not to view a full report, you can select Show Less Information which will hide most Software reports. This can be toggled by selecting Show More Information to bring them back.
System Reports
A great benefit of System Information is that reports can be saved and opened on any Mac. You can save a report from one Mac and open it on another, useful when trying to troubleshoot an issue with a remote Mac.
To save a report, select File > Save. The report saved reflects the current view of System Information so if you’ve opted to display less information, a basic report is saved.
A full report can be several megabytes in size whereas a basic report can be only a few hundred kilobytes. Unless there’s a need to include all software information, it can be sometimes worth displaying less information before saving a report.
All system reports are saved with the .spx file extension and opening any system reports will launch System Information automatically.
System Information Via the Command-Line
As we touched upon earlier, System Information is just a viewer for system reports, all of the work for creating them is done by the command system_profiler .
Sometimes it may be necessary to bypass System Information when we’re wanting to view a report. For example, you may need a system report of a Mac that you only have remote access to via SSH so opening System Information wouldn’t be possible, but that doesn’t mean we can’t create a system report.
Generating Reports
To get started, open Terminal and enter the command system_profiler . You’ll notice that (after a brief delay) a lot of system information is displayed within the Terminal window.

Running the command without any arguments just dumps the entire system report to the screen. If we wanted to find out what the Mac’s Model Identifier is, we could use:

This isn’t very efficient as running system_profiler generates a complete report each time, which can be time consuming if the Mac contains a lot of software or isn’t particularly speedy.
Instead, we can generate a report only on a particular part of the Mac, such as network or storage information, by specifying a Data Type. What data types are available depend on the Mac’s hardware capabilities and configuration.
To list all of the available types of data, use the listDataTypes argument:

You can request a system report on only a specific part of the hardware by invoking the system_profiler command, along with the data type, like so:

The Mac’s Model Identifier is located within the SPHardwareDataType data type. By generating a report just using that data type, the result to our grep search is substantially quicker:

Saving a System Report
To save a text-only version of a system report to your desktop, you can use the following command:
As you’re redirecting the output to a text file rather than the terminal window, any reports you generate (including on specific data types) can be saved.

Full Report Detail Level
By default, system_profiler generates a complete system report. Just like System Information, we can choose to generate a more basic one using the argument detailLevel :
There are three different levels of detail that can be used:
- mini (report with no personal information, such as Serial Number of Hardware UUID)
- basic (basic hardware and network information)
- full (all available information)
So to generate a basic report, the command would be:
Opening Reports in System Information
So far, the reports generated have all been plaintext. To create System Information-compatible reports, an additional argument would be needed, xml , and the file extension specified must be .spx .
Combining all of this together, an example command would be:
These reports can then be opened within System Information and more easily viewed.

Wrapping Up
The ability to generate system reports via the command-line using system_profiler provides a level of flexibility that System Information cannot, such as generating or scheduling reports on remote Macs via SSH. This can be advantageous when trying to determine what software is installed on which Mac or if any users are running an outdated version of OS X.
Источник
С использованием Apple System Profiler в Mac OS X — манекены — Бизнес 2021

Table of Contents:
Нужна жесткая информация о вашем оборудовании? Возможно, вам нужно будет точно определить, какое оборудование установлено на вашем Mac по следующим причинам:
- Если вы работаете с специалистом технической поддержки для решения проблемы: Этот человек обычно запрашивает информацию о вашей системе, такую как какой процессор вы используете и сколько у вас памяти.
- Если вы оцениваете приложение перед его покупкой: Вам нужно
проверить минимальные системные требования к аппаратным средствам на вашем Mac.
- Если вы планируете модернизировать свой Mac: Вам, вероятно, потребуется определить, сколько у вас памяти, какой тип и какие слоты памяти заполнены. (То же самое касается вашего жесткого диска и вашей видеокарты для тех компьютеров Mac с разъемами для видеокарт.)
Apple предоставляет Mac OS X аппаратное и программное обеспечение «все в одном», точно названное Apple System Profiler, , который вы можете найти в папке «Утилиты» в папке «Приложения». Вы также можете попасть в Profiler через меню Apple. Просто нажмите «Об этом Mac», а затем нажмите кнопку «Подробнее».) Как видно из рисунка 1, многое можно переварить из окна «Профилировщик системы».
Рисунок 1: Вы можете отобразить обзор своего Mac через System Profiler.
Как и папки в окне Finder в режиме просмотра списка, вы можете развернуть или свернуть каждый основной заголовок, который появляется на экране Profiler. Просто нажмите треугольник, который появляется слева от заголовка Содержание, чтобы развернуть или свернуть этот заголовок.
Основные заголовки системного профайлера включают
- Оборудование: В этом разделе рассказывается о ваших жестких дисках, а также о специфических особенностях ваших дисков CD и DVD, модема, AirPort и Bluetooth , графическое оборудование, настройки питания переменного тока и любые устройства FireWire и USB, подключенные к вашей системе. На рисунке 2 показана информация с экрана USB, при этом многие из устройств расширены, так что вы можете их видеть. (Текст, который вы видите в нижней половине окна, — это подробная информация о выбранном элементе.)
- Сеть: В этом заголовке отображается список вашей сетевой конфигурации, активных сетевых подключений и других разнообразных сетевых атрибутов , Вероятно, вам понадобится этот экран только тогда, когда вас попросит специалист технической поддержки по сетевым протоколам, которые вы используете, но тем не менее это удобно. (Здесь вы можете найти информацию о своем сетевом соединении, в котором вы не можете найти нигде в Tiger.)

Рисунок 2: См. Информацию о портах и соединениях на вашем Mac.
- Программное обеспечение: Хорошо, этот заголовок показывает что-то полезное для обычного человека! На этом экране перечислены все приложения, шрифты и предпочтения, распознанные в вашем томе запуска, а также их номера версий. Если вам интересно, нужно ли обновлять приложение файлом исправления (исправлять ошибки в программном обеспечении) или обновлять файл от разработчика, вы можете посмотреть здесь, чтобы проверить текущий номер версии приложения. Вы также получаете довольно скучный список расширений (или драйверов), используемых приложениями Mac OS X. Журналы обычно ценны только для технического персонала; они документируют недавние блокировки, сбои приложений и даже сбои системы.
Источник
Команда system_profiler: опции, ключи и примеры использования
Report system hardware and software configuration.
system_profiler -xml > MyReport.spx
- Display a hardware overview (Model, CPU, Memory, Serial, etc):
- Print the system serial number:
system_profiler SPHardwareDataType|grep «Serial Number (system)» |awk ‘
sysctl
Access kernel state information. Show all available variables and their…
systemsetup
Configure System Preferences machine settings. Enable remote login (SSH): systemsetup…

Как установить PostgreSQL на Linux и создать базу и пользователя
PostgreSQL — система управления базой данных общего назначения. Одна из самых распространённых баз данных, используемая на многих коммерческих и некоммерческих проектах.
Как скопировать вывод команды из терминала в буфер обмена Linux и MacOS
Скорее приятный, чем необходимы «трюк», но возможность использовать возможность скопировать вывод в буфер обмена – действительно круто иной раз выручает.

Как создать неизменяемый файл в Linux / MacOS / FreeBSD
Само собой, root может всё (если введёт пару команд), однако, это вполне легальный способ запретить изменение файла.

Как удалить все Docker образы и контейнеры
Не всегда нужно удалять всё, но объяснение данного «рецепта» объяснит как в целом удалять образы и контейнеры.
Bash вывода && управляющие конструкции || коротко о главном
Небольшая заметка о конструкциях Bash, в которых путается большинство новичков. А именно: >,

Так ли безопасен Linux? Несколько коммитов с уязвимосятми в stable
Исследователи сумели пройти code-review с реквестами в ядро Linux, заведомо содержащими добавление уязвимостей.

Microsoft открывает исходники, а её IDE супер-популярна
Решил сложить пару фактов и немного над этим поразмыслить. Реально ли Microsoft «переобулись»?

Пример своей консольной команды в Django проекте
Если вы работали с Django проектом, то, скорее всего, запускали команды из консоли (manage.py). В Django есть простой способ писать свои команды для управления проектом.

Как на Bash посчитать число строк в проекте (директории)
Ниже будет представлен однострочник, решающий данную задачу на Bash + пошаговое описание его работы.

Как на Bash получить файлы, изменённые за сегодняшний день
Bash имеет огромные возможности по программированию/скриптованию и администрированию операционной системы. Не важно: Linux это, FreeBSD, или MacOS – на Bash можно сделать многое.

Как установить часовой пояс в Linux
В рамках первичной настройки Операционной Системы важно установить и по какому времени вы живёте, ведь при следующем обновлении времени через Интернет ваше время слетит.

Как найти самые большие папки и файлы в Linux
Когда кончается место на жестком диске, возникает закономерный вопрос: на что же оно было потрачено, какие файлы разрослись больше положенного?

Команда grep – полезные ключи и примеры использования
У команды «grep» довольно много различных особенностей. особенно, если учесть, что с английского это «решето» – а что может войти в решето , не факт что выйдет!
Источник


