- How to Fix ‘System Registry File is Missing’ Startup Error on Windows?
- What’s causing the ‘System Registry File is Missing’ error on Windows?
- Method 1: Booting to the last good configuration
- Method 2: Fixing the booting sequence
- Method 3: Repairing System File Corruption
- Method 4: Performing a repair install
- Как исправить ошибку SERVICE REGISTRATION IS MISSING OR CORRUPT на Windows 10?
- Отсутствует или содержит ошибки файл \windows\system32\ winload.efi в Windows 10
- Включите режим совместимости CSM и отключите Secure Boot
- Автоматическое восстановление загрузчика Windows
- Отключите функцию защиты ELAM
- Выполните проверку дисков на ошибки и целостность системных файлов
- Восстановление BCD загрузчика и файла winload.efi для UEFI системы
- Пересоздание загрузочных записей в хранилище BCD с помощью bootrec и bcdedit
How to Fix ‘System Registry File is Missing’ Startup Error on Windows?
As it turns out, some users are encountering the ‘System Registry File is Missing’ error during the booting procedure. As a result, they are unable to start their computers conventionally. Most affected users are reporting that the error occurs a few seconds after the final loading screen (of the booting procedure) appears. Although this error is mostly reported to occur on Windows 10, we’ve managed to find a lot of instances of it happening on Windows 7 and Windows 8.1 computers.
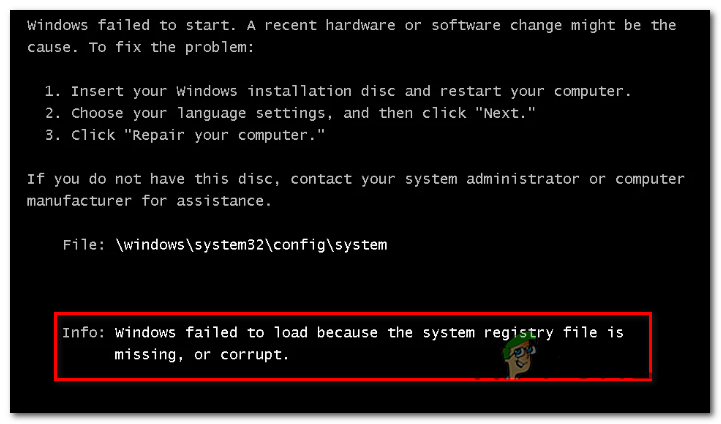 System Registry File is Missing Startup error on Windows
What’s causing the ‘System Registry File is Missing’ error on Windows?
We investigated this particular issue by looking at various user reports and by testing out the various repair strategies that are recommended by other users that already managed to threat the symptoms of this issue. As it turns out, several different scenarios might lead to the apparition of this issue. Here’s a list of potential culprits that might be responsible for this problem:
- Wrong startup configuration – If you’ve previously set up a dual boot system, chances are the wrong BCD data is being used during the startup procedure. In this case, you should be able to resolve the issue by booting to the last known good configuration. Several affected users have confirmed that this procedure was effective in their case.
- Corrupted BCD data – Once of the most common causes that will produce this particular error is an underlying booting problem caused by corruption inside the BCD data. If this scenario is applicable, you should be able to fix the problem by using the Bootrec.exe utility to repair the corrupted BCD data.
- System file corruption – As it turns out, system file corruption can also be responsible for the apparition of this startup error. Several affected users that were also encountering this issue have managed to fix it by running a couple of utilities capable of fixing system file corruption (DISM and SFC). In most severe cases, you might need to reset every OS component with a repair install or a clean install procedure.
Method 1: Booting to the last good configuration
If the issue only started occurring recently and you’re looking for a fix that doesn’t involve complicated troubleshooting strategies, you should start by seeing if your computer is capable of completing the startup procedure by using the last good configuration.
Several affected users have reported that they finally managed to bypass the startup System Registry File Is Missing error by forcing the Startup options screen to appear and selecting the Last known good configuration from the list.
Here’s a quick guide on booting from the last good configuration:
- Start your computer and start pressing F8 repeatedly as soon as you see the initial screen to arrive inside the Advanced Boot Options.
- Once you’re inside the Advanced Boot Options screen, select Last Known Good Configuration from the list of available options.

- Wait for the procedure to complete and see if the startup procedure completes without issues.

If the same problem is still occurring, move down to the next potential fix below.
Method 2: Fixing the booting sequence
As it turns out, one of the most common instances that will spawn the ‘System Registry File is Missing’ error during the startup sequence is an underlying booting problem. In these cases, the only effective way of getting to the bottom of the issue is to repair the entire booting sequence by using the Bootrec.exe.
Bootrec.exe is a built-in Windows utility capable of fixing the entire master boot record, the whole booting sequence, and the boot configuration data. Keep in mind that any of these components might be responsible for the current error that you’re dealing with.
Prerequisite: Keep in mind that to perform this installation procedure, you need a valid Windows installation media that is compatible with the operating system that you’re using. If you don’t have that already, you can create one by following the instructions outlined in one of the resources featured below:
Note: Choose the article that applies to the operating system that you’re using. And in case you don’t have the installation media and no means of obtaining one, you can force the Startup Recovery menu to appear by forcing 3 consecutive startup interruptions (turning off the computer in the middle of the booting sequence).
Once you have the prerequisite, follow the instructions below to run the Bootrec.exe utility to resolve the ‘System Registry File is Missing’ error:
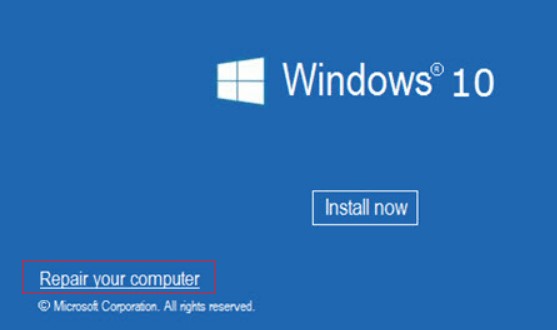
- Start the operation by inserting the installation media before the booting sequence can begin. Next, press any key when prompted to boot from in. Once you see the initial Windows installation window, click on Repair your computer (You can see it either in the bottom right or the bottom left corner, depending on your Windows version). Choose Repair your computer
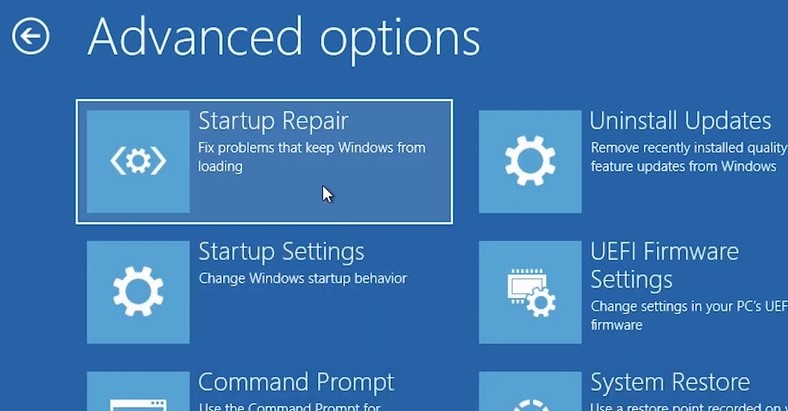
- You should be taken directly to the Advanced Options menu. Once you get there, click on Troubleshoot, then select Command Prompt from the list of available options. Choosing Command Prompt from Advanced Options
- Once you’re inside the elevated Command prompt window, type the following commands inside and press Enter after each command to rebuild the entire Boot Configuration data:
- Once all commands have been processed successfully, all boot configuration data should be repaired. All you need to do now is test the startup procedure to see if it completes without any errors.
 Choose Repair your computer
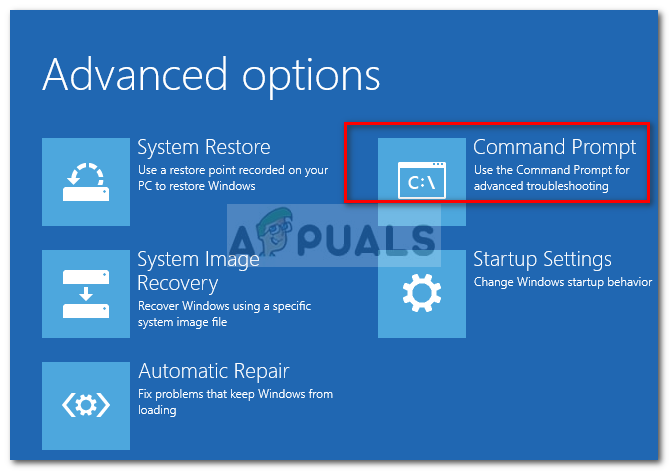 Choosing Command Prompt from Advanced Options
If you’re still encountering the same error during the booting procedure, move down to the next method below.
Method 3: Repairing System File Corruption
As it’s been confirmed by several affected, users the ‘System Registry File is Missing’ error can also be triggered by some degree of System File corruption that is interfering with the booting sequence. Keep in mind that under normal circumstances, you should open an elevated Command prompt to run the two utilities.
But since you can’t get past the booting sequence, you will need to perform these scans before the booting sequence completes. To do this, you’ll need to open up an elevated CMD prompt using the Advanced Options menu.
Here’s a quick guide that will guide you through the procedure of running SFC and DISM scans from a CMD opened from inside the Advanced Options menu:
- Start by inserting the installation media and restarting your machine. Before you get to see the first startup screen, start pressing any key to boot from the Windows installation media. Press any key to boot from installation media
- Once you find yourself at the initial Windows screen, click on Repair your computer (bottom-left corner of the screen) Choosing Repair your computer from Windows Setup
- At the next menu, start by selecting the Troubleshooting tab, then click on the Advanced Options. Once you get to that menu, select the Command Prompt options. Command Prompt in Advanced options
- Once you manage to get inside the elevated Command Prompt, type the following command and press Enter to initiate a System File Checker scan:
 Press any key to boot from installation media
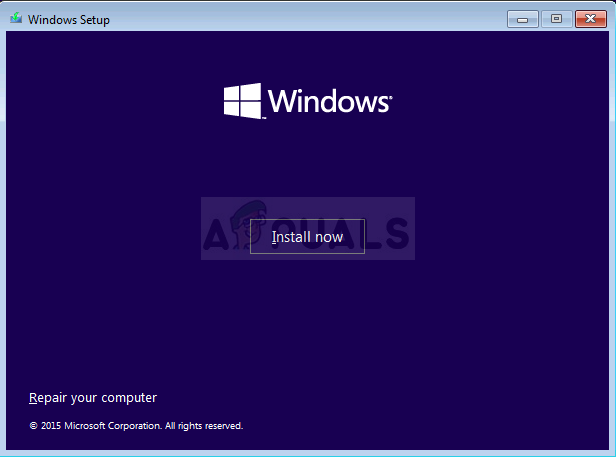 Choosing Repair your computer from Windows Setup
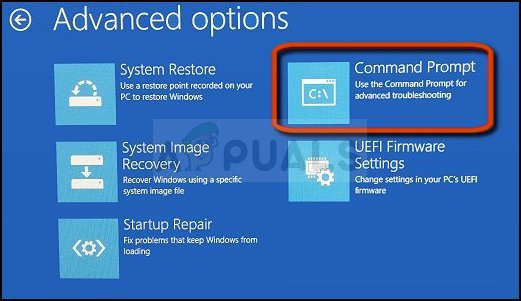 Command Prompt in Advanced options
Note: Keep in mind that SFC is using a locally cached copy to replace corrupted files with healthy copies. Interrupting this utility after the initial scan has been started is not recommended since you leave your system exposed to other logical errors. Wait patiently until the procedure is complete.
Once the SFC scan is complete, restart your computer and re-follow the steps above to return to the elevated CMD screen at the next system startup. After you manage to return to the elevated CMD prompt, type the following commands and press Enter after each one to investigate and fix corruption instances using the DISM utility:
Note: This utility is highly dependent on the Windows Update component. It uses WU to download healthy copies of the corrupted files that need to be replaced. Because of this fact, make sure that your Internet connection is stable before initiating the DISM scan.
If the same ‘System Registry File is Missing’ error is still occurring during the startup sequence, move down to the next method below.
Method 4: Performing a repair install
If you’ve followed all the potential fixes above and you’re still encountering the same ‘System Registry File is Missing’ error, chances are you’re dealing with an underlying system file corruption issue that cannot be resolved conventionally.
If this scenario is applicable, the only way of resolving the OS-related issues is to follow a procedure that will reset every Windows component. When it comes to achieving this state, you have two ways forward:
A clean install is a more straightforward option that doesn’t require any prerequisites, but the major downside is that you will experience serious data loss – Personal files, applications, user preferences and any other type of data will be lost unless you back it up in advance.
If you want a more efficient approach, go for the repair install procedure. Although it’s a more tedious procedure and it requires you to have a valid Windows installation media, it will only reset your Windows components. But the major advantage is that you will be able to keep all your files (documents, pictures, music, etc.) applications, games, and even some user preferences.
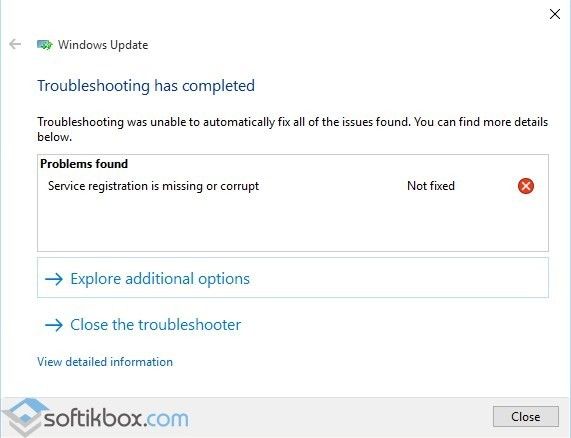
Как исправить ошибку SERVICE REGISTRATION IS MISSING OR CORRUPT на Windows 10?
При обновлении операционной системы Windows 10 многие пользователи ПК могут столкнуться с ошибкой SERVICE REGISTRATION IS MISSING OR CORRUPT (Регистрация отсутствует или повреждена), которая появляется не сразу, а только после запуска утилиты Windows Update. Указывает эта неполадка на то, что системные файлы повреждены или отсутствуют. При этом запуск через командную стоку утилиты sfc /scannow не помогает решить проблему. Поэтому рекомендуем ознакомиться со следующими вариантами решения ошибки.
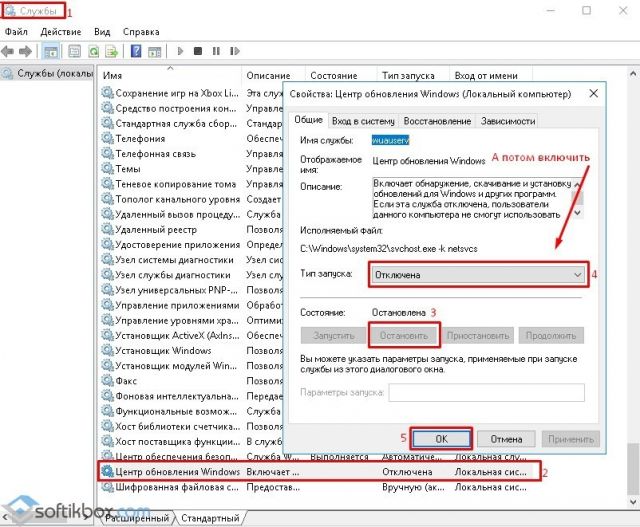
В первую очередь, если вы столкнулись с ошибкой SERVICE REGISTRATION IS MISSING OR CORRUPT на Виндовс 10, стоит проверить, включена ли служба обновления операционной системы. Для этого стоит выполнить следующее:
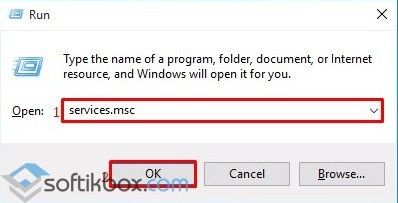
- Откроется окно служб. Нужно найти службу «Windows Update» или «Центр обновления Windows». Отключить и вновь включить службу, выставить автоматический запуск этой же службы.
- Послу нужно перезагрузить компьютер.
Также устранить проблему с обновлением системы можно с помощью командной строки. Для этого выполняем следующее:
- Запускаем командную строку с правами Администратора и вставляем все нижеприведенные команды:
net stop wuauserv
net stop cryptSvc
net stop bits
net stop msiserver
ren C:\Windows\SoftwareDistribution SoftwareDistribution.old
ren C:\Windows\System32\catroot2 catroot2.old
net start wuauserv
net start cryptSvc
net start bits
net start msiserver.
- После выполнения всех приведенных команд, стоит перезагрузить систему.
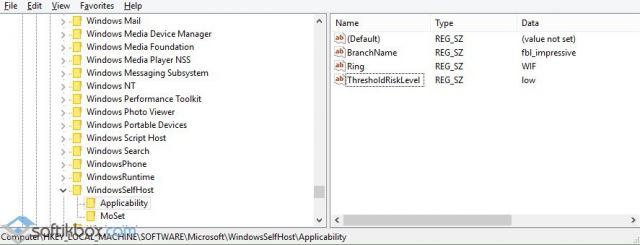
Важно отметить, что часто вирусы становятся виновниками этой ошибки. Вредоносное ПО не только повреждает системные файлы, но и вносит изменения в реестр. Поэтому, если вы проверили ПК на вирусы и обнаружили вредоносный объект, то его нужно удалить, а затем внести изменения в системный реестр. Для этого выполняем следующее:
- Откроется редактор реестра. Переходим по ветке «HKEY_LOCAL_MACHINE \ SOFTWARE \ Microsoft \ WindowsSelfHost \ Applicability». Здесь ищем и удаляем параметр «ThresholdOptedIn» (если есть). После его удаления и перезагрузки ПК, Windows 10 сама создаст нужный параметр.
Также исправлять эту ошибку можно с помощью твика реестра. Для этого в блокноте создаем файл со следующим содержанием:
Windows Registry Editor Version 5.00
- Сохраняем файл с расширением .reg. запускаем его с правами Администратора.
- После твика реестра также нужно перезагрузить систему.
Выше представленные советы работают только с лицензионными системами. Если вы столкнулись с данной неполадкой на пиратской сборке, стоит приобрести ключ и активировать систему.
О том, как еще можно решить проблему ERVICE REGISTRATION IS MISSING OR CORRUPT на Windows 10, смотрите в видео:
Отсутствует или содержит ошибки файл \windows\system32\ winload.efi в Windows 10
Рассмотрим еще одну распространенную ошибку загрузки Windows 10, вызванную повреждением или отсутствием файла winload.efi. Проблема проявляется следующим образом: Windows 10 перестает загружаться с ошибкой BSOD и следующим сообщением на экране загрузки:
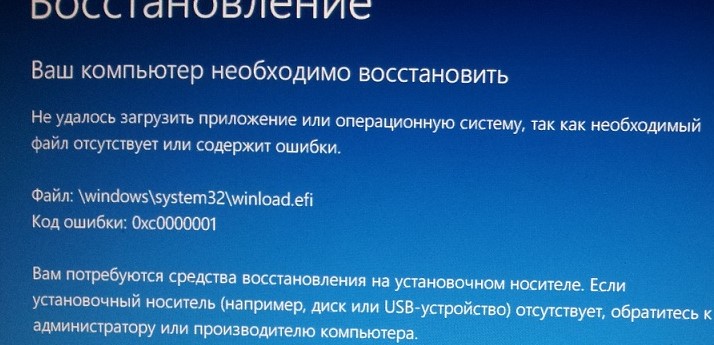
Данная проблема связана с отсутствием или повреждением файла загрузчика \windows\system32\winload.efi. Эта проблема появляется чаще всего после некорректного обновления системы, при повреждении диска или файловой системы, при переразбивке диска сторонними утилитами, обновлении антивируса, после переноса (клонирования) установленного образа Windows на новый диск, замене материнской платы компьютера и прочими вмешательствами.
Решение проблемы зависит от того, использовался ли у вас режим загрузки UEFI или Legacy до возникновения проблемы. Далее рассмотрим основные шаги, которые помогут исправить данную ошибку и корректно загрузить Windows 10/Windows Server 2016.
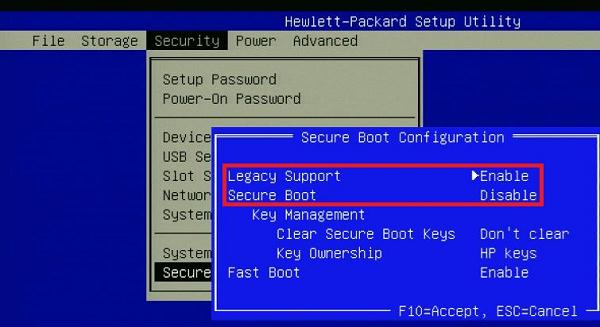
Включите режим совместимости CSM и отключите Secure Boot
Большинство компьютеров с поддержкой UEFI могут загружаться как с дисков с таблицей разделов GPT, так и с MBR дисков старого формата в режиме совместимости (Legacy).
Перезагрузите компьютер и войдите в меню настройки UEFI. Клавиша входа в меню UEFI зависит от производителя компьютера, как правило, это клавиши F2, F8, Del или Esc. Либо на нажмите кнопку ESC прямо на экране с ошибкой.

- Попробуйте в настройках UEFI включить режим совместимости CSMBoot (в некоторых версиях прошивок UEFI он может называться Legacy Boot);
- В настройках UEFI найдите и отключите режим Secure Boot. Местоположение данной настройки зависит от производителя прошивки UEFI. Как правило, ее стоит поискать в разделах Security, Authentication или Boot. На ноутбуке HP, например, пункт Secure Boot находится в разделе Security. Измените режим Secure Boot на Disabled или Off;
Автоматическое восстановление загрузчика Windows
Попробуйте исправить ошибку с помощью средства автоматического восстановления системы. Для этого:
- Загрузитесь с установочного DVD диска (или загрузочной UEFI флешки) с Windows 10;
- Нажмите кнопку Repairyourcomputer (Восстановить ваш компьютер) или клавишу R;
- Перейдите в раздел Troubleshoot-> Advancedoptions-> Startuprepair(Диагностика -> Дополнительные параметры -> Восстановление системы);
- Запустится мастер восстановления. Далее следуйте его инструкциям.
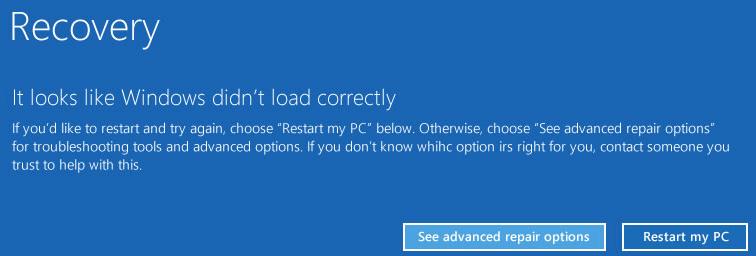
Если установочного диска с Windows под рукой нет, следует три раза перезагрузить компьютер нажатием на кнопку питания (Power) до тех пор, пока не появится экран консоли восстановления WinRe. Выберите пункт See advanced repair options (Дополнительные варианты восстановления). Далее все аналогично.
Отключите функцию защиты ELAM
Если предыдущие методы не исправили ошибку с загрузкой winload.efi, попробуйте отключить технологию ранней защиты от вредоносного ПО — ELAM (Early-launch Anti-Malware), которая по умолчанию активна для загрузчика Windows.
- Выполните шаги 1-2 из 2 способа;
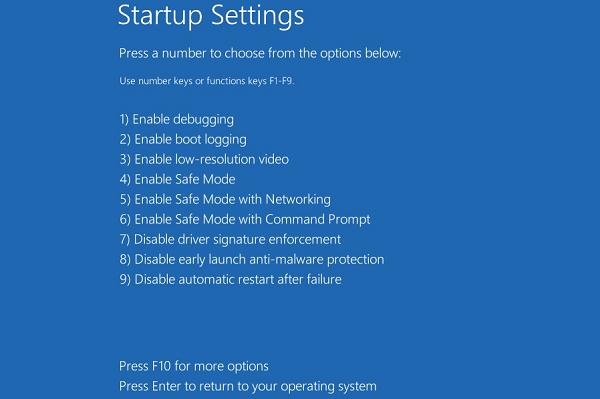
- Перейдите в раздел Troubleshoot->Advancedoptions-> Startupsettings(Диагностика ->Дополнительные параметры -> Восстановление при загрузке);
- Перезагрузите компьютер, нажав кнопку Restart;
- После следующей загрузки, система автоматически откроет меню настройки параметров загрузки — StartupSetting / Параметры загрузки (кстати, именно отсюда можно Windows 10 в безопасном режиме);
- Нажмите F8 чтобы выбрать пункт 8)Disableearlylaunchanti-malwareprotection/ Отключить автоматическую перезагрузки при сбое системы.
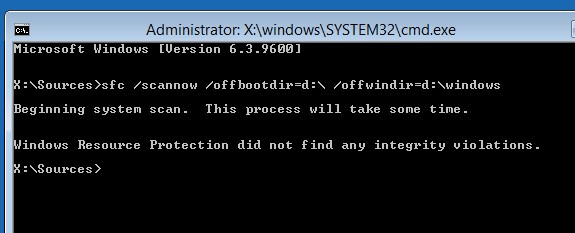
Выполните проверку дисков на ошибки и целостность системных файлов
Проверьте свои диски на наличие ошибок, возможно имеются ошибки диска или файловой системы на разделе с файлом winload.efi. Чтобы проверить все диски на наличие ошибок и исправить их, выполните команду:
После этого желательно проверить целостность системных файлов с помощью утилиты sfc. Для использования утилиты sfc в офлайн режиме, нужно указать путь к системному диску и папке Windows. Вы можете определить букву диска, назначенную разделу Windows с помощью команды:
Bcdedit /enum | find «osdevice»
Предположим, в вашем случае это диск D:. Команда проверки системных файлов будет выглядеть так:
sfc /scannow /offboot=d:\ /offwindir=d:\windows
Также нужно выполнить офлайн проверку хранилища компонентов Windows с помощью DISM. Нужно сравнить ваш образ с оригинальным установочным wim файлом вашего билда Windows 10 (предположим, оригинальный wim образ лежите на диске E:):
Dism /image:D:\ /Cleanup-Image /RestoreHealth /Source:E:\sources\install.wim
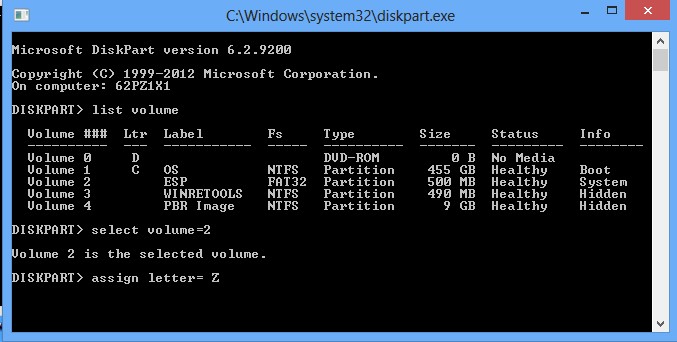
Восстановление BCD загрузчика и файла winload.efi для UEFI системы
Если ваша Windows 10 была установлена в нативном UEFI режиме на GPT диске, мы рекомендуем вам воспользуетесь инструкцией по пересозданию EFI загрузчика Windows 10 на устройствах с UEFI . Рекомендую воспользоваться статьей по ссылке, там все описано довольно подробно. Здесь оставлю короткий гайд:
Загрузитесь с загрузочного диска и запустите командную строку:
- Выполните команду: diskpart
- Выведите список разделов на дисках: list volume
- айдите раздел с меткой ESP или EFI размером 500 мб (размер и название раздела может отличаться в зависимости от версии Windows, но главное – его файловая система всегда должна быть FAT32). Запомните его номер. Если EFI раздел был случайно удален, его можно восстановить так;
- Выберите этот раздел: select volume 2
- Назначьте разделу букву диска: assign letter=Z
- Выйдите из diskpart: exit
- Теперь нужно пересоздать загрузчик, скопировать загрузочные файлы из каталога Windows: bcdboot c:\Windows /s Z: /f ALL (замените c:\ на букву диска, на котором у вас находится ОС); Если вы все сделали правильно, появится надпись Boot files successfully created ;
- Перезагрузите компьютер и проверьте, исправлена ли проблема.
Пересоздание загрузочных записей в хранилище BCD с помощью bootrec и bcdedit
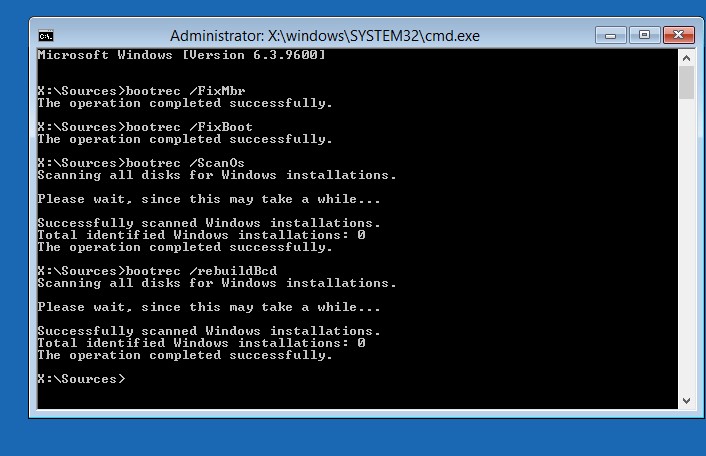
Если у вас система установлена не в режиме UEFI, тогда вы можете восстановить пересоздать загрузочные записи и сам MBR загрузчик Windows с помощью утилиты bootrec.
- Выполните шаги 1-2 из 2 способа;
- Перейдите в раздел Troubleshoot > Command Prompt (Диагностика – Командная строка).
- В открывшемся окне командной строки выполните последовательно команды:
bootrec /FixMbr
(запись основной загрузочной записи в системный раздел)
bootrec /FixBoot
(перезапись нового загрузочного сектора в системном разделе)
bootrec /ScanOs
(сканирование дисков на предмет наличия установленных ОС)
bootrec /RebuildBcd
(пересоздание конфигурации загрузчика) - Закройте командную строку командой:
exit - Перезагрузите компьютер.
Если предбудущий способ не помог, нужно пересоздать файл конфигурации загрузки для MBR в командной строке консоли восстановления или загрузочного диска:
bcdedit /set
bcdedit /set
bcdedit /set
bcdedit /set
bcdedit /set
bcdedit /set
Перезагрузите компьютер и проверьте, исправлена ли проблема.


