- System Restore Points Gone in Windows 10 | 5 Fixes
- Overview of system restore points
- Why system restore points missing in Windows 10?
- How to fix no system restore points in Windows 10?
- Fix 1: Enable System Restore
- Fix 2: Increase the disk space usageВ
- Fix 3: Start Volume Shadow Service
- Fix 4: Change triggers in SR properties
- Fix 5: Run system file checkerВ
- System restore points gone in Windows 10 | use backup directly
- The way forward
- System Restore points are disabled after you upgrade to Windows 10
- Symptoms
- Cause
- More information
- FIX: Windows 10 can’t find a restore point
- How do I restore Windows 10 if there is no restore point?
- 1. Make sure System Restore is enabled
- 2. Create restore points manually
- 3. Check the HDD with Disk Cleanup
- 4. Check the HDD state with command prompt
- 5. Rollback to previous Windows 10 version
- 7. Reset your PC
System Restore Points Gone in Windows 10 | 5 Fixes
Get the possible reason to system restore point gone of Windows 10 and fix it per your situation immediately! Here are 5 fixes and one useful tip.

By Ivy  / Last Updated March 17, 2021
Content of this article:
Overview of system restore points
System restore points, the collection of important system files (like drivers, registry keys, system files, installed programs, etc.) on a given date and time, can be used to restore your computer to an early date. Also, you can do system restore in safe mode if your computer is unbootable. It’s mainly used to fix the problems, which causes your computer running slowly or stopping responding.
If your system files are corrupted or damaged, you can restore your computer to the previous date. If the installed programs do not work properly, you still can fix it by system restore points.
However, when you need to restoreВ from a system restore point to fix certain problems, you may findВ no system restore points have been created in Windows 10. Why did myВ system restore points disappear? How to Fix this issue easily and quickly? Please keep reading below to learn more.
Why system restore points missing in Windows 10?
For Windows 10 system restore points gone, there are several possible reasons. Maybe, different users have different reason, just learn them below and find yours, so you can fix this issue thothroughly.
1. You upgrade or reinstall the operating system. If you upgrade or reinstall the operating system, the system restore points on the previous version of Windows are not applicable to the existing system. Thus, Windows will delete it automatically.
2. System Restore is disabled by default in Windows 10. In Windows 10, System Restore is disabled by default unless you manually enable it. Only to enable System Restore, you can create a restore point in Windows 10.
3.В The max usage to save restore points is low. If the max usage is low, System Restore may clean up the older restore points. So, you should make sure your disk has enough space to save restore points.
4. The retention time of Windows 10 system restore is less than 90 days.В В In Windows 7, a restore point can be kept for 90 days. However, in Windows 10, it cannot be kept over 90 days.
5. Any kind of USB turbo-boosters like ASRock XFast USB can affect the Volume Shadow Service. If your computer have a SRock XFast USB, you need to remove it before you create a restore points.
6. The page file is defragmented.В If you find no system restore points have been created in Windows 10 after you restart your computer, your page file is defragmented. You need to recreate it.
7. System Restore has corrupt files. If the System restore has corrupt files, your restore points will be deleted. You can run sfc/scannow to check if there are corrupt files.
How to fix no system restore points in Windows 10?
To fix no system restore point in Windows 10, you need to check if it’s enabled first and be sure there is no USB turbo-booster. Then, try other given solutions below.В
Fix 1: Enable System Restore
Step 1. Type System in the search box, and then select System protection
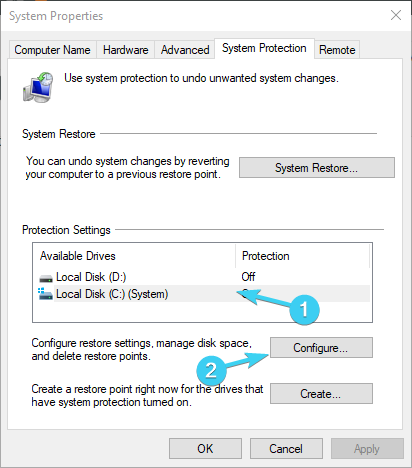
Step 2. Select a drive and click Configure to enable system protection.
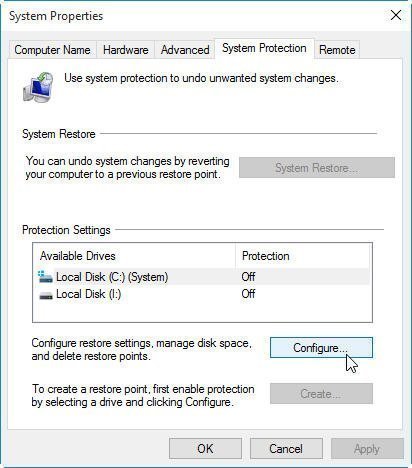
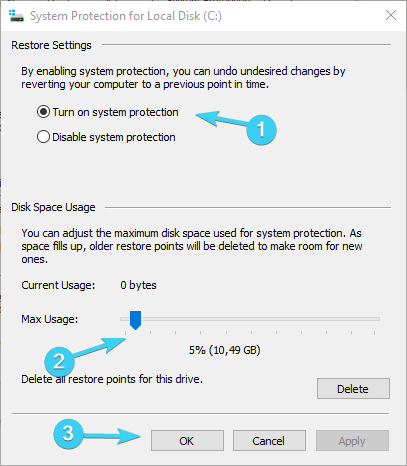
Step 3. In the Restore Settings tab, tick Turn on system protection and click OK to exit this window.
Fix 2: Increase the disk space usageВ
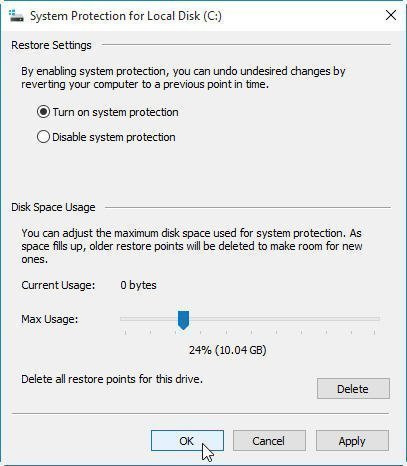
Step 1. Go the System Proetction for Local Disk (C:) and scroll down to Disk Space Usagae.
Step 2. Drag the Max Usage slider to the right side and make sure there are enough space to store restore points. Then, click Apply and OK to exit.В
Fix 3: Start Volume Shadow Service
Step 1. Press Win + R to summon the Run window
Step 2. Type services.msc to open the Service utility
Step 3. Start the Volume Shadow Service if it not running. You can Find it from the list, and then right-click it and select Start.

Fix 4: Change triggers in SR properties
Step 1. Type Task Scheduler in the search box and select it from the context menu.
Step 2. Expand the Task Scheduler Library, then select Microsoft > Windows > SystemRestore.
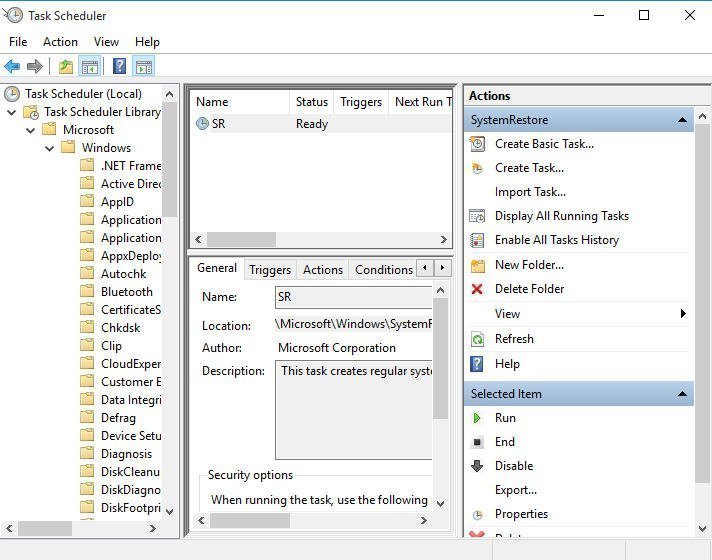
Step 3. Click the entry named SR in the top pane.
Step 4. Click the History tab in the bottom pane, and then see system restore tasks, warnings and errors recorded.
Step 5. Double-click SR file, then click Triggers and Edit to change the Triggers.
Step 6. Specify the conditions. You can click Conditions, then uncheck Start the task only if the computer is idle for and Start the task only if the computer is on AC power.
Now, you may successfully fix the system restore points lost problem. And you still need to create a new restore point for your computer.
Fix 5: Run system file checkerВ
Step 1. Type cmd in the search box and select Run as administrator.
Step 2. Type sfc /scannow and hit Enter to execute this command line.

System restore points gone in Windows 10 | use backup directly
System restore point will be deleted automatically due to different reasons, such as, low disk space usage, disabled system restore, Windows updates, and more. In addition, itВ cannot restore the following items.В
1. You cannot restore your personal data. The restore points does not affect any of your documents, pictures, or other personal data. Only the recent installed programs and drivers will be uninstalled.
2. You cannot restore your computer when the hard drive or system crash. The restore points are saved in the corresponding hard drive. Therefore, if the hard drive or system crash, the restore points will also be deleted. And it does not contain all the items required to start Windows.В
Then,В if you don’t want to lose your data or reinstall Windows 10 from scratch, backup will be a better choice. You can keep it forever as long as the backup disk has enough space. And it can fix all the computer failure, even the system crashes.
To make it effortlessly, you need a trust and reliableВ backup and restore softwareВ like AOMEI Backupper Standard. It has an intitive interface and is able to backup system, disk, partition and files per your needs. Also, it supports schedule backup in daily/weekly/monthly so as to ensure you always have the lastest version.
In addition, you can move Windows 10 to new computer, even with dissimilar hardware. It makes use of a feature called «Universal Restore (supported by the professional version)» to install all the necessary drivers to start Windows.В В
Step 1. Download AOMEI Backupper Standard, install and launch it.
Step 2. Click System Backup under the Backup tab.

Step 3. Specify the Task Name and select the destination path for your backup. AOMEI Backupper will automatically select the system partition and other partition related to boot your computer. Thus, you just need to choose the destination path.

Step 4. Set up backup settings and then click Start Backup.В
Options: You can comment on this task for clearly distinguish, enable email notification to get final result timely, set pre/post-command, etc.
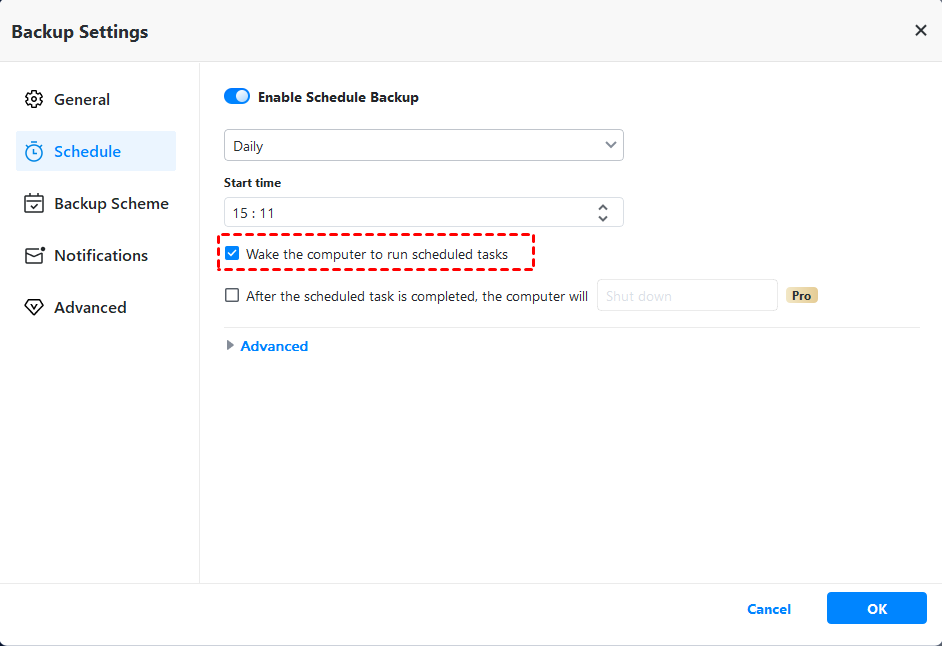
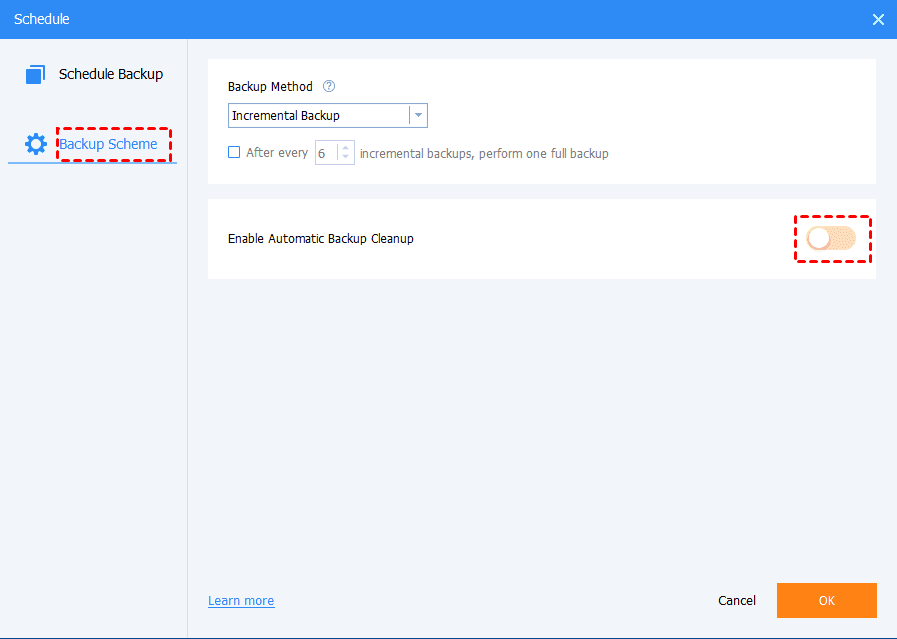
Schedule: You can backup system at a regular time, such as, daily/weekly/monthly. It all depends on how often you will change your files on the system. If you want to backup system during off-peak hours, please remember to tick «Wake the computer to run scheduled tasks»
Scheme: You can manage backup disk space by deleting old backup image. It has 5 options, you can choose one per your needs. Note that this feature is only available on theВ professional version.
The way forward
If you are troubled by Windows 10 system restore points gone, you can try above solutions to solve it. Then, when your computer becomes slow or has other problems, you can restore it to previous working date.
However, system restore points do not restore files or entire system when your computer is unbootable. At this time, you need a complete system image forВ Windows 10 or disk backup, which will contain everything required to start Windows as well as data on it.В
To avoid such failure, you need a free backup and restore software like AOMEI Backupper Standard. It not only help youВ backup system or disk, but also changes made later as long as you add a schedule setting in that task. Just download it to have a try right now!
System Restore points are disabled after you upgrade to Windows 10
This article discusses an issue where you can’t restore the system to an earlier restore point after an upgrade to Windows 10.
Original product version: В Windows 10 — all editions
Original KB number: В 3209726
Symptoms
Assume that you have a Windows 7-based system with system restore points set, and the computer is upgraded to Windows 10. When you try to restore the system to an earlier restore point after the upgrade, you discover that you can’t do that. The option is disabled.
Windows 7 Disk Size:

Restore points on Windows 7:

Restore points after you upgrade to Windows 10:

Querying the System Restore via PowerShell:

Cause
This issue occurs because system restore points don’t persist after a Windows upgrade. This behavior is by design.
More information
By default, System Restore should be disabled after an upgrade regardless of its earlier setting, and all the older Restore Points will be deleted from System Restore. However, on an MSI or Windows Update installation, if the size of the operating system disk is greater than 128 gigabytes (GB), a restore point is automatically created without the user enabling System Restore (as if System Restore were already enabled). Similarly, if the disk size is less than 128 GB, no restore point is created until System Restore is manually enabled.
You can verify this yourself by checking for a restore point after a .msi or Windows Update installation on a computer that has a disk size of greater than 128 GB.
FIX: Windows 10 can’t find a restore point

- If you can’t find a restore point in System Restore on Windows 10, make sure the option is enabled.
- When no restore points are found in Windows 10, you might have to create one manually.
- Also, if there are no system restore points in Windows 10, check the HDD for corrupted files.
- Another possibility is to roll back to a previous Windows version via the Settings menu.

The first thought that comes to the user’s mind when something goes awry with anything Windows is System Restore. This feature is as old as the Windows platform itself and it provided a safe exit for many concerned Windows users.
As you probably know, System Restore creates restore points you can use to rewind time.
But what happens when you just can’t access any restore point? Some users reported this issue in Windows 10, but it’s frequently occurring in previous iterations, as well.
How do I restore Windows 10 if there is no restore point?
1. Make sure System Restore is enabled
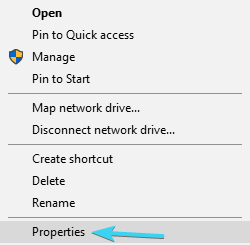
- Right-click on This PC and open Properties.

- Click on System protection on the left side.
- Select Local Disk System partition, usually (C:).
- Click on Configure… below.
- Click on Turn on system protection.
- Select the preferred disk usage limit on the scale. Once the restore points reach the limit, they’ll be deleted from older to newer. Take into consideration the available space since they tend to pile up quickly.
- Confirm changes and restart your PC.
After that, your system will keep track of changes and create restore points accordingly. Basically, after every newly installed program or major system change, the system will create a restore point.
With Windows 10, Microsoft decided to disable the System Restore feature by default in order to preserve storage space and lower the requirements.
Restore points can take a lot of storage space and, with them running in the background, the minimum of 16GB of free space Windows 10 actually requires, would be impossible to work with.
For that reason, make sure that automatic restore maintenance is enabled. Of course, if you’re trying to repair your already damaged system, enabling System restore won’t help you too much.
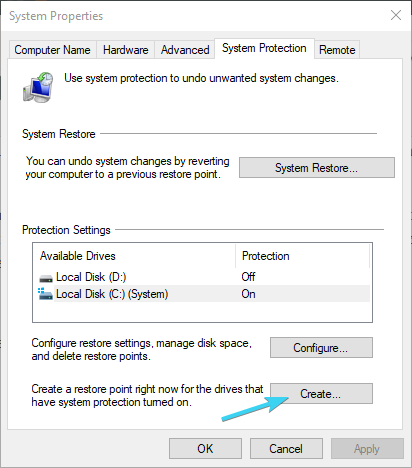
2. Create restore points manually
- In the Windows Search bar, type restore and open Create a restore point.
- Under the System protection tab, click on Create….
- Name the restore point and click on Create.
- The system will create a restore point and you’ll be good to go when the future issues emerge.

There’s a scenario where you are certain that there were some restore points but they’re gone for no apparent reason. Sadly, that’s not unusual.
Sometimes they’re wiped out by system updates, configuration changes, or even third-party antivirus solutions. And the worst thing is that you are, most of the time, unaware of that.
And when the dire times come and you’ll need to restore PC and fix the errors – not a single restore point is there to answer your call.
If this is a repeating occurrence, your best bet is to leave the automatization behind and do it manually. You can create a restore point whenever you deem it needed, but you can’t move it from the default location which complicates things.
The only thing you can do to avoid possible absence at the time of need is to create them as often as you can.
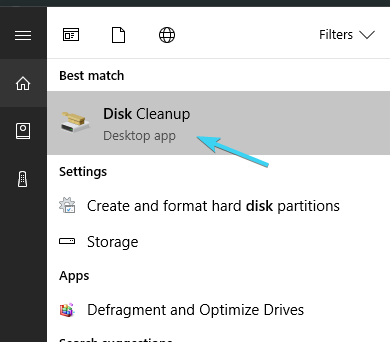
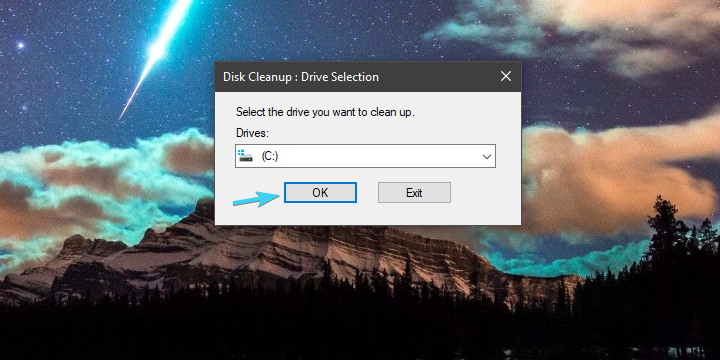
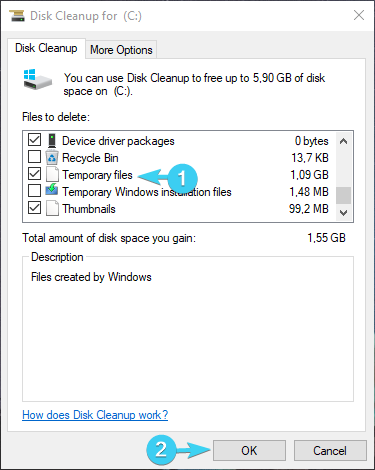
3. Check the HDD with Disk Cleanup
- In the Windows Search bar, type Disk and open Disk Cleanup.
- Select the system partition (usually C:) and click on OK.
- Click on the Clean up system files.
- Check whatever you want but checking Temporary files is a must since those take the most space.
- Click OK.
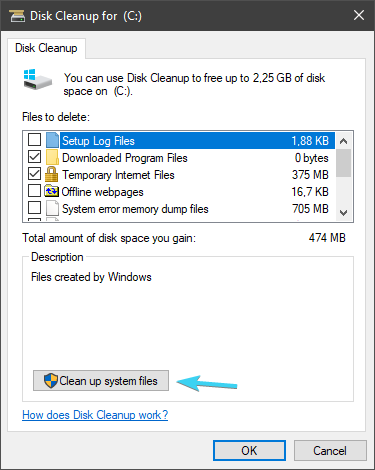
Of, course, you can uninstall old or unused programs or games to get even more free space.
Many users use third-party tools to delete temporary and unnecessary files, but our advice is to stick with Disk Cleanup in order to avoid critical damage.
4. Check the HDD state with command prompt
- Type cmd in the Windows Search bar, right-click on Command Prompt and run it as an Administrator.
- In the command line, type chkdsk /f C: and press Enter.
- In case the Check Disk utility finds any errors, it will repair them accordingly.
- Once the procedure ends, restart your PC and try creating a restore point manually (as explained above).
5. Rollback to previous Windows 10 version
Via Recovery
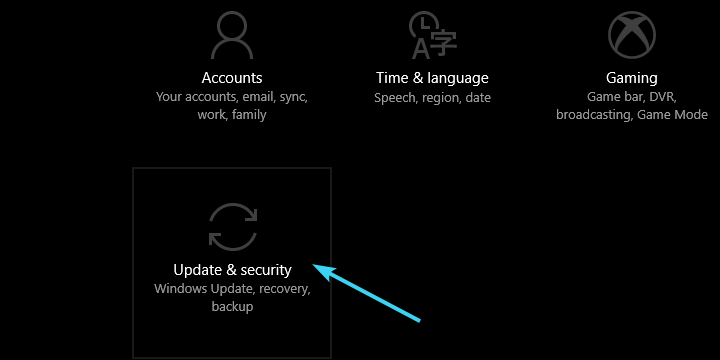
- Press Windows key + I to open Settings.
- Click on Update & security.
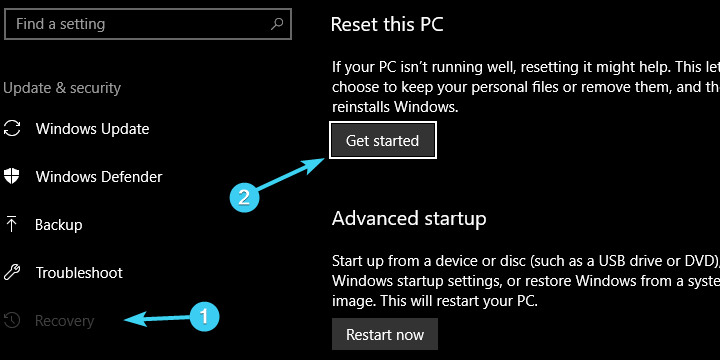
- Select Recovery from the left pane.
- Under Go back to the previous version of Windows 10, click Get started.
- Follow the instructions until you roll back the Windows 10 version and, hopefully, resolve the problem that’s bothering you.
The previous steps were mainly intended to fix the issues with missing restore points. But, what to do when you’ve already bumped into a critical system issue and there’s no restore point you can turn to for help?
Luckily, there are a lot of alternative recovery options in Windows 10. It’s just like they predicted the possible problems that might occur.
The first one is mainly introduced to repair an abundance of issues that often emerge after a major update. It enables you to restore to a previous build version.
You’ll eventually update again (just Windows 10 thing, we guess), but waiting for patches with the fully functional system is a much more pleasant experience.
Via Advanced Startup
- Right-click Start and open Settings.
- Choose Update & security.
- Highlight Recovery from the left pane.
- Under the Advanced Startup section, click Restart now.
- When the Advanced Startup menu appears, click Troubleshoot.
- Select Advanced options.
- Click on the Go back to the previous version of Windows option.

If the first option is missing, there’s an alternative way to utilize this recovery tool. Follow the instructions above.
7. Reset your PC
- Use Windows key + I to summon the Settings app.
- Open the Update & security section.
- Choose Recovery from the left pane.
- Click on the ”Get started” button under ”Reset this PC”.
- Chose whether to keep or erase all your files.
- Continue with the steps until the system is fully restored to default values.
This recovery option enables you to reset your PC to default settings, restoring everything in the process to the default values. It’s analog to reinstallation of the system, with the exception that you can keep your files untouched.
Finally, if none of the previous steps worked for you, you can always perform a clean reinstallation. Make sure to check out our detailed explanation in our guide.
That should do it. In case you have questions or suggestions in regards to System restore and/or missing restore points, don’t forget to tell us in the comments section below.


