- Блог Сергея Ёлчева о компьютерах
- Что такое трей в компьютере, как его использовать
- Что такое трей в компьютере
- Как настроить трей и убрать программы
- Как настроить значки в трее мышкой
- Заключение
- Что такое системный трей Windows и для чего он нужен?
- Немного из истории системного трея
- Как избавиться от значков удаленных программ в трее?
- How to Fix System Tray or Icons Missing in Windows 10
- How to Fix System Tray or Icons Missing in Windows 10
- Use a Mouse to Show Hidden Icons in the System Tray
- Use Windows 10 Settings to Show Hidden Icons in the System Tray
- Turn System Icons On or Off
- Restart Windows Explorer
- Reset or Delete the IconCache
- How to Reset the IconCache Database on Windows 10
- How to Delete the IconCache Database on Windows 10
- Disable Controlled Folder Access
- Reinstall the Taskbar
- Edit the Registry
- Get Your System Tray and Icons Back
Блог Сергея Ёлчева о компьютерах
Грамотная работа за компьютером и в Интернете
Что такое трей в компьютере, как его использовать
Что такое трей на рабочем столе компьютера? В данной статье ответим на вопрос и рассмотрим практическую работу с треем. С помощью трея вы сможете управлять скрытыми значками и получать необходимые уведомления.
Что такое трей в компьютере
Здравствуйте, подписчики и читатели! Если вы первый раз включили компьютер и используйте его, то во время работы со скрытыми значками, возможно, задавались вопросом, а что такое трей? Ведь многие пользователи говорят об этом термине. Давайте разберем термин подробно.
Простыми словами трей в компьютере – это область уведомлений. Данная функция обозначается стрелкой вверх, которая расположена в правом нижнем углу на панели задач компьютера (скрин 1).

Если навести курсор компьютерной мыши на стрелку и нажать на нее, то мы увидим работающие программы в данный момент времени. Это может быть антивирус, фоновые приложения, например, Блютуз и так далее.
Для чего нужен трей? Чтобы скрыть значки программ и получать уведомления. К примеру, у меня установлена программа, которая очищает компьютер от мусора. Когда перезагружаю Виндовс, всплывает уведомление из трея, которое показывает, сколько времени перезагружался компьютер. Это один из примеров работы с треем.
Далее покажу, как убирать программы из трея, если они вам мешают.
Как настроить трей и убрать программы
Есть несколько способов убрать программу из трея:
- выйти из программы;
- удалить программу;
- настроить отображения значков в трее.
Рассмотрим каждый способ детально. Чтобы закрыть ненужную вам программу, откройте скрытые значки в трее далее щелкните правой кнопкой мыши по программе и нажмите «Выйти из программы» (скрин 2).

В следующий раз программа отобразится в трее при повторном запуске.
Второй способ: удаление программ. В статье я уже рассказал пошагово, «как удалить программу с компьютера в Виндовс 8», это сделать достаточно просто.
Третий вариант: настройка значков на панели задач. Для этого нажимаете правой кнопкой мыши по стрелке, которая направлена вверх на панели задач и выбираете из меню «Параметры панели задач» (скрин 3).

Этот вопрос рассматривается в Windows 10.
Далее находите в настройках раздел «Область уведомлений» и нажимаете по разделу «Выберите значки, отображаемые на панели задач» (скрин 4).

Чтобы убрать программу с панели, достаточно выбрать программу и нажать кнопку отключения (скрин 5).

После этого программа переместится в трей.
Кроме того, вы можете нажать на кнопку «Включение и отключение системных значков» в этих настройках. Далее нажмите ползунок в левую сторону, если не хотите, например, чтобы отображался значок электропитания. Чтобы активировать значок, нажимаете кнопку вправо, и она будет подсвечена синим цветом. Это значит, что значок в трее и на панели задач отобразился.
Как настроить значки в трее мышкой
Иногда, неохота тратить время на настройки и дополнительные клики. В этом случае, вы можете нажать по значку, и, удерживая его левой кнопкой мыши перенести в трей, либо обратно на панель задач вашего компьютера (скрин 6).

Кроме того, можно сэкономить время и зайти в настройки программы через иконки. Для этого кликните по ним правой кнопкой мыши и нажмите по пункту меню «Настройки».
Заключение
В данной статье рассмотрели вопрос, что такое трей в компьютере и как им пользоваться. По этой инструкции вы сможете пользоваться системным треем без проблем. Главное знайте, что это удобный инструмент в Windows.
Что такое системный трей Windows и для чего он нужен?
Сегодня речь пойдет о таком интересном понятии, как системный трей Windows (system tray). Научное определение трея – это область уведомлений или так называемый элемент панели инструментов рабочего стола.
Эта область уведомлений применяется для программ, которые работают в системе продолжительное время или же постоянно, но при этом используются редко. Это могут быть антивирусы, ICQ, Skype и прочий софт. Трей позволяет левой клавишей мыши вывести на экран интерфейсное окно необходимой программы. Путем несложной настройки с помощью специальных программ можно любую программу поместить в трей.

Немного из истории системного трея
Изначально, во времена Windows-95, системный трей использовался для вывода пользователю небольших системных сообщений, например, о начале или невозможности печати документа на принтере, о переполнении жесткого диска и т. д. В этом были и свои минусы. Многие программы помещали в трее свои значки, и он становился чересчур загроможденным.

С появлением Windows XP системный трей стал более современным в части отображения значков. Теперь появилась возможность его настраивать. Можно скрыть ненужные программы и показывать только те, которые требуются постоянно.
Как избавиться от значков удаленных программ в трее?
В новых операционных системах наподобие Windows 7 и выше постепенно в системном трее скапливаются значки уже удаленных программ. Чтобы избавиться от этого выполните ряд несложных команд.
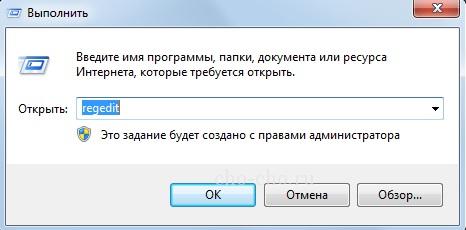
- Запустите редактор реестра, нажав «Пуск» – «Выполнить» или же сочетание клавиш «WIN + R«. В появившемся окне введите команду regedit, затем нажмите «Enter«.

- У вас появится окно с названием «Редактор реестра». Перейдите по пути:
Для изменения области уведомлений (системного трея) создано огромное число различных программ (платных и бесплатных). Они позволяют значительно увеличить его площадь, улучшить многие характеристики. Использовать их или нет – дело каждого. Важный нюанс – они расходуют оперативную память, особенно это ощущается, если компьютер слабый. Ну вот и все о системном трее на сегодня.
How to Fix System Tray or Icons Missing in Windows 10
Plus what to do as a last resort
The Windows 10 System Tray (Notification area), is located on the right side of the taskbar and provides access to system notifications, functions, and apps.
The system tray also holds shortcuts to some important settings like network, power, volume, and Action Center icons.
If you hover over the system tray and notice that the icons you use are missing, there are several reasons why this happens. You may have installed a Windows Update, which caused a glitch, or there are corrupted Registry entries that seem to conflict with Windows 10, making the system tray or icons disappear.
Here’s how you can fix the system tray or icons missing in windows 10 problem.
How to Fix System Tray or Icons Missing in Windows 10
There are two ways to show hidden icons in the system tray: Using the mouse and using Windows 10 Settings.
Use a Mouse to Show Hidden Icons in the System Tray
To do this using your mouse, select the arrow next to the Notification area to open the system tray and reveal the hidden icons. You can also drag the icons with your cursor and drop them on the taskbar.
Use Windows 10 Settings to Show Hidden Icons in the System Tray
If you want to see all your icons in the system tray all the time, remove the arrow and expandable pane, and enable the Always show all icons in the notification area setting.
- To do this, right-click your taskbar and select Taskbar Settings.
- Next, go to the Notificationsarea and click the Select which icons appear on the taskbar option.
- Toggle the Always show all icons in the notification area setting at the top of the list.
Note: Icons in the system tray only appear when their corresponding apps are running.
Turn System Icons On or Off
If you still don’t see icons on your system tray, use the Turn system icons on or off setting and see if it helps.
- To do this, right-click the Taskbar > Taskbar Settings.
- In the Taskbar Settings, go to the Notification area and select Turn system icons on or off.
- Find the system icons you want to show on the system tray and toggle their sliders to On (if they’re Off).
Restart your computer for the changes to take effect.
Restart Windows Explorer
Restart Windows Explorer to reload it and restore the missing system tray or icons on your computer.
- To do this, right-click the taskbar and select Task Manager.
- Select explorer.exe under the Processes tab, right-click and select End Task.
- Next, open the App History tab, click File > Run New Task.
- Type explorer.exe in the message box that appears and select OK.
Windows Explorer (explorer.exe) will reload and the icons will appear in the system tray. If there’s an icon you don’t see, go back to the Taskbar settings, select Turn system icons on or off and check the box next to the missing icon.
Reset or Delete the IconCache
The icon cache database contains the icons you see on apps and files so that the operating system can display them on your screen. Caching icons keeps your system from slowing down by not having to look up icons every time.
However, as the icon cache database grows, corruption may creep in and the icons may not render correctly, may appear broken, or missing from the system tray.
To resolve this problem, try to reset or delete the IconCache to resolve the problem.
How to Reset the IconCache Database on Windows 10
- To reset the icon cache database, close all running applications, and then open the command prompt. Type CMD in the search bar and select the Run as administrator option.
- Type this path in the command prompt window and press Enter:
cd %homepath%\AppData\Local\Microsoft\Windows\Explorer
- Next, type dir iconcache* and press Enter (a list of database files will appear).
- Stop File Explorer by typing the command: taskkill /f /im explorer.exe and then press Enter. You’ll notice your taskbar and desktop background disappear after terminating File Explorer, but it’s temporary. Closing File Explorer helps delete the icon cache files.
- Next, type del iconcache* and press Enter.
- Type dir iconcache* to confirm that you have deleted the icon cache files, and then press Enter. Start File Explorer by typing explorer.exe and press Enter.
Close Command Prompt to complete the process, and Windows will recreate the database files with new icons.
How to Delete the IconCache Database on Windows 10
- To delete the IconCache database file, right-click Start > Run and enter %appdata% in the Run window to open the Roaming folder.
- In the Roaming folder, select Appdata in the address bar.
- Select the Local folder.
- Select View and check the Hidden items option.
- Right-click IconCache in the Local folder, and select Delete.
- Close Windows Explorer, reboot your PC, and check whether the system tray and icons are visible again.
Disable Controlled Folder Access
Controlled Folder Access is an intrusion prevention feature in Windows 10 that protects your valuable data from modification by threats like malware, viruses, and ransomware. If you find system tray or icons missing in Windows 10, try disabling the Control folder access option and see if they’re restored after that.
- To disable Control folder access, select Start, type Windows Security in the search box, and select Virus & Threat protection.
- Scroll down to Ransomware protection and select Manage ransomware protection.
- Next, toggle the Control folder access option button to turn it off or disable it.
Reinstall the Taskbar
If the system tray or icons are missing on your computer, chances are the taskbar may not be working properly. To resolve this, reinstall the taskbar using Windows PowerShell.
Right-click Start > Windows PowerShell (Admin).
Copy and paste this command and press Enter:
Get-AppxPackage -AllUsers| Foreach
Check if your system tray and icons are back in the notification area.
Edit the Registry
Editing the Windows Registry helps correct errors or corruption, or prevent undesired system activity. The process can be dangerous, especially if you make a wrong edit in the wrong entry, so make sure you backup the registry before proceeding with the steps below.
- Select Start > Run and type regedit in the Run window to open the Registry Editor.
- Next, navigate to the HKEY_CURRENT_USER\Software\Classes\LocalSettings\Software\Microsoft\Windows\CurrentVersion\TrayNotify key.
- Select the Tray Notify folder, and then right-click IconStreams and PastIconsStream to delete their values.
If nothing else works, try a System Restore as this protects and repairs your computer’s software. It saves the Windows Registry and some system files as restore points for use in case of data corruption or an install failure.
A System Restore returns the system to working condition by reverting back the settings and files saved to the restore point.
Get Your System Tray and Icons Back
We hope these steps helped you get your missing system tray and icons back. Make sure to search the rest of our site for more troubleshooting tips and tricks to help you fix other issues in different operating systems and devices.
Elsie is a technology writer and editor with a special focus on Windows, Android and iOS. She writes about software, electronics and other tech subjects, her ultimate goal being to help people out with useful solutions to their daily tech issues in a simple, straightforward and unbiased style. She has a BCom degree in Marketing and currently pursuing her Masters in Communications and New Media. Read Elsie’s Full Bio


