- Microsoft is working on Foldable Windows tablet
- Foldable Windows tablet with Windows Lite
- Fix Wacom Pen Not Working: Windows 10 [Resolved]
- How To Fix Wacom Tablet Pen Not Working on Windows 10
- Method 1: Restart Wacom Tablet Services
- Method 3: Check USB Wire of Wacom Tablet
- Method 4: Change Wacom Pen’s Tip
- Method 5: Restart Your PC
- Method 6: Reinstall Wacom Tablet Driver
- Method 6: Revert Windows 10 Update
- Method 7: Install Previous Wacom Driver
- Method 8 Download Windows compatible driver from Wacom
- Closing Words
- viziblr
- The Ultimate Guide to Making Your Wacom Tablet Work on Windows 7
- PLEASE READ: The Windows and Wacom Tablet Nightmare is Over
- YOU HAVE TWO OPTIONS. PICK ONE.
- MANUALLY CONFIGURING YOUR SETTINGS
- PREFER TO WATCH THE SCREENCAST?
- STEP 1: DOWNLOAD AND INSTALL THE LATEST DRIVERS
- STEP 2: DISABLE THE TABLET PC INPUT PANEL
- STEP 3: DISABLE FLICKS
- STEP 4: DISABLE PRESS-AND-HOLD
- STEP 5: DISABLE DYNAMIC FEEDBACK
- ONE LAST STEP
Microsoft is working on Foldable Windows tablet
Microsoft would once again work on a competitor for Chrome OS, Google’s lightweight operating system for cheaper laptops. This time it would be a folding tablet.
In the latest version of Windows 10, website Petri found information on ‘Windows Lite’. According to Petri it is a version of Windows that is focused on Chromebooks, laptops running on Chrome OS. Microsoft has already tried several times to make a lightweight version of Windows, intended for less powerful laptops or tablets: Windows RT and Windows 10 S. The latter was announced in 2017, but early 2018 it was already removed as a separate Windows version.
Petri states that Windows Lite does not become a stand-alone version of Windows that users can buy themselves, but a separate version that is only intended for lightweight laptops. Unlike Windows 10 S, Windows Lite would have its own unique look.
Foldable Windows tablet with Windows Lite
Windows Central in their end reports on a folding tablet that Windows would work on, under the work name Centaurus. It would be a larger version of the small folding tablet that Microsoft would work on under the codename Andromeda.According to Windows Central , Microsoft has been working on the Centaurus tablet for about a year, and the device would be unveiled in the autumn of 2019. It would be the first of a new type of Windows tablets that work with two screens. Windows Central says that the foldable tablet runs on Windows Core OS, a title that has been around for a while. It seems that Core OS and Windows Lite are the same operating system.
Microsoft again halts October 2018 Update on some PCs — 12/05/2018 09:51 AM
Blimey, this release must be a small nightmare for Microsoft, it seems PCs running corporate security software Morphisec Protector or applications that make use of Morphisec technology will be blocke.
Microsoft could be ending Edge browsers, to be replaced with Chromium alternative — 12/04/2018 05:00 PM
It seems Microsoft might be ditching Edge, Microsoft is working on a new browser, based on Chromium. Microsoft is working internally to convert the main browser in Windows 10 to the Chromium engine.
Microsoft blocks Windows 10 October 2018 Update (Again) — 11/23/2018 10:00 AM
This time there is a flaw detected with Intel display drivers, Microsoft has decided to halt the Windows 10 October 2018 Update on computers with specific Intel display drivers. On systems with thes.
Microsoft is working on cheaper Disc-Less Xbox — 11/20/2018 10:18 AM
Microsoft is reportedly working on an Xbox without a tray for reading DVD / CDs. The game console would be released to the market in the spring of 2019, reports the news site dedicated to Microsoft Th.
Microsoft Replacing Surface 4 Pro models that have screen issues after update — 11/19/2018 10:39 AM
It looks like the Microsoft Surface 4 Pro has a bit of an issue after an update that was applied in July users have been reporting display issues. It seems that the problem is so far fetched that Micr.
Fox2232
Senior Member
Posts: 11741
Joined: 2012-07-20
Bitey
Member
Posts: 29
Joined: 2018-07-15
asturur
Senior Member
Posts: 1052
Joined: 2010-05-12
#5613812 Posted on: 12/05/2018 01:00 PM core os, what it would be?
I would happy to buy again windows 10 if i could have a sort of game only OS with the linux subsystem working.
nothing else.
But i bet core OS is a windows 10 version that is entirely STORE + CORTANA + MICROSOFT MAPS based.
Fix Wacom Pen Not Working: Windows 10 [Resolved]
Wacom tablets are one of the most used, reliable, and sought after pen tablets. People from all across the world know Wacom pen tablet devices. And, people dealing with graphics swear by Wacom. But, at times, devices from Wacom fail to work too. The reason behind Wacom pen not working might be something related to your device, but most of the times it may be a minor glitch, something related to drivers, or some other thing.
So, let us discuss what may be the reason and how to fix the issue of Wacom pen not working on Windows 10.
How To Fix Wacom Tablet Pen Not Working on Windows 10
As I said, there are several reasons that may be causing your Wacom Pen to stop working. The first thing to do is carry out basic troubleshooting, and proceed with a solution accordingly. While facing Wacom Pen not working issue, some directly jump to play with driver settings. Refrain from doing that.
Method 1: Restart Wacom Tablet Services
To run various software as well as devices, Windows runs several services. At times, restarting the services related to an issue may solve the problem. As complex it may sound, restarting a service to fix Wacom Tablet Pen not working issue is not difficult at all. Let me show you how:
Step 1: Press Windows + R keys at the same time to open the Run Command box.
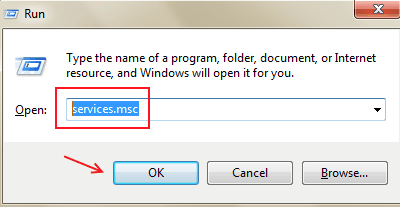
Step 2: In the Run box, type services.msc, then click Ok or press Enter.
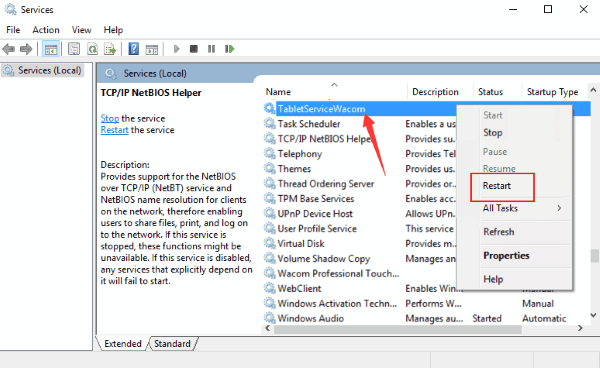
Step 3: This will open the Services window with a list of services. In the list, look for Wacom tablet service. For different Wacom tablets, the name of service differs. The service name of your Wacom tablet could be one of the following:
- Wacom Profession Service
- TabletServiceWacom
- Touch Keyboard and Handwriting Panel Service
- Wacom Consumer Service
As you find the service, right click on it. From the context menu, click on the Restart button. If the Restart button is grayed out, it means your Wacom service is not running. In that case, click on the Start button.
Test out your Tablet pen to see if it’s working or not. If it is not, it’s time to play with the Wacom Driver.
Method 3: Check USB Wire of Wacom Tablet
See if the USB cable of your Wacom tablet is properly connected. You can try to remove USB wire and re-insert it from both Tablet and PC ends. Keep an eye on the small LED light on your Tablet; if it is flickering and not running constantly, then the problem is with either your wire or USB ports. If this does not help, make sure the wire is working properly. Most probably your tablet USB cable has a Micro USB pin; try to test the cable on any other micro USB compatible device. Most of the Android phones and chargeable gadgets still have Micro USB charging holes. If your cable seems fine, then move on to the next step to fix the Wacom Pen not working on Windows 10.
Method 4: Change Wacom Pen’s Tip
The next thing to fix Wacom Pen issue is to try a new tip on your Wacom tablet’s pen or stylus. If you do not know how to change the tip, refer to the user manual of your tablet. If changing the tip doesn’t help too, then it’s probably your Wacom tablet or your PC at fault. Try the next method.
Method 5: Restart Your PC
Unplug your Wacom Tablet from your PC. When removed, restart your PC. Plugin the tablet again to your PC and see if your Pen is working or not. If not, try Method 4.
Now on, we will see if your computer is messing up with your Wacom Tablet and Pen and causing the Wacom Pen not working problem.
Method 6: Reinstall Wacom Tablet Driver
This method to fix Wacom Pen not working on Windows 10 is most possibly going to solve the problem for you. It happens sometimes that current driver gets corrupted or outdated with Windows 10 update. If your Wacom Pen cannot work, try the following steps to reinstall Wacom Tablet driver:
Step 1: Disconnect your Wacom Tablet from your PC.
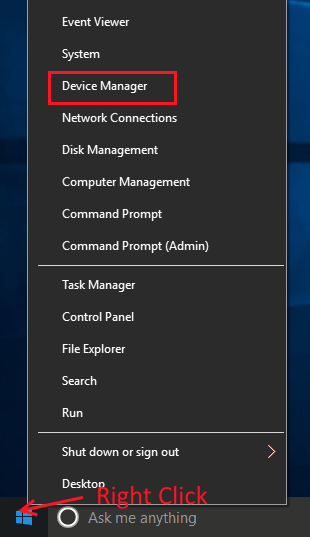
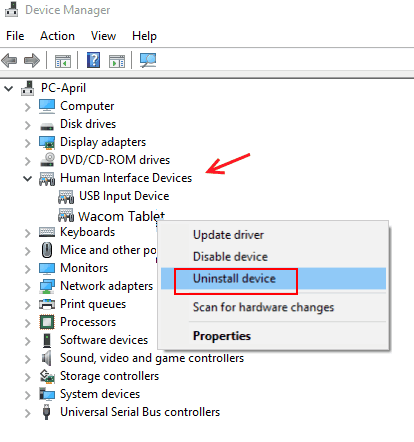
Step 2: Open Device Manager. To do so, you can either press Windows + X keys simultaneously on your Windows 10 computer. Or, right click on the Start button. Either way, a menu will appear; from there, you have to click on Device Manager option.
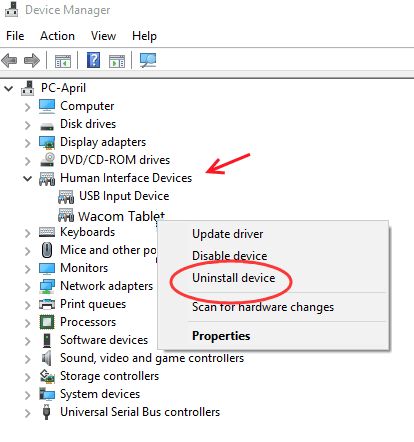
Step 3: This will open the Device Manager window. There, look for Human Interface Devices; click on it to expand its options. From the expanded menu, right click on Wacom Tablet driver and then select the Uninstall device option. This will remove the driver of your Wacom tablet from your computer.
Step 4: Download the latest driver for your Wacom tablet model compatible with your current OS, that is Windows 10. You can look for and download the latest and compatible driver from Wacom website.
Do not forget to look for compatible products before downloading a driver. If your device is not compatible with the latest driver, you can scroll down on Wacom website and look for product compatibility with previous drivers. Download the driver to your PC.
After you have downloaded the compatible driver, install in on your Windows 10 computer. To install the driver, you just have to double click on the downloaded driver file. It will automatically run the installation process.
When done, restart your PC, then plug in your Wacom Tablet device. Test if Wacom Pen is running fine.
Method 6: Revert Windows 10 Update
Windows 10 updates sometimes mess up things on your computer. If your Windows 10 PC was updated recently, it is quite possible that it would have made your Wacom pen to stop working. You can go ahead and try to uninstall the latest Windows 10 update and see if things work for you.
To uninstall a Windows 10 update, do the following:
Step 1: Press Start button on your PC to open Start menu. In the Search box of Start menu, type “Settings“.
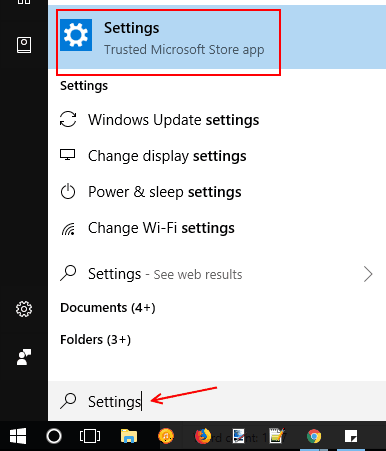
Step 2: This opens the Settings window. Look for Update and security section; there click on Windows Update option.
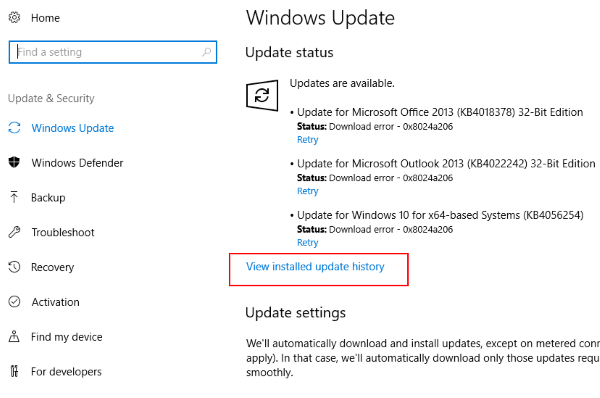
Step 3: On the right side of the Settings window, click on View installed update history under Update status section.
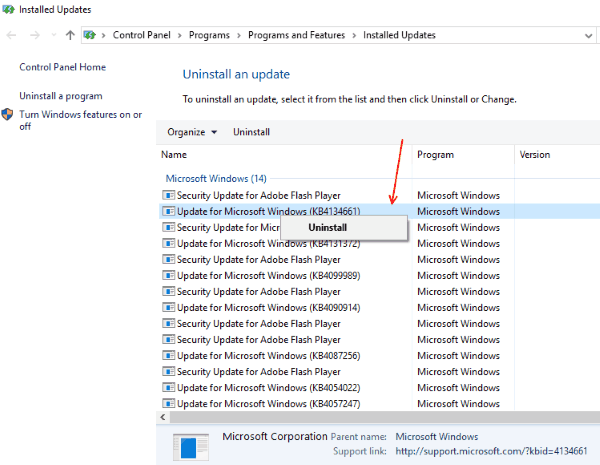
Step 4: From the new screen that opens, click on Uninstall updates option.
Step 5: This will open a new window with a list of all the latest Windows 10 updates done on your PC. Scroll down and locate the latest update done in the Microsoft Windows section, right click on the update, then click Uninstall.
Step 6: When the update uninstall is complete, restart your PC, and replug your Wacom Tablet. Check if it is working fine.
Method 7: Install Previous Wacom Driver
The last thing for you to try to fix Wacom Tablet Pen not working is to install previous Wacom Driver. It is also known as rolling back driver updates. For this, you have to uninstall current Wacom driver, then install previous version of Wacom Driver. To do so, follow these steps:
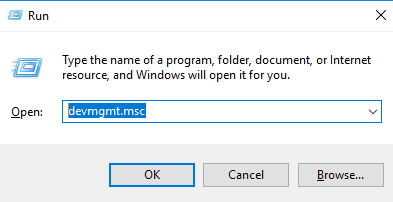
Step 1: Launch Run window. To do so, press Windows + R keys at once. In the Run window, type devmgmt.msc and press Enter.
Step 2: This will open the Device Manager window. From the list of devices, click on Human Interface Devices to expand it. From there, right click on Wacom Tablet driver, then click on Uninstall device.
Step 3: Go to the Wacom website and download previous version of compatible Wacom driver from there. You can find it just below the latest version. As suggested in Method 5, do not skip looking for device compatibility.

Step 4: Now, double click the downloaded Wacom driver to install it on your PC.
Step 5: Restart your PC after installation. As an additional step, press Windows + R again to open Run box, then type services.msc. Now, as shown in Method 4, Start the Wacom Tablet service. See if this method worked for you.
Method 8 Download Windows compatible driver from Wacom
1. Download Windows compatible driver from official website of Wacom. (Search product name and find compatible driver)
2. Plug out the Wacom tablet from your PC.
3. Uninstall the existing Wacom applications from your PC.
4. Restart computer
5. Execute and run the downloaded driver setup file from wacom website.
6. Restart PC
7. Plug in the wacom tablet again
Closing Words
Is your Wacom Pen not working yet? Then, there must be some issues that need to be addressed to experts. You can always get some help from Wacom Technical Support team regarding the Wacom Pen not working problem. They have support centers across many of the major countries. When you do so, do not forget to mention what troubleshooting have you done yet to solve Wacom Tablet pen not working issue.
viziblr
The Ultimate Guide to Making Your Wacom Tablet Work on Windows 7
PLEASE READ: The Windows and Wacom Tablet Nightmare is Over
When Windows 7 sees that your DESKTOP PC has a Wacom tablet attached, it activates a bunch of Tablet PC – based features that annoy most users. This post will explain what these problems are and how to disable them.
NOTE: I’ve covered these topics before, but separately and went into a lot of technical detail – this post is the comprehensive guide that just tells you what you need to know.
YOU HAVE TWO OPTIONS. PICK ONE.
The AUTOMATIC option: use the Fix My Pen! tool.
The MANUAL option: follow the steps below in the order given.
MANUALLY CONFIGURING YOUR SETTINGS
PREFER TO WATCH THE SCREENCAST?
In case you prefer watching me do the steps, you can see this screencast.
STEP 1: DOWNLOAD AND INSTALL THE LATEST DRIVERS
Don’t argue with me on this. Just do it.
You can get the drivers here:
NOTE: When the drivers are first installed is when Windows 7 starts to enable all the unwanted Tablet PC features.
STEP 2: DISABLE THE TABLET PC INPUT PANEL
The first annoying Tablet PC feature is the Tablet PC Input Panel
You’ll typically see it as a little bar on the side of your desktop.

And when your cursor gets close it starts to flaunt itself…

Clicking it will reveal its full monstrosity ….

And there’s more. You’ll often also see a small input panel icon hovering hear any text input boxes

We want to disable this entirely.
Go to Control Panel > Tablet PC Settings

Click on the Other tab

On the Other tab, under Tablet PC Input Panel options, click on Go to Input Panel Settings

Disable all the checkboxes and select OK.

STEP 3: DISABLE FLICKS
The Flicks icon shows up on the notification area.

If you click on the Icon you’ll see some for of the Flick UI

The effect of flicks is that normal gesturing with the pen causes Windows to think you are giving it a command. For example, drawing a short down stroke will cause the following flick notifcation

Of course, we hate this and want to disable it.
Open the Pen and Touch control panel

Click on the Flicks tab

Uncheck the two checkboxes and press OK

STEP 4: DISABLE PRESS-AND-HOLD
Another hated feature. It’s a bit hard to describe in words, so here is an animation of its effect. All I am doing is pressing the pen down and then you’ll see the hated “glowing ring” followed by a property menu when I lift the pen (Press-and-hold things that pressing is an equivalent of a “right click”)
In Control Panel go to Pen and Touch

Under Pen Options, select Press and Hold and click Settings

Uncheck Enable press and hold for right-clicking and press OK

STEP 5: DISABLE DYNAMIC FEEDBACK
This is all the little rings that display whenever you press down with the pen
The is the hardest one to disable because there’s no place in the control panel that lets you disable it.
You are just going to have modify the registry and take care of it that way.I have provided a REG file that will help you do this
The file is called disable-pen-feedback-regedit.zip
Extract the contents of the file

Inside are two REG files. One to disable dynamic feedback (this is the one you want) and other file to re-enable it (some people wanted this so I made it for them)
Right-click on disable-pen –feedback.reg and select Merge

Windows will warn you, but just click Run

And Windows will warn you again, just press Yes.

And finally it will tell you that it has merged the settings

In case, you are wondering here are the contents of the file.
Windows Registry Editor Version 5.00
ONE LAST STEP
Sometimes all these changes will take place immediately, sometimes it takes a little longer. Usually the easiest way to force the changes is to simply log-off and then log back on. If that doesn’t work just try restarting your machine. (Those who are more technical may choose to simply restart the “Tablet PC Input Service”)


