- How to take and annotate screenshots on Windows 10
- Take a screenshot
- Annotate snips with Snip & Sketch
- How to Take a Screenshot on a PC
- How to screenshot or print a screen on Windows 10, 8, 7, Vista, and XP
- What to Know
- How to Take a Screenshot
- How to Paste or Save a Screenshot
- Take a Screenshot on PC With the Windows Snipping Tool
- Download a Print Screen Program
- How to take and save screenshots on Windows 10 [STEP-BY-STEP GUIDE]
- How do I take screenshots on PC?
- Where does Windows 10 save my screenshots?
- Editor’s choice: Use a dedicated tool for screenshots
- 4 quick methods to take screenshots on PC
- Method 1 – Use Print Screen key
- Method 2 – Use Windows Key + PrtScn shortcut
How to take and annotate screenshots on Windows 10
Sometimes the easiest way to make a copy of something is to take a snapshot of your screen. While you can already capture your screen using your keyboard’s PrtScn button, you can now press Windows logo key + Shift + S to open the new modern snipping experience (also called the snipping bar), then drag the cursor over the area you want to capture.
Here are some common ways to take and annotate screenshots in Snip & Sketch on Windows 10.
Take a screenshot
Option 1: Using the Snip & Sketch app
Press the Start button and enter Snip & Sketch in the search field.
Press the New button to start snipping with the snipping bar.
The snipping bar allows you to capture the following types of snips:
Rectangular snip. Drag the cursor around an object to form a rectangle.
Free-form snip. Draw a free-form shape around an object.
Full-screen snip. Capture the entire screen.
Once you snip an area of your screen — the snipped image is added to your clipboard and you can paste it immediately in another app. A screen prompt will also allow you to annotate, save or share it using the Snip & Sketch app.
Option 2: With the Print Screen key
While the PrtScn key already captures your full screen and sends it to your clipboard, opening the snipping bar provides you with more snipping tools you can use for precise snipping. For better control of your screen capturing options, you can opt to have your PrtScn key open the new snipping bar instead of having to type Windows logo key + Shift + S.
To turn on the new snipping feature keyboard shortcut Select Start > Settings > Ease of Access > Keyboard
Option 3: With the Window logo key + Shift + S shortcut
Pressing the S key + Windows logo + Shift keys down initiates the snipping bar at any time.
Annotate snips with Snip & Sketch
Opening images for editing with Snip & Sketch
To open an image from Snip & Sketch, select Open File or drag and drop an image from apps like File Explorer or Photos in the Snip & Sketch window.
Annotating images with Snip & Sketch
Snip & Sketch provides a few tools for annotating images, namely pen, pencil and highlighter. Once you click a tool to select it, you can click it again to change its color or thickness.
The tools work better with a pen device, but they can also be used with mouse or touch if you select the Touch Writing button icon.
Use the Eraser tool to remove specific strokes or click it twice to get the option to erase all ink.
Use the ruler or protractor tools and draw straight lines or arches.
Press the ruler/protractor button again to hide the ruler/protractor
Reside or rotate the ruler/protractor by using two finger touch gestures (if the Touch Writing button is selected) or with the mouse wheel.
Use the crop tool to crop the annotated image.
To undo cropping, select the crop tool again and press Cancel to restore the image to its full original area.
Panning the view
Some of the images you annotate might be larger than the size of the Snip & Sketch window. You can use the scroll bars to pan the view, but you can also pan the view with touch input (if the Touch Writing button is not selected) or by dragging with your mouse button while holding the Ctrl key down.
Zoom in and out of screenshots to make them easier to mark up using the magnifying glass icon. You can also zoom in and out of screenshots by pressing the Ctrl key down and tapping the + or — buttons.
Sharing and saving snips
Snip & Sketch copies the annotated snip to your clipboard when you open it and every time you make edits. Snip & Sketch allows you to save the annotated image to a file, share it or open with another app, or print it on paper or to a pdf file.
Using keyboard in Snip & Sketch
While annotating is best done using a pen or mouse — Snip & Sketch provides a lot of keyboard shortcuts you can use. Access keys are activated if you press and hold the Alt key.
How to Take a Screenshot on a PC
How to screenshot or print a screen on Windows 10, 8, 7, Vista, and XP
:max_bytes(150000):strip_icc()/jonfishersquare-93eb80e77a004035887f56816d3623c5.jpg)
What to Know
- On Windows 10 and 8, press Windows Key+PrtScn to capture the entire screen. On Windows 7 and earlier, press PrtScn.
- To capture only the active window, press Alt+PrtScn.
- To capture specific parts of the screen, use the Windows Snipping Tool or Snip & Sketch.
This article explains how to take screenshots on a Windows PC. Instructions apply to Windows 10, 8, 7, Vista, and XP.
How to Take a Screenshot
The basic way to take a screenshot in Windows is the same way no matter what version of Windows you’re using, and it’s very easy: press the PrtScn key on the keyboard.
- PrtScn: Pressing the button once saves a screenshot of the entire screen. If you have multiple monitors connected, a single press of the print screen button will save a screenshot of all the screens in one single image.
- Alt+PrtScn: Press these buttons at the same time to take a screenshot of a single window that you’re focused on. Select the window once to make sure it’s in focus, and then hit these keys.
- Win+PrtScn: Using the Windows key with the print screen button (in Windows 8 and newer) will take a screenshot of the whole screen and then save it in the default Pictures folder in a subfolder called Screenshots (e.g. C:\Users\[user]\Pictures\Screenshots).
:max_bytes(150000):strip_icc()/take-screenshots-using-windows-3507009-3079c7b233eb4473bed09e1a5a4a7c61.gif)
How to Paste or Save a Screenshot
The easiest way to save a screenshot is to first paste it in the Microsoft Paint application. This is simple to do in Paint because you don’t have to download it – it’s included with Windows by default.
You do have other options like to paste it in Microsoft Word, Photoshop, or any other program that supports images, but for the sake of simplicity, we’ll use Paint. The quickest way to open Paint in all versions of Windows is through the Run dialog box.
Press Win+R.
Type mspaint into the Run field, and press Enter.
:max_bytes(150000):strip_icc()/mspaint-566c41d2e9cc4a3f942e2bd6e41de3c6.jpg)
With Microsoft Paint open, and the screenshot still saved in the clipboard, use Ctrl+V to paste it into Paint, or select Paste.
:max_bytes(150000):strip_icc()/mspaintpaste-055a89525bb94cf8923a30a3e044df3f.jpg)
Press Ctrl+S, or select File > Save as to save the screenshot.
:max_bytes(150000):strip_icc()/mssaveas-3117783b3b4044e2a4e2861e24ac4b27.jpg)
At this point, you may notice that the image you saved looks a bit off. If the image doesn’t take up the entire canvas in Paint, it will leave white space around it. To fix this, drag the bottom right corner of the canvas toward the top left of the screen until you reach the corners of your screenshot.
Take a Screenshot on PC With the Windows Snipping Tool
Another way to take screenshots is to use the Windows Snipping Tool.
- In Windows 10, type snipping tool in the search box on the taskbar and select the Snipping Tool from the list of results.
- In Windows 8, swipe in from the right edge of the screen, select Search, type snipping tool in the search box, and select Snipping Tool from the list of results.
- In Windows 7, select the Start button, type snipping tool in the search box, and select the Snipping Tool from the list of results.
:max_bytes(150000):strip_icc()/Capture-dda252c0f1e74031bd28f4705d461c47.JPG)
Windows 10 users also have the option of using Snip & Sketch.
Download a Print Screen Program
Although Windows works great for basic screenshotting abilities, you can install both free and paid third-party applications for more advanced features like fine-tuning the screenshot by pixel, annotating it before you save it, and easy saving to a predefined location.
One example of a free print screen tool that’s more advanced than the Windows one is PrtScr. Another, WinSnap, is good, but the free edition lacks some of the more advanced features of the premium version.
How to take and save screenshots on Windows 10 [STEP-BY-STEP GUIDE]


- Download Restoro PC Repair Tool that comes with Patented Technologies (patent available here).
- Click Start Scan to find Windows issues that could be causing PC problems.
- Click Repair All to fix issues affecting your computer’s security and performance
- Restoro has been downloaded by 0 readers this month.
Sometimes you need to quickly share a screenshot with someone online. Creating and sharing them is relatively simple, and today we’re going to show you where your screenshots go on Windows 10.
How do I take screenshots on PC?
Creating screenshots on Windows 10 is fairly simple, and it doesn’t even require you to use a complex software application.
You can easily create screenshots on Windows 10 with built-in tools or with dedicated tools, and today we’re going to show you where your screenshots are saved by default on Windows 10.
Where does Windows 10 save my screenshots?
If you haven’t changed your default settings, you should be able to find your screenshots under the following path: C:Users[User]My PicturesScreenshots.
Of course, you can also create a dedicated folder where you can save your screenshots. You can create the folder on your desktop or use a location of your choice.
Furthermore, you can also upload your screenshots if you need to share them with someone. Follow this article to find out more about how to upload screenshots and what tools to use.
Editor’s choice: Use a dedicated tool for screenshots
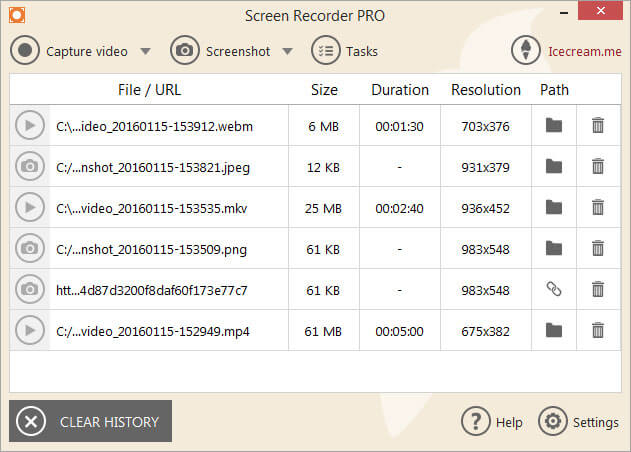
Icecream Screen Recorder is a simple tool, straightforward yet with enough features to accomplish what you want but not confuse you. Keep your screenshots organized, ready to be used right away with this innovative program.
You can save your screenshots straight to your hard drive to the destination of your choosing. And, you will be able to store the screenshots in various file formats.
This software is a viable alternative to typical screen capturing apps that are on the market.
You can easily capture an image in order to highlight particular areas or a specific section.
This tool is ideal if you use multiple browsers during your daily Internet sessions.
Here are just some of its features:
- Project history: you can easily find your past projects
- Screen area selection: select the area you want to be recorded
- Drawing panel: add arrows, lines, and marks to your capture
- You can also record online videos.
- Capture videos with the simple click of a button.
- Change format of the recorded videos
- Schedule screen recording
Icecream Screen Recorder is already the world’s bestseller and you can give it a try for free right now. A fully-functional trial version is available for download.
4 quick methods to take screenshots on PC
Method 1 – Use Print Screen key
This is probably one of the oldest methods of creating screenshots. To create a screenshot simply press the Print Screen or PrtScn key on your keyboard. By pressing this key you’ll create a screenshot of your entire screen.
If you want to create just a screenshot of your current window, you can do so by using Alt + PrtScn shortcut.
By using these shortcuts your screenshot will be saved to your Clipboard. In order to save it to your hard drive, you need to start Paint or any other image editing software and paste the screenshot from the Clipboard by pressing Ctrl + V shortcut.
Although this method is rather simple, we have to warn you that you won’t be able to view any previously made screenshots. Clipboard saves only one entry at the time, and if you accidentally copy something else into Clipboard you’ll remove your screenshot.
If you use this method, it’s recommended to paste the screenshot to your image editor as soon as you can in order not to lose it. By using any image editing tool you can save the screenshot to any folder that you want.
We have to mention that you can somewhat avoid the problem with Clipboard simply by using a clipboard manager tool. These types of tools allow you to view all items that were copied to your Clipboard so you won’t ever lose your unsaved screenshots again.
If you’re having trouble with copy-paste on Windows 10, this complete guide will help you solve any issues with it.
Method 2 – Use Windows Key + PrtScn shortcut
Print Screen shortcut was available in previous versions of Windows, but with Windows 8 Microsoft introduced a new shortcut. In Windows 8 we got Windows Key + PrtScn shortcut, and this one made its way to Windows 10.
We have to mention that some laptops might use a slightly different shortcut, so be sure to check your laptop’s instruction manual for details.
By using this shortcut your screen will become dim for a half second and you’ll hear the shutter sound. This means that you successfully created a screenshot.


