- How to take and annotate screenshots on Windows 10
- Take a screenshot
- Annotate snips with Snip & Sketch
- Создание в Windows снапшотов и восстановление с их помощью системы в RollBack RX
- Моментальные снимки системы
- 7 ways you can take screenshots in Windows 10
- Snip & Sketch
- Snipping Tool
- Print Screen
- Windows key + Print Screen
- Alt + Print Screen
- Game bar
- Windows Logo + Volume Down
How to take and annotate screenshots on Windows 10
Sometimes the easiest way to make a copy of something is to take a snapshot of your screen. While you can already capture your screen using your keyboard’s PrtScn button, you can now press Windows logo key + Shift + S to open the new modern snipping experience (also called the snipping bar), then drag the cursor over the area you want to capture.
Here are some common ways to take and annotate screenshots in Snip & Sketch on Windows 10.
Take a screenshot
Option 1: Using the Snip & Sketch app
Press the Start button and enter Snip & Sketch in the search field.
Press the New button to start snipping with the snipping bar.
The snipping bar allows you to capture the following types of snips:
Rectangular snip. Drag the cursor around an object to form a rectangle.
Free-form snip. Draw a free-form shape around an object.
Full-screen snip. Capture the entire screen.
Once you snip an area of your screen — the snipped image is added to your clipboard and you can paste it immediately in another app. A screen prompt will also allow you to annotate, save or share it using the Snip & Sketch app.
Option 2: With the Print Screen key
While the PrtScn key already captures your full screen and sends it to your clipboard, opening the snipping bar provides you with more snipping tools you can use for precise snipping. For better control of your screen capturing options, you can opt to have your PrtScn key open the new snipping bar instead of having to type Windows logo key + Shift + S.
To turn on the new snipping feature keyboard shortcut Select Start > Settings > Ease of Access > Keyboard
Option 3: With the Window logo key + Shift + S shortcut
Pressing the S key + Windows logo + Shift keys down initiates the snipping bar at any time.
Annotate snips with Snip & Sketch
Opening images for editing with Snip & Sketch
To open an image from Snip & Sketch, select Open File or drag and drop an image from apps like File Explorer or Photos in the Snip & Sketch window.
Annotating images with Snip & Sketch
Snip & Sketch provides a few tools for annotating images, namely pen, pencil and highlighter. Once you click a tool to select it, you can click it again to change its color or thickness.
The tools work better with a pen device, but they can also be used with mouse or touch if you select the Touch Writing button icon.
Use the Eraser tool to remove specific strokes or click it twice to get the option to erase all ink.
Use the ruler or protractor tools and draw straight lines or arches.
Press the ruler/protractor button again to hide the ruler/protractor
Reside or rotate the ruler/protractor by using two finger touch gestures (if the Touch Writing button is selected) or with the mouse wheel.
Use the crop tool to crop the annotated image.
To undo cropping, select the crop tool again and press Cancel to restore the image to its full original area.
Panning the view
Some of the images you annotate might be larger than the size of the Snip & Sketch window. You can use the scroll bars to pan the view, but you can also pan the view with touch input (if the Touch Writing button is not selected) or by dragging with your mouse button while holding the Ctrl key down.
Zoom in and out of screenshots to make them easier to mark up using the magnifying glass icon. You can also zoom in and out of screenshots by pressing the Ctrl key down and tapping the + or — buttons.
Sharing and saving snips
Snip & Sketch copies the annotated snip to your clipboard when you open it and every time you make edits. Snip & Sketch allows you to save the annotated image to a file, share it or open with another app, or print it on paper or to a pdf file.
Using keyboard in Snip & Sketch
While annotating is best done using a pen or mouse — Snip & Sketch provides a lot of keyboard shortcuts you can use. Access keys are activated if you press and hold the Alt key.
Создание в Windows снапшотов и восстановление с их помощью системы в RollBack RX

П олагаем, все более или менее опытные пользователи хорошо знакомы с программами типа Acronis True Image или Hetman, предназначенными для создания резервных копий системы. Как правило, защита системы в подобных программах подразумевает создание полной резервной копии или так называемого образа. В отличие от этих инструментов программа RollBack RX не требует создания полных образов. Она позволяет восстанавливать систему с помощью быстрых снимков — снапшотов , наподобие тех, которые применяются в виртуальных машинах.
Откат к ранее созданному снимку можно выполнить в любое время, причём не имеет большого значения является ли система в данный момент в рабочем состоянии или нет.

RollBack RX проста, удобна, имеет поддержку русского языка и плюс ко всему она ещё бесплатна для домашнего использования. Установка программы ничем не отличается от установки других десктопных приложений, разве что по завершении инсталляции мастер попросит вас перезагрузить компьютер.

Внешне программа имеет много общего с классическим штатным приложением для работы с точками восстановления Windows. Слева располагается панель инструментов, справа можно видеть список снимков.

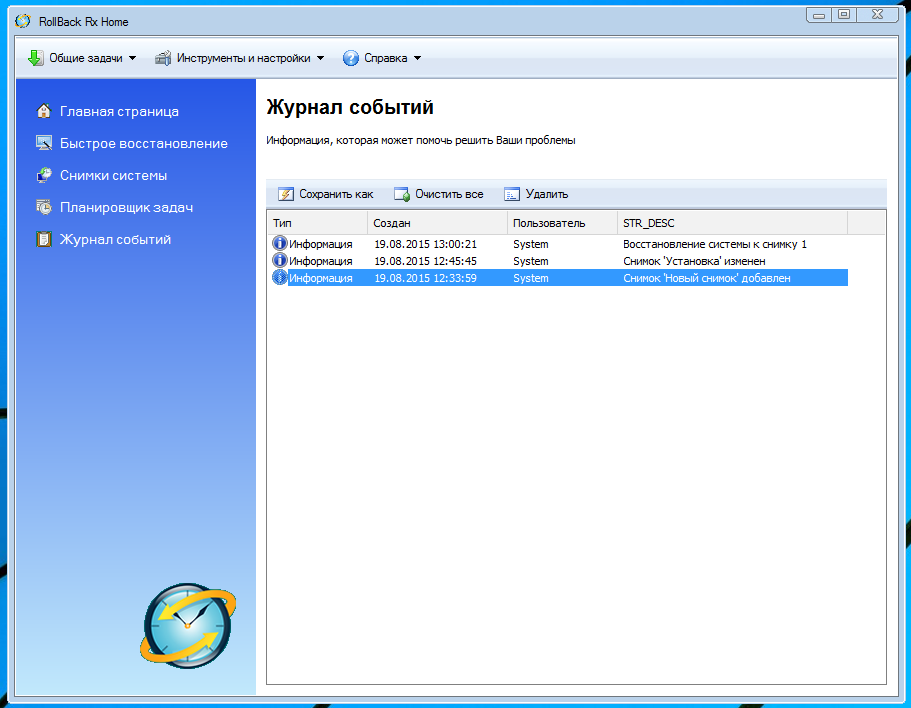
Снимки можно создавать, удалять, блокировать с целью защиты от случайного удаления, просматривать их свойства, а также исследовать. Под исследованием подразумевается временное монтирование снимка как виртуального диска, получить доступ к которому можно через обычный Проводник.
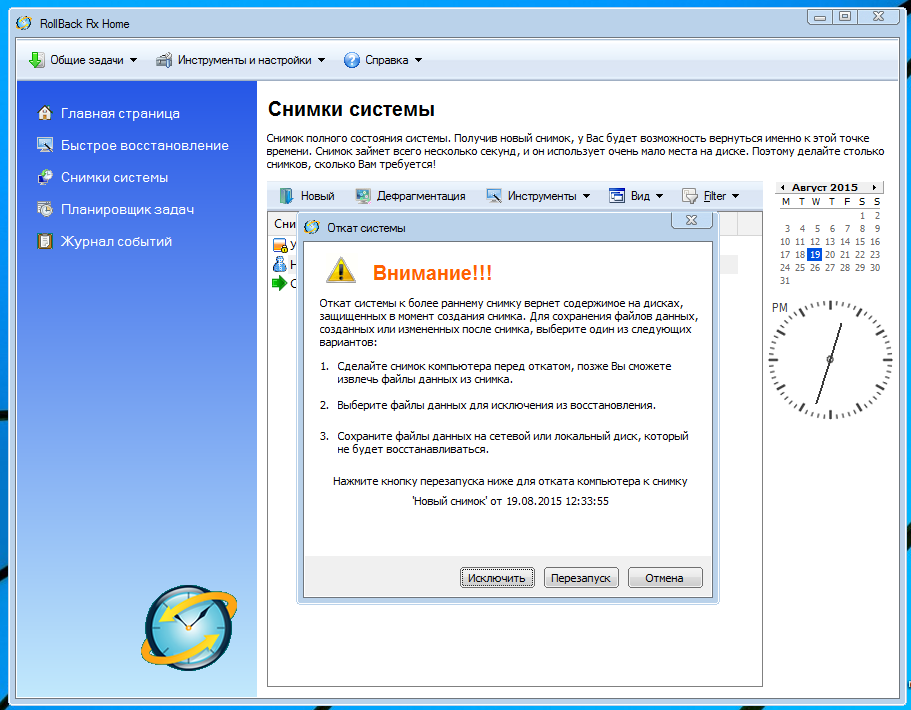
Дополнительно RollBack RX поддерживает дефрагментацию снимков, восстановление из резервных копий отдельных папок и файлов по именам, типу или расположению, склеивание множества снимков в один базовый снимок. Также в программе имеется удобный планировщик задач и журнал событий. Само собой, вы можете выполнять откаты к любому из выбранных снимков. Для этого достаточно кликнуть по нужному снимку правой кнопкой мыши и выбрать в контекстном меню опцию «Откат». При этом Windows будет немедленно перезагружена, а все изменённые файлы в системном разделе будут восстановлены в исходное состояние.
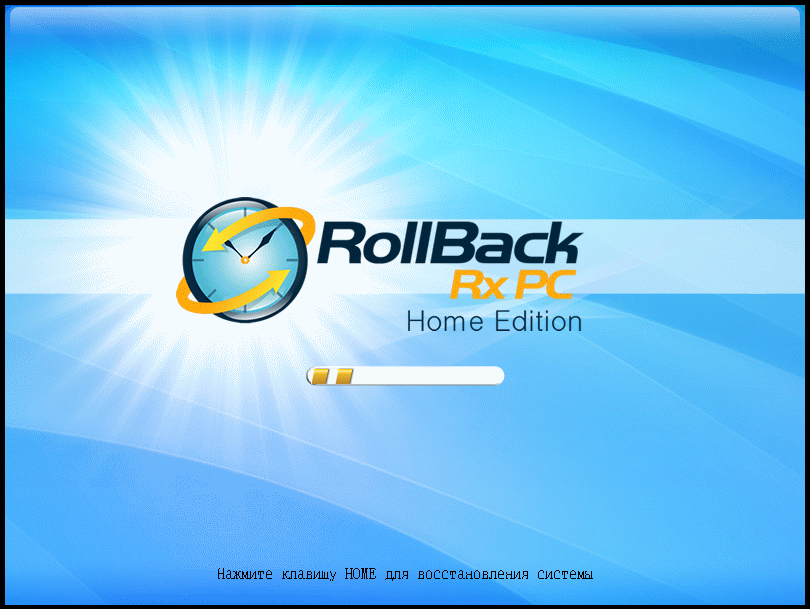
Это что касается отката при нестабильной, но всё же работающей системе. Если Windows не может загрузится самостоятельно, в самом начале загрузки при появлении окна RollBack RX на клавиатуре следует нажать кнопку Home . При этом вы попадёте в загрузочное меню программы, где и сможете выбрать нужное вам действие. RollBack RX достаточно эффективна, но относиться к ней как панацее от всех бед не стоит.
Кроме того, во избежание возможных проблем вам нужно будет избегать использования дефрагментаторов, а также любых инструментов для исправления логических ошибок файловой системы.
Моментальные снимки системы
Моментальные снимки являются основой функций справки средства. Моментальный снимок — это доступная только для чтения копия текущего состояния одного или нескольких следующих списков, расположенных в системной памяти: процессов, потоков, модулей и куч.
Процессы, использующие функции справки средства, обращаются к этим спискам из моментальных снимков, а не непосредственно из операционной системы. Списки в системной памяти изменяются при запуске и завершении процессов, создании и уничтожении потоков, при загрузке и выгрузке исполняемых модулей из системной памяти, а также при создании и уничтожении куч. Использование сведений из моментального снимка предотвращает несоответствия. В противном случае изменения в списке могут привести к неправильному просмотру списка или вызвать нарушение прав доступа (ошибка GP). Например, если приложение проходит по списку потоков во время создания или завершения других потоков, то сведения, используемые приложением для обхода списка потоков, могут стать устаревшими и могут вызвать ошибку при прохождении приложения в списке.
Чтобы создать снимок системной памяти, используйте функцию CreateToolhelp32Snapshot . Вы можете управлять содержимым моментального снимка, указав одно или несколько следующих значений при вызове этой функции:
- TH32CS _ снафеаплист
- TH32CS _ снапмодуле
- TH32CS _ снаппроцесс
- TH32CS _ снапсреад
Значения TH32CS _ Снафеаплист и TH32CS _ снапмодуле обрабатываются отдельно. Если эти значения заданы, то списки кучи и модулей указанного процесса включаются в моментальный снимок. Если в качестве идентификатора процесса указать нуль, используется текущий процесс. Значение TH32CS _ снапсреад всегда создает моментальный снимок на уровне системы, даже если идентификатор процесса передается в CreateToolhelp32Snapshot.
Чтобы перечислить кучу или состояние модуля для всех процессов, укажите значение TH32CS _ снапалл и идентификатор процесса текущего процесса. Затем для каждого дополнительного процесса в моментальном снимке вызовите CreateToolhelp32Snapshot еще раз, указав идентификатор процесса и значение TH32CS _ снафеаплист или TH32CS _ снапмодуле .
Код расширенного состояния ошибки для CreateToolhelp32Snapshot можно получить с помощью функции GetLastError .
Когда процесс завершит использование моментального снимка, удалите его с помощью функции CloseHandle . Если не уничтожить моментальный снимок, то процесс будет утечкой памяти до тех пор, пока он не завершит работу, после чего система освободит память.
Обработчик моментальных снимков выступает в качестве маркера файла и подчиняется тем же правилам, что и для процессов и потоков, в которых он может использоваться. Чтобы указать, что маркер наследуется, Создайте моментальный снимок, используя значение _ inherit TH32CS .
7 ways you can take screenshots in Windows 10
Capture all of your Windows 10 screen — or just part of it — with a few keystrokes.


What’s the best way to capture that Windows 10 screen? We’ll show you.
Taking a screenshot is a quick and easy way to capture part of or the entirety of your display, from an image you want to annotate and share to an online receipt you’d like to snip and save. In Windows 10 ($170 at Best Buy) , there is a pair of built-in tools — Snip & Sketch and Snipping Tool — as well as a number of keyboard shortcuts for capturing screenshots.
Microsoft introduced the Snip & Sketch tool for taking screenshots in Windows 10 a couple years ago, but only recently made a change to the app that has finally led me to embrace it and say goodbye to the tried-and-true Snipping Tool. (No hard feelings, Snipping Tool. We had a good run together.)
Get more out of your tech
I’ll cover both built-in Windows screenshot tools so you can choose for yourself — along with a few other shortcuts for taking screenshots with Windows 10.
Snip & Sketch
The Snip & Sketch tool is easier to access, share and annotate screenshots than the old Snipping Tool. And it can now capture a screenshot of a window on your desktop, a surprising omission when the app was first introduced that kept me on Team Snipping Tool until recently.
The easiest way to call up Snip & Sketch is with the keyboard shortcut Windows key + Shift + S. You can also find the Snip & Sketch tool listed in in the alphabetical list of apps accessed from the Start button as well as in the notification panel where it listed as Screen snip. Or you can just search for it if you don’t commit the keyboard shortcut to memory. (If you’re regular screenshot taker, I recommend pinning the app to the taskbar.)
The built-in Snip & Sketch app has finally won me over and is now my go-to method for taking screenshots in Windows 10. So long, Snipping Tool.
Screenshot by Matt Elliott/CNET
Either the keyboard shortcut or the notification button will dim your screen and open a tiny menu at the top of your screen that lets you choose which type of screenshot you want to take — rectangular, free-form, window or full-screen. Once you take your screenshot, it will be saved to your clipboard and show up momentarily as a notification in the lower-right corner of your screen. Click the notification to open the screenshot in the Snip & Sketch app to annotate, save or share it. (If you miss the notification, open the notification panel and you’ll see it sitting there.
If you open Snip & Sketch from the Start menu or by searching for it, it will open the Snip & Sketch window instead of the small panel at the top of the screen. From here, you need to click the New button in the upper-left to initiate a screen capture and open the small panel. It’s an extra step to proceed this way, but it also lets you delay a screenshot. Click the down-arrow button next to the New button to delay a snip for 3 or 10 seconds.
Snipping Tool
The Snipping Tool has been around since Windows Vista. Windows has warned for a couple years that the Snipping Tool is moving away, but it’s still kicking around. The Snipping Tool has been delisted from the list of apps from the Start menu, but it’s easily accessible via the search bar.
Click the New button to begin the screenshot process. The default snip type is a rectangular snip, but you can also take free-form, full-screen and window snips.
The Snipping Tool does not automatically save your screenshots — you will need to manually save them in the tool before you exit — and it does automatically copy your captures to the clipboard.
Screenshot by Matt Elliott/CNET
Print Screen
To capture your entire screen, tap the Print Screen (sometimes labeled PrtScn) key. Your screenshot will not be saved as a file, but it will be copied to the clipboard. You’ll need to open an image editing tool (such as Microsoft Paint), paste the screenshot in the editor and save the file from there.
You can also set the PrtScn button to open the Snip & Sketch tool by going to Settings > Ease of Access > Keyboard and toggling on Use the PrtScn button to open screen snipping under Print Screen Shortcut.
Screenshot by Matt Elliott/CNET
Windows key + Print Screen
To capture your entire screen and automatically save the screenshot, tap the Windows key + Print Screen key. Your screen will briefly go dim to indicate that you’ve just taken a screenshot, and the screenshot will be saved to the Pictures > Screenshots folder.
Alt + Print Screen
To take a quick screenshot of the active window, use the keyboard shortcut Alt + PrtScn. This will snap your currently active window and copy the screenshot to the clipboard. You’ll need to open the shot in an image editor to save it.
Game bar
You can use the Game bar to snap a screenshot, whether you’re in the middle of playing a game or not. Hit the Windows key + G key to call up the Game bar. From here, you can click the screenshot button in the Game bar or use the default keyboard shortcut Windows key + Alt + PrtScn to snap a full-screen screenshot. To set your own Game bar screenshot keyboard shortcut, to Settings > Gaming > Game bar. Backing up a bit, you’ll also need to enable Game bar from this settings page by making sure you’ve toggled on Record game clips, screenshots, and broadcast using Game bar.
Windows Logo + Volume Down
If you’re rocking a Microsoft Surface device , you can use the physical (well, sort of physical) buttons to take a screenshot of your entire screen — similar to how you would take a screenshot on any other phone or tablet. To do this, hold down the Windows Logo touch button at the bottom of your Surface screen and hit the physical volume-down button on the side of the tablet. The screen will dim briefly and the screenshot will be automatically saved to the Pictures > Screenshots folder.


