- Как открыть диспетчер задач?
- Как открыть диспетчер задач в Windows?
- Как открыть диспетчер задач в Windows 10?
- Как диспетчер задач как открыть в Linux?
- Способы запуска Системного монитора в Ubuntu
- Запускаем Системный монитор в Ubuntu
- Способ 1: Терминал
- Способ 2: Комбинация клавиш
- Use Task Manager Equivalent in Linux
- System Monitor: The Task Manager of Linux distributions
- How to Use the Top Command as Task Manager in Linux
- Understanding top command in Linux
- User Info, Uptime, and Load Averages
- Tasks
- CPU information in top command
- Memory usage in top command
- Task Table
- Customizing and interacting with the top command output
- 1. Color and Memory Scale
- 2. Toggle Views for Summary Info
- 3. View CPU-Specific Info
- 4 Top Field Manipulation
- 5. Locate String
- 6. Organize Your View
- 7. Toggle Full-Path, Idle Tasks, Cumulative Time, and Text Justification
- 8. Toggle Highlights
- 9. Filter by User or Field/Value
- 10. Filter number of Processes
- 11. Renice or Kill Process with PID in top command
- 12. Change the default update time in top command
Как открыть диспетчер задач?
Как это не печально, но любой компьютер с любой операционной системой может зависнуть. И это может случить в самый неподходящий момент, когда вы, к примеру, пишите большую статью. И вот беда, вы не успели сохранить текст! Если просто перезагрузить компьютер, то вы можете потерять много часовой труд!
Чаще всего выход есть — убить процесс, который повесил систему. Но как это сделать? Какие инструменты можно использовать?
Чаще всего нам может помочь обыкновенный диспетчер задач.
Как открыть диспетчер задач в Windows?
В Windows диспетчер задач можно открыть очень просто — запоминайте: Ctrl нажимаем и держим и тут же нажимаем Alt и держим и потом Del — диспетчер задач откроется.

Теперь мы смотрим на столбец ЦП (центральный процессор) и вырубаем процесс, который грузит систему. Или смотрим столбец ПАМЯТЬ и гасим процесс, который сожрал всю память.
Бывают случаи, что виндовс так зависает, что даже диспетчер задач не открыть, все висит мертво. Вот тут я уже ничего не сделаешь, нужно грубо перезагрузить компьютер, несколько секунд удерживая кнопку питания.
Как открыть диспетчер задач в Windows 10?
А вот в Linux все в этом плане благополучнее, и сейчас вы поймете почему.
Как диспетчер задач как открыть в Linux?
В Ubuntu Linux, да и в других разновидностях линукс, есть тоже диспетчер задач или СИСТЕМНЫЙ МОНИТОР. Чтобы включить его, нужно зайти в МЕНЮ — СИСТЕМНЫЕ УТИЛИТЫ — СИСТЕМНЫЙ МОНИТОР. А можно просто вызвать его командой:

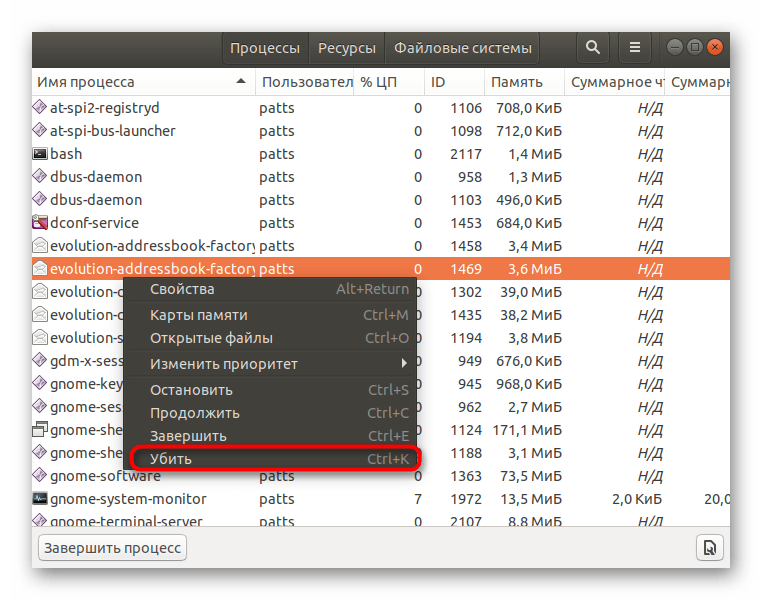
Тут можно убить любой процесс по тому же принципу. Можно также запустить программу top в терминале, которая по сути является тем же системным монитором.

Чтобы убить процесс, запоминаем его id — цифра слева и нажимаем букву (англ) — k
После этого пишем номер процесса и жмём Enter. Спросит подтверждение — пишем yes и Enter.
Всё, процесс убит.
А что делать, если Linux завис так сильно, что даже мышкой не шевельнуть? И вот тут вы увидите преимущество линукс над виндовс.
ПРОСТО нажимаем Ctrl — Alt — F1 — и выходим в консоль. Набираем свой логин и пароль. Потом команда:
И далее убиваем зависший процесс, как описано выше. Чтобы вернуться опять в графическую среду нажимаем Alt + F7.
Вот так все просто, мне не раз все это пригодилось, думаю, что пригодится и вам 🙂
Источник
Способы запуска Системного монитора в Ubuntu

Большинство пользователей знают, что в операционной системе Windows присутствует классическое приложение «Диспетчер задач», позволяющее следить за всеми запущенными процессами и выполнять с ними определенные действия. В дистрибутивах, основанных на ядре Linux, тоже присутствует такой инструмент, но называется он «Системный монитор» (System Monitor). Далее мы поговорим о доступных методах запуска этого приложения на компьютерах под управлением Ubuntu.
Запускаем Системный монитор в Ubuntu
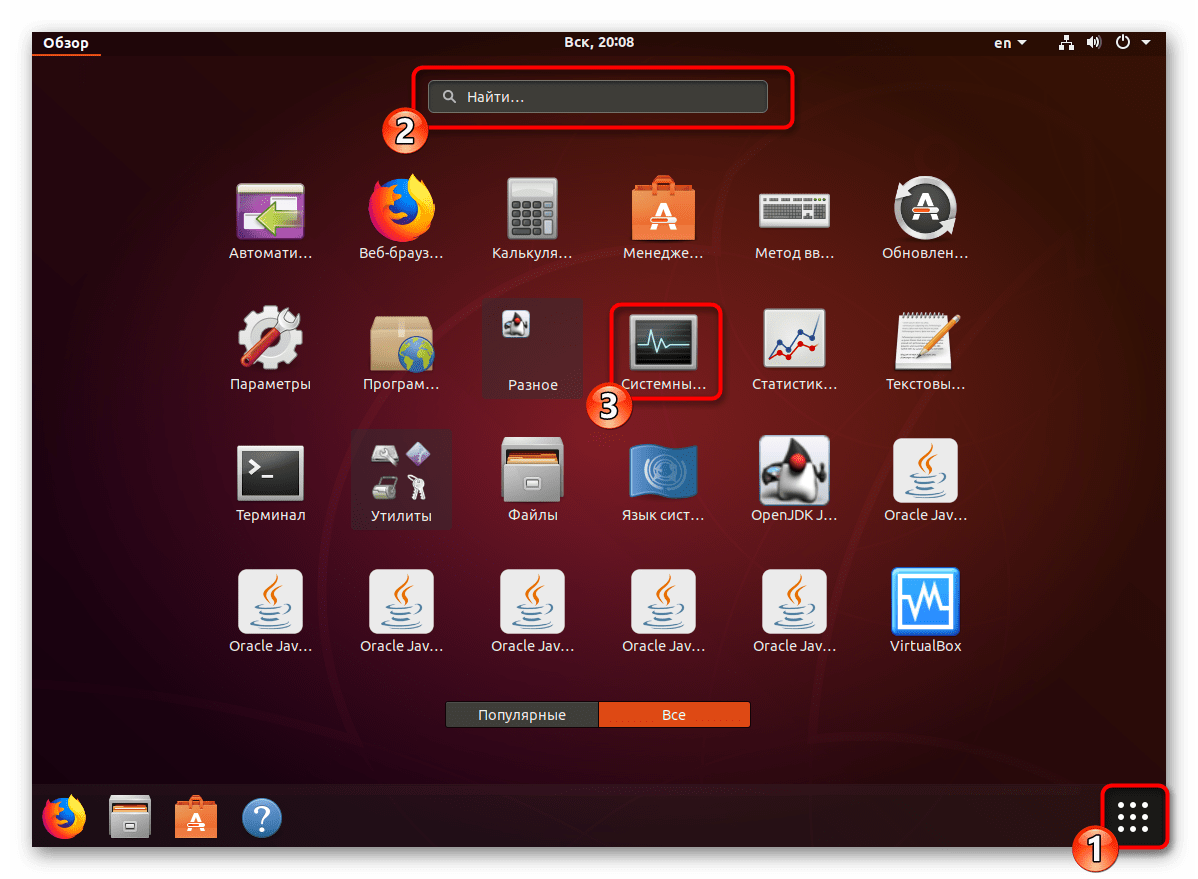
Каждый рассмотренный ниже метод не требует от юзера дополнительных знаний или навыков, поскольку вся процедура производится достаточно просто. Только иногда возникают трудности с настройкой параметров, но это исправляется очень легко, о чем вы тоже узнаете далее. Сначала хотелось бы рассказать о том, что проще всего «Системный монитор» запустить через основное меню. Откройте это окно и отыщите требуемый инструмент. Воспользуйтесь поиском, если иконок слишком много и отыскать нужную становится трудно.
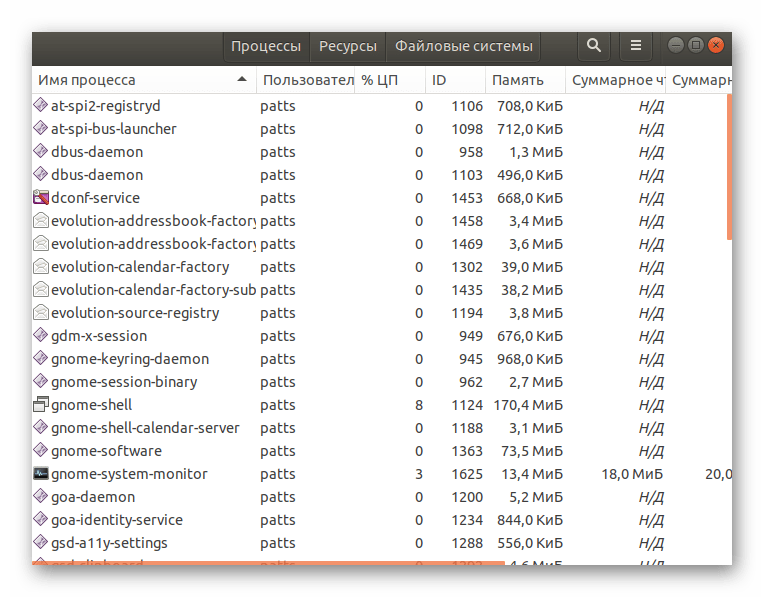
После нажатия на значок откроется диспетчер задач в графической оболочке и вы можете переходить к выполнению других действий.
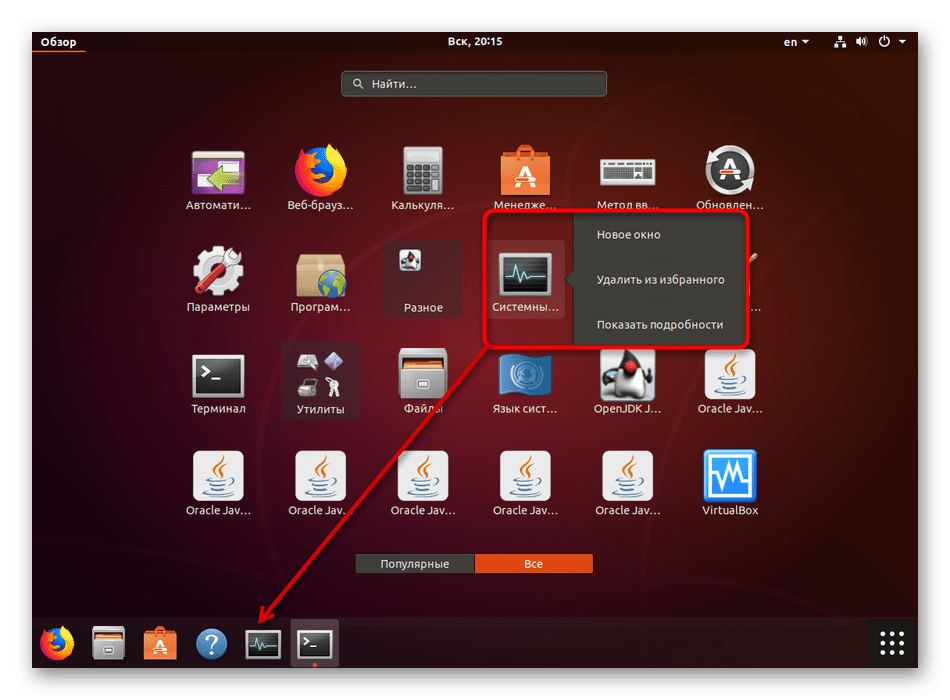
Кроме этого, следует отметить, что вам доступно добавление «Системного монитора» на панель задач. Найдите в меню приложение, кликните на нем ПКМ и выберите «Добавить в избранное». После этого иконка появится на соответствующей панели.
Теперь давайте перейдем к вариантам открытия, требующим большее количество действий.
Способ 1: Терминал
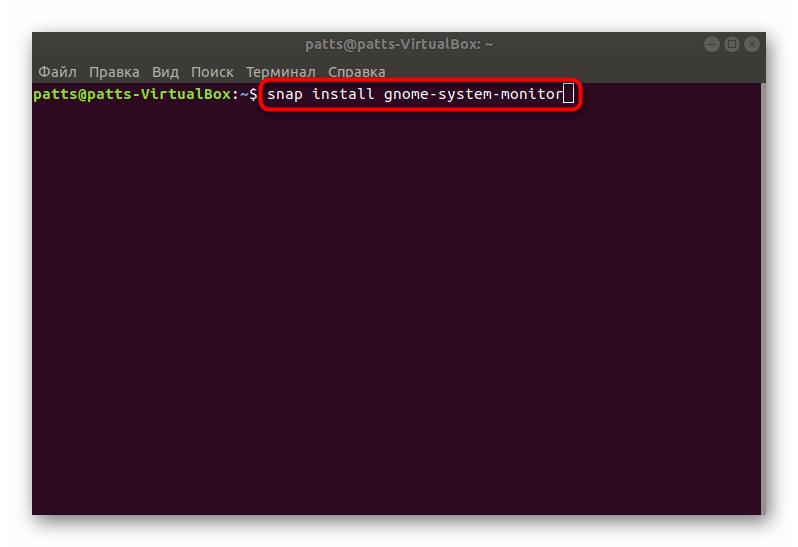
Каждый пользователь Ubuntu непременно столкнется с работой в «Терминале», поскольку через эту консоль практически всегда происходит установка обновлений, дополнений и различного программного обеспечения. Помимо всего, «Терминал» предназначен для запуска определенных инструментов и управления операционной системой. Запуск «Системного монитора» через консоль выполняется одной командой:
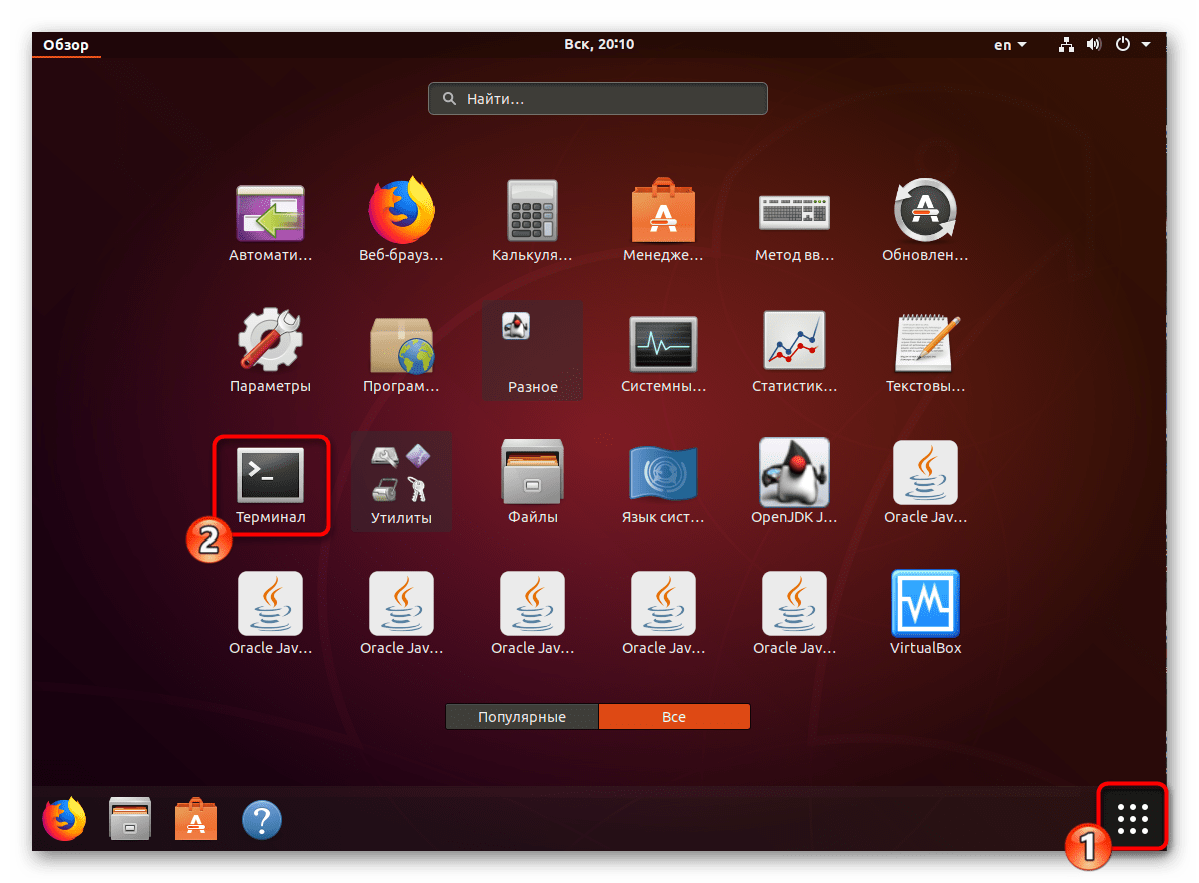
- Откройте меню и откройте приложение «Терминал». Вы можете использовать горячую клавишу Ctl + Alt + T, если графическая оболочка не отвечает.
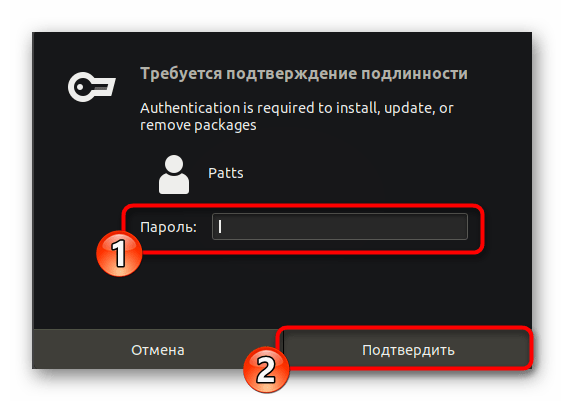
Запустится системное окно с требованием подтверждения подлинности. Введите в соответствующее поле пароль, а затем щелкните на «Подтвердить».
После установки «Системного монитора» откройте его командой gnome-system-monitor , рут-права для этого не нужны.
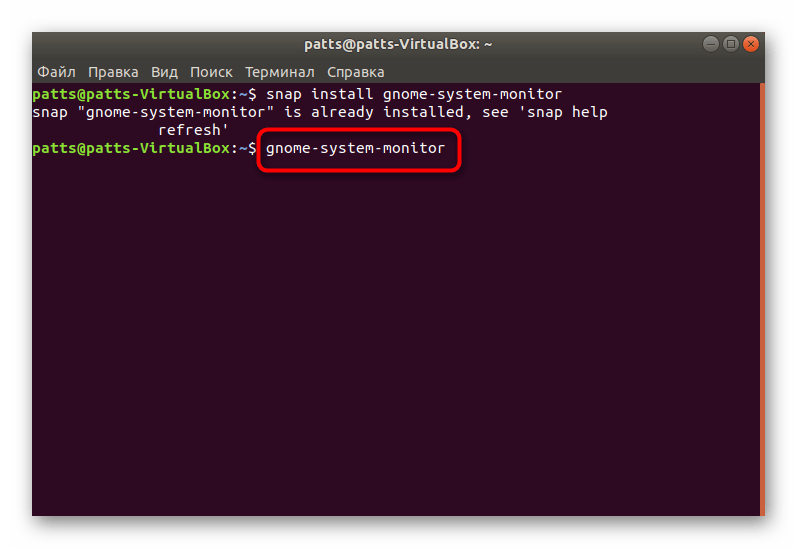
Новое окно откроется поверх терминала.
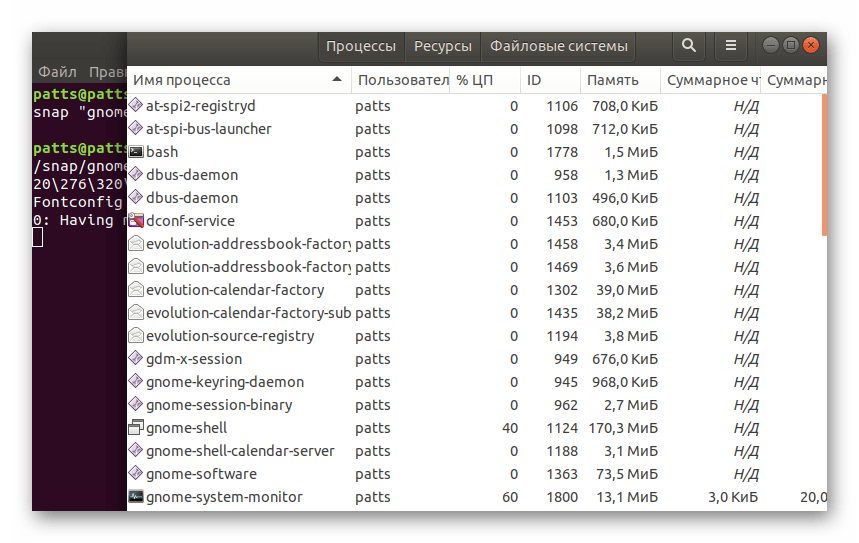
Здесь вы можете нажать ПКМ по любому процессу и выполнить с ним любое действие, например, убить или приостановить работу.
Такой метод не всегда удобен, поскольку требует предварительного запуска консоли и ввода определенной команды. Поэтому если он вас не устраивает, советуем ознакомиться со следующим вариантом.
Способ 2: Комбинация клавиш
По умолчанию горячая клавиша для открытия необходимого нам ПО не настроена, поэтому придется добавить ее самостоятельно. Производится этот процесс через системные настройки.
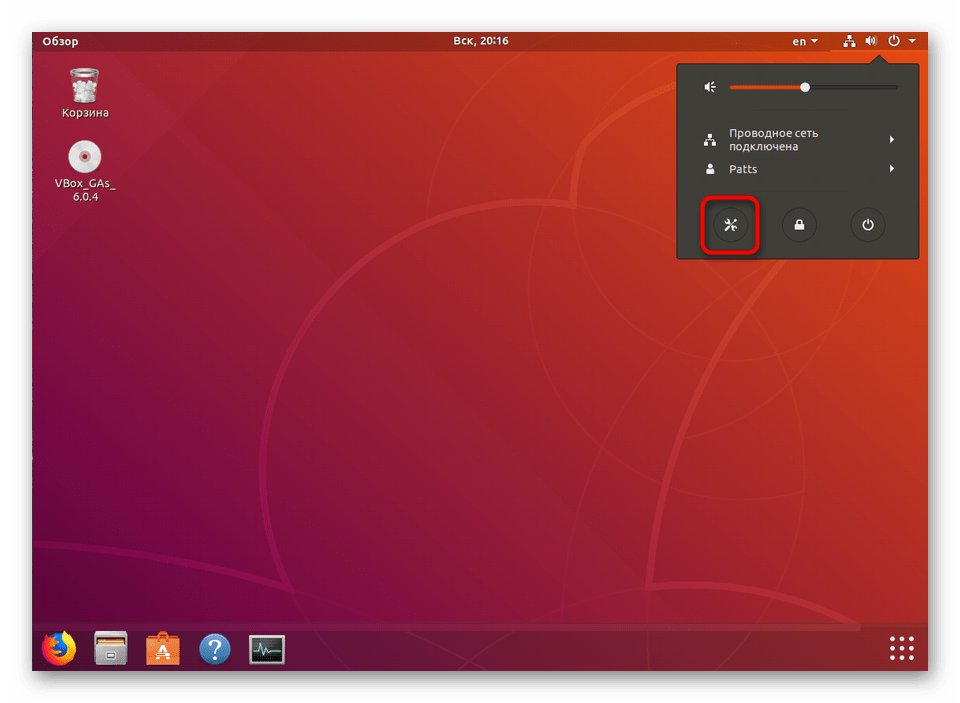
- Нажмите на кнопку выключения и перейдите в раздел системных настроек, кликнув на значок в виде инструментов.
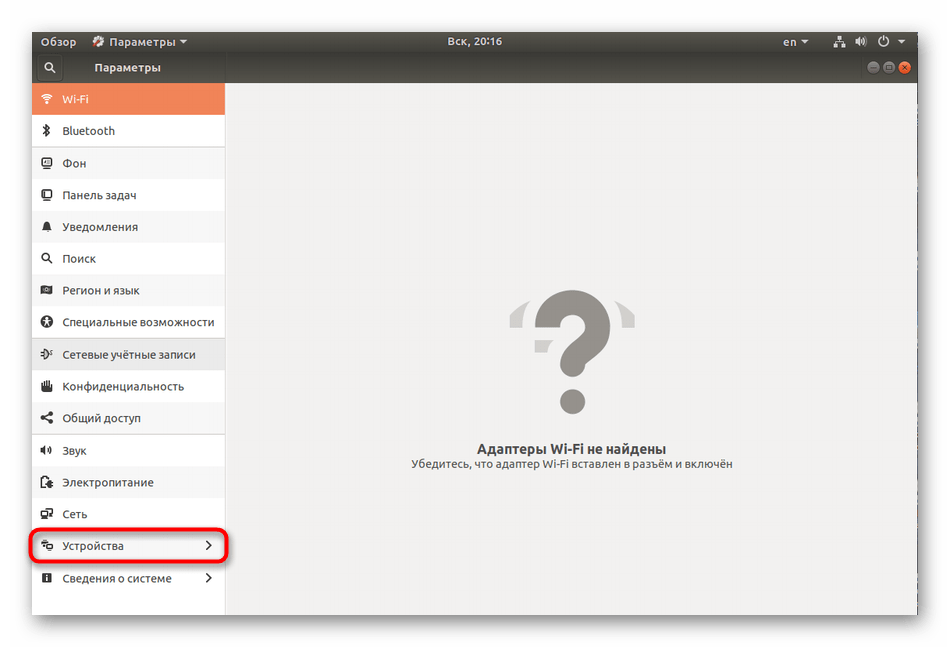
На панели слева выберите категорию «Устройства».
Переместитесь в меню «Клавиатура».
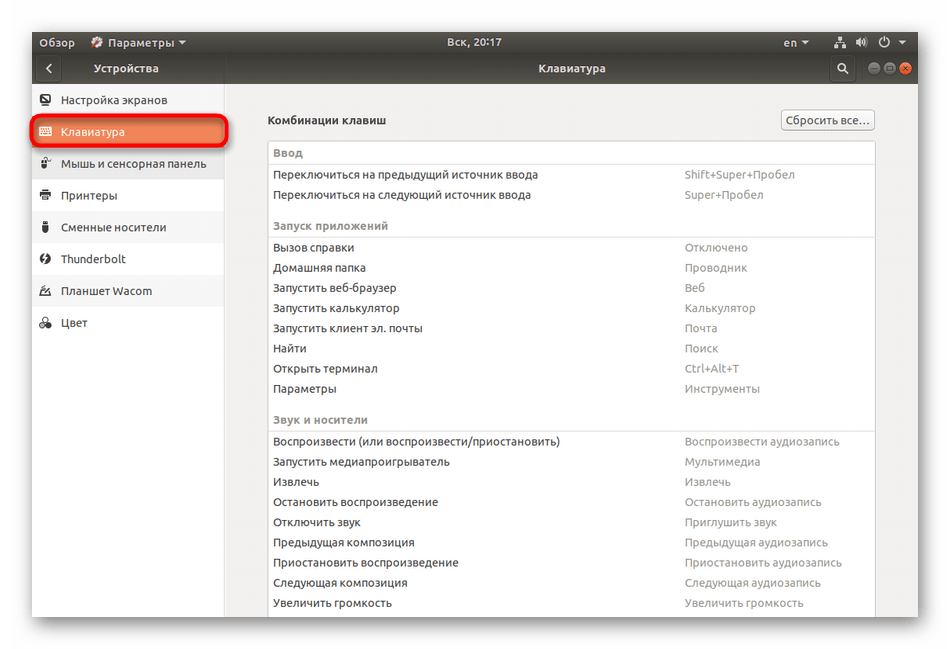
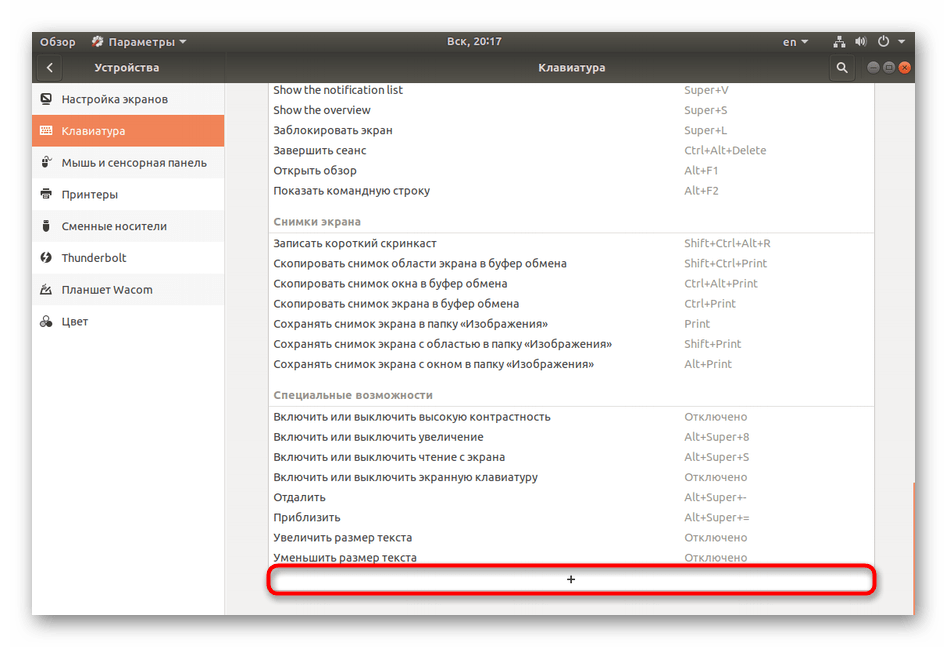
Опуститесь в самый низ списка комбинаций, где найдите кнопку +.
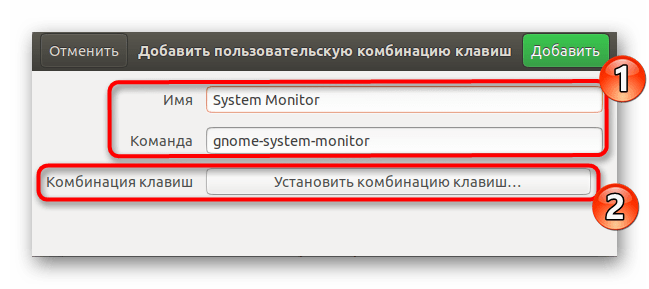
Добавьте произвольное имя горячей клавиши, а в поле «Команда» введите gnome-system-monitor , после чего нажмите на «Установить комбинацию клавиш».
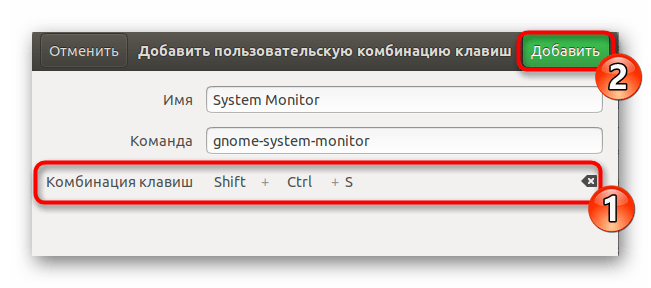
Зажмите на клавиатуре необходимые клавиши, а затем отпустите их, чтобы операционная система произвела считывание.

Ознакомьтесь с полученным результатом и сохраните его, нажав на «Добавить».
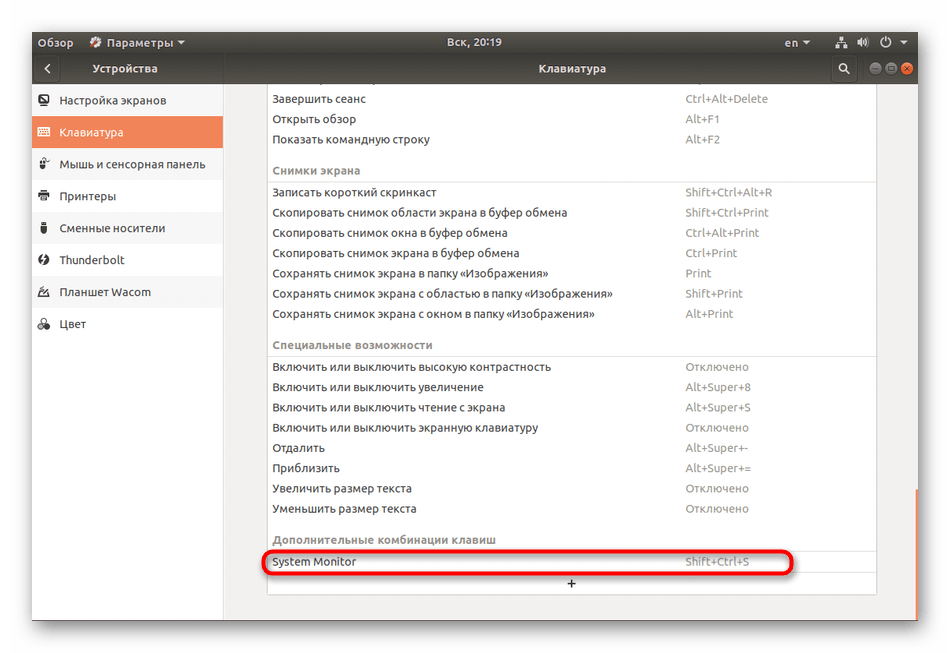
Теперь ваша команда будет отображаться в разделе «Дополнительные комбинации клавиш».
Важно перед добавлением нового параметра убедиться в том, что желаемая комбинация клавиш не используется для запуска других процессов.
Как видите, запуск «Системного монитора» не вызывает никаких трудностей. Мы же можем порекомендовать использовать первый метод в случае зависания графической оболочки, а второй — для быстрого доступа к требуемому меню.
Помимо этой статьи, на сайте еще 12315 инструкций.
Добавьте сайт Lumpics.ru в закладки (CTRL+D) и мы точно еще пригодимся вам.
Отблагодарите автора, поделитесь статьей в социальных сетях.
Источник
Use Task Manager Equivalent in Linux
Last updated April 11, 2020 By Abhishek Prakash 9 Comments

These are some of the most frequently asked questions from Linux beginners: “Is there a task manager for Linux?” “How do you open the task manager on Linux?” “Where do I find the Ubuntu task manager?”
People who are coming from Windows know how useful the task manager is. You press Ctrl+Alt+Del to get to the task manager in Windows. This task manager shows you all the running processes and their memory consumption. You can choose to end a process from this task manager application.
When you’re just starting out with Linux, you may look for a task manager equivalent on Linux as well. An expert Linux user prefers the command-line way to find processes and memory consumption, etc., but you don’t have to go that way, at least not when you’re just starting out with Linux.
All the major Linux distributions have a task manager equivalent. Usually, it’s called System Monitor, but it actually depends on your Linux distribution and the desktop environment it uses.
In this article, we’ll see how to find and use the task manager on Ubuntu and other Linux distributions that use GNOME as the desktop environment.
System Monitor: The Task Manager of Linux distributions
If you’re using the GNOME desktop, press the Super key (Windows key) and look for System Monitor. In other desktop environments, search for System Monitor in the menu.
This will start the GNOME System Monitor. It shows you all the running processes and their memory consumption.
You can select a process and click on End process to kill it. You can also select multiple entries here and kill the processes in one click.
You can also see some statistics about your system in the Resources tab, such as CPU consumption per core basis, memory usage, network usage, etc.
You can watch this video to see it in action:
There are more ways to manage tasks
That was the graphical way. If you want to go the command line way, just run the top command in terminal and you can see all the running processes and their memory consumption. You can easily kill processes in the Linux command line.
If you want a command-line based task manager on Linux, I recommend using htop. You can see running processes, memory usage, and more, and you can easily use hotkeys to end processes. And it looks good as well.

This is all you need to know about task manager equivalents on Linux. I hope you found this quick tutorial helpful. If you have questions or suggestions, feel free to comment.
Like what you read? Please share it with others.
Источник
How to Use the Top Command as Task Manager in Linux
The top command offers a quick overview of system information. It reports data about current processes which is refreshed (by default) every 3 seconds.
Using and understanding a program like top is an essential system administration skill. In this article, I will explain teach you how to navigate top command with confidence.
Understanding top command in Linux
Top is straight-forward to use. This simple command will bring you into the top application. When you want to exit, type the letter q to quit. There are also other key commands to make full use of it that I’ll discuss later.
 Top command output has two sections
You can easily check CPU load, the number of current tasks, as well as viewing information about memory usage. You’ll notice that while running there are essentially 2 sections with information.
At the top of our terminal, we get our overview data including memory usage and cpu load. Below that, we have a table with specific processes with plenty of details.
There is a lot of detailed information displayed in a condensed format. Let’s break it into smaller pieces so that we have a more complete understanding. The first four lines contain the overview data I mentioned before. Let’s take them line by line and explain what’s going on.
User Info, Uptime, and Load Averages
The first piece of information is a timestamp, which is pretty self-explanatory. Next to it you will see the system up time. In my case, it reads 24 mins. This refers to how long the computer has been running without interruption. Next we see three values for the load average. These figures are readings over 1 minute, 5 minutes, and 15 minutes, in that respective order.
For our purposes load values can be understood as an estimate of the “stress” on your system’s processing power. For example, a load of 1.0 would mean that 100% of your processing power is currently at work.
Tasks
System processes are also known as tasks. An operating system relies on a number of processes running in the background to make other activities possible, such as using a web browser.
Processes can be run in many different ways and are prioritized using a variety of algorithms. This serves to optimize how and when the computer performs the task. This is intended as a high-level overview so we will keep it simple here. We want our readers to know that there is more to computing than the states described here.
That said, let’s look at what each of these means:
| State | Description |
|---|---|
| Running | Active / in Queue to be Processed |
| Sleeping | Waiting for a Process to Complete |
| Stopped | Interrupted by Job Control Signal (CTRL+C, for example) |
| Zombie | Made up of “Orphaned” Child Tasks / No Longer Running |
CPU information in top command
Each of the values here is a percentage of time spent on the respective tasks. The table below explains what is meant by each abbreviation. This gives a fairly detailed breakdown of how processing power is being used.
| Abbreviation | Description |
|---|---|
| us | Processing done in User Mode |
| sy | Processing done in System/Kernel Mode |
| ni | Time Spent on “Nice” Processes |
| id | Time Spent Idle |
| wa | Waiting for a I/O Process to Complete |
| hi | Time Spent Due to Hardware Interrupts |
| si | Time Spent Due to Software Interrupts |
| st | Time “Stolen” by Virtual Machine Resources |
Memory usage in top command
These lines mimic the output of the free command in Linux.
Task Table
This is really the heart of the top command. If you came from windows, you’re probably familiar with using CTRL+ALT+DEL to access Task Manager. This is sort of a more “stripped” down version of that. You see the table of all the currently running tasks.
Here is a sample of some tasks displayed in top.
Here is a table to help make sense of the column header abbreviations.
| Abbreviation | Description |
|---|---|
| PID | Process ID (Unique Positive Integer) |
| USER | User Name |
| PR | Priority (Kernel) |
| NI | Nice Value |
| VIRT | Virtual Memory |
| RES | Resident Size (Physical Memory) |
| SHR | Shared Memory |
| S | Process Status (Running, Stopped, etc.) |
| %CPU | CPU Load |
| %MEM | Percentage of RES / Total RAM |
| TIME + | Total Time Spent on Process |
| COMMAND | Command That Began Process |
These are the default fields on my distribution. Your system may be slightly different. These are customizable by typing F while top is running. This will display a complete list of available options
Customizing and interacting with the top command output
Once you have your display set up in a way that you like. It’s time to get some work done. Let’s take a look at the full list of options for top (accessible by typing h) and look at some examples.
1. Color and Memory Scale
We have covered the color changes, but you can also modify the memory scale from bytes all the way up to petabytes. E modifies the figures from the summary section, while a e adjusts the scale in the task table.
2. Toggle Views for Summary Info
Each respective key will adjust the display options. The default is a text based output, but there are also simulated bars or you can turn items off completely.
3. View CPU-Specific Info
I only have one CPU on my virtual machine, but you can see how it would work if there were multiples. You can separate into individual nodes with their own statistics.
4 Top Field Manipulation
We can add or remove any fields we want displayed, we can also adjust the fixed-width of the text.
5. Locate String
6. Organize Your View
These commands give you options for organizing task information. Sort will display all of the tasks by PID, rather than the default sort by activity function. Threads will change your detailed and summary view to thread-oriented instead of task-oriented. Forest view arranges processes in a ‘tree’ structure to demonstrate parent-child relationships. Numeric justify changes the default left-aligned position of numeric fields.
7. Toggle Full-Path, Idle Tasks, Cumulative Time, and Text Justification
When you toggle c , you will see the full path of commands. Idle removes all non-active tasks from the display. S uses cumulative time. String justify changes the default left-aligned position of string fields.
8. Toggle Highlights
Using x to toggle sort field and y to sort running tasks.
9. Filter by User or Field/Value
We can easily filter out specific users or field/values. This is great for a system with many users or a lot of open tasks. Filters require a comparison operator between the field and the value. As you can see here I typed COMMAND=top to filter all commands except for top. Using shift with either command toggles case-sensitivity.
10. Filter number of Processes
Using either n or # will give you the option to enter a numeric value. This will show only the number of processes desired.
11. Renice or Kill Process with PID in top command
Using these commands, we can change the nice value or kill the process. I filtered out the specific PID to make it easier to see. I changed the nice value to 20. Then I sent a kill command. Using kill by default sends a SIGTERM signal. This allows it to finish executing code before terminating.
12. Change the default update time in top command
Here, I have changed the default update time from every 3.0 seconds, to every 1 second. You can adjust any time that suits your needs. It’s possible to use d or s to perform the same operation.
Conclusion
Did you enjoy our guide to top? I hope these tips taught you something new about working with top. If you like this guide, please share it on social media.
If you have any comments or questions, leave them below. If you have any suggestions, for topics you’d like to see covered, feel free to leave those as well. Thanks for reading.
Источник


