- How to use the taskbar in Windows 10
- Pin an app to the taskbar
- Настройка макета меню Пуск и панели задач в Windows 10 через групповые политики
- Экспорт/импорт макета меню Пуск в Windows 10 с помощью PowerShell
- Распространение макета начального экрана пользователям с помощью GPO
- Partial Lockdown – частичная блокировка макета начального экрана Windows
- Управление закрепленными ярлыкам в панели задач с помощью GPO
How to use the taskbar in Windows 10
Use the taskbar for more than seeing your apps and checking the time. You can personalize it in many ways—change the color and size, pin your favorite apps to it, move it around on your screen, and rearrange or resize taskbar buttons. You can also lock the taskbar to keep your options, check your battery status, and minimize all open programs momentarily so that you can take a look at your desktop.

Pin an app to the taskbar
Pin an app directly to the taskbar for quick access when you’re on the desktop. (Or unpin it, if you want.) You can do it from Start or the Jump List, which is a list of shortcuts to recently opened files, folders, and websites.
In the search box on the taskbar, type the name of the app you want to pin to the taskbar. Select More > Pin to taskbar . If you’re unpinning, follow the same steps and select Unpin from taskbar .
If the app is already open, locate the app’s icon button on the taskbar, press and hold the button, and then swipe up until the App list appears. If you’re using a mouse, locate the app icon button on the taskbar, right-click the button, and then select Pin to taskbar . If you’re unpinning, follow the same steps and select Unpin from taskbar .
Change your taskbar settings
Customize the taskbar from the taskbar itself. If you want to change multiple aspects of the taskbar at one time, use Taskbar settings. Press and hold or right-click any empty space on the taskbar, and then select Taskbar s ettings .
In the Taskbar settings, scroll to see the options for customizing, sizing, choosing icons, battery information and much more.
Select any of the following to see more info.
To change the color of your taskbar, select Start > Settings > Personalization > Colors > Show accent color on the following surfaces. Select Start, taskbar, and action center. This will change the color of your taskbar to the color of your overall theme.
Locking the taskbar is handy to make sure it remains how you set it up. Unlock the taskbar later when you want to make changes or change its location on the desktop. Press and hold or right-click any empty space on the taskbar, select Taskbar settings , and turn on Lock the taskbar.
If Lock the taskbar has a check mark next to it, you know it’s already locked. To turn it off, select Lock the taskbar or go to Taskbar settings and turn it Off.
If you have multiple monitors that display the taskbar, you’ll see Lock all taskbars.
Typically, the taskbar is at the bottom of the desktop, but you can also move it to either side or the top of the desktop. When the taskbar is unlocked, you can change its location. See Lock and unlock the taskbar to find out if yours is locked. When you’ve confirmed that your taskbar is unlocked, press and hold or right-click any empty space on the taskbar. Select Taskbar settings > Taskbar location on screen, and then select Left, Top, Right, or Bottom.
Like many other changes in the taskbar, you’ll need to first unlock the taskbar. Then, move the pointer over the border of the taskbar until the pointer turns into a double arrow. Drag the border to the size you want and release.
To add the battery icon to the taskbar, select Start > Settings > Personalization > Taskbar, and then take a look at the notification area. Choose Select which icons appear on the taskbar, and switch Power to On.
You can check battery status by selecting the battery icon in the taskbar.

Note: You might need to select show hidden icons Up arrow icon on the taskbar before selecting the battery icon. Power is not an option on systems without a battery.
Whenever you want to change the order of app buttons on the taskbar, just drag a button from its current position to a different one.
You might want to choose how taskbar buttons are grouped, especially if you have multiple windows open. By default, all open files from the same app are always grouped together, even if you didn’t open them in succession.
If you want to change how taskbar buttons group together, press and hold or right-click any empty space on the taskbar, select Taskbar settings > Combine taskbar buttons and then select from the list:
Always, hide labels. This is the default setting. Each app appears as a single, unlabeled button, even when multiple windows for that app are open.
When taskbar is full. This setting shows each window as an individual, labeled button. When the taskbar becomes crowded, apps with multiple open windows collapse into a single app button. Select the button to see a list of the windows that are open.
Never. This setting shows each window as an individual, labeled button and never combines them, no matter how many windows are open. As more apps and windows open, buttons get smaller, and eventually the buttons will scroll.
If you use multiple displays, you can make a different choice for your extra displays. Select Taskbar settings > Multiple Displays > Combine taskbar buttons on other taskbars. For these displays, select from Always, hide labels, When taskbar is full, and Never.

If you want to show more of your apps on the taskbar, you can show smaller versions of the buttons. Press and hold or right-click any empty space on the taskbar, select Taskbar settings , and then select On for Use small taskbar buttons. Select Off to return to the larger taskbar buttons.
Note: Badges aren’t displayed on small taskbar buttons.
A badge on a taskbar button is an alert to let you know that some activity is happening or needs to happen with that app.
For example, a bell badge on the Alarms & Clocks app alerts you to an active alarm that will notify you at the time you set. This feature is turned on by default, but if you want to make sure it’s on (or to turn it off), press and hold or right-click any empty space on the taskbar, select Taskbar settings , and go to Show badges on taskbar buttons.
Use the Peek feature to take a quick look at what’s on your desktop behind all the open windows.
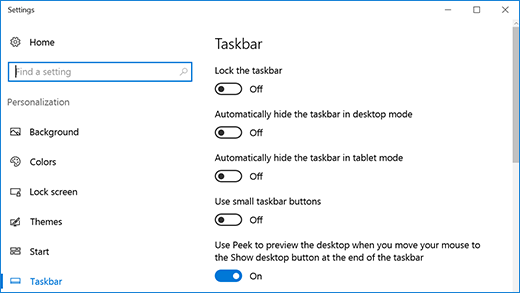
Press and hold or right-click any empty space on the taskbar, select Taskbar settings , and then turn on Use Peek to preview the desktop when you move your mouse to the Show desktop button at the end of the taskbar.
Open Taskbar settings
Move the mouse pointer over (or press and hold) the far-right edge of the taskbar to see the desktop.
To restore the view of all your open windows, move the pointer away or press and hold the edge one more time.
You can hide the taskbar based on whether you’re in desktop mode or tablet mode. Press and hold or right-click any empty space on the taskbar, select Taskbar settings , and then turn on either Automatically hide the taskbar in desktop mode or Automatically hide the taskbar in tablet mode (or both).
Настройка макета меню Пуск и панели задач в Windows 10 через групповые политики
В домене Active Directory вы можете централизованно управлять макетом начального экрана (Start Layout) меню Пуск и панели задач на компьютерах пользователей Windows 10 с помощью групповых политик. Это позволяет назначить одинаковые настройки, вид и местоположение значков и ярлыков в меню Пуск и панели задач пользователям различных подразделений компании в зависимости от используемых програм и убедиться, что все рабочие места настроены одинаково.
Экспорт/импорт макета меню Пуск в Windows 10 с помощью PowerShell
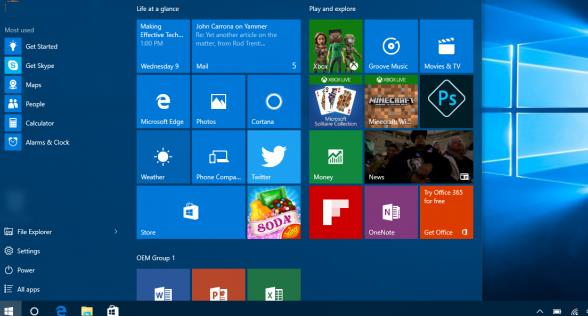
Самый простой способ получить макет стартового меню Пуск в Windows 10 — вручную настроить внешний вид и элементы рабочего стола на эталонном ПК. Создайте ярлыки (плитки) для необходимых приложений, закрепите и сгруппируйте их, удалите ненужные элементы. Затем вы можете экспортировать текущее описание элементов стартового меню в xml файл.
Экспортировать текущие настройки можно с помощью PowerShell командлета Export-StartLayout:
Export-StartLayout –path c:\ps\StartLayoutW10.xml 
Вы можете вручную импортировать данный шаблон стартового меню на другом компьютере Windows 10 с помощью командлета Import-StartLayout:
Import-StartLayout –LayoutPath c:\ps\StartLayoutW10.xml –MountPath c:\
Основной недостаток командлета Import—StartLayout – он импортирует макет начального экрана не к профилю текущего пользователя, а к профилю пользователя по умолчанию (в каталоге C:\Users\Default\AppData\Local\Microsoft\Windows\Shell\ появляется файл Layoutmodification.xml). Данный XML макет начального экрана применится только к новым пользователя при первом входе в систему
Распространение макета начального экрана пользователям с помощью GPO
Чтобы распространить файл с макетом меню Пуск на компьютеры домена с помощью групповых политик (GPO), нужно скопировать полученный XML файл в каталог Netlogon на котроллере домена. Затем откройте консоль управления доменными групповыми политиками Group Policy Management Console (GPMC.msc) и создайте новую или отредактируйте существующую политику и назначьте ее на OU с пользователями.
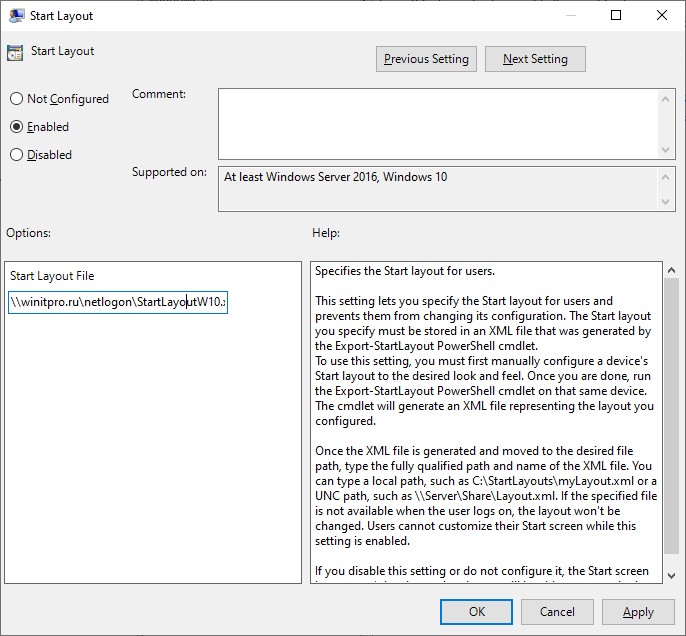
В редакторе GPO найдите политику с именем Start Layout (Макет начального экрана) в секции User Configuration -> Policies -> Administrative Templates -> Start Menu and Taskbar (также вы можете привязать макет меню Пуск к компьютеру, для этого нужно настроить политику в секции Computer Configuration).
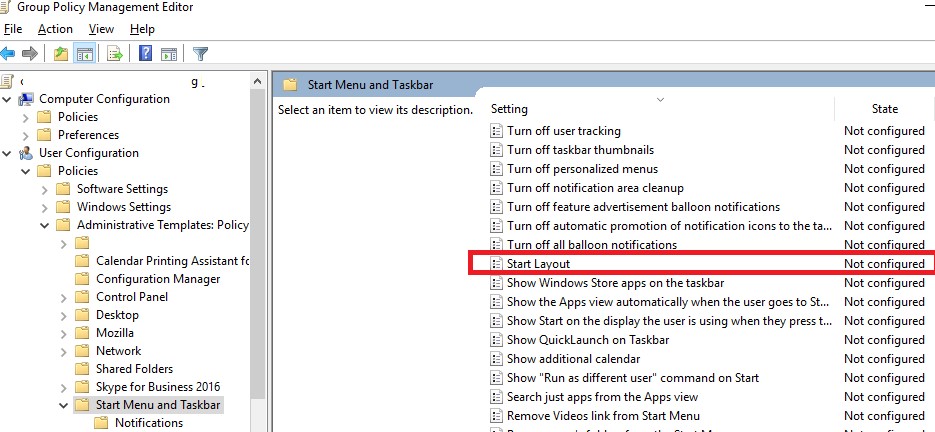
Откройте политику, включите ее (Enabled) и в поле Start layout file укажите UNC путь к xml файлу, содержащему макет стартового экрана Windows 10 на контроллере домена (например, \\domain.ru\netlogon\StartLayoutW10.xml).
Если вы хотите применить политику Start Layout, только к определенным группам пользователям или компьютерам, вы можете использовать Security Filtering или WMI фильтры GPO.
Partial Lockdown – частичная блокировка макета начального экрана Windows
Режим Partial Lockdown, появился в Windows 10 версии 1511, и позволяет указать группы плиток стартового меню, которые пользователи не могут изменить. Т.е. вы можете разрешить пользователяи изменять любые ярлыки, значки и плитки кроме определенной группы ярлыков корпоративных приложений.
Чтобы указать заблокированные группы начального экрана, нужно отредактировать XML файл с макетом с помощью любого текстового редактора (для редактирования XML файла удобно использовать Notepad++).
Откройте ваш файл StartLayoutW10.xml и найдите в нем секцию . Чтобы заблокировать определенную группу ярлыков, нужно в атрибуты данной секции изменить на .
Сохраните изменения в xml файле и распространите его на пользователей. Таким образом, будут заблокированы для редактирования пользователями только группы плиток (ярлыков), указанные в XML файле.
Partial Lockdown работает как в Windows 10 Enterprise так и в Pro (начиная с 1703).
В Windows 10 есть небольшой глюк, когда назначенный ярлык Internet Explorer не появляется после применения XML файла макета через GPO.
Для решения проблемы нужно отредактировать XML файл и исправить строку для ярлыка IE следующим образом:
И затем через GPO нужно скопировать ярлык “Internet Explorer.lnk” в каталог %ALLUSERSPROFILE%\Microsoft\Windows\Start Menu\Programs\.
Управление закрепленными ярлыкам в панели задач с помощью GPO
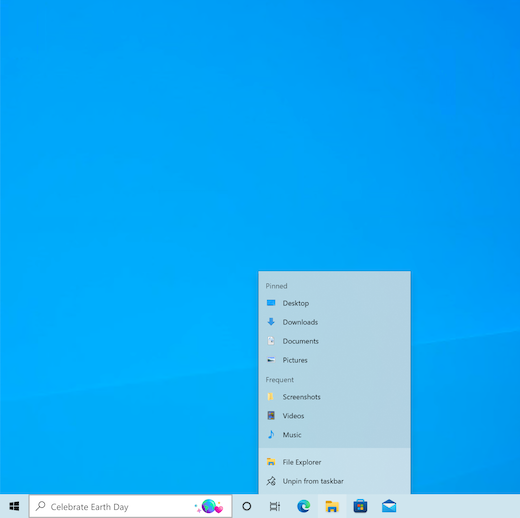
Начиная с Windows 10 1607 вы можете управлять закрепленными ярлыками в панели задач через тот же самый XML файл с макетом начального экрана. Чтобы добавить собственные закрепленные ярлыки в XML макет, который распространяется через GPO, отредактируйте XML файл. После тега нужно добавить следующий код:
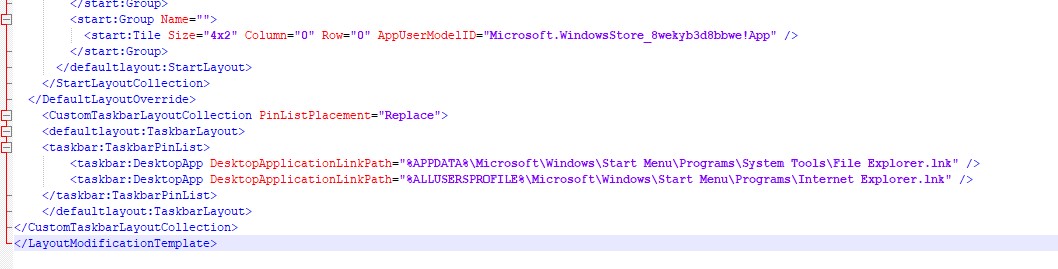
В данном примере мы добавим в панель задач два ярлыка: File Explorer и Internet Explorer. После применения политики на компьютере пользователя, в таскбаре появятся два закрепленных ярлыка.

В старых версия Windows 10 (до 1607) ярлыки приложений в панели задач настраивается по другому. Попробуем разобраться как.
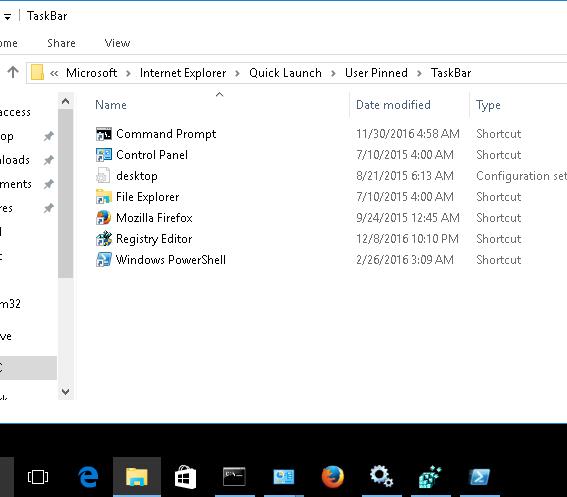
Список закрепленных в панели задач ярлыков хранится в Windows 10 в каталоге %APPDATA%\Microsoft\Internet Explorer\Quick Launch\User Pinned\TaskBar.
При этом параметры закрепленных в панели задач приложений хранятся в закодированном виде в ветке реестра HKEY_CURRENT_USER\Software\Microsoft\Windows\CurrentVersion\Explorer\Taskband.
Для распространения настроек таскбара на компьютеры компании, нужно экспортировать содержимое данной ветки в reg файл:
reg export HKCU\Software\Microsoft\Windows\CurrentVersion\Explorer\Taskband c:\ps\PinnedItem.reg
Этот reg файл и каталог с ярлыками (%APPDATA%\Microsoft\Internet Explorer\Quick Launch\User Pinned\TaskBar) нужно скопировать в общедоступную сетевую папку (например в Netlogon). И в редакторе доменной групповой политики (User Configuration- > Policies -> Windows Settings -> Scripts (Logon/Logoff) -> Logon) добавить логон скрипт с кодом:
@echo off
set Logfile=%AppData%\pinned.log
if not exist «%Logfile% (
IF EXIST «%APPDATA%\Microsoft\Internet Explorer\Quick Launch\User Pinned\TaskBar» GOTO NOTASKDIR
del «%APPDATA%\Microsoft\Internet Explorer\Quick Launch\User Pinned\TaskBar\*» /S /Q
:NOTASKDIR
xcopy /E /Y «\\domain.ru\netlogon\PinnedItem » «%APPDATA%\Microsoft\Internet Explorer\Quick Launch\User Pinned»
regedit.exe /s «\\domain.ru\netlogon\PinnedItem.reg «
echo PinnedItemImported on %date% at %time% >> %LogFile%
taskkill /IM explorer.exe /f
start explorer.exe
>
Теперь при входе пользователя в систему ему будет применен “корпоративный” набор закрепленных иконок приложений в панели задач.


