- Teamcity Agent For Mac
- Requirements
- Supported Environments
- Parameters Reported by Agent
- Setting up and Running Additional Build Agents
- Prerequisites
- Necessary OS and environment permissions
- Common
- Windows
- Linux
- Build-related Permissions
- Agent-Server Data Transfers
- Unidirectional Agent-to-Server Communication
- Bidirectional Communication
- Changing Communication Protocol
- Installing Additional Build Agents
- Installing via Windows installer
- Installing via Docker Agent Image
- Installing via ZIP File
- Installing via Agent Push
- Remote Host Requirements
- Installation
- Starting the Build Agent
- Manual Start
- Automatic Start
- Automatic Agent Start under Windows
- Build Agent as a Windows Service
- Automatic Agent Start under Linux
- Automatic Agent Start under macOS
- Stopping the Build Agent
- Stopping the Agent Service on macOS
- Configuring Java
- Upgrading Java on Agents
- Installing Several Build Agents on the Same Machine
- Configuring second build agent on macOS
- Configuring second build agent on Windows
Teamcity Agent For Mac
Installing Additional Build Agents. Before the installation, please review Known Issues#Conflicting Software section. Necessary OS and environment permissions. Please note that in order to run a TeamCity build agent, the user account under which the Agent is running should have the correct privileges, as described below. Sharma is somewhat correct, and KIR has it completely correct. I needed a build configuration for each server, Mac and Windows. Then I set a snapshot dependency from the Windows build on the Mac build (to make sure the Mac version builds completely first) and a artifact dependency from the same (to copy the resulting build output from the Mac to the Windows box). By default (since TeamCity 10), a TeamCity agent connects to the TeamCity server via the URL configured as the ‘serverUrl’ agent property. This is called unidirectional agent-to-server connection. In rare cases, TeamCity may switch to old, bidirectional communication which also requires establishing a connection from the server to the agents. Not able to setup/run the TeamCity build agent on Mac OSX 10.9.3 Follow. Vishnu sharma Created June 20, 2014 08:54. Hello I downloaded the build agent zip from the server UI portal and unziped that in my Application folder. ## A token which is used to identify this agent on the TeamCity server.
TeamCity comes with Docker Support, implemented as a bundled plugin.
Requirements
The integration requires Docker installed on the build agents. To use the Docker Compose build runner, install Docker Compose as well.
Since version 2019.2.1, TeamCity periodically checks if Docker is available on active build agents. Based on the docker.server.version and docker.version variables received from the agents, TeamCity distributes builds that use Docker only between agents with the installed Docker engine.
If a build configuration uses the Docker runner or the Docker Wrapper extension, TeamCity automatically adds the docker.server.version agent compatibility requirement for this configuration.
Supported Environments
TeamCity Docker Support can run on Windows, Linux, and macOS build agents. It uses the docker executable on the build agent machine, so it should be runnable by the build agent user.
On Linux, the integration will run if the installed Docker is detected.
On Windows, the integration works for Linux and Windows container modes.
On macOS, the official Docker support for Mac should be installed for the user running the build agent.
Parameters Reported by Agent
During the build, the build agent reports the following parameters:
Источник
Setting up and Running Additional Build Agents
Before you can start customizing projects and creating build configurations, you need to configure build agents. Review the agent-server communication and Prerequisites sections before proceeding with agent installation. Make sure to also read our security notes on maintaining build agents.
If you install TeamCity bundled with a Tomcat servlet container, or use the TeamCity installer for Windows, both the server and one build agent are installed on the same machine. This is not a recommended setup for production purposes because of security concerns and since the build procedure can slow down the responsiveness of the web UI and overall TeamCity server functioning. If you need more build agents, perform the procedure described below.
If you need the agent to run an operating system different from the TeamCity server, perform the procedure described below.
Prerequisites
Necessary OS and environment permissions
Before the installation, review the Conflicting Software section. In case of any issues, make sure no conflicting software is used.
Note that to run a TeamCity build agent, the environment and user account used to run the Agent need to comply with the following requirements:
Common
The agent process (Java) must:
be able to open outbound HTTP connections to the server URL configured via the serverUrl property in the buildAgent.properties file (typically the same address you use in the browser to view the TeamCity UI). Sending requests to the paths under the configured URL should not be limited. See also the recommended reverse proxy settings. Ensure that any firewalls installed on the agent or server machines, network configuration and proxies (if any) comply with these requirements.
be able to launch processes (to run builds).
be able to launch nested processes with the following parent process exit (this is used during agent upgrade).
Windows
Log on as a service (to run as Windows service).
Start/Stop service (to run as Windows service, necessary for the agent upgrade to work, see also Microsoft KB article).
Debug programs (required for take process dump functionality).
Reboot the machine (required for agent reboot functionality) .
To be able to monitor performance of a build agent run as a Windows service, the user starting the agent must be a member of the Performance Monitor Users group.
For granting necessary permissions for unprivileged users, see Microsoft documentation.
You can assign rights to manage services with Microsoft SubInACL utility, a command-line tool enabling administrators to directly edit security information. The tool uses the following syntax:
For example, to grant Start/Stop rights, you might need to execute the command:
Linux
The user must be able to run the shutdown command (for the agent machine reboot functionality and the machine shutdown functionality when running in a cloud environment).
If you are using systemd , it should not kill the processes on the main process exit (use RemainAfterExit=yes ). See also how to set up automatic agent start under Linux.
Build-related Permissions
The build process is launched by a TeamCity agent and thus shares the environment and is executed under the OS user used by the TeamCity agent. Ensure that the TeamCity agent is configured accordingly. See Known Issues for related Windows Service Limitations.
Agent-Server Data Transfers
A TeamCity agent connects to the TeamCity server via the URL configured as the serverUrl agent property. This is called unidirectional agent-to-server connection.
If specifically configured, TeamCity agent can use legacy bidirectional communication which also requires establishing a connection from the server to the agents. To view whether the agent-server communication is unidirectional or bidirectional for a particular agent, navigate to Agents | | Agent Summary tab, the Details section, Communication Protocol.
Unidirectional Agent-to-Server Communication
Agents use unidirectional agent-to-server connection via the polling protocol: the agent establishes an HTTP(S) connection to the TeamCity Server, and polls the server periodically for server commands.
It is recommended to use HTTPS for agent-to-server communications (check related server configuration notes). If the agents and the server are deployed into a secure environment, agents can be configured to use plain HTTP URL for connections to the server as this reduces transfer overhead. Note that the data travelling through the connection established from an agent to the server includes build settings, repository access credentials and keys, repository sources, build artifacts, build progress messages and build log. In case of using the HTTP protocol that data can be compromised via the «man in the middle» attack.
Bidirectional Communication
The bidirectional communication is a legacy connection between the agent and the server and it needs to be specifically enabled (see the example below). When enabled, it requires the agent to connect to the server via HTTP (or HTTPS) and the server to connect to the agent via HTTP.
The data that is transferred via the connections established by the server to agents is passed via an unsecured HTTP channel and thus is potentially exposed to any third party that may listen to the traffic between the server and the agents. Moreover, since the agent and server can send «commands» to each other, an attacker that can send HTTP requests and capture responses may in theory trick the agent into executing an arbitrary command and perform other actions with a security impact.
The communication protocol used by TeamCity agents is determined by the value of the teamcity.agent.communicationProtocols server internal property. The property accepts a comma-separated ordered list of protocols ( polling and xml-rpc are supported protocol names) and is set to teamcity.agent.communicationProtocols=polling by default. If several protocols are specified, the agent tries to connect using the first protocol from this list and if it fails, it will try to connect via the second protocol in the list. polling means unidirectional protocol, xml-rpc — older, bidirectional communication.
Changing Communication Protocol
To change the communication protocol for all agents, set the TeamCity server teamcity.agent.communicationProtocols server internal property. The new setting will be used by all agents which will connect to the server after the change. To change the protocol for the existing connections, restart the TeamCity server.
By default, the agent’s property is not configured; when the agent first connects to the server, it receives it from the TeamCity server. To change the protocol for an individual agent after the initial agent configuration, change the value of the teamcity.agent.communicationProtocols property in the agent’s properties. The agent’s property overrides the server property. After the change the agent will restart automatically upon finishing a running build, if any.
Installing Additional Build Agents
Install a build agent using any of the following options:
by downloading a ZIP file and installing manually (any platform): minimal and full-packed ZIP archives ara available
via the Docker Agent Image option to prepare a Docker container based on the official TeamCity Agent image
After installation, configure the agent specifying its name and the address of the TeamCity server in the conf/buildAgent.properties file.
Start the agent. If the agent does not seem to run correctly, check the agent logs.
When the newly installed agent connects to the server for the first time, it appears on the Agents page, Unauthorized agents tab visible to administrators/users with the permissions to authorize it. Agents will not run builds until they are authorized in the TeamCity web UI. The agent running on the same computer as the server is authorized by default.
The number of authorized agents is limited by the number of agents licenses on the server. See more under Licensing Policy.
Installing via Windows installer
In the TeamCity web UI, navigate to the Agents tab.
Click the Install Build Agents link and select Windows Installer to download the installer.
On the agent, run the agentInstaller.exe Windows Installer and follow the installation instructions.
Ensure that the user account used to run the agent service has appropriate permissions
Installing via Docker Agent Image
In the TeamCity UI, navigate to the Agents tab.
Click the Install Build Agents link and select Docker Agent Image.
Follow the instructions on the opened page.
Installing via ZIP File
Make sure a JDK (JRE) 1.8.0_161 or later (Java 8-11 are supported, but 1.8.0_161+ is recommended) is properly installed on the agent computer.
On the agent computer, make sure the JRE_HOME or JAVA_HOME environment variables are set (pointing to the installed JRE or JDK directory respectively).
In the TeamCity web UI, navigate to the Agents tab.
Minimal ZIP file distribution: a regular build agent with no plugins
(since TeamCity 2020.1) Full ZIP file distribution*: a full build agent prepacked with all plugins currently enabled on the server
Extract the downloaded file into the desired directory.
Navigate to the \conf directory, locate the file called buildAgent.dist.properties and rename it to buildAgent.properties .
Edit the buildAgent.properties file to specify the TeamCity server URL and the name of the agent. Refer to the Build Agent Configuration page for details on agent configuration.
Under Linux, you may need to give execution permissions to the bin/agent.sh shell script.
On Windows, you may also want to install the build agent Windows service instead of using the manual agent startup.
* A minimal TeamCity agent distribution does not contain plugins: the agent downloads them on the first start. The full agent contains all enabled plugins and automatically stays relevant with the current TeamCity server state. This makes its distribution archive larger but significantly reduces the time spent on the first agent run.
The full agent is the most convenient if you use scripts for creating agent images (for example, in cloud). All instances will be synchronized with the server from the start and can instantly run a build.
Note that after starting, the full agent behaves like a regular agent. If you modify the state of plugins on the TeamCity server, all active agents will need to restart to sync with the server.
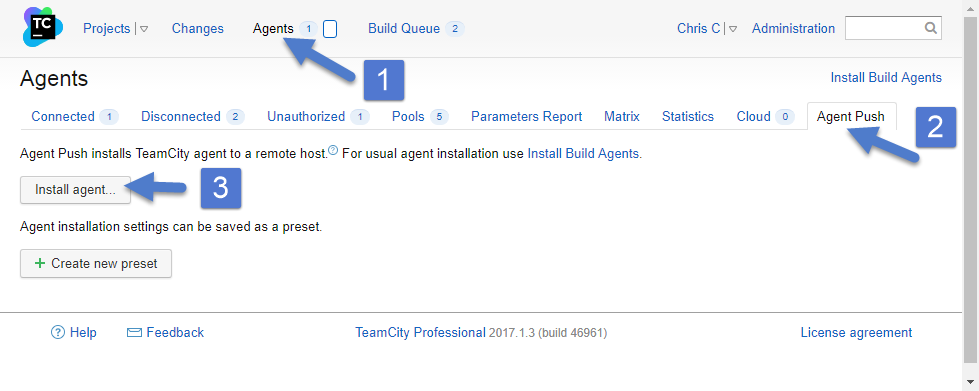
Installing via Agent Push
TeamCity provides the Agent Push functionality that allows installing a build agent to a remote host.
Currently, supported combinations of the server host platform and targets for build agents are:
from the Unix-based TeamCity server, build agents can be installed to Unix hosts only (via SSH)
from the Windows-based TeamCity server, build agents can be installed to Unix (via SSH) or Windows (via psexec) hosts
Make sure the «Password» or «Public key» authentication is enabled on the target host according to a preferred authentication method.
Remote Host Requirements
There are several requirements for the remote host:
Installed JDK (JRE) 8-11 ( 1.8.0_161 or later is recommended). The JVM should be reachable via the JAVA_HOME ( JRE_HOME ) global environment variable or be in the global path (instead of being specified in, for example, user’s .bashrc file)
The unzip utility.
Either wget or curl .
Installed JDK/JRE 8-11 ( 1.8.0_161 or later is recommended).
Administrative share on a remote host is enabled and accessible.
Remote services work (MMC snap-in can connect to the machine).
Remote registry works ( regedit can connect to the machine via services.msc ).
Server and workstation services are running (check via services.msc ).
You can test the connection with the following commands:
Installation
In the TeamCity Server web UI navigate to the Agents | Agent Push tab, and click Install Agent.
If you are going to use same settings for several target hosts, you can create a preset with these settings and use it each time when installing an agent to another remote host.
In the Install agent dialog, either select a saved preset or choose » Use custom settings«, specify the target host platform, and configure corresponding settings. Agent Push to a Linux system via SSH supports custom ports (the default is 22) specified as the SSH port parameter. The port specified in a preset can be overridden in the host name (for example, hostname.domain:2222 ), during the actual agent installation.
You may need to download Sysinternals psexec.exe , in which case you will see the corresponding warning and a link to the Administration | Tools page where you can download it.
You can use Agent Push presets in Agent Cloud profile settings to automatically install a build agent to a started cloud instance.
Starting the Build Agent
TeamCity build agents can be started manually or configured to start automatically.
Manual Start
To start the agent manually, run the following script:
for Windows: \bin\agent.bat start
for Linux and macOS: \bin\agent.sh start
Automatic Start
To configure the agent to be started automatically, see the corresponding sections:
Linux: configure a daemon process with the agent.sh start command to start it and the agent.sh stop command to stop it.
Automatic Agent Start under Windows
To run an agent automatically on the machine boot under Windows, you can either set up the agent to be run as a Windows service or use another way of the automatic process start.
Using the Windows service approach is the easiest way, but Windows applies some constraints to the processes run this way.
A TeamCity agent works reliably under Windows service provided all the requirements are met, but is often not the case for the build processes configured to be run on the agent.
That is why it is recommended to run a TeamCity agent as a Windows service only if all the build scripts support this. Otherwise, it is advised to use alternative OS-specific ways to start a TeamCity agent automatically.
One of the ways is to configure an automatic user logon on Windows start and then configure the TeamCity agent start (via agent.bat start ) on the user logon (for example, via Windows Task Scheduler).
Build Agent as a Windows Service
In Windows, you may want to run TeamCity agent as a Windows service to allow it running without any user logged on. If you use the Windows agent installer, you have an option to install the service in the installation wizard.
To run builds, the build agent must be started under a user with sufficient permissions for performing a build and managing the service. By default, a Windows service is started under the SYSTEM account which is not recommended for production use due to extended permissions the account uses. To change it, use the standard Windows Services applet ( Control Panel | Administrative Tools | Services) and change the user for the TeamCity Build Agent service.
If you start an Amazon EC2 cloud agent as a Windows service, check the related notes.
The following instructions can be used to install the Windows service manually (for example, after .zip agent installation). This procedure should also be performed to create Windows services for the second and following agents on the same machine.
To install the service:
Check if the service with the required name and id (see #4 below, service name is TeamCity Build Agent by default) is not present; if installed, remove it.
If you want to run the agent under user account (recommended) and not «System», add the wrapper.ntservice.account and wrapper.ntservice.password properties to the \launcher\conf\wrapper.conf file with appropriate credentials
To start the service:
To stop the service:
You can also use the standard Windows net.exe utility to manage the service once it is installed.
For example (assuming the default service name):
The user account used to run the build agent service must have enough rights to start/stop the agent service, as described above.
Automatic Agent Start under Linux
To run an agent automatically on the machine boot under Linux, configure a daemon process with the agent.sh start command to start it and the agent.sh stop command to stop it.
For systemd, see the example teamcityagent.service configuration file:
For init.d , refer to an example procedure:
1. Navigate to the services start/stop services scripts directory:
2. Open the build agent service script:
3. Paste the following into the file :
4. Set the permissions to execute the file:
5. Make links to start the agent service on the machine boot and on restarts using the appropriate tool:
For Red Hat/CentOS:
Automatic Agent Start under macOS
For macOS, TeamCity provides the ability to load a build agent automatically when a build user logs in.
The recommended approach is to use launchd (LaunchAgent):
To configure an automatic build agent startup via launchd , follow these steps:
1. Install a build agent on a Mac via buildAgent.zip .
2. Prepare the conf/buildAgent.properties file (set agent name there, at least).
3. Make sure that all files under the buildAgent directory are owned by your_build_user to ensure a proper agent upgrade process.
4. Load the build agent via the command:
Run these commands under the your_build_user account.
Wait for some time for the build agent to auto-upgrade from the TeamCity server. This can take up to several minutes. You can watch the process in the logs:
5. When the build agent upgrades and successfully connects to TeamCity server, stop the agent:
6. After the build agent upgrades from the TeamCity server, copy the buildAgent/bin/jetbrains.teamcity.BuildAgent.plist file to the $HOME/Library/LaunchAgents/ directory (you might have to create it). If you don’t want TeamCity to start under the root permissions, specify the UserName key in the .plist file, for example:
7. Configure your Mac system to automatically login as your_build_user , as described here.
On the system startup, the build user should automatically log in, and the build agent should start.
To quickly check that the build agent is running, use the following command:
Stopping the Build Agent
Use stop to request stopping after the current build finished.
Use stop force to request an immediate stop (if a build is running on the agent, it will be stopped abruptly (canceled)).
Under Linux, you have one more option top use stop kill to kill the agent process.
If the agent runs with a console attached, you may also press Ctrl+C in the console to stop the agent (if a build is running, it will be canceled).
Stopping the Agent Service on macOS
If a build agent has been started as a LaunchAgent service, it can be stopped using the launchctl utility:
Configuring Java
A TeamCity build agent is a Java application (supported Java versions).
A build agent contains two processes:
Agent Launcher — a Java process that launches the agent process
Agent — the main process for a Build Agent; runs as a child process for the agent launcher
The (Windows) .exe TeamCity distribution comes bundled with 64-bit Amazon Corretto 8.
If you run a previous version of the TeamCity agent, you will need to repeat the agent installation to update the JVM.
Using 64-bit JDK (not JRE) is recommended. JDK is required for some build runners like IntelliJ IDEA Project, Java Inspections, and Duplicates. If you do not have Java builds, you can install JRE instead of JDK.
On switching from 32- to 64-bit, you might need to double the -Xmx memory value for the main agent process (see related notes for build agents and server).
For the .zip agent installation you need to install the appropriate Java version. Make it available via PATH or available in one of the following places:
in the directory pointed to by the TEAMCITY_JRE , JAVA_HOME or JRE_HOME environment variables (check that you only have one of the variables defined).
if you plan to run the agent via Windows service, make sure to set the wrapper.java.command property in the \launcher\conf\wrapper.conf file to a valid path to the Java executable
Upgrading Java on Agents
If you are trying to launch an agent, and it is not able to find the required Java version (currently Java 8) in any of the default locations, the agent will report an error on starting, the process will not launch, and the agent will be shown as disconnected in the TeamCity UI.
If a build agent uses a Java version older than Java 8, you will see the corresponding warning on the agent’s page and a health item in the web UI.
Support for Java prior to version 8 on agents has been dropped in TeamCity 2019.2. Consider upgrading Java on the agent if you see the warning.
An agent machine can have multiple Java versions installed, and the agent can use one Java version while the build tasks use other Java versions.
Please let us know using any of our support channels if your setup depends on the older version of Java and if you will not be able to upgrade to version 8 for some reason.
It is recommended to use latest Java 8, 64-bit version.
OpenJDK 8 (for example, bundled Amazon Corretto) 1.8.0_161 or later. Oracle Java 8 is also supported.
To update Java on agents, do one of the following:
If the agent details page in the TeamCity UI displays a Java version note with the corresponding action, you can switch to using newer Java: if the appropriate Java version of the same bitness as the current one is detected on the agent, the agent page provides an action to switch to using that Java automatically. Upon the action invocation, the agent process is restarted (once the agent becomes idle, i.e. finishes the current build if there is one) using the new Java.
(Windows) Since the build agent Windows installer comes bundled with the required Java, you can just manually reinstall the agent using the Windows installer ( .exe ) obtained from the TeamCity server Agents page. See installation instructions. It is important to uninstall the previous version of the agent before installing the updated agent: invoke Uninstall.exe in the agent home directory, clear all the » Remove» checkboxes, and click Uninstall.
Install a required Java on the agent into one of the standard locations, and restart the agent — the agent should then detect it and provide an action to use a newer Java in the web UI (see above).
Install a required Java on the agent and configure the agent to use it.
In a rare case of updating the Java for the process that launches the TeamCity agent, use one of the options for the agent Java upgrade. Another way for Build Agent started as a Windows service, is to stop the service, change the wrapper.java.command variable in buildAgent\launcher\conf\wrapper.conf to point to the new java.exe binary, and restart the service.
Installing Several Build Agents on the Same Machine
You can install several TeamCity agents on the same machine if the machine is capable of running several builds at the same time. However, we recommend running a single agent per (virtual) machine to minimize builds cross-influence and making builds more predictable. When installing several agents, it is recommended to install them under different OS users so that user-level resources (like Maven/Gradle/NuGet local artifact caches) do not conflict.
TeamCity treats all agents equally regardless of whether they are installed on the same or on different machines.
When installing several TeamCity build agents on the same machine, consider the following:
The builds running on such agents should not conflict by any resource (common disk directories, OS processes, OS temp directories).
Depending on the hardware and the builds’ specifics, you may experience degraded building performance. Ensure there are no disk, memory, or CPU bottlenecks when several builds are run at the same time.
Preferably, agents should run under different OS users.
After having one agent installed, you can install additional agents by following the regular installation procedure (see an exception for the Windows service below), but make sure that:
The agents are installed in separate directories.
The agents have the distinctive workDir and tempDir directories in the buildAgent.properties file.
Values for the name and ownPort properties of buildAgent.properties are unique.
No build configurations specify the absolute path to the checkout directory (or, if necessary, you can enable the «clean checkout» option and make sure they do not run in parallel).
Usually, for a new agent installation you can just copy the directory of the existing agent to a new place except its temp , work , logs , and system directories. Then, modify conf/buildAgent.properties with the new name and ownPort values. Clear (delete or remove the value) the authorizationToken property and make sure the workDir and tempDir are relative/do not clash with another agent.
Configuring second build agent on macOS
If you want to start several build agents on macOS, repeat the procedure of installing and starting build agent with the following changes:
Install the second build agent in a different directory.
In conf/buildAgent.properties , specify a different agent name.
Create a copy of the $HOME/Library/LaunchAgents/jetbrains.teamcity.BuildAgent.plist file as $HOME/Library/LaunchAgents/jetbrains.teamcity.BuildAgent2.plist .
the Label parameter to jetbrains.teamcity.BuildAgent2
the WorkingDirectory parameter to the correct path to the second build agent home
Start the second agent with the command launchctl load $HOME/Library/LaunchAgents/jetbrains.teamcity.BuildAgent2.plist .
To check that both build agents are running, use the following command:
Configuring second build agent on Windows
If you use Windows installer to install additional agents and want to run the agent as a service, you will need to perform manual steps as installing second agent as a service on the same machine is not supported by the installer: the existing service is overwritten (see also a feature request).
In order to install the second agent, it is recommended to install the second agent manually (using the .zip agent distribution). You can use the Windows agent installer and do not opt for service installation, but you will lose uninstall option for the initially installed agent this way.
After the second agent is installed, register a new service for it as mentioned in the section above.
For step-by-step instructions on installing a second Windows agent as a service, see the related external blog post.
Источник


