macOS Catalina — How to grant access to TeamViewer on your Mac
If you are starting TeamViewer on your Mac running macOS 10.15 (Catalina) for the first time, you will be prompted with the following dialog:
By default, all permissions are set to Denied. Please give permission to the system capabilities manually to use TeamViewer as desired. If you or others need to access the Mac remotely, Screen Recording and Accessibility are required at a minimum.
To allow the access, click the buttons shown in the dialog. Eg. click Open Full Disk Access Preferences. which will bring you to the Full Disk Access section of the Privacy pane, inside the Security & Privacy preferences:
For the Accessibility access you will need to click the padlock icon in the lower-left corner to make changes. You will be prompted to enter the credentials of an administrator account to continue.
Put a check next to TeamViewer to grant it access:
Repeat the same for Screen Recording and Accessibility if desired. Those are required to control your Mac.
Click again on the padlock in the lower-left corner to prevent further changes.
Now you can close the Security & Privacy window. The next time you want to receive an incoming connection with TeamViewer, the person connecting to your Mac will be able to see and control your screen.
The permission status can be reviewed under Help -> Check system access at any time.
Источник
Can’t Boot after uninstalling Teamviewer on Mac OS Catalina
Am in a bit of a pickle after a succesful upgrade to Catalina and then uninstalling Teamviewer through CleanMyMac uninstaller utility. It all seemed fine till i had rebooted and it fails with an Unrecoverable error for security agent Teamviewer auth plugin.start.
Anyone know how to fix this, w/o needing to install all from scratch?
Thanks in advance.
Best Answer
This issue can be caused by deleting an authorization plugin on macOS (in this case, TeamViewerAuthPlugin.bundle) without de-registering it first.
We recommend always using the built-in uninstaller in TeamViewer (Preferences > Advanced). This makes sure that the plugin is properly de-registered before deletion.
In my tests, CleanMyMac X versions prior to 4.4.5 seem to be deleting the plugin without de-registering it, so that could have caused the issue. If you use CleanMyMac X, you’ll want to make sure to use the newest version.
If you do not have the possibility to restore the plugin as described by @Mrsharifi, you may instead be able to delete your Mac’s authorization database. Your Mac re-creates a missing database during the next startup (using some default settings that are fine for most users).
- Start your Mac in macOS Recovery by holding down Cmd-R until the Apple logo appears.
Once your Mac has booted into macOS Recovery, you should see a window titled «macOS Utilities». - To delete the authorization database, your Mac’s hard disk needs to be mounted and you will need to know its name (usually something like «Macintosh HD» or «macOS»).
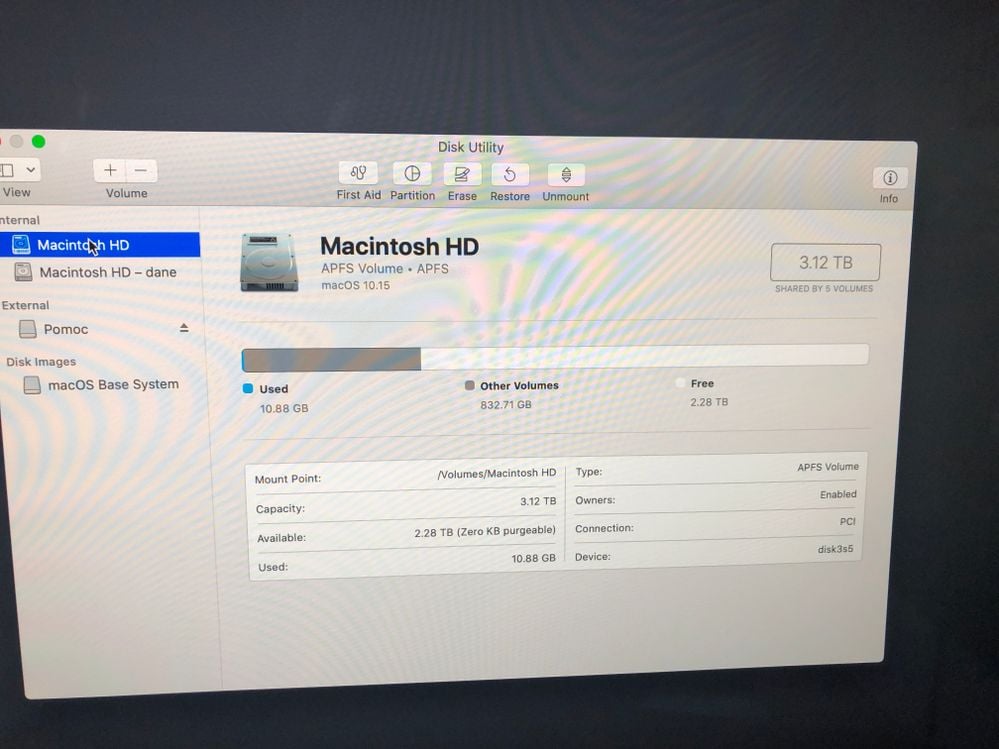
- Open Disk Utility and check the left sidebar for the name of your disk. For Macs running Catalina, look for the name that does not end in «- Data».
- Select the disk in the sidebar.
- Click «Mount» in the toolbar (if you only see «Unmount», it is already mounted and you don’t need to do anything).
- Quit Disk Utility.
- You should be back at the «macOS Utilities» window.
- From the menu bar on top of the screen, open Utilities > Terminal.
- Enter the command Replace with the name of your built-in hard disk, e.g. Make sure not to forget the quotes in case your disk name contains spaces.
- Restart your Mac.
Answers
I had exactly the same problem and the following helped me to resolve the problem.
- Install the TeamViewer app on another MacOS
- Copy the «TeamViewerAuthPlugin.bundle» from «/Library/Security/SecurityAgentPlugins/TeamViewerAuthPlugin.bundle» to a USB. Make sure the USB is formatted in the native MacOS filesystem to avoid incompatibility issues in the next steps.
- Restart your machine and hold Command+R to enter the MacOS Recovery mode until the Apple Logo appears. this process may take some time
- Upon entering the recovery mode, you’ll be instructed to select the language, username, and finally to enter your password.
- After a few minutes, the macOS Utilities window will appear
- From the list select Disk Utility
- In the Disk Utility window, from the left pane select the «macOS» disk and in the right pane click on the «Mount» button. If asked, enter your login password. Now, the macOS disk is mounted. to verify this, look at the info bar on the page. it should be active and show detail information about the disk.
- Close the Disk Utility window and from the menu bar, select Utilities and select Terminal
- Once the Terminal window opened, connect the USB to the machine and type following:
- To verify the above operation, enter the following; it should show the «TeamViewerAuthPlugin.bundle». If not shown, try to retype step 9 but use the Tab key to autocomplete the path step by step. Don’t rush.
- If successful, from Apple logo on the top left corner select Restart and wait for the machine to restart
- Now you should be able to successfully login to your machine.
In case of any problem during step 9, especially receiving «Operation not permitted». enter the following:
Restart the machine for the changes to take effect. Then, repeat step 3 and follow the instructions again. Once the macOS booted successfully, open a Terminal and reverse the setting by entering:
NOTE: I tried to recall all the steps after two days, so I might have missed something. So, in case of any problem please email me at [email protected]
It seems like cp command is not working. every time i’m trying to use it the following error accures
so i decided moving the .bundle would help, but still the same error
pls, post the screenshot of the exact command you use and the output.

that’s the code i’ve been using
I am having the same problems and took your advice and installed teamviewer on another mac. (Mojave). There is no authplugin.bundle in the directory with the application so I cannot copy the plugin? What shoul I do?
You’re copying the file to a wrong directory «/Volumes/macOS Base System». Put it simply, consider macOS Base as a light version of macOS to provide necessary tools for troubleshooting and recovery. Therefore, the filesystem is in Read-only mode. That’s why you can’t write or modify.
As instructed in step 7, you should FIRST mount the macOS disk so that you can access the main filesystem and copy the file to the right path.
Once done, open the terminal and use enter following:
You should be able to see following in the output in addition to «macOS Base System»:
If so, you can continue with step 9 and so on. But, as shown below, make sure to use «macOS» in the destination instead of «macOS Base System».
 which disk shall I mount?
Macintosh HD. but it seems it’s already mounted. so try the command «ls -l /Volumes» to see if it lists the «Macintosh HD». If so, continue with copying the file to:
OMG! You are great! Works fine! Now I am able to use my computer! THANK YOU.
it’s TeamViewerAuthPlugin.bundle not authplugin.bundle. it’s case sensitive so make sure you’re looking for the right file.
Please see my new post on this issue here. I rewrote the entire instruction. I fixed some minor mistakes and added more details including the errors.
Anyone has theses files somewhere i can download .. i don’t have another MAC .. so i can’t appy this solution .
Anyone else found a way of removing the file that does prevent us to get to the login page without having to Copy back the file from another computer?
This issue can be caused by deleting an authorization plugin on macOS (in this case, TeamViewerAuthPlugin.bundle) without de-registering it first.
We recommend always using the built-in uninstaller in TeamViewer (Preferences > Advanced). This makes sure that the plugin is properly de-registered before deletion.
In my tests, CleanMyMac X versions prior to 4.4.5 seem to be deleting the plugin without de-registering it, so that could have caused the issue. If you use CleanMyMac X, you’ll want to make sure to use the newest version.
If you do not have the possibility to restore the plugin as described by @Mrsharifi, you may instead be able to delete your Mac’s authorization database. Your Mac re-creates a missing database during the next startup (using some default settings that are fine for most users).
- Start your Mac in macOS Recovery by holding down Cmd-R until the Apple logo appears.
Once your Mac has booted into macOS Recovery, you should see a window titled «macOS Utilities». - To delete the authorization database, your Mac’s hard disk needs to be mounted and you will need to know its name (usually something like «Macintosh HD» or «macOS»).
- Open Disk Utility and check the left sidebar for the name of your disk. For Macs running Catalina, look for the name that does not end in «- Data».
- Select the disk in the sidebar.
- Click «Mount» in the toolbar (if you only see «Unmount», it is already mounted and you don’t need to do anything).
- Quit Disk Utility.
- You should be back at the «macOS Utilities» window.
- From the menu bar on top of the screen, open Utilities > Terminal.
- Enter the command Replace with the name of your built-in hard disk, e.g. Make sure not to forget the quotes in case your disk name contains spaces.
- Restart your Mac.
«/Library/Security/SecurityAgentPlugins/TeamViewerAuthPlugin.bundle» cant find this can you please shar the screen shot where exactly i will find this file
its saying permission denied
You just need to reinstall Teamviewer from Recovery Mode
1-Download Teamviewer .dmg file from Teamviewer site to a usb https://www.teamviewer.com/en/download/mac-os/
2-start computer in recovery mode (Command+R)
4- go Terminal from Uitility
5-install Teamviewer .dmg file using:
I would like to thank you for the post and also the readers who have had faced similar issue before.
Copying to macOS folder does not work on 10.15 but copying .bundle folder to Machintosh HD does work.

I had exactly the same problem and the following helped me to resolve the problem.
- Install the TeamViewer app on another MacOS
- Copy the «TeamViewerAuthPlugin.bundle» from «/Library/Security/SecurityAgentPlugins/TeamViewerAuthPlugin.bundle» to a USB. Make sure the USB is formatted in the native MacOS filesystem to avoid incompatibility issues in the next steps.
- Restart your machine and hold Command+R to enter the MacOS Recovery mode until the Apple Logo appears. this process may take some time
- Upon entering the recovery mode, you’ll be instructed to select the language, username, and finally to enter your password.
- After a few minutes, the macOS Utilities window will appear
- From the list select Disk Utility
- In the Disk Utility window, from the left pane select the «macOS» disk and in the right pane click on the «Mount» button. If asked, enter your login password. Now, the macOS disk is mounted. to verify this, look at the info bar on the page. it should be active and show detail information about the disk.
- Close the Disk Utility window and from the menu bar, select Utilities and select Terminal
- Once the Terminal window opened, connect the USB to the machine and type following:
- To verify the above operation, enter the following; it should show the «TeamViewerAuthPlugin.bundle». If not shown, try to retype step 9 but use the Tab key to autocomplete the path step by step. Don’t rush.
- If successful, from Apple logo on the top left corner select Restart and wait for the machine to restart
- Now you should be able to successfully login to your machine.
In case of any problem during step 9, especially receiving «Operation not permitted». enter the following:
Restart the machine for the changes to take effect. Then, repeat step 3 and follow the instructions again. Once the macOS booted successfully, open a Terminal and reverse the setting by entering:
NOTE: I tried to recall all the steps after two days, so I might have missed something. So, in case of any problem please email me at [email protected]
Источник
macOS Catalina
Has anyone gotten Teamviewer to work on Catalina? When I connect from another computer, I just see the desktop background and the menu bar at the top. Yes I realize this is beta software etc. Just wondering if anyone has had any success.
Best Answer
Security & Privacy > Screen Recording > TeamViewer
Answers
Security & Privacy > Screen Recording > TeamViewer
That indeed worked, thanks!

thanks for your messages.
Have a great evening,
What about the people who have bought license to Teamviewer 12 also not working with Mac OS Catalina. This is far from being solved!

Thank you for your message.
Kindly refer to the Support Operating Systems article:

MacOS 10.15 (Catalina) is only compatible with TeamViewer versions 14.7 and higher.
It is not possible to install TeamViewer 12 on a device running MacOS 10.15 Catalina; TeamViewer 12 would only be compatible up to MacOS 10.13 (High Sierra).
Did my response answer your question? Help out others and select it as the Accepted Answer
So we are forced to upgrade to higher version and no solution will be provided for teamviewer version 12?
Thank you for your post.
In section 3.3 (Maintenance phases), Active Maintenance of versions starts with the release of the version and ends with the release of the next version. This includes OS compatibility.
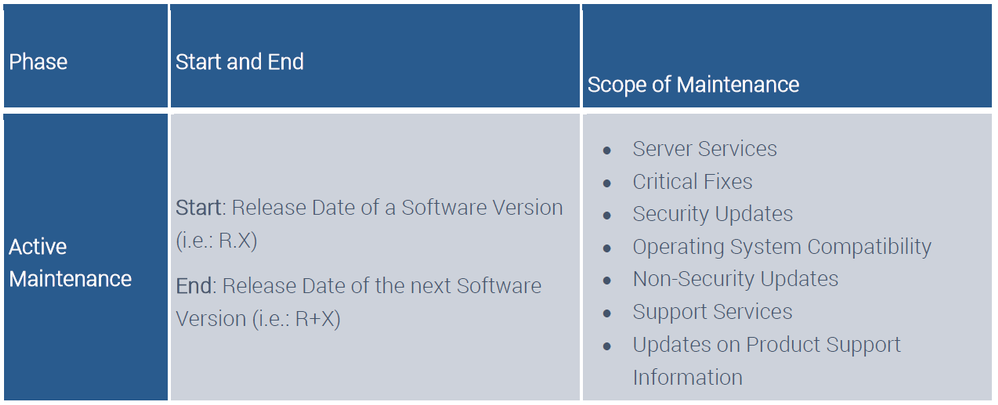 TeamViewer Product Lifecycle Policy — Active Maintenance
Once the new version of TeamViewer is released, we cannot guarantee Operating System compatibility, as some major Operating System updates alter or remove components that older versions may have used.
You can download the full TeamViewer Lifecycle Policy pdf here.
Did my response answer your question? Help out others and select it as the Accepted Answer
we are installing a corporate License of Team Viewer 12 on Catalina with no issues, and we have learned how to use it so to say it CANT be installed is a very bold statement because I KNOW it can.
Thank you for your message, and the feedback.
You are correct; I should not have used the word not. Rather, I should have used ‘compatible’, as I did in my second reply.
Regardless, version 12 is not a supported version for MacOS Catalina, as mentioned in our Supported Operating Systems article, and it would not be updated to become compatible with the latest MacOS or any other Active Maintenance, per our Product Lifecycle Policy.
Thanks again for the feedback!
Did my response answer your question? Help out others and select it as the Accepted Answer
I’ve uninstalled TeamViewer on my iMac and right after I restarted the iMac. Now, whenever I try to put on the computer it takes me to the login page where I put in my passwords. As soon as it loads all I get is a black screen and a small popup box:
SecurityAgent was unable to create requested mechanism TeamViewerAuthPlugin:start.
Clicking «OK» makes no difference.
Apple doesn’t know what to do. The one I spoke to didn’t at least.
Any advice please let me know.
Thanks in Advance
This wokred for me Teamveiwer version12:
If you can see everything, but cannot control, try the following on the Mac you want to control:
- On the Mac that you want to control, go to System Preferences > Security > Privacy > Accessibility.
- Un-check the TeamViewer and TeamViewer_Desktop entries.
- Check the TeamViewer and TeamViewer_Desktop entries again.
If you still cannot control the Mac and it has «Start with system» turned on:
- Turn «Start with system» off on the Mac you want to control (Remote Control > Unattended Access).
- Restart that Mac (just in case).
- Open TeamViewer again (still with «Start with system» off).
Источник


