- Monitoring with Telegraf, InfluxDB and Grafana
- Table of content
- The TIG stack
- InfluxDB installation
- Configure InfluxDB
- Install Telegraf
- Configure Telegraf
- Grafana installation
- Grafana configuration
- Grafana dashboard
- InfluxDB over HTTPS
- Установка telegraf и передача метрик в InfluxDB
- Установка и настройка InfluxDB
- Подготовка сервера
- 1. Время
- 2. Брандмауэр
- 3. SELinux
- Установка InfluxDB
- а) Установка InfluxDB на CentOS
- б) Установка InfluxDB на Ubuntu
- Установка Telegraf
- Linux CentOS (Red Hat / Fedora)
- Linux Ubuntu (Debian / Mint)
- Windows
- Настройка telegraf и отправка данных в InfluxDB
- Создание конфигурационного файла для telegtaf
- Настройка адреса базы
- Запуск агента
- В Linux
- В Windows
- Проверка данных в базе
- Читайте также
Monitoring with Telegraf, InfluxDB and Grafana
I’ve been using Munin for the past years as my monitoring tool. It works well, it’s light, and super easy to set up.
It’s a bit old and limited though, so it’s time to look at what kind of monitoring software we have in 2018.
Instead of having one software that does everything nowadays we like to separate the roles this way:
- The collector, which you will install on the machines you want to monitor
- The database that will store all the measurements
- The visualization system, e.g. a web dashboard
The 3 most popular stacks seems, for me, to be:
But there are a lot of other softwares like Collectd, Grafite, OpenTSDB,etc. (Just look at Grafana’s possible sources
ELK is overkill for us (the “E”…), and is more used to process logs. Prometheus is a nice option, but as you read in the title, we’re going to see how to setup TIG in this post.
I was afraid at first because I thought all these hype softwares were a pain to install, but as you’ll see, they’re actually super simple to setup.
Table of content
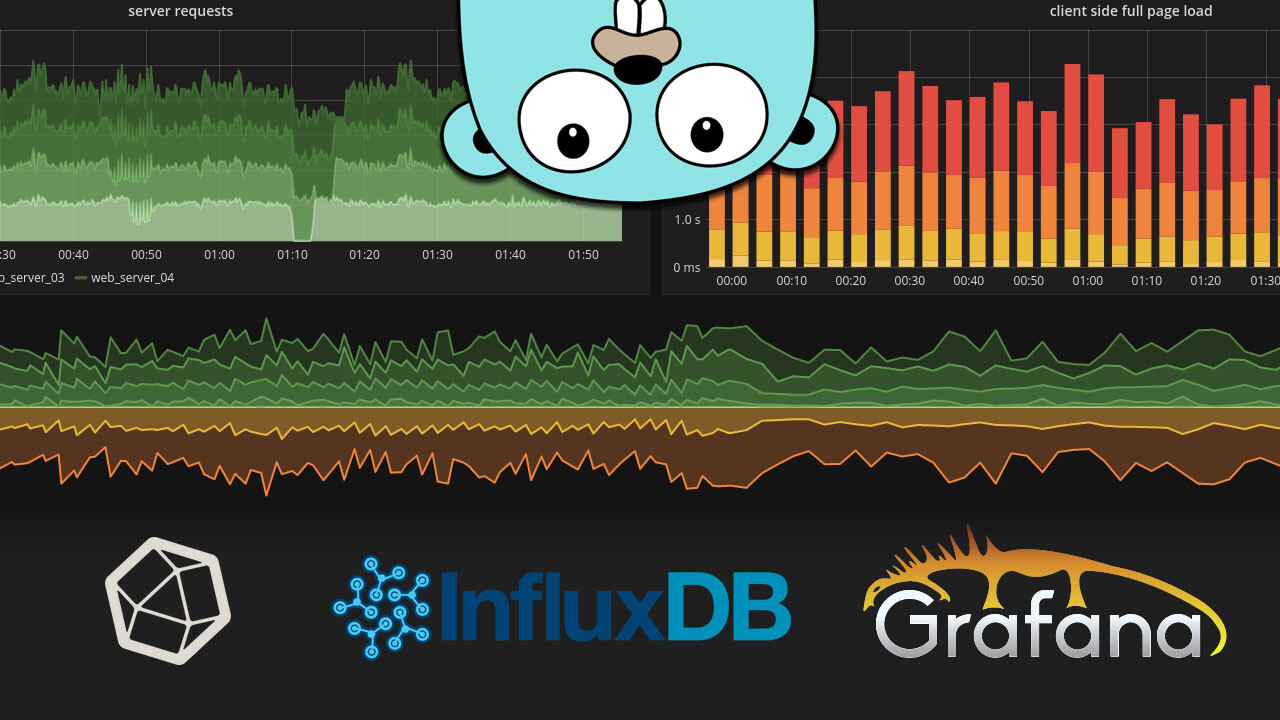
The TIG stack
A bit more information about our stack: Telegraf and InfluxDB are actually made by the same people, InfluxData. They’re both open source and written in go. InfluxData provide the complete stack with Chronograf for displaying the data and Kapacitor for the alerting. This makes the TICK stack.
As Grafana is a very high quality software that can also do alerting, I chose to use it. It’s also more advanced than Chronograf. As you can see, we really have a lot of possibilities!
FYI we won’t use Docker at all in the post, but you can run the components in containers if you want.
InfluxDB installation
Configure InfluxDB
InfluxDB is a time-series database compatible with SQL, so we can setup a user and database easily. You can launch its shell with the influx command.
Create the database:
Create a user. Choose a good password as InfluxDB will be exposed to the internet.
You can setup a retention policy if you wish
Install Telegraf
As I said before Telegraf and InfluxDB are made by the same company, so they use the same APT repository.
Configure Telegraf
Let’s backup the configuration file:
I suggest you to read it, but here’s a quick start on what you can add in /etc/telegraf/telegraf.conf .
By default, the hostname will be the server hostname (makes sense), and the metrics will be collected every 10 seconds.
Basic inputs configuration, e.g. probes:
To see all the inputs available you can type:
I usually take a look at the inputs folder in the github repo because each inputs has a README that helps to set it up.
Then the outputs, which is our InfluxDB database:
Then we can restart telegraf and the metrics will begin to be collected and sent to InfluxDB.
You can see what Telegraf collects with this command:
This is very useful when adding new plugins:
Grafana installation
Grafana is the web app that we will plug to InfluxDB to visualize the data.
We will install Grafana using their APT repo, as described in http://docs.grafana.org/installation/debian/.
Grafana configuration
The configuration takes place in /etc/grafana/grafana.ini .
The defaults are fine and Grafana will use SQLite to store its data.
Though, here is what I recommend to change :
Then we restart Grafana and we enable it at boot:
Then we’ll use Nginx configured as reverse proxy to access Grafana via HTTPS. You can use HTTPS directly with Grafana but I want to access it with port 443 and I already have Nginx installed, so..
To generate a certificate, I recommend acme.sh.
Then here’s a server block example:
You can now login using the default admin/admin credentials.
Once you’re in, create a new user and delete the admin user immediately.
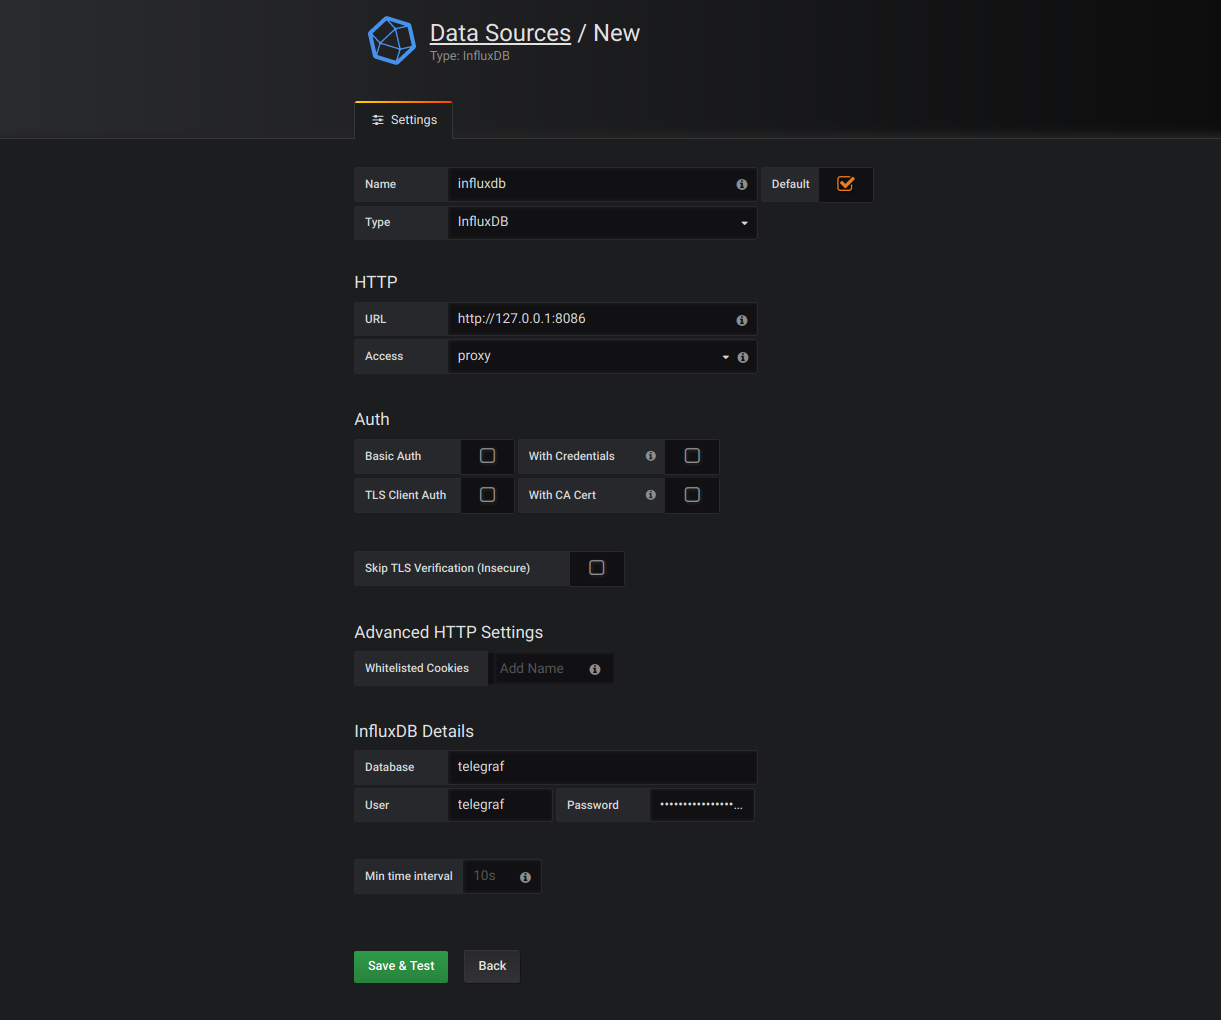
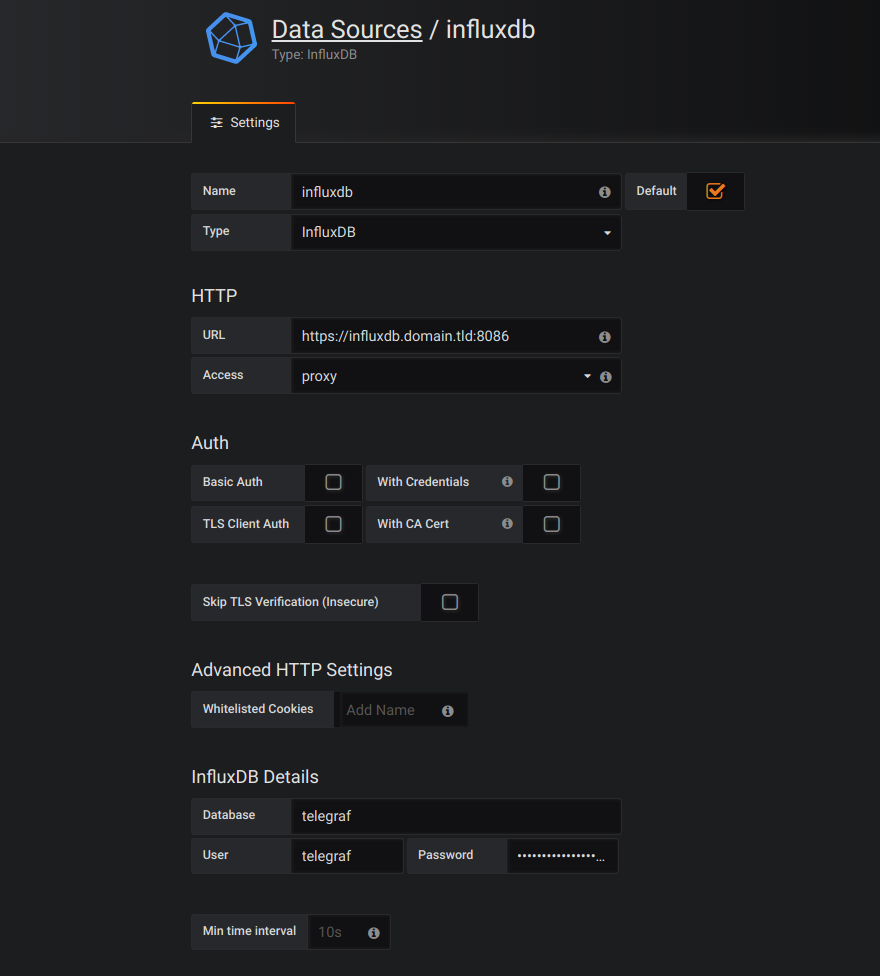
Add your InfluxDB database as a source:
Grafana dashboard
You can now add a dashboard and begin to configure panels.
Here a CPU panel example queries:
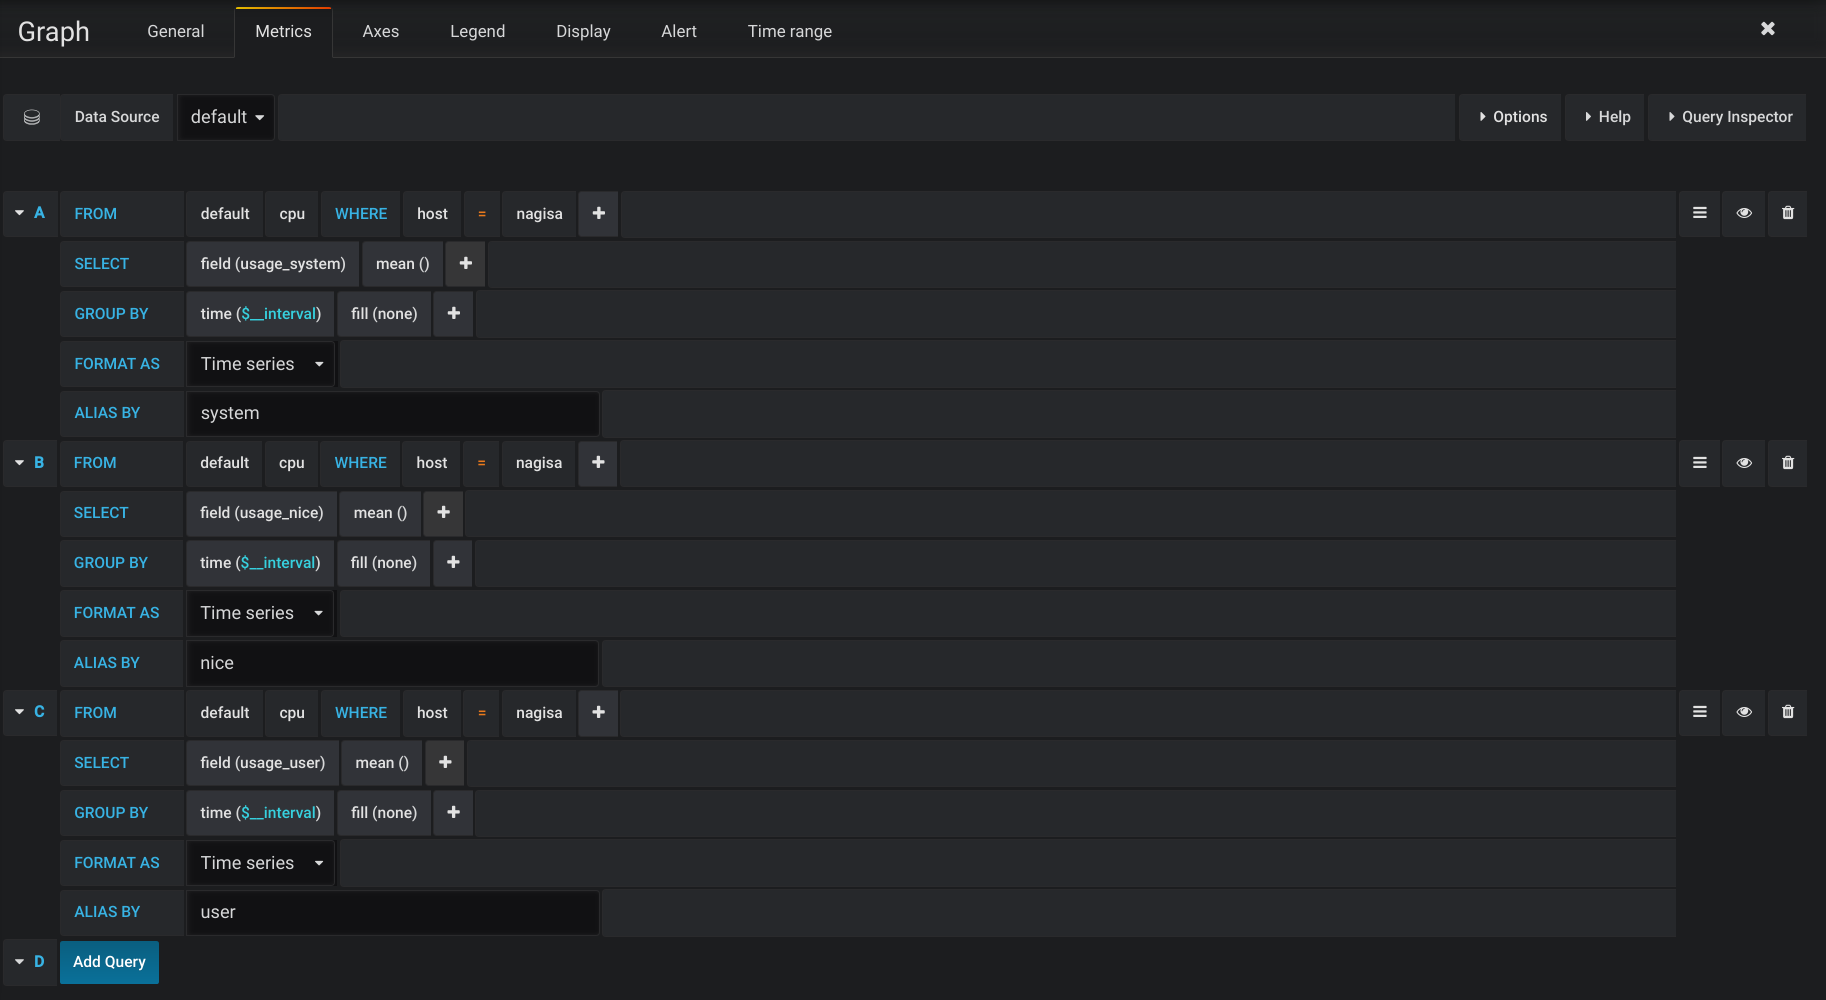
Play around with the measurements and graphs and you will begin to get how it works.
Here is how one of my dashboards looks like:
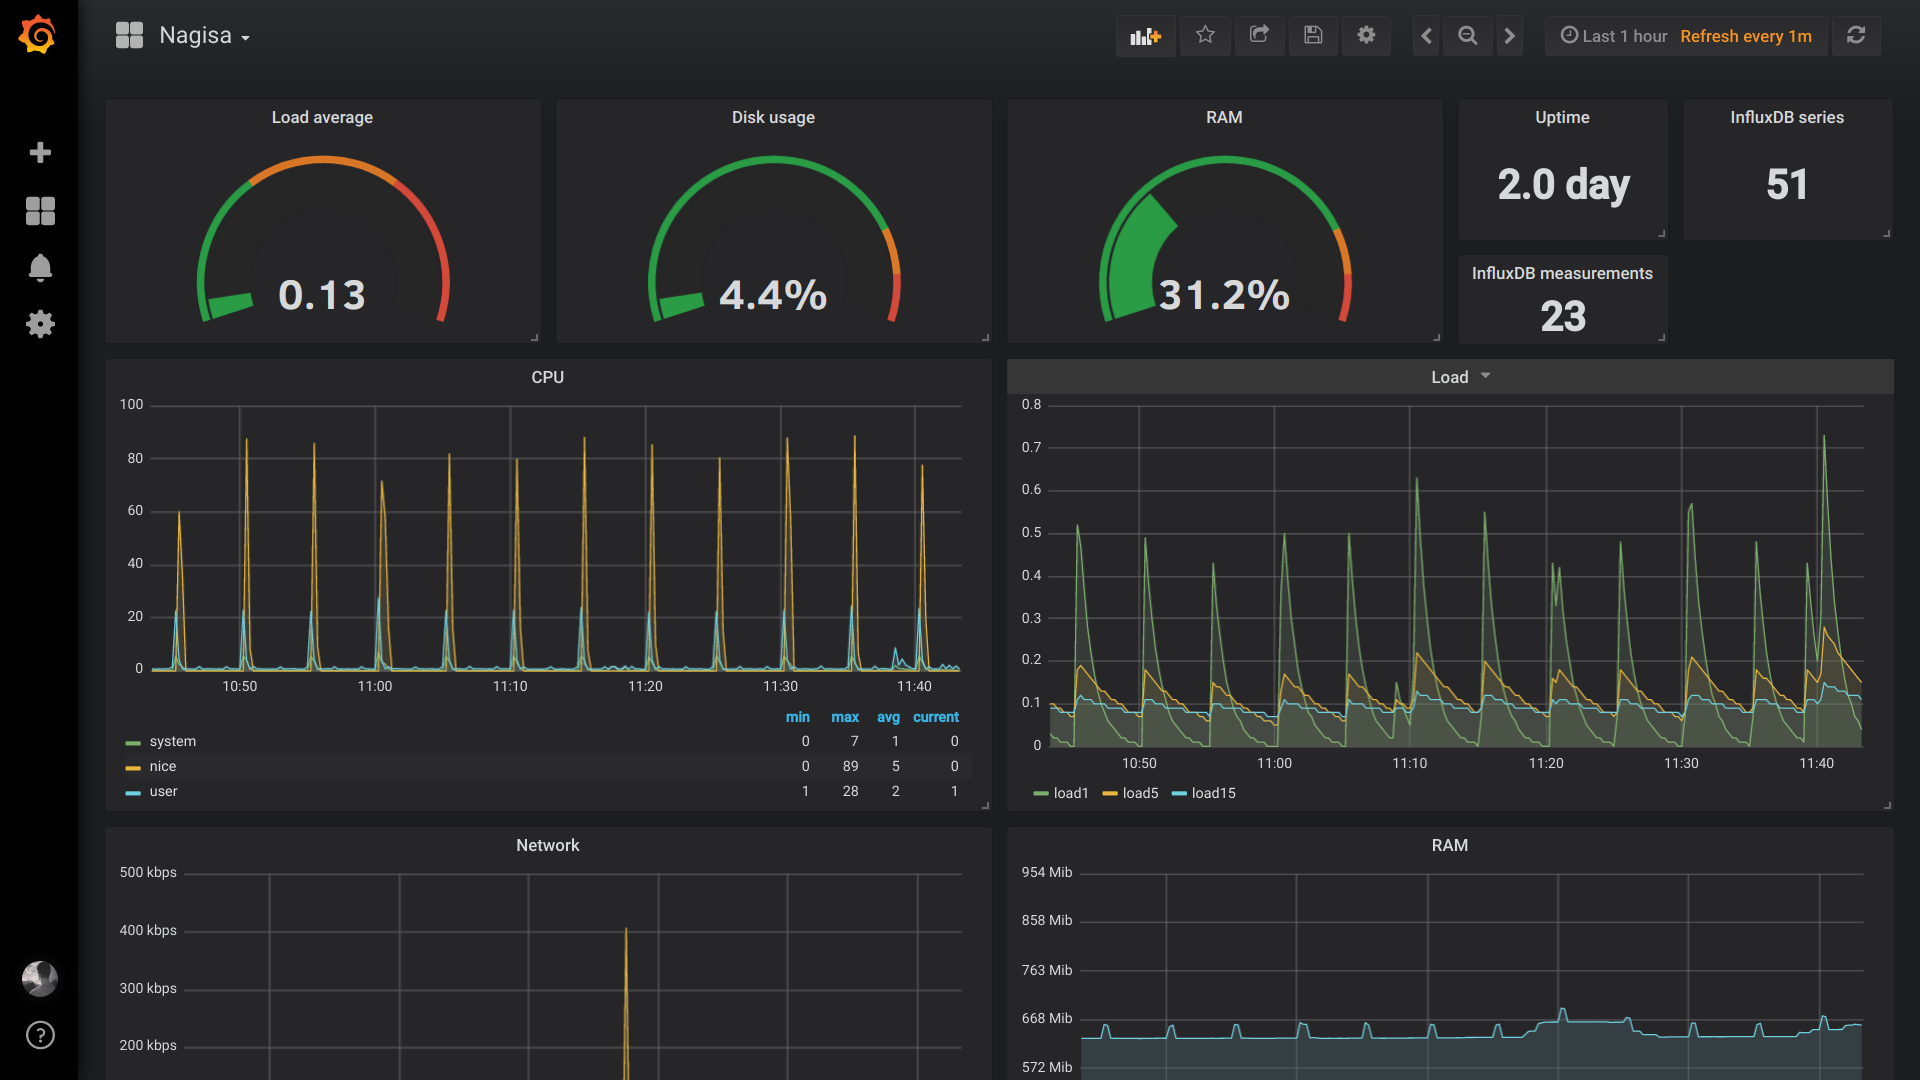
FYI, there are 2 kinds of measurements:
- the ones that show you how much of $ there is at one instant
- the ones that show you the total amount of $ since the last start of $$
That does not makes sense so here are examples:
- At this moment there are x numbers of processes
- There has been x bytes transmitted since this interface is up
The thing is the second type will show you increasing graphs which are pointless, so you’ll have to add “transformation” -> “derivative” to your select query so that it will show the difference between each measurements.
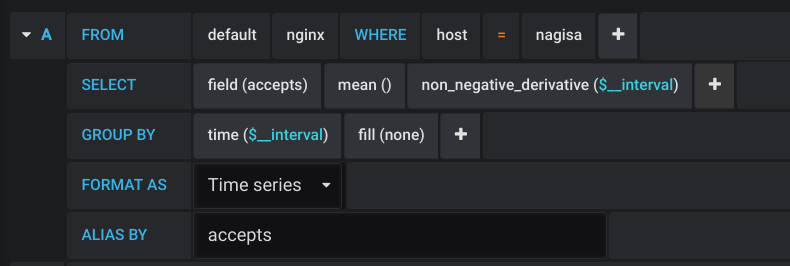
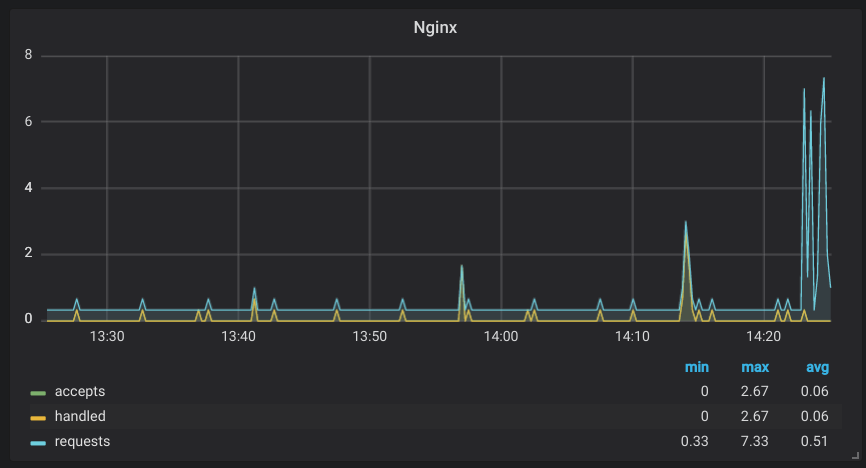
Example with Nginx, where half the metrics are the first type and the other is the second.
Let’s take “accepts”, “handled” and “requests” as an example:

InfluxDB over HTTPS
So now, we want to monitor other servers and send the data to InfluxDB. To do this securely, we will use HTTPS, as InfluxDB communicates trough HTTP.
FYI, don’t use Nginx to do HTTPS for InfluxDB. This will mess up your data and database. You have to use the HTTPS implementation of InfluxDB.
First we want to have certificates. You can get them the same way you did for Grafana, with acme.sh.
Don’t forget to give InfluxDB the rights to the read them:
Then enable HTTPS in /etc/influxdb/influxdb.conf :
Now, we can’t use InfluxDB on localhost trough localhost.
You’ll have to modify /etc/telegraf/telegraf.conf :
You will use the same config on all the other servers you’ll monitor.
Next, you will have to update Grafana:
And you’re good to go.
The new command to connect to influx is:
Now you’re ready to add other servers to monitor. To do so, just install and configure Telegraf the exact same way, and use your InfluxDB database trough HTTPS to store the metrics. Easy!
I don’t cover alerting in this post because it’s not specific to the stack and you will find resources online on how to configure it on Grafana. A few months ago I used Telegram and WebDav:
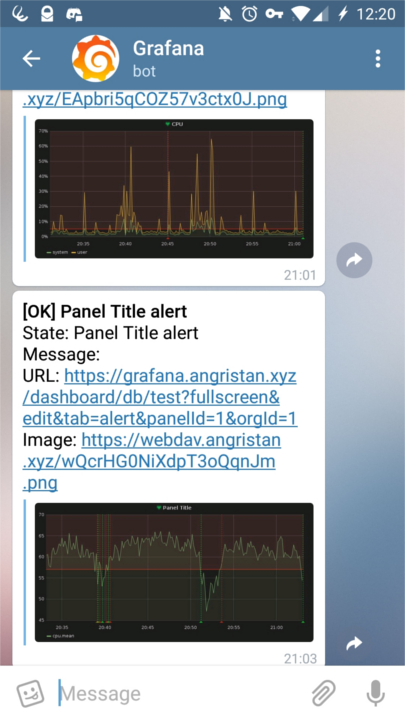
Pretty neat right?
I hope you will find this post useful. As for me I’ll take a look in the TICK stack to see how it performs compared to TIG.
Источник
Установка telegraf и передача метрик в InfluxDB
В двух словах, telegraf — агент для передачи метрик в различные базы временных рядов. В данной инструкции мы рассмотрим процесс установки и настройки сервера InfluxDB на Linux (Ubuntu и CentOS) и настройки telegraf для отправки данных в установленную базу. Сам агент для отправки метрик мы установим на Linux и Windows.
Установка и настройка InfluxDB
Если у нас уже есть сервер баз данных, совместимый с telegraf, можно пропустить данный раздел. В противном случае, рассмотрим процесс подготовки сервера и установки InfluxDB. В данной инструкции мы будем разворачивать сервер баз данных на Linux, но при необходимости, InfluxDB может быть установлен на Windows.
Подготовка сервера
1. Время
Для любой базы хранения временных рядов важно своевременно обновлять время на сервере.
Задаем временную зону:
\cp /usr/share/zoneinfo/Europe/Moscow /etc/localtime
* в данном примере задаем московское время. В каталоге /usr/share/zoneinfo список всех возможных вариантов.
Устанавливаем и запускаем сервис для автоматической синхронизации времени.
а) в CentOS / Red Hat / Fedora:
yum install chrony
systemctl enable chronyd —now
б) в Ubuntu / Debian:
apt-get install chrony
systemctl enable chrony
2. Брандмауэр
Если мы используем фаервол, то необходимо открыть порт 8086, на котором по умолчанию запускается данный сервер баз данных. В зависимости от используемой утилиты управления, команды будут отличаться.
а) Firewalld
По умолчанию, используется в системах на базе RPM. Для открытия нужного нам порта вводим команды:
firewall-cmd —permanent —add-port=8086/tcp
б) Iptables
Чаще всего, используется в системах на базе DEB или в ранних версиях RPM. Вводим команду:
iptables -I INPUT 1 -p tcp —dport 8086 -j ACCEPT
. и сохраняем правила:
* если система вернет ошибку, что программа не установлена, выполним инсталляцию командой apt-get install netfilter-persistent.
3. SELinux
По умолчанию, пакет безопасности SELinux установлен на системах RPM. Чаще всего, его выключают командами:
sed -i ‘s/^SELINUX=.*/SELINUX=disabled/g’ /etc/selinux/config
* но если мы хотим настроить SELinux, принцип конфигурирования можно прочитать в инструкции Настройка SELinux в CentOS.
Установка InfluxDB
Мы выполним установку базы данных на примере двух различных систем — CentOS и Ubuntu.
а) Установка InfluxDB на CentOS
Создаем файл с настройками репозитория:
[influxdb]
name = InfluxDB Repository — RHEL $releasever
baseurl = https://repos.influxdata.com/rhel/$releasever/$basearch/stable
enabled = 1
gpgcheck = 1
gpgkey = https://repos.influxdata.com/influxdb.key
Можно устанавливать InfluxDB:
yum install influxdb
Разрешаем автоматический запуск сервиса и стартуем его:
systemctl enable influxdb —now
б) Установка InfluxDB на Ubuntu
Устанавливаем ключ для репозитория:
wget -qO- https://repos.influxdata.com/influxdb.key | sudo apt-key add —
Вводим команду для создания переменных в системном окружении, в которых будут храниться данные о версии дистрибутива:
Следующей командой мы создадим файл с настройкой репозитория:
echo «deb https://repos.influxdata.com/$
Обновляем список пакетов:
Теперь установим InfluxDB:
apt-get install influxdb
Разрешаем автоматический запуск сервиса и стартуем его:
systemctl enable influxdb
systemctl start influxdb
Установка Telegraf
Выполним установку Telegraf для различных операционных систем. В зависимости от текущей версии агента, команды будут разные. Поэтому мы переходим на страницу загрузки influxdata и кликаем по последней версии telegraf:

* на момент написания инструкции это была v1.14.1.
В открывшемся окне мы увидим конкретные команды для загрузки и установки Telegraf под различные операционные системы.
Linux CentOS (Red Hat / Fedora)
Устанавливаем утилиту для загрузки файлов:
yum install wget
Согласно инструкции на сайте influxdata.com, загружаем пакет установки:
* напоминаю, что версия может быть другой.
Устанавливаем загруженный пакет:
yum localinstall telegraf-*.rpm
Linux Ubuntu (Debian / Mint)
По инструкции на influxdata.com, скачиваем пакет установки:
* обратите внимание, что версия может быть другой.
Устанавливаем скачанный пакет:
dpkg -i telegraf_*.deb
Windows
Скачиваем архив по ссылке на сайте. На момент написания инструкции, это было:
Создаем каталог Telegraf в папке Program Files. В моем случае, получился путь C:\Program Files\Telegraf. Распаковываем в него содержимое скачанного архива — файлы telegraf.conf и telegraf.exe.
Теперь открываем командную строку от администратора и запускаем установку Telegraf в качестве службы:
«C:\Program Files\Telegraf\telegraf.exe» —service install
Настройка telegraf и отправка данных в InfluxDB
Независимо от операционной системы, создание конфига происходит в командной строке. Рассмотрим процедуры генерирования конфигурационного файла, настройки сервера баз данных и запуска агента по сбору метрик.
Создание конфигурационного файла для telegtaf
В командной строке переходим в каталог с конфигом телеграфа.
cd «c:\Program Files\Telegraf»
* если мы установили агент в другой каталог, переходим в него.
Затем генерируем конфигурационный файл. Синтаксис для команды следующий:
telegraf -sample-config —input-filter —output-filter >
Если мы введем команду:
telegraf -sample-config > telegraf.conf
. то мы получим конфигурационный файл telegraf.conf со всеми возможными плагинами.
Лучше создавать конфигурационный файл с нужными нам плагинами. Например, создадим конфиг для получения метрик дисковой системы с помещением данных в InfluxDB:
telegraf -sample-config —input-filter disk:diskio:hddtemp —output-filter influxdb > telegraf.conf
* перечень плагинов для получения метрик идет после ключа —input-filter; после —output-filter мы перечисляем системы, для отправки в которые будут подготовлены данные — в нашем случае это influxdb. Также это могут быть Elasticsearch, Graphite, OpenTSDB, Prometheus и другие.
Проверить полученный конфигурационный файл можно командой:
* если путь до конфигурационного файла отличается от стандартного, его можно указать с помощью ключа —config.
Если в настройках telegraf будут ошибки, мы увидим:
[telegraf] Error running agent:
Настройка адреса базы
Как правило, сервер баз данных находится на одном сервере, но по умолчанию, в telegtaf создается конфигурационный файл для отправки метрик на локальный сервер баз данных. Чтобы изменить настройку, открываем созданный нами ранее конфиг.
а) в Linux с помощью текстового редактора, например:
б) в Windows также текстовым редактором, например, обычным блокнотом или Notepad++.
Находим строку в разделе OUTPUT PLUGINS:
Снимаем комментарий и меняем адрес сервера, например:
* где 192.168.1.16 — IP-адрес нашего сервера баз данных.
Если наш сервер баз данных требует аутентификации, добавим 2 строки:
username = «username»
password = «userpass»
* где username и password — соответственно, логин и парлоль для подключения к базе.
Запуск агента
Процедуры в Linux и Windows немного отличаются.
В Linux
Разрешаем автозапуск telegraf:
systemctl enable telegraf
systemctl restart telegraf
В Windows
Открываем службы Windows. Находим службу Telegraf Data Collector Service — открываем ее. Проверяем, чтобы тип запуска был автоматический и кликаем по Запустить:

Также запустить службу можно из командной строки:
net start telegraf
Проверка данных в базе
Чтобы завершить настройку, необходимо убедиться, что данные с метрик приходят в нашу базу. Для этого на сервере InfluxDB вводим команду:
Мы подключимся к базе. Смотрим список баз:
* если influxdb требует аутентификации, то мы получим ошибку ERR: unable to parse authentication credentials. Необходимо сначала ввести команду auth и последовательно логин и пароль.
Мы должны увидеть базу telegraf:
name: databases
name
—-
_internal
telegraf
Подключаемся к базе и смотрим список таблиц:
Смотрим список значений для нужной нам метрики, например, для diskio:
> SELECT * FROM diskio ORDER BY time DESC LIMIT 15
* так как значений будет очень много, лучше ограничить вывод — в данном примере последних 15 записей.
Чтобы получить данные для определенного хоста, вводим запрос:
SELECT * FROM diskio WHERE host=’server1′ ORDER BY time DESC LIMIT 15
* в данном примере мы получим данные, которые пришли с компьютера server1.
Читайте также
Возможно, будут интересны сопутствующие инструкции:
4. Установка и настройка сервера мониторинга Zabbix на CentOS и Ubuntu.
Источник


