- How To Install and Use Telnet Client In Linux and Windows
- Install
- Ubuntu, Debian, Mint, Kali
- Fedora, CentOS, RHEL
- Windows
- Security
- Connect Telnet Server
- Connect Different Telnet Port
- Specify Login Name
- Interactive Shell
- HOW TO CONFIGURE TELNET SERVER AND TELNET CLIENT IN RHEL/CENTOS/FEDORA
- Introduction
- My Scenario :
- Telnet Server Configuration :
- Step : 1 Configure the IP Address
- Step : 2 Install Required Packages for Telnet Server
- Step : 3 Configure the Telnet Server
- Step : 4 Allow root User Login to Telnet Server (If Required)
- Testing From Telnet Client Side :
- Linux telnet command
- Description
- Syntax
- Options
- Protocol
- Commands
- Environment
- Files
- Examples
How To Install and Use Telnet Client In Linux and Windows
Telnet is easiest remote management protocol used in Computer networks. It remains popular even today because of its simplicity. Telnet is a client server protocol where clients uses telnet tool which to connect remote telnet server. This telnet server may be switch, router, windows operating system, linux server or a printer. In this tutorial we will look how to install and enable telnet with some usage examples.
Install
Ubuntu, Debian, Mint, Kali
We can install telnet package with the following command in deb based Linux distributions.
Fedora, CentOS, RHEL
We can install telnet package with yum command for rpm based distributions like Fedora, centOS and RHEL.
Windows
As windows operating system do not have online package manager telnet is provided by inline. By defualt telnet server and client applications are not enabled. We will enable the client where server can be enabled too. Follow these instructions.
- Click Start >Control Panel.
- Click Programs and Features.
- Click Turn Windows features on or off.
- In the Windows Features dialog box, check the Telnet Client check box.
 Windows
Security
As telnet is old fashion protocol it provides some defects. One of the most important negative issue with telnet is its security features. Telnet do not have any encryption support as builtin. So telnet traffic can be easily eavesdropped during transmission. So do not rely telnet on insecure networks.
Connect Telnet Server
We will start by simply connecting a telnet server. The simplest form is just providing the host name or IP address of the telnet server. The syntax is like below. In this example telnet server is a Ubuntu 17.10 .
 Connect Telnet Server
Connect Different Telnet Port
The default port for telnet is TCP 23 . By default it is not specified during connection. But in some cases telnet server may use different then 23. We can specify the port number by adding after the host name or IP address. In this example we will connect port number 2323 .
Specify Login Name
Most cases telnet servers requires authentication. In order to authenticate ourself we need to provide some user name and password. The regular usage is providing username and then put password interactively. We will use -l which stands for login.
Interactive Shell
Telnet provides interactive shell where it provides its own environment. We can enter interactive shell just putting telnet command.
We can get help for interactive shell with help command. We can see that we will use open command and the hostname or IP address to connect telnet server.
 help
help
We will connect to the localhost telnet server.
 Open Connection
Источник
HOW TO CONFIGURE TELNET SERVER AND TELNET CLIENT IN RHEL/CENTOS/FEDORA
by Balamukunda Sahu · Published February 17, 2017 · Updated February 19, 2017

HOW TO CONFIGURE TELNET SERVER AND TELNET CLIENT IN LINUX
Introduction
In this article we are going to discuss on How to configure Telnet Server and Telnet Client in RHEL/CentOS/Fedora. Telnet is nothing but a protocol was invented in 1969 used to take remote of systems over Network in text mode or command mode as it is not supports GUI (Graphical User Interface). There are two instances of Telnet i.e. Telnet Server and Telnet Client. So the concept is you can take the remote console of Telnet Server from client using telnet tools like putty or you can use Command prompt if you are using Windows Operating System. The port number of Telnet is 23. Telnet is no doubt a useful tool but has one major disadvantage is the data transfer over network by telnet is in non-encrypted manner i.e. in Plain Text which is Risky in case of Confidential Data.
So Let’s have a look at configuration steps of Telnet Server and also Telnet Client.
WARNING! : CONFIGURING TELNET IS A BAD IDEA AS ITS TRANSFER’S DATA IN PLAIN TEXT FORMAT (UNENCRYPTED FORMAT). TRY TO AVOID TELNET AS MUCH AS POSSIBLE AND USE SSH INSTADE.
My Scenario :
Telnet Server :
IP Address : 192.168.0.105
Telnet Server Configuration :
Follow the below steps to configure the Telnet Server.
Step : 1 Configure the IP Address
Before start the configuration of Telnet Server, configure the NIC (Network Interface Card) and check properly if the system is in network. Here my IP Address is 192.168.0.105. Refer the output below.
Step : 2 Install Required Packages for Telnet Server
To start the Telnet Server configuration we need to install some packages :
telnet-server.xxx.xxx.xx.rpm
xinetd.xxx.xxx.xx.rpm
You can install above packages by using YUM Package Repository or by rpm packages from Installation media. Here I am installing using YUM Repository. Refer the output below.
As you can see above we have installed all required packages. To confirm the package installation use the below command.
Now let’s check configuration file location of Telnet Server using rpm -ql command as shown below.
Step : 3 Configure the Telnet Server
So as shown on the output above the main configuration file of telnet server is telnet which is located at /etc/xinetd.d/telnet, So let’s go ahead and enable telnet by edit the configuration file.
To enable the Telnet Server just edit the /etc/xinetd.d/telnet file and find for line disable = yes and change it to disable = no. Follow the output below, Configuration line is highlighted in Red color.
After configuration just save the file and start the xinetd service to start the Telnet Server protocol by using below command.
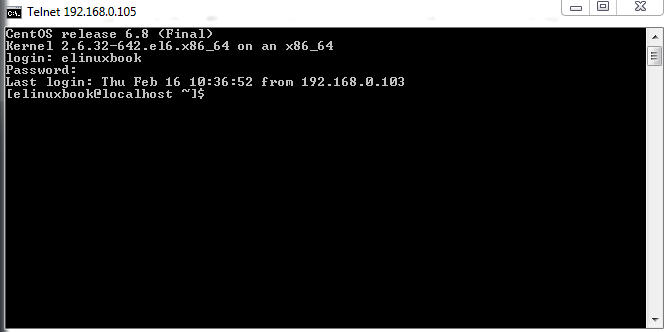
Now you can connect to Telnet Server using Telnet client tools like putty or if you are using windows Operating System then can use command prompt to connect to telnet server and take console of the Linux Server using normal users. For example I have a username i.e. elinuxbook. refer the output below.
Step : 4 Allow root User Login to Telnet Server (If Required)
So here I can connect to Telnet Server by using Username as elinuxbook and Password as Password of elinuxbook.
Disadvantages and Security issue in Telnet :
WARNING! : It’s highly Recommended that you should not allow root login as there may be chances of misuse. Because telnet transfer data in plain text format. Also redhat recommend that use SSH instade of telnet for security reason. But for learning purpose or on your own R & D lab you can use where security is not a matter of concern. I explained this is just for knowledge & information purpose & not to use in production server.
But if you want to login using root then you have to allow on /etc/securetty file. for that just edit the file and paste the below lines. Configuration part is highlighted in Red color.
So we have done with all required configuration from Server Side. Now restart the xinetd service to take effect the configuration.
Then start the xinetd service on startup using below command so that service will start automatically when you restart the system.
Testing From Telnet Client Side :
You can use telnet server to take console/remote of Linux server in text mode/Command Mode for so many purposes, eg : for configuration. To connect to telnet server use tools like putty or in windows operating system you can use command prompt.
Here I am using command prompt to connect to Telnet Server as i am using Windows Operating System.
Login Telnet Server using normal user eg: elinuxbook. Refer the snapshot below.
Connecting to Telnet Server
Login Telnet Server using root user. Refer the snapshot below.
Note : You will only allowed to login through root if you have added pts in /etc/securetty file, Explained above.
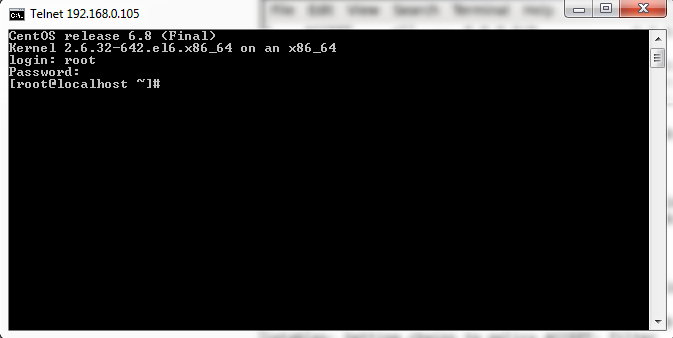
connecting to telnet server
This is how we can configure Telnet Server and Telnet Client in RHEL/CentOS/Fedora.
If you found this article useful then Like Us, Share the article on your social media profile, Subscribe our Newsletter Or if you have something to say then feel free to comment on the comment box below.
Источник
Linux telnet command
Description
The telnet command is used for interactive communication with another host using the TELNET protocol. It begins in command mode, where it prints a telnet command prompt («telnet>«).
If telnet is invoked with a host argument, it performs an open command implicitly (see the Commands section below for details).
Syntax
Options
| -4 | Force IPv4 address resolution. |
| -6 | Force IPv6 address resolution. |
| -8 | Request 8-bit operation. This option causes an attempt to negotiate the TELNET BINARY option for both input and output. By default, telnet is not «8-bit clean» (it does not recognize 8-bit character encodings such as Unicode). |
| -E | Disables the escape character functionality; that is, sets the escape character to «no character». |
| -L | Specifies an 8-bit data path on output. This option causes the TELNET BINARY option to be negotiated on output. |
| -a | Attempt automatic login. Currently, this sends the username via the USER variable of the ENVIRON option if supported by the remote system. The username is retrieved via the getlogin system call. |
| -b address | Use bind on the local socket to bind it to a specific local address. |
| -d | Sets the initial value of the debug toggle to TRUE. |
| -r | Emulate rlogin. In this mode, the default escape character is a tilde. Also, the interpretation of the escape character is changed: an escape character followed by a dot causes telnet to disconnect from the remote host. A ^Z (Control-Z) instead of a dot suspends telnet, and a ^] (Control-close bracket, the default telnet escape character) generates a normal telnet prompt. These codes are accepted only at the beginning of a line. |
| -S tos | Sets the IP TOS (type-of-service) option for the telnet connection to the value tos. |
| -e escapechar | Sets the escape character to escapechar. If no character is supplied, no escape character will be used. Entering the escape character while connected causes telnet to drop to command mode. |
| -l user | Specify user as the user to log in as on the remote system. By sending the specified name as the USER environment variable, so it requires that the remote system support the TELNET ENVIRON option. This option implies the -a option, and may also be used with the open command. |
| -n tracefile | Opens tracefile for recording trace information. See the set tracefile command below. |
| host | Specifies a host to contact over the network. |
| port | Specifies a port number or service name to contact. If not specified, the telnet port (23) is used. |
Protocol
Once a connection is opened, telnet attempts to enable the TELNET LINEMODE option. If this fails, then telnet will revert to one of two input modes: either «character at a time» or «old line by line» depending on what the remote system supports.
When LINEMODE is enabled, character processing is done on the local system, under the control of the remote system. When input editing or character echoing is to be disabled, the remote system will relay that information. The remote system also relays changes to any special characters that happen on the remote system, so that they can take effect on the local system.
In «character at a time» mode, most text typed is immediately sent to the remote host for processing.
In «old line by line» mode, all text is echoed locally, and (normally) only completed lines are sent to the remote host. The «local echo character» (initially «^E«) may be used to turn off and on the local echo (this would mostly be used to enter passwords without the password being echoed).
If the LINEMODE option is enabled, or if the localchars toggle is TRUE (the default for «old line by line»; see below), the user’s quit, intr, and flush characters are trapped locally, and sent as TELNET protocol sequences to the remote side. If LINEMODE has ever been enabled, then the user’s susp and eof are also sent as TELNET protocol sequences, and quit is sent as a TELNET ABORT instead of BREAK. There are options (see toggle autoflush and toggle autosynch, below) which cause this action to flush subsequent output to the terminal (until the remote host acknowledges the TELNET sequence) and flush previous terminal input (in the case of quit and intr).
Commands
The following telnet commands are available. Unique prefixes are understood as abbreviations.
| auth argument . | The auth command controls the TELNET AUTHENTICATE protocol option. If telnet was compiled without authentication, the auth command is not supported. Valid arguments are as follows:
Note that the current version of telnet does not support authentication. | ||||||||||||||||||||||||||||||||||||||||
| close | Close the connection to the remote host, if any, and return to command mode. | ||||||||||||||||||||||||||||||||||||||||
| display argument . | Display all, or some, of the set and toggle values (see below). | ||||||||||||||||||||||||||||||||||||||||
| encrypt argument . | The encrypt command controls the TELNET ENCRYPT protocol option. If telnet was compiled without encryption, the encrypt command will not be supported. Valid arguments are as follows:
Note that the current version of telnet does not support encryption. | ||||||||||||||||||||||||||||||||||||||||
| environ arguments. | The environ command is used to propagate environment variables across the telnet link using the TELNET ENVIRON protocol option. All variables exported from the shell are defined, but only the DISPLAY and PRINTER variables are marked to be sent by default. The USER variable is marked to be sent if the -a or -l command-line options were used. Valid arguments for the environ command are:
| ||||||||||||||||||||||||||||||||||||||||
| logout | Send the TELNET LOGOUT protocol option to the remote host. This command is similar to a close command. If the remote host does not support the LOGOUT option, nothing happens. But if it does, this command should cause it to close the connection. If the remote side also supports the concept of suspending a user’s session for later reattachment, the logout command indicates that the session should be terminated immediately. | ||||||||||||||||||||||||||||||||||||||||
| mode type | The type is one of several options, depending on the state of the session. telnet asks the remote host to go into the requested mode. If the remote host says it can, that mode takes effect. Options for type are as follows:
| ||||||||||||||||||||||||||||||||||||||||
| open host [[-l] user][— port] | Open a connection to the named host. If no port number is specified, telnet attempts to contact a telnet daemon at the standard port (23). The host specification may be a hostname or IP address. The -l option may be used to specify a username to be passed to the remote system, like the -l command-line option. When connecting to ports other than the telnet port, telnet does not attempt telnet protocol negotiations. This method of connecting makes it possible to connect to services that do not support the telnet protocol without making a mess. Protocol negotiation can be forced by placing a dash before the port number. After establishing a connection, any commands associated with the remote host in /etc/telnetrc and the user’s .telnetrc file are executed, in that order. The format of the telnetrc files is as follows: Lines beginning with a #, and blank lines, are treated as comments (ignored). The rest of the file should consist of hostnames and sequences of telnet commands to use with that host. Commands should be one per line, indented by whitespace; lines beginning without whitespace are interpreted as hostnames. Lines beginning with the special hostname ‘DEFAULT’ will apply to all hosts. Hostnames including ‘DEFAULT’ may be followed immediately by a colon and a port number or string. If a port is specified it must match exactly with what is specified on the command line. If no port was specified on the command line, then the value ‘telnet’ is used. Upon connecting to a particular host, the commands associated with that host are executed. | ||||||||||||||||||||||||||||||||||||||||
| quit | Close any open session and exit telnet. An end of file condition on input, when in command mode, will trigger this operation as well. | ||||||||||||||||||||||||||||||||||||||||
| send arguments | Send one or more special telnet protocol character sequences to the remote host. The following are the codes which may be specified (more than one may be used in one command):
| ||||||||||||||||||||||||||||||||||||||||
| set argument value, unset argument value | The set command will set any one of the telnet variables to a specific value or as TRUE. The special value off turns off the function associated with the variable. This command is equivalent to using the unset command. The unset command will disable or set to FALSE any of the specified variables. The values of variables may be interrogated with the display command. The variables which may be set or unset, but not toggled, are listed here. Also, any of the variables for the toggle command may be explicitly set or unset.
| ||||||||||||||||||||||||||||||||||||||||
| slc state | The slc command (set local characters) is used to set or change the state of the special characters when the TELNET LINEMODE option is enabled. Special characters are characters that get mapped to TELNET commands sequences (like ip or quit) or line editing characters (like erase and kill). By default, the local special characters are exported. state may be one of the following:
| ||||||||||||||||||||||||||||||||||||||||
| status | Show the current status of telnet. This command includes the name of the remote host, if any, and the current mode. | ||||||||||||||||||||||||||||||||||||||||
| toggle arguments . | Toggle (between TRUE and FALSE) various flags that control how telnet responds to events. These flags may be set explicitly to TRUE or FALSE using the set and unset commands. More than one flag may be toggled at once. The state of these flags may be examined with the display command. Valid flags are:
| ||||||||||||||||||||||||||||||||||||||||
| z | Suspend telnet. This command only works when the user uses the C Shell (csh). | ||||||||||||||||||||||||||||||||||||||||
| ! [command] | Execute a single command in a subshell on the local system. If command is omitted, then an interactive subshell is invoked. | ||||||||||||||||||||||||||||||||||||||||
| ? [command] | Get help. With no arguments, telnet prints a help summary. If a command is specified, telnet prints the help information for that command. |
Environment
telnet uses at least the HOME, SHELL, DISPLAY, and TERM environment variables. Other environment variables may be propagated to the other side via the TELNET ENVIRON option.
Files
| /etc/telnetrc | global telnet startup values |
| /.telnetrc | user customized telnet startup values |
Examples
Attempts to open a connection to the remote host myhost.com. If a connection is established, the host prompts for a login name and password.
Attempts to open a connection to the remote host myhost.com on port 5555, using the login name myusername. If successful, the host prompts for myusername‘s password.
Opens a local telnet> prompt, where you can enter any of the commands listed above. For example, entering the following command at the prompt:
Источник


