- How to Install Telnet on macOS?
- Install Telnet on Mac via Homebrew
- Conclusion
- How to Install Telnet on MacOS Catalina
- Installing Telnet on MacOS with Homebrew
- Installing Telnet on MacOS by Building Telnet from Source
- Step 1: Installing the command line tools
- Step 2: Getting the Telnet source
- Step 3: Extract the source
- Step 4: Configure and build
- How to Get Telnet for MacOS in Big Sur, Catalina, Mojave or High Sierra
- Installing Telnet in MacOS with Homebrew
- Installing Telnet in MacOS Mojave & High Sierra via Older MacOS Versions or Backups
- Telnet Alternatives for Mac: SSH, Netcat
- Restoring Telnet to MacOS Mojave & High Sierra by Compiling Telnet from Source
- What about Telnet for iPad and iPhone? Telnet for iOS!
- Enable Telnet on macOS Catalina for EVE-NG
- Как получить Telnet для Mac
- Способы установки Telnet Mac Mojave и Sierra
- Способ 1: подключение через SSH
- Способ 2. Установите telnet для Mac OS High Sierra и Mojave с помощью homebrew
- Способ 3: установка Telnet с использованием резервных копий
How to Install Telnet on macOS?

Greetings friends! After I upgraded my old MacBook Pro to High Sierra 10.13, Terminal surprised me with something like this: “telnet command not found on Mac”. What? It turns out! He was deleted! Well, here the question arose of how to return telnet on Mac?
Install Telnet on Mac via Homebrew
You must first install the missing Homebrew package manager. What does Homebrew do? Homebrew installs the packages you need that are not provided by Apple. Use this step-by-step guide for the fastest solution:
- Install Homebrew via Terminal:
- Install telnet using the Homebrew package manager:
- We are waiting for the installation to complete;
- Now telnet is installed on macOS High Sierra. We check the performance:
Conclusion
Of course, now few people use the telnet protocol, because there is SSH more powerful and secured tool, but still telnet sometimes could be necessary. Apple is so reckled about our security from that to exclude telnet from the list of basic Terminal commands on Mac.
It’s the best time to ask questions and give us your feedback in comments.
Hi there! My Name is Vincent Lago! My goal is to share insightful reviews, guides, and manuals for people looking to know more about current solutions for Apple hardware and OS. I have years of technological background knowledge including owning a custom iMacs & PCs which was using for different types of business. And now, I want to share my experience with you.
Источник
How to Install Telnet on MacOS Catalina
Have you found yourself needing to use Telnet on MacOS? Rest assured that you’re not alone, as you have probably discovered Telnet has been removed from modern versions of the system software starting from MacOS Mojave and newer. This instructions should work for MacOS Mojave and High Sierra but I happen to be running Catalina and this it what I did to get Telnet back.
Installing Telnet on MacOS with Homebrew
First I would like to mention that there is an easier route, that is using Homebrew. I see a lot about it and many people seem happy with it but I have an aversion to putting it on my machine. If you don’t already have Homebrew on you machine, navigate over to the website and follow the installation instructions. I would caution against following them exactly though for security purposes. I would do it like this instead:
Open and inspect the install.sh script to see and make sure what it does. And then run it.
After installing Homebrew, install Telnet
Installing Telnet on MacOS by Building Telnet from Source
This was the method I used. There are some prerequisite steps though, if you don’t already have them you’ll need to install the MacOS command line tools.
Step 1: Installing the command line tools
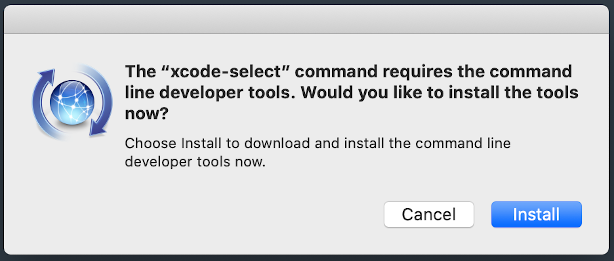
Open a terminal and enter the following line, you’ll then be shown a pop up prompt.
Click install when the prompt pops up.
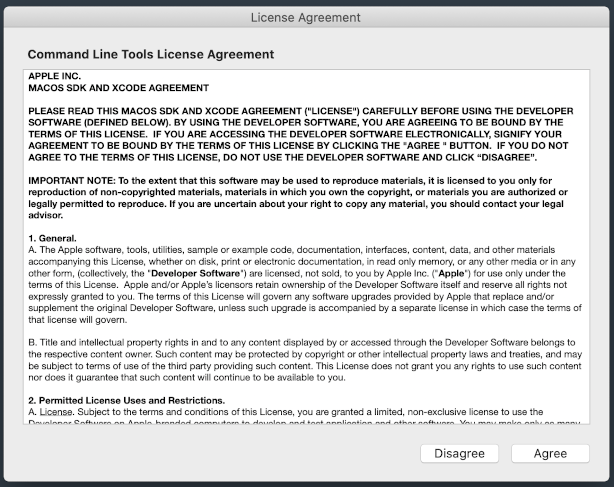
After that you’ll be shown a license which you’ll have to agree to in order to install.
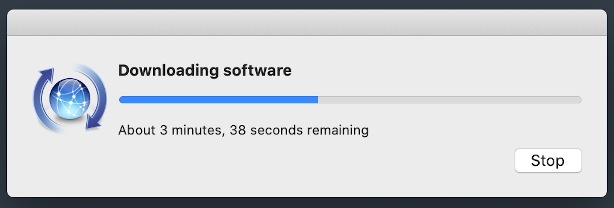
After that you’ll see the download progress and the install will happen after that. Unfortunately I forget to get screen shots of the following message boxes.
Step 2: Getting the Telnet source
For this step you’ll be getting the GNU network utilities navigate to the download page and find the latest source. At the time I’m writing this it’s 1.9.4:
Step 3: Extract the source
Step 4: Configure and build
Now that the source is extracted change into the directory:
Run the configure command:
Run the make command to build:
And then install:
Either way you choose is fairly easy, the build for this is pretty straight forward and was very quick. I don’t think it even took me 10 minutes to build and install.
Источник
How to Get Telnet for MacOS in Big Sur, Catalina, Mojave or High Sierra

Need to use Telnet in MacOS? Well, many Mac users have discovered that Telnet has been removed from modern versions of system software, including macOS Big Sur, Catalina, Mojave and macOS High Sierra. Presumably this is to encourage using the ssh client instead, but there are many Mac users who need Telnet for a variety of reasons. Telnet continues to be in a valid tool for many systems and network administrators, security professionals, people working with Cisco hardware or towards Cisco certification, MUD enthusiasts, amongst many other purposes.
Accordingly, this tutorial will detail several different ways to get Telnet back in modern versions of Mac OS system software. We’ll cover installing Telnet with Homebrew, restoring Telnet from a prior system software release or backup, compiling Telnet from source, as well as a few alternatives to telnet.
This article will assume that you have experience working with the Terminal and command line, since Telnet is entirely command line based.
Installing Telnet in MacOS with Homebrew
By far the simplest option is for Mac users to install Telnet through Homebrew. Of course this means you will need to install Homebrew on the Mac first, but if you’re advanced user that spends time in the command line you’ll likely appreciate having Homebrew for other reasons since you
- Install Homebrew on Mac OS if you haven’t done so already – if you already have Homebrew skip this step
/usr/bin/ruby -e «$(curl -fsSL https://raw.githubusercontent.com/Homebrew/install/master/install)»
Use Homebrew to install telnet with the following command:
brew install telnet
One simple way to test that Telnet is working properly after installation is to connect to the goofy Star Wars telnet server, which plays Star Wars in ASCII art:
You’ll know Telnet is working when you are greeted by Star Wars rendered in ASCII characters (and yes seriously, it’s the full movie).
Installing Telnet in MacOS Mojave & High Sierra via Older MacOS Versions or Backups
If you happen to have access to a Mac that is running a prior version of MacOS (Sierra or prior), or you happen to have an older MacOS system software backup laying around from Time Machine or otherwise, you can actually just copy the old binaries from that computer or backup to your modern MacOS installation, and telnet will work just fine.
With Mac OS and Mac OS X versions that include telnet, you will find Telnet at the following location (thus serving as a reference for where to find the binary in the backups:
The telnet binary is tiny weighing in at only 114 kb, so this is a quick simple task.
Copying that telnet binary into the following location in modern macOS releases, including MacOS Mojave 10.14 and MacOS High Sierra 10.13.x, will allow telnet to run on the new system software releases:
At that point you can run the ‘telnet’ command as usual.
Another option which requires more caution is to request the telnet binary from a trusted coworker or trusted friend who is running MacOS Sierra or prior. All they need to do is zip up and send you their /usr/bin/telnet binary file. Do not try and find a random telnet binary zip file from the internet since it could be compromised or otherwise untrustworthy. It’d be a good idea to use md5 hash or sha1 checksum on the original telnet binary if you’re going this route.
By the way, if you’re relying on binaries of telnet from Sierra or earlier, you might also be interested in grabbing ftp as well, which is also removed from modern macOS releases, but is located at the following location in prior MacOS builds:
Again you’d place the ftp binary into /usr/local/bin/ on new versions of system software.
For those wondering, while Telnet (and ftp) has been removed from Mojave, High Sierra, and presumably anything moving forward, MacOS Sierra remains the last version of system software to include Telnet by default, while any MacOS / Mac OS X release prior to Sierra also includes Telnet and ftp, including El Capitan, Snow Leopard, Yosemite, Mountain Lion, Mavericks, Tiger, Cheetah, etc.
Telnet Alternatives for Mac: SSH, Netcat
Of course there are some alternatives for Telnet, depending on what you need to use telnet for in the first place.
For remote connections, ssh is the new standard as it is secured, and both the ssh server and ssh client are available by default in all modern versions of MacOS system software. Simply, connecting to a remote IP with ssh would look as follows:
For simple testing of network connectivity, or for testing of an open / listening port, netcat can often fulfill the same needs that telnet provides. For example, you can confirm that the connection to the aforementioned ASCII Star Wars server and port 80 works with the following netcat command string:
nc -vz towel.blinkenlights.nl 80
Remember that netcat for this purpose requires specifying a valid TCP or UDP port number of whatever the host protocol is.
Restoring Telnet to MacOS Mojave & High Sierra by Compiling Telnet from Source
If you don’t want to use Homebrew for whatever reason, you can also compile Telnet yourself from inetutils source. As a prerequisite you’ll still need to install the Mac OS command line tools to be able to accomplish this, however.
First you’d download the latest inetutils package from gnu.org:
curl -o http://ftp.gnu.org/gnu/inetutils/inetutils-1.9.4.tar.gz
Next you’d decompress the tarsal:
tar xvzf inetutils-1.9.4.tar.gz
Now change into the appropriate directory:
cd inetutils-1.9.4
Issue the configure command to begin:
./configure
When configure is complete, make from source:
make
And finally, use make install to complete the installation of inetutils and telnet:
sudo make install
Personally I think using Homebrew is easier, plus there are many other great and useful Homebrew packages available. If you’re familiar with compiling from source and you are this far, you’ll almost certainly appreciate having Homebrew anyway.
What about Telnet for iPad and iPhone? Telnet for iOS!
Just to cover all bases, there are also telnet clients available for iOS. How practical this is for you likely depends on your particular device and what your intention with telnet is, but a free option for iOS is iTerminal and an excellent paid option is Prompt. Using ssh and telnet from an iOS device can be a challenge without an external keyboard though, so you might want to connect one to your iPhone or iPad before going that route, and realistically this is a better option for the iPad simply due to the larger screen. Of course iOS is not MacOS however, so this is sort of off topic.
Alright so that’s a pretty comprehensive guide to getting Telnet in modern MacOS releases, but if you know of another method, or another approach to getting Telnet in MacOS High Sierra or returning Telnet to MacOS Mojave, share with us in the comments below!
Источник
Enable Telnet on macOS Catalina for EVE-NG
Note: Big Sur – this method no longer works – instead, head over to the eve-ng download page (link) scroll to the bottom and download the ‘Apple OSX Client Side’ package – it bundles in iTerm and works great!
Since Apple has removed the telnet and ftp programs from their latest operating system, you may find yourself unable to use EVE-NG’s clickable interface to start up sessions to your routers that rely on telnet, and may be receiving the error below;
[Command not found: telnet]
Could not create a new process and open a pseudo-tty.
Even if you follow some other guides online which suggest using homebrew or copying the files to /usr/local/bin, you’ll find this doesn’t resolve the problem of accessing telnet:// style links which EVE-NG rely’s upon.
So, to fix this; first we need to disable SIP (System Integrity Protection);
1. Reboot your Mac and hold the CMD + R keys
2. When presented with the recovery options, (you might need to enter your password first if you use FileVault encryption) click Utilities at the top and choose Terminal
3. Type; csrutil disable
4. Reboot as normal
Next we need to put the files back to where they were pre-High Sierra
5. Once back onto your desktop, download the telnet and ftp files -from here-
and extract them to your downloads folder.
6. Next, open a terminal and type;
Pre-Catalina;
sudo cp
/Downloads/mac-telnet-ftp/telnet /usr/bin/telnet
sudo cp
Catalina
sudo mount -uw /
killall Finder
sudo cp
/Downloads/mac-telnet-ftp/telnet /usr/bin/telnet
sudo cp
7. Ensure these are executable, type;
sudo chmod +xr /usr/bin/telnet
sudo chmod +xr /usr/bin/ftp
Next we need to reboot and re-enable SIP (System Integrity Protection);
8. Again, Reboot your Mac and hold the CMD + R keys
9. When presented with the recovery options, click Utilities at the top and choose Terminal
10. Type; csrutil enable
11. Reboot as normal
Et Voila! EVE-NG should be back and working as normal, and your command line tools have been restored.
Источник
Как получить Telnet для Mac
Telnet – очень полезное приложение, которое до сих пор используется многими пользователями Mac по разным причинам, включая цели безопасности, системное администрирование и т. Д. Но, к сожалению, этот инструмент больше не доступен в более высокой версии Mac, такой как Mac OS Mojave или Sierra. , В любом случае, существует множество способов установить telnet Mac Mojave. Используете ли вы Mac Mojave или Sierra, процессы одинаковы. Итак, прочитайте.
Способы установки Telnet Mac Mojave и Sierra
Способ 1: подключение через SSH
Это лучшая альтернатива Telnet, и этот SSH доступен во всех современных версиях Mac. Итак, это самый простой способ получить Telnet. Используя SSH, вы можете обеспечить очень безопасное и стабильное соединение. Вот шаги для этого.
- Сначала нажмите на опцию Shell. Здесь вам нужно выбрать «Новое удаленное соединение». Откроется новое окно, в котором вам нужно ввести имя хоста или IP-адрес. Поэтому для входа через Shell необходимо иметь учетную запись. Далее нажмите кнопку подключения. Вам будет предложено ввести пароль. Итак, введите пароль при появлении запроса и сохраните настройки. Вас снова попросят ввести IP-адрес или имя хоста сервера. После этого нажмите ОК. Теперь введите идентификатор пользователя в необходимое поле и нажмите «Подключиться». Это оно.
Итак, вот как использовать Telnet на Mac Sierra или Mojave.

Способ 2. Установите telnet для Mac OS High Sierra и Mojave с помощью homebrew
Это еще один лучший и самый простой способ установить telnet Mac Mojave и Mac OS Sierra. Telnet это все о команде. Так что, просто набрав несколько командных строк, и вам будет хорошо идти. Выполните следующие шаги здесь.
Шаг 1:
Это требует Homebrew на вашем Mac. Итак, первый шаг в этом процессе – установить Homebrew, если у вас его нет. Командная строка для этого:
Шаг 2:
Следующим шагом является установка telnet с использованием Homebrew с использованием этой командной строки:
заварить установить телнет
Шаг 3:
Теперь нажмите return и разрешите Homebrew загружать и устанавливать Telnet на вашем Mac.
Шаг 4:
После завершения установки вы можете запустить telnet с помощью следующей командной строки:
telnet-сервер или IP-адрес
Итак, вот как получить Telnet на Mac с помощью Homebrew.
Способ 3: установка Telnet с использованием резервных копий
Еще одним простым и легким способом получить telnet на вашем новом Mac является использование резервного копирования. Это произойдет, когда у вас уже есть старый Mac с Telnet. Итак, вам нужно просто скопировать telnet из старого в новый. Это простой двухэтапный процесс. Итак, прочитайте:
Шаг 1:
Вы найдете telnet на старой версии Mac, используя следующую командную строку:
/USR/ Bin / телнет
Шаг 2:
Скопируйте этот telnet на новый Mac в следующем месте с помощью командной строки:
/ USR / местные / бен /
И тогда вы можете запустить команду telnet на вашем новом Mac, как обычно.
Итак, это три полезных способа установки telnet на ваш Mac. Вы можете использовать любой из них и использовать его как обычно.
Источник


