- Как установить программу Telnet в Windows 7/8/10
- Как установить telnet.exe через командную строку
- Установка клиента Telnet в компонентах Windows
- Telnet mac to windows
- Not completely unknown.
- Telnet mac to windows
- How can I telnet from Windows to my server by MAC address?
- 5 Answers 5
- How to Get Telnet for MacOS in Big Sur, Catalina, Mojave or High Sierra
- Installing Telnet in MacOS with Homebrew
- Installing Telnet in MacOS Mojave & High Sierra via Older MacOS Versions or Backups
- Telnet Alternatives for Mac: SSH, Netcat
- Restoring Telnet to MacOS Mojave & High Sierra by Compiling Telnet from Source
- What about Telnet for iPad and iPhone? Telnet for iOS!
Как установить программу Telnet в Windows 7/8/10
Любой системный администратор пользуется системной утилитой встроенной в Windows – telnet.exe. Эта программа позволяет подключаться к локальным и удалённым серверам по адресу и порту, указанными в параметрах запуска. Полезная штука для проверки возможности соединения с сервером по порту и выполнения команд. Также, не редко эта утилита указывается в помощи различных программ и сервисов. Однако часто оказывается что телнет не установлен по умолчанию.
Как установить telnet.exe через командную строку
Вы можете посмотреть видео или читать статью:
Самый простой способ – это открыть командную строку с правами Администратора и исполнить такую команду:
dism /online /Enable-Feature /FeatureName:TelnetClient
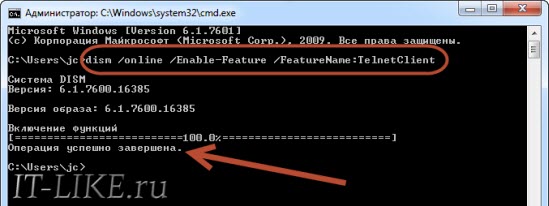
Нажимаем «Enter» и немного подождём, должно появиться сообщение «Операция успешно завершена». На этом установка закончена.
Установка клиента Telnet в компонентах Windows
Второй способ, для тех, кто не хочет пользоваться командной строкой или первый способ не сработал. Идём в «Панель управления -> Программы и компоненты -> Включение или отключение компонентов Windows» и ставим галочку на «Клиент Telnet».

Может потребоваться установочный диск Windows. Если список компонентов будет пуст, то нужно исправить одно значение в реестре Windows. Для этого запускаем редактор реестра командой:
В параметре «CSDVersion» необходимо заменить значение на 100 или 0. Перезагрузиться.
Telnet mac to windows
Sun Dec 18, 2005 10:45 am
Mon Dec 19, 2005 8:51 am
Mon Dec 19, 2005 10:06 am
Tue Dec 20, 2005 2:16 am
Tue Dec 20, 2005 2:36 am
Wed Dec 21, 2005 6:45 am
Wed Dec 21, 2005 7:09 am
José Ignacio Acosta
MikroTik Consultant IDAR0001
Mikronet
Movile: +54 9 3472-624722
Email/Msn: info[at]mikronet.com.ar
Wed Dec 21, 2005 8:09 am
What does NETBIOS a session layer protocol have to do with MAC-Telnet that operates at Layer 2?
If you have winbox.exe on your laptop/pc and are on the same segment as the mikrotik router, open winbox click the «. » button next to the «Connect to:» field and it should show the IP and MAC address of the mikrotik device. As well as the device name. You should then be able to select that device and login via MAC-winbox.
The neighbor viewer works the same way just be connected to the same segment. Also make sure any software firewalls you have are properly configured or disabled when you use this program.
Not completely unknown.
Wed Dec 21, 2005 8:47 am
I have the exact same behavior, on three different WinXP boxes against two MT (RB500 / 2.9.7) boxes. have contacted MT about this and got the reply «It works»
When I replied that I was willing to allow them to remote control one of my machines to see for themselfs I got the reply «It works»
So I guess this is the way it is supposed to work.
Wed Dec 21, 2005 8:59 am
What does NETBIOS a session layer protocol have to do with MAC-Telnet that operates at Layer 2?
If you have winbox.exe on your laptop/pc and are on the same segment as the mikrotik router, open winbox click the «. » button next to the «Connect to:» field and it should show the IP and MAC address of the mikrotik device. As well as the device name. You should then be able to select that device and login via MAC-winbox.
The neighbor viewer works the same way just be connected to the same segment. Also make sure any software firewalls you have are properly configured or disabled when you use this program.
José Ignacio Acosta
MikroTik Consultant IDAR0001
Mikronet
Telnet mac to windows
MAC SSH client for Windows
This is a MAC-SSH client for Windows based on MAC-Telnet from aouyar (Ali Onur Uyar) which is an SSH-enabled version of the original MAC-Telnet implementation from haakonnessjoen (Håkon Nessjøen).
The code handles the layer 2 UDP connection and MNDP discovery portion of the MAC-Telnet protocol to allow tunneling SSH connections to an SSH enabled MAC-Telnet server.
SSH support is provided by an embedded copy of the PuTTY «plink.exe» utility.
Parts of the code are taken from the OpenWrt libubox project.
Command line processing is provided by a portable variant of a free IBM getopt() implementation, see pgetopt.c for licensing details.
See the LICENSE file for licensing information on the MAC-SSH code in macssh.c, protocol.c, interfaces.c and mndp.c .
The libubox routines in utils.c are available under a MIT style license, see the source file for details.
Portable getopt is provided as-is and free of use, see pgetopt.c for details.
Compiling MAC-SSH has been tested on Debian 7 using the «gcc-mingw32» package. If you intend to build it on other distributions or with other variants of the MinGW toolchain you might need to change the TOOLPATH variable in Makefile to suit your needs.
To build MAC-SSH clone the sources and execute «make» — the resulting «macssh.exe» utility will be placed in the same directory.
Make will fetch, modify and compile PuTTY as part of the build process, this requires GNU wget and GNU sed on the build system.
How can I telnet from Windows to my server by MAC address?
How can I telnet from Windows to my server by MAC address?

5 Answers 5
I’m going to take a risk here and say.. Yes you can. In the same sense that you can telnet to a hostname.
Some people are saying you can’t ‘cos one says «Telnet is a Layer 3 network protocol. » I don’t think that’s correct, for one thing, telnet is an application layer protocol, that’s layer 7. IP or IPX or whatever else, is the layer 3 network layer protocol. But that’s not even relevant.
The whole layer concept is not useful here. It’s used to identify different headers, and to identify which bunches of headers are stripped off and added(encapsulation).
The «packet» and by that I mean the whole lot(not just the layer 3). But looking at the whole thing all the fields. There’s an IP address and a MAC address. You have to know a lot of things to get the packet sent. The application layer protocol(telnet), the TCP port, the IP address. In theory, you can telnet to a host given a MAC address, by getting the IP address. Just as you can telnet to a host given a hostname (you’d take the hostname and get the ip address). And just as you can get an IP from a hostname, one can also(though in a different way) get the IP given a MAC address.
RARP http://en.wikipedia.org/wiki/Reverse_Address_Resolution_Protocol it’s apparently allegedly obsolete now(according to the first line of that wikipedia article) though I see the arp command on windows 7 and no doubt ARP is still used. RARP goes MAC->IP (getting IP from a MAC address). As opposed to ARP which goes IP->MAC (getting MAC address from IP). Just as you have DNS and rDNS.. that get you between IP addresses and hostnames. So too ARP and RARP get you between IP addresses and MAC addresses. So just as you can telnet to a hostname, you can with a similar principle, in theory, telnet to a host with a MAC address. Maybe that program you mention (mactelnet) does that.
ADDED I haven’t got telnet on this machine but here’s an example with a script
mactelnet.bat has one line
And as I said to ramhound » there is a 1-1 relationship [between ip and mac address], try the command arp -a The only limitation is it’d only apply locally. ARP or RARP won’t tell you the ip address for a MAC address on a different subnetwork. You’d need your own list for that to do the conversion if you want to go beyond the local subnetwork. But locally the command arp -a will tell you in windows»
How to Get Telnet for MacOS in Big Sur, Catalina, Mojave or High Sierra

Need to use Telnet in MacOS? Well, many Mac users have discovered that Telnet has been removed from modern versions of system software, including macOS Big Sur, Catalina, Mojave and macOS High Sierra. Presumably this is to encourage using the ssh client instead, but there are many Mac users who need Telnet for a variety of reasons. Telnet continues to be in a valid tool for many systems and network administrators, security professionals, people working with Cisco hardware or towards Cisco certification, MUD enthusiasts, amongst many other purposes.
Accordingly, this tutorial will detail several different ways to get Telnet back in modern versions of Mac OS system software. We’ll cover installing Telnet with Homebrew, restoring Telnet from a prior system software release or backup, compiling Telnet from source, as well as a few alternatives to telnet.
This article will assume that you have experience working with the Terminal and command line, since Telnet is entirely command line based.
Installing Telnet in MacOS with Homebrew
By far the simplest option is for Mac users to install Telnet through Homebrew. Of course this means you will need to install Homebrew on the Mac first, but if you’re advanced user that spends time in the command line you’ll likely appreciate having Homebrew for other reasons since you
- Install Homebrew on Mac OS if you haven’t done so already – if you already have Homebrew skip this step
/usr/bin/ruby -e «$(curl -fsSL https://raw.githubusercontent.com/Homebrew/install/master/install)»
Use Homebrew to install telnet with the following command:
brew install telnet
One simple way to test that Telnet is working properly after installation is to connect to the goofy Star Wars telnet server, which plays Star Wars in ASCII art:
You’ll know Telnet is working when you are greeted by Star Wars rendered in ASCII characters (and yes seriously, it’s the full movie).
Installing Telnet in MacOS Mojave & High Sierra via Older MacOS Versions or Backups
If you happen to have access to a Mac that is running a prior version of MacOS (Sierra or prior), or you happen to have an older MacOS system software backup laying around from Time Machine or otherwise, you can actually just copy the old binaries from that computer or backup to your modern MacOS installation, and telnet will work just fine.
With Mac OS and Mac OS X versions that include telnet, you will find Telnet at the following location (thus serving as a reference for where to find the binary in the backups:
The telnet binary is tiny weighing in at only 114 kb, so this is a quick simple task.
Copying that telnet binary into the following location in modern macOS releases, including MacOS Mojave 10.14 and MacOS High Sierra 10.13.x, will allow telnet to run on the new system software releases:
At that point you can run the ‘telnet’ command as usual.
Another option which requires more caution is to request the telnet binary from a trusted coworker or trusted friend who is running MacOS Sierra or prior. All they need to do is zip up and send you their /usr/bin/telnet binary file. Do not try and find a random telnet binary zip file from the internet since it could be compromised or otherwise untrustworthy. It’d be a good idea to use md5 hash or sha1 checksum on the original telnet binary if you’re going this route.
By the way, if you’re relying on binaries of telnet from Sierra or earlier, you might also be interested in grabbing ftp as well, which is also removed from modern macOS releases, but is located at the following location in prior MacOS builds:
Again you’d place the ftp binary into /usr/local/bin/ on new versions of system software.
For those wondering, while Telnet (and ftp) has been removed from Mojave, High Sierra, and presumably anything moving forward, MacOS Sierra remains the last version of system software to include Telnet by default, while any MacOS / Mac OS X release prior to Sierra also includes Telnet and ftp, including El Capitan, Snow Leopard, Yosemite, Mountain Lion, Mavericks, Tiger, Cheetah, etc.
Telnet Alternatives for Mac: SSH, Netcat
Of course there are some alternatives for Telnet, depending on what you need to use telnet for in the first place.
For remote connections, ssh is the new standard as it is secured, and both the ssh server and ssh client are available by default in all modern versions of MacOS system software. Simply, connecting to a remote IP with ssh would look as follows:
For simple testing of network connectivity, or for testing of an open / listening port, netcat can often fulfill the same needs that telnet provides. For example, you can confirm that the connection to the aforementioned ASCII Star Wars server and port 80 works with the following netcat command string:
nc -vz towel.blinkenlights.nl 80
Remember that netcat for this purpose requires specifying a valid TCP or UDP port number of whatever the host protocol is.
Restoring Telnet to MacOS Mojave & High Sierra by Compiling Telnet from Source
If you don’t want to use Homebrew for whatever reason, you can also compile Telnet yourself from inetutils source. As a prerequisite you’ll still need to install the Mac OS command line tools to be able to accomplish this, however.
First you’d download the latest inetutils package from gnu.org:
curl -o http://ftp.gnu.org/gnu/inetutils/inetutils-1.9.4.tar.gz
Next you’d decompress the tarsal:
tar xvzf inetutils-1.9.4.tar.gz
Now change into the appropriate directory:
cd inetutils-1.9.4
Issue the configure command to begin:
./configure
When configure is complete, make from source:
make
And finally, use make install to complete the installation of inetutils and telnet:
sudo make install
Personally I think using Homebrew is easier, plus there are many other great and useful Homebrew packages available. If you’re familiar with compiling from source and you are this far, you’ll almost certainly appreciate having Homebrew anyway.
What about Telnet for iPad and iPhone? Telnet for iOS!
Just to cover all bases, there are also telnet clients available for iOS. How practical this is for you likely depends on your particular device and what your intention with telnet is, but a free option for iOS is iTerminal and an excellent paid option is Prompt. Using ssh and telnet from an iOS device can be a challenge without an external keyboard though, so you might want to connect one to your iPhone or iPad before going that route, and realistically this is a better option for the iPad simply due to the larger screen. Of course iOS is not MacOS however, so this is sort of off topic.
Alright so that’s a pretty comprehensive guide to getting Telnet in modern MacOS releases, but if you know of another method, or another approach to getting Telnet in MacOS High Sierra or returning Telnet to MacOS Mojave, share with us in the comments below!


