Sword Art Online Custom Windows Theme
The following is mid to high-level desktop customization. While the process is fairly simple and should take about 10 minutes to set up the essentials and give you the basic look, you need to put in a bit more effort and tweak it here and there to make it completely fit the theme and suit your taste.
Make sure you know what you’re doing every step of the way and just drop a comment below if you need any help.

Click to enlarge.
Using Windows 10?
For starters, the visual style of the theme, meaning the way the start bar looks and the windows explore look cannot be achieved in Windows 10 for now. There are other alternatives to achieve a similar look. So at the very least, you will have something like this.
Click to enlarge
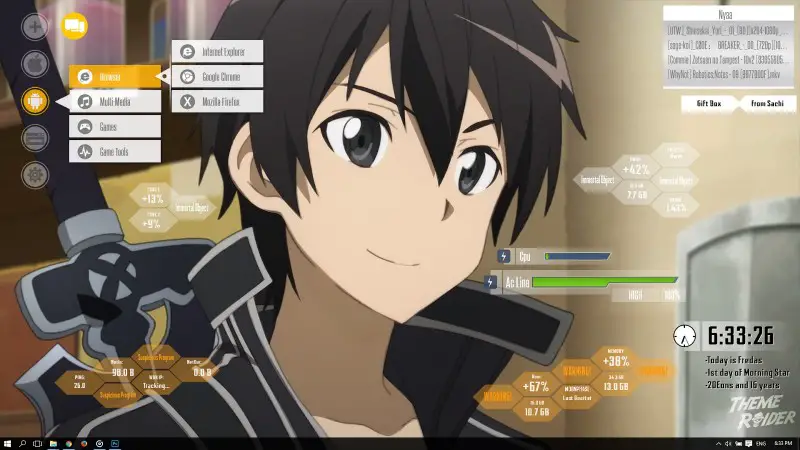
SAO Rainmeter Skin
There are 2 main components to this theme: A Rainmeter Skin and A Visual Style.
Let’s start off with getting the rainmeter skin. But before we do that you need to have rainmeter installed on your computer. If you do, just keep reading. Or if you don’t, just set up rainmeter for your desktop first and then continue.
If you’ve successfully set up rainmeter, you should have something like this (or any other layout.)

Default Rainmeter layout
First thing we need is that awesome SAO rainmeter skin made by deviantart user 9Sun. Looks cool right? Simply download the SAO rainmeter layout that I’ve set up and modified.
Run the SAO_ThemeRaider.rmskin file that you just downloaded.

Click Install and complete the installation. If you did things right, you should have a modified wallpaper and the new skin all laid out.
The positioning of the layout might vary depending on your resolution. Simply click and drag the skins to your liking.
Once you’re done, you should have something similar to this.
 Click to enlarge
The Various Skins
As you might have noticed, there are multiple skins each with it’s own function. We’ll take a look at what each of theme and how you can customize them.
The Launcher
 |
| Left-clicking the plus icon opens up the launcher. |
You’ll find the launcher at the top right as a plus icon. Clicking it will open up a list of quick shortcuts to launch your favorite applications or quick access to computer settings like power control.
The shortcuts are arranged hierarchically so you can categorize your apps. So how do you customize these shortcuts to your liking? Simple, middle-click the plus icon to bring up the option skin for your launcher.
 |
| Middle-clicking the plus icon opens this options skin. |
In this options skin, you can click on the 4 layers of buttons: Type, Floor, Region and Room to edit the name, icon and target of each application.
Just click on the name of the application or icon to change it. Click ‘Target’ to change which program this shortcut should open.
 |
| Once you are done, click the blue circle to save your changes. |
Notes
 |
| Middle-click to edit your notes. |
Near the launcher, you’ll find the notes icon. Left-click on it to open up the notes skin. You can click it again to go back to the small icon. This skin is useful to save quick reminders or notes to get things done.
To edit your notes, middle-click on the skin. This will open up a notepad file where you can edit and save your notes.
Music Player
 |
| Left-click the Gift Box to open up the music player. |
There is also a skin to the right that says Gift Box. Clicking this opens up the music player. By default, this is set to Windows Media Player, but you can change it to other players by editing the skin. Right click the skin and choose ‘Edit Skin’. There you’ll need to change the PlayerName and PlayerPath. Check out rainmeters list of supported players for more info.
RSS Feed
 |
| Left-Click on top title to change rss feed. |
The RSS feed to the top right will bring you the latest content from your favorite website. To change the url, left-click on the title of the feed and it’ll open up a notepad where you can change the url to your feed.
Other Skins
There are several others skins most notably the system meters like CPU usage, RAM, battery life, network status and hard disk space.
Most of these do not need any editing and should work right off the box. However if you need to tweak any of them right click the skin and choose ‘Edit Skin’. This should open up a notepad setting file that you can edit. Might look complicated to beginners but just find the variable you need to change and you should be good to do.
You can add enable some additional skins by accessing the context menu. For this, right click on any skin and go to the SAO sub-menu.
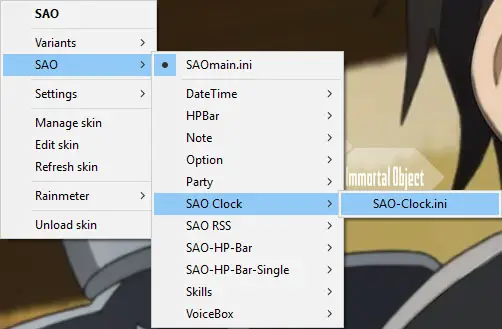 |
| Context Menu has some additional skins that are not enabled by default. |
And that’s all the rainmeter you need for this theme. If you’re a Windows 10 user, that’s about it for this theme. If not, move on to getting the visual style next. This will bring the grey look with custom cursors and start menu.
You can add enable some additional skins by accessing the context menu. For this, right click on any skin and go to the SAO sub-menu.
SAO Visual Style
The visual styles are completely optional. They do however change a lot of aesthetics like cursors, icons, start bar etc. Now, depending on what version of Windows you’re using there are two visual styles you could get both made by deviantart user yorgash.
I’m not going to go into detail on how you install these visual styles. If you’re familiar with installing third-party themes, this should be easy.
If this is new to you, just follow the instructions in the links above. Regardless, if there’s anything that’s troubling you, just drop a comment below and I’ll do my best to help.
If all things go well, you should have something that looks like this.
Click to enlarge
Give yourself some credit for sticking through till the end
! And props again to the original creators of the skins and styles, 9Sun and yorgash.


