- How to Install PHP on Windows
- Learn PHP for free!
- Why PHP?
- Why Install PHP Locally?
- Alternative Installation Options
- Use an All-in-One package
- Use a Linux Virtual Machine
- Use Windows Subsystem for Linux 2
- Use Docker
- Install Apache (optional)
- Install PHP
- Step 1: Download the PHP files
- Step 2: Extract the files
- Step 3: Configure php.ini
- Step 4: Add C:\php to the PATH environment variable
- Step 5: Configure PHP as an Apache module
- Step 6: Test a PHP file
- Unit Testing with PHPunit on Windows
- Installing PHP5.x on Windows
- Installing PHPunit on Windows
- Writing PHPunit Tests
- Running the PHPunit Tests on Windows
- Writing Your Own PHP Tests
- Summary
- 4 thoughts on “Unit Testing with PHPunit on Windows”
- Как установить PHP на Windows
- Скачать PHP:
- Установка PHP:
- Тест PHP:
How to Install PHP on Windows
Learn PHP for free!
Make the leap into server-side programming with a comprehensive cover of PHP & MySQL.
Normally RRP $39.99 Yours absolutely free
This article explains how to install PHP 8 and Apache 2.4 on Windows 10 (64-bit).
Linux and macOS users often have Apache and PHP pre-installed or available via package managers. Windows 10 requires a little more effort. The steps below may work with other editions of Windows, PHP, and Apache, but check the documentation of each dependency for specific instructions.
Why PHP?
PHP remains the most widespread and popular server-side programming language on the Web. It’s installed by most web hosts, and has a simple learning curve, close ties with the MySQL database, superb documentation, and an excellent collection of libraries to cut your development time. PHP may not be perfect, but it should be considered as an option for your next web application. It’s the language of choice for Facebook, Slack, Wikipedia, MailChimp, Etsy, and WordPress — the Content Management System which powers 40% of the web.
Why Install PHP Locally?
Installing PHP on your development PC allows you to safely create and test websites and applications without affecting the data or systems on your live server.
Alternative Installation Options
Before you jump in, there may be a simpler installation options…
Use an All-in-One package
All-in-one packages are available for Windows which contain Apache, PHP, MySQL, and many other dependencies in a single installation file — such as XAMPP, WampServer and Web.Developer.
These packages are easy to use, but they may not exactly match your live server. Installing Apache and PHP manually will help you learn more about the system and configuration options.
Use a Linux Virtual Machine
Microsoft Hyper-V (provided in Windows 10 Professional) and VirtualBox are free hypervisors which emulate a PC so you can install another operating system.
You can install any version of Linux, then follow its Apache and PHP installation instructions. Alternatively, distros such as Ubuntu Server provide them as standard (although they’re rarely the latest editions).
Use Windows Subsystem for Linux 2
WSL2 is also a virtual machine, but it’s tightly integrated into Windows so activities such as file sharing and localhost resolution is seamless. You can install several Linux distros, so refer to the appropriate Apache and PHP instructions.
Use Docker
Docker creates a wrapper (known as a container) around pre-configured application dependencies such as Apache, PHP, MySQL, MongoDB, and most other web software. Containers look like full Linux Virtual Machines but are considerably more lightweight.
Docker is currently considered the best option for setting up a PHP development environment. Check out SitePoint’s article “Setting Up a Modern PHP Development Environment with Docker” for a complete guide to setting it up.
Install Apache (optional)
If you’re still reading, the following sections describe how to install Apache and PHP directly on Windows.
PHP provides a built-in web server which can be launched by navigating to a folder and running the PHP executable with an -S parameter to set the localhost port. for example:
PHP pages can then be viewed in a browser at http://localhost:8000.
This may be adequate for quick tests, but your live server will use Apache or similar web server software. Emulating that environment as closely as possible will prevent development errors.
To install Apache, download the latest Win64 ZIP file from https://www.apachelounge.com/download/ and extract its Apache24 folder to the root of your C: drive. You’ll also need to install the Visual C++ Redistributable for Visual Studio 2015–2019 ( vc_redist_x64 ); a link is provided on the same page.
Open a cmd command prompt (not PowerShell) and start Apache with:
You may need to accept a firewall exception before the server starts to run. Open http://localhost in a browser and an “It works!” message should appear. Note:
- If you need to change any settings, Apache’s configuration file is located at C:\Apache24\conf\httpd.conf .
- The web server root folder is located at C:\Apache24\htdocs . Initially, it contains a single index.html file with the “It works!” message.
Also not that, if Apache won’t start, it’s likely another application is hogging port 80. (Skype is the prime candidate and the Windows 10 app won’t let you disable it!) If this occurs, edit C:\Apache24\conf\httpd.conf and change the line Listen 80 to Listen 8080 or any other free port. Restart Apache and, from that point onward, you can load web files at http://localhost:8080
The server can be stopped with Ctrl + C . The ReadMe file in the ZIP also provides instructions for installing Apache as a Windows service.
Install PHP
Install PHP by following the steps below. Note that there are several ways to configure Apache and PHP, but this is possibly the quickest method.
Step 1: Download the PHP files
Get the latest PHP 8 x64 Thread Safe ZIP package from https://www.php.net/downloads.php.
Step 2: Extract the files
Create a new php folder in the root of your C:\ drive and extract the contents of the ZIP into it.
PHP can be installed anywhere on your system, but you’ll need to change the paths referenced below if C:\php isn’t used.
Step 3: Configure php.ini
PHP’s configuration file is named php.ini . This doesn’t exist initially, so copy C:\php\php.ini-development to C:\php\php.ini . This default configuration provides a development setup which reports all PHP errors and warnings.
There are several lines you may need to change in a text editor (use search to find the current value). In most cases, you’ll need to remove a leading semicolon ( ; ) to uncomment a setting.
First, enable any required extensions. This will depend on the libraries you want to use, but the following extensions should be suitable for most applications:
If you want to send emails using PHP’s mail() function, enter the details of an SMTP server in the [mail function] section (your ISP’s server should be suitable):
Step 4: Add C:\php to the PATH environment variable
To ensure Windows can find the PHP executable, you need to change the PATH environment variable. Click the Windows Start button and type “environment”, then click Edit the system environment variables. Select the Advanced tab, and click the Environment Variables button.
Scroll down the System variables list and click Path followed by the Edit button. Click New and add C:\php :
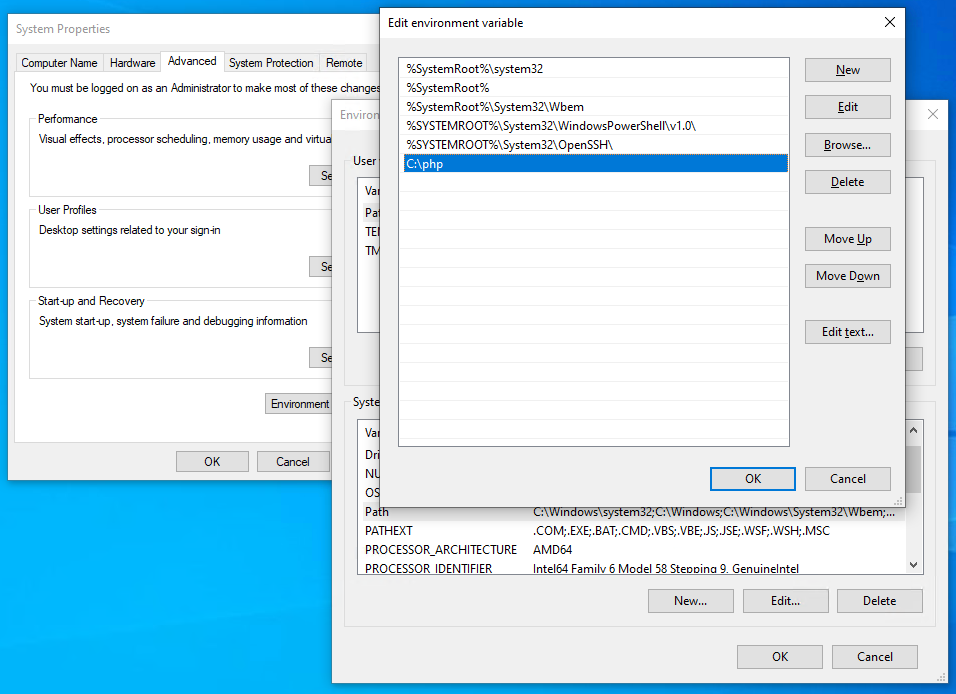
Note that older editions of Windows have a single text box where each path is separated by a semi-colon ( ; ).
Now OK your way out. You shouldn’t need to reboot, but you may need to close and restart any cmd terminals you have open.
Step 5: Configure PHP as an Apache module
Ensure Apache isn’t running and open its C:\Apache24\conf\httpd.conf configuration file in a text editor. Add the following lines to the bottom of the file to set PHP as an Apache module (change the file locations if necessary):
Optionally, change the DirectoryIndex setting to load index.php instead of index.html when it can be found. The initial setting is:
Save httpd.conf and test the updates from a cmd command line:
Syntax OK should appear … unless you have errors in your configuration.
If all went well, restart Apache with httpd .
Step 6: Test a PHP file
Create a new file named index.php in Apache’s web page root folder at C:\Apache24\htdocs and add the following PHP code:
Open a web browser and enter your server address: http://localhost/. A “PHP version” page will appear showing the various PHP and Apache configuration settings.
You can now create PHP sites and applications in any sub-folder of C:\Apache24\htdocs . If you need to work on multiple projects, consider defining Apache Virtual Hosts so you can run separate codebases on different localhost domains or ports.
Unit Testing with PHPunit on Windows

I’m currently working as a teacher again temporarily, so to enable every student to be able to get into unit testing, I had to take a look at PHPunit and how to run it on Windows.

Take a look at my github repository for phpunit-demo to get the code for this article.
Installing PHP5.x on Windows
To install PHP on Windows, you can simply download one of the binary packages from the official website. Remember to pick the right architecture, x86 if you’re running 32 bit Windows, x64 if you’re on 64 bit Windows.
After unpacking the ZIP, you can simply move the directory to the root of your C: drive. Believe me, it will make things easier to have a short path to type.
Installing PHPunit on Windows
Installing PHPunit basically requires downloading one single .phar file, which can be executed with PHP. You can find it on the PHPunit Getting Started section of their page, or simply save the following link: https://phar.phpunit.de/phpunit.phar.
Writing PHPunit Tests
There is an elaborate example in the PHPunit Getting Started section with OOP code, but I will quickly go through a very simple one below
- my_functions.php is the procedural part of code we want to test
- my_class.php is the OOP part of code we want to test
- phpunit.phar is the PHPunit test suite
- tests is the directory that contains our tests
- tests/my_function_test.php is the file that contains the tests we write
- tests/my_function_test.php is the file that contains the tests we write
The content of my my_functions.php file is the following:
To thest this function, I can simply use the following code in tests/my_function_test.php :
Running the PHPunit Tests on Windows
To run the unit tests, you need to open the command line interface on Windows. Most easily you can do that by opening your start menu and typing cmd in the search box.
Firstly we will need to switch to the directory where the code, that is supposed to be tested and the tests themselves are placed.
If you’re working with WAMP, your path could be something like this: C:\wamp\www\yourproject . To get to that path we simply type in the cmd: cd C:\wamp\www\yourproject .
Now we can start running our tests:
If you want to test a class, you don’t need to do any include() in your test file and can run a command like the following:
This for example is the output of running the my_function_test.php :
OK! Our first test passed! Easy, right? Right! Now if we change the value that we expect to get if we add 1 and 1, we will receive an error message, that tells us which test fails. This is extremely handy if you’re not testing one, but 500 functions.
The most valuable line is probably Failed asserting that 2 matches expected 3. , because it tells both the return value and which one we thought we would get in the test.
Writing Your Own PHP Tests
To write your own tests, you can have a look at the list of all assertions for PHPUnit. It has a lot of practial functions that can test for true or false , if a function outputs a number or if a value is lesser or greater than another. All assertion functions come with handy examples, from which you can build your own tests.
The functions may seem very basic, but since it also supports regulary expressions, you can test for many of the string conversions that are typical for web projects, or url escaping, user input validation and so on.
Summary
This is a very brief introduction, but I hope it’s a useful one, if you haven’t touched phpunit or unit testing before. I think testing is underrated, because I wasn’t really taught it at my academies. I’m lucky that I get to teach it and that we have a new generation of programmers coming up that put value into developing stable software.
Let me know what you thought of this and if I could have been more clear or elaborate!
Thank you for reading! If you have any comments, additions or questions, please leave them in the form below! You can also tweet them at me
If you want to read more like this, follow me on feedly or other rss readers
4 thoughts on “Unit Testing with PHPunit on Windows”
Hi, what if I using phpunit from composer? I get error like
SRC_DIR=”`pwd`”
cd “`dirname “$0″`”
cd “../phpunit/phpunit”
BIN_TARGET=”`pwd`/phpunit”
cd “$SRC_DIR”
“$BIN_TARGET” “$@”
What should I do?
Not sure about that, I haven’t seen the error before actually
Hi, it is the only easy tutorial on how to use phpunit without Pear or Composer. Thanks.
I have a question Is is necessary to use composer or pear?
It’s not necessary, but usually a great advantage, since it saves you work in the long run
Как установить PHP на Windows

В этой статье вы узнаете как установить php 7.0 и выше на Windows 10, очень просто, надеюсь эта статья будет полезна для вас.
Скачать PHP:
Сначала вам надо скачать PHP 7 для Windows 10 c сайта или для Windows 7, для этого заходим по ссылки, там нажимаем на Zip.

Как можете заметить, я скачиваю тут x64 битную, но не переживаете, там также вы можете скачать x32 битную версию, для этого надо прокрутить чуть ниже и найти, где будет написано x86, если в друг у вас архитектура не x64.
Установка PHP:
После того как скачали сам PHP, пришло время его установить, для архивируем архив который скачали, и создаём папку куда положим все файлы.

Как можете заметить, я поместил все файлы в папку в документах, но это ещё не всё.
Теперь на надо добавить PHP в path, чтобы была возможность запускать PHP скрипты из командной строки, для этого заходим в «Этот компьютер» и там нажимаем правой кнопкой мыши, выбираем «Свойства».

Дальше в открывшемся окне с боку выбираем «Дополнительные параметры системы».

В открывшемся окне нажимаем на кнопку «Переменные среды…».

В открывшемся окне выбираем внизу «Path» и нажимаем кнопку изменить.

Нажимаем «Создать» и вписываем путь, куда вы архивировали ваш PHP, на этом всё и заканчивается, поздравляю вас, вы установили и подключили PHP.
Тест PHP:
Теперь не большой тест, что бы наперника проверить что мы правильно установили PHP, для этого открываем блокнот и делаем не большую PHP программу.


