- Тестирование IOPS дисков в Linux
- Установка утилиты fio для тестирования IOPS в Linux
- Измерение производительности дисков в IOPS с помощью fio
- Тестирование производительности дисков с помощью файлов.
- Проверка latency диска с помощью ioping
- Disk Speed Test (Read/Write): HDD, SSD Performance in Linux
- dd: TEST Disk WRITE Speed
- dd: TEST Disk READ Speed
- dd: TEST Read/Write Speed of an External Drive
- hdparm: Test HDD, SSD, USB Flash Drive’s Performance
- 17 Replies to “Disk Speed Test (Read/Write): HDD, SSD Performance in Linux”
- Скорость Диска (Чтения/Записи): Тест HDD, SSD в Linux
- dd: ТЕСТ Скорости ЗАПИСИ Диска
- dd: ТЕСТ Скорости ЧТЕНИЯ Диска
- dd: ТЕСТ Скорость Чтения/Записи Внешнего Накопителя
- hdparm: Проверка Производительности HDD, SSD, USB Флэш Накопителья
- Linux and Unix Test Disk I/O Performance With dd Command
- Use dd command to monitor the reading and writing performance of a disk device:
- Understanding dd command options
- Finding server latency time
- But why the server throughput and latency time are so low?
- Use hdparm command to see buffered and cached disk read speed
- Use dd command on Linux to test read speed
- Linux Laptop example
- Apple OS X Unix (Macbook pro) example
- Not a fan of the command line tools…?
- Graphical method
- Running Disks tool under Ubuntu 20.04 LTS:
- Which method and command do you recommend to use to test disk I/O performance?
- Conclusion
Тестирование IOPS дисков в Linux
В этой статье рассмотрим способы тестирования производительности IOPS дисков или дискового массива в Linux. IOPS (input/output operations per second) – количество операций ввода-вывода, выполняемые системой хранения данных за одну секунду (это может быть как один диск, RAID массив или LUN на системе хранения). Условно IOPS можно считать количество блоков, которые успевает считаться или записаться на носитель.
Для большинства дисков производители указывают номинальные значения IOPS, но такие значение на практике не гарантируются. Для понимания производительности вашей дисковой подсистемы перед запуском проекта желательно получить значения IOPS.
Установка утилиты fio для тестирования IOPS в Linux
Для замера производительности IOPS дисков в Linux можно использовать утилиту fio (утилита доступна для CentOS в репозитории EPEL). Соотвественно для установки fio в RHEL, CentOS используется пакетный менеджер yum (dnf):
# yum install epel-release -y
# yum install fio -y
Либо apt-get в Debian, Ubuntu :
# apt-get install fio
Затем вам нужно определить диски для тестирования. Тестирование выполняется путев выполнения операций записи/чтения в той директории, в которую примонтирован диск или LUN.
Измерение производительности дисков в IOPS с помощью fio
Выполним несколько видов тестирования производительности IOPS диска в различных сценариях нагрузки на диск (реждим тестирования, который нужон выбрать зависит от логики размещенного приложения и общей архитектуры проекта).
Тест случайных операций на чтение/запись
При запуске такого теста, будет создан файл размером 8 Гб. Затем утилита fio выполнит чтение/запись блока 4КБ (стандартный размер блока) с разделением на 75/25% по количеству операций чтения и записи и замерит производительность. Команда выглядит следующим образом:
# fio —randrepeat=1 —ioengine=libaio —direct=1 —gtod_reduce=1 —name=fiotest —filename=testfio —bs=4k —iodepth=64 —size=8G —readwrite=randrw —rwmixread=75
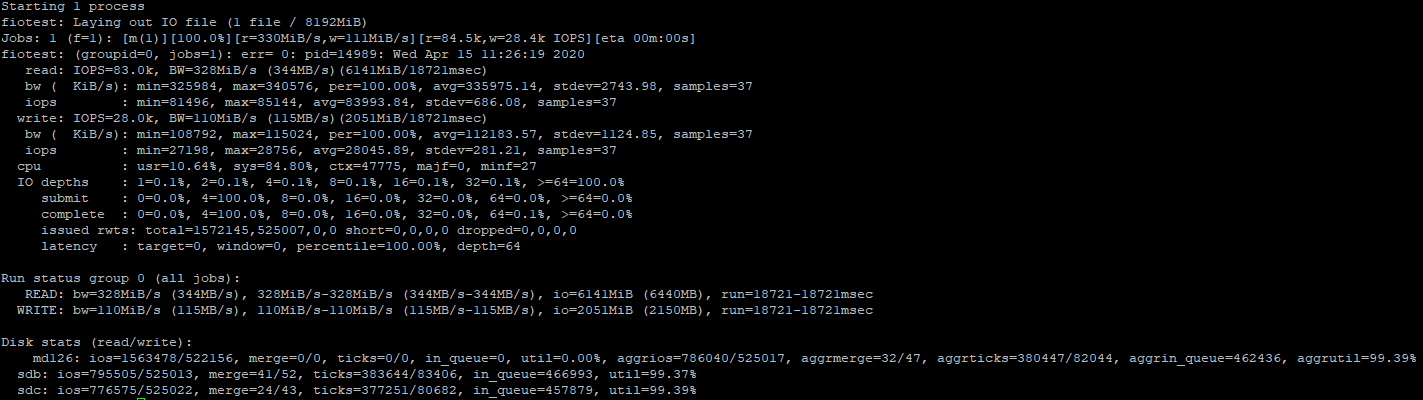
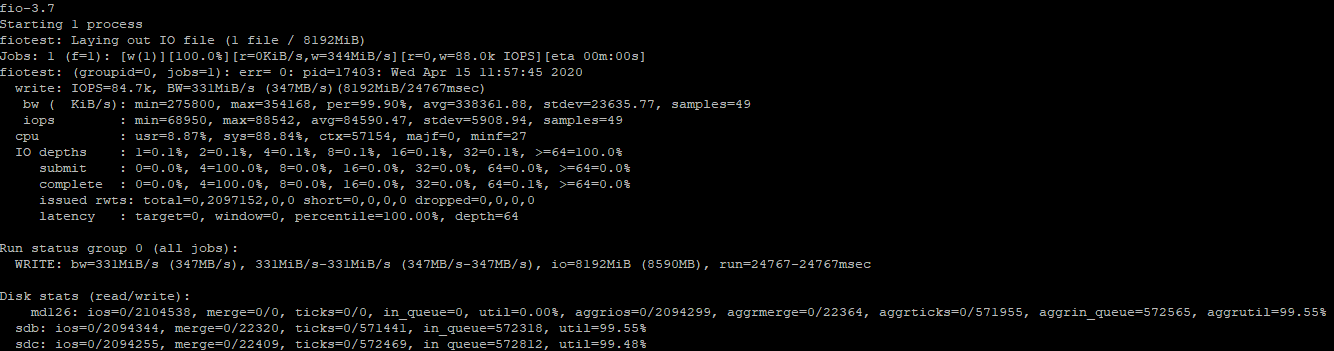
Первую проверку я запустил на массиве из двух SSD дисков и результаты получились хорошие:
- Чтение:
328MiB/s, 83000 IOPS
Запись:
110MiB/s, 28000 IOPS
Так как мы запустили тест на чтение/запись, показатели по отдельным проверкам, будут чуть выше.
Для сравнения, я замерил скорость на обычном SATA диске:
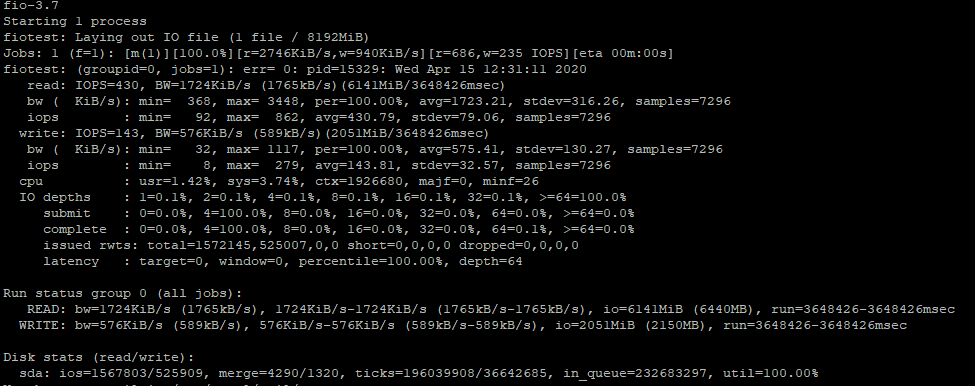
- Чтение
1.7 MiB/s, 430 IOPS
Запись
0.5 MiB/s, 143 IOPS
Для HDD диска результаты, конечно гораздо хуже, чем для SSD.
Тест случайных операций на чтение
Чтобы замерить производительность дисков только для случайных операций на чтение, нужно выполнить следующую команду:
# fio —randrepeat=1 —ioengine=libaio —direct=1 —gtod_reduce=1 —name=fiotest —filename=testfio —bs=4k —iodepth=64 —size=8G —readwrite=randread
Команда поменялась в самом конце на —readwrite=randread .
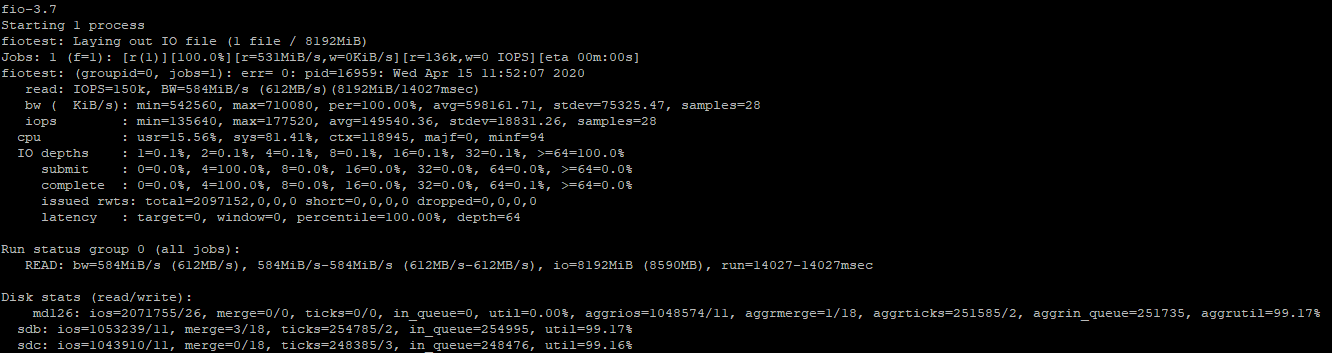
Как ранее я уже говорил, скорость по отдельным замерам будет выше:
Если запустить тест только на чтение, разница со смешанным тестом достигает (200-250 MiB/s и 67000 IOPS), что достаточно ощутимо.
Тест случайных операций на запись
Для замера производительности диска для случайных операций записи, выполните команду:
# fio —randrepeat=1 —ioengine=libaio —direct=1 —gtod_reduce=1 —name=fiotest —filename=fiotest —bs=4k —iodepth=64 —size=8G —readwrite=randwrite
Производительность операций записи на хороших SSD дисках тоже очень высокая. Как и в случае с чтением, разница со смешанным тестом достигает 200-250 MiB/s, а в IOPS 56000.
Если опираться на официальную документацию по дискам от производителя (это SSD диски от Intel), можно смело сказать, что в данном случае они не обманули.
Тестирование производительности дисков с помощью файлов.
Утилита fio позволяет проверять диски не только с помощью интерактивного запуска команд, но и запускать заранее подготовленные конфигурационные файлы для тестов. Чтобы воспользоваться данным вариантом, создайте файл:
И добавьте в него содержимое:
Теперь запустите тест:
Данный тест замерит скорость чтения диска. Чтобы выполнить проверку производительности для операций записи, используйте такой конфиг:
Проверка latency диска с помощью ioping
Помимо IOPS есть еще один важный параметр, характеризующий качество вашей дисковой подсистемы – latency. Latency – это время задержки выполнения запроса ввода/вывода и характеризуют время доступа к системе хранения (измеряется в миллисекундах). Чем выше latency, тем больше приходится ждать вашему приложения данных от дисковой подсистемы. Для типовых систем хранения значения latency более 20 мс считаются плохими.
Для проверки latency диска используется утилита ioping:
# yum install ioping -y
# apt-get install ioping
Запустите тест latency для диска (выполняется 20 запросов):
# ioping -c 20 /tmp/
Среднее значение 298.7 us (микросекунд), т.е. средняя latency диска в нашем случае 0.3 ms, что очень хорошо.
Таким образом, вы можете провести нагрузочное тестирование дисковой подсистемы на вашем сервере до запуска проекта и получить максимальную производительность. Конечно такой тест не дает гарантий, что дисковый массив или диск будет постоянно гарантировать такую производительность, но на начальном этапе это тест, который обязательно нужно выполнить. Методика тестирования IOPS в Windows описана в этой статье.
Источник
Disk Speed Test (Read/Write): HDD, SSD Performance in Linux
From this article you’ll learn how to measure an input/output performance of a file system on such devices as HDD, SSD, USB Flash Drive etc.
I’ll show how to test the read/write speed of a disk from the Linux command line using dd command.
I’ll also show how to install and use hdparm utility for measuring read speed of a disk on Linux Mint, Ubuntu, Debian, CentOS, RHEL.
To get the accurate read/write speed, you should repeat the below tests several times (usually 3-5) and take the average result.
Cool Tip: How to choose SSD with the best quality/price relation! Read more →
dd: TEST Disk WRITE Speed
Run the following command to test the WRITE speed of a disk:
dd: TEST Disk READ Speed
To get the real speed, we have to clear cache.
Run the following command to find out the READ speed from buffer:
Clear the cache and accurately measure the real READ speed directly from the disk:
dd: TEST Read/Write Speed of an External Drive
Cool Tip: Have added a new drive to /etc/fstab ? No need to reboot! Mount it with one command! Read more →
To check the performance of some External HDD, SSD, USB Flash Drive or any other removable device or remote file-system, simply access the mount point and repeat the above commands.
Or you can replace tempfile with the path to your mount point e.g.:
Reminder: All the above commands use the temporary file tempfile . Don’t forget to delete it when you complete the tests.
hdparm: Test HDD, SSD, USB Flash Drive’s Performance
And it can also be used as a simple benchmarking tool that allows to quickly find out the READ speed of a disk.
hdparm is available from standard repositories on the most Linux distributions.
Install hdparm depending on your Linux distribution.
Cool Tip: Troubleshooting an issue with a hard drive performance? It will be a good idea also to test download/upload Internet speed. It can be easily done from the Linux command line! Read more →
On Linux Mint, Ubuntu, Debian:
On CentOS, RHEL:
Run hdparm as follows, to measure the READ speed of a storage drive device /dev/sda :
17 Replies to “Disk Speed Test (Read/Write): HDD, SSD Performance in Linux”
Anyone has hdparm version for Android?
“Reminder: All the above commands use the temporary file tempfile. Don’t forget to delete it when you complete the tests.”
I can not find any place where you instruct as to how to delete the tempfile. How is this done safely?
go to directory where you executed the command, in terminal:
““rm tempfile““
or in a gui select the file and delete it.
I must have done something wrong. I tested first with bs=4k and count=256k.
It finished quickly.
Afterwards I decided myself to alter the parameters like so: bs=1M and count=256k
I didn’t know exactly what I was doing. I left it running not having slightest hunch if it’s wrong to interrupt it via Ctrl-C. It run approximately 1000 seconds having written almost 100GB of all 150GB free on the SSD. Only then I’ve read the man pages searching for clues but still didn’t found. So I have a couple of questions if kindly allowed. That ‘k’ at the end of count I am not sure of it’s meaning or even if it makes sense. I have to also ask what would have happened if the command filled the whole free space? Would it have stopped by itself with message/error? Was it dangereous for an ssd doing this. The fact I performed it from sysresccd on ssd with Windows installed has any effect on outcome?
I mean the if = is it from the RAM memory? I specified an of= on the ssd after mounting it like /mnt/windows/some.output.file. Is the way I did it significant for the results?
> bs=4k and count=256k
k means what it always means: about 1,000, but in the case of computers (here), usually 1024. “bs” means block size, “count” means number of blocks. So this means write 4k x 256k bytes. 1k x 1k = 1 megabyte (about 1,000 x about 1,000 = about 1,000,000). How many megabytes? Since we already took care of the ‘k’s; 4x 256 = 1024 (aka about 1000, or 1k again.) What’s 1k x 1k x 1k? 1 gigabyte (about 1,000,000,000.) You wrote 1 gigabyte of zeros.
> bs=1M and count=256k
1M = (1k x 1k)
(1k x 1k) x 1k(the k from “count”) = 1 gigabyte
1 gigabyte x 256 = 256 gigabytes.
You were writing 256 gigabytes of zeros. Your drive is only 150 gigabytes in size. It won’t hurt your drive, it will just delete everything on your drive. When it fills your drive, it will stop.
The “if” is not from ram, it is a program (/dev/zero) in your system disguised as a file but whenever it is read is just endless zeros.
How to check sdb drive?
Should I use /dev/sdb instead of /dev/zero here:
sync; dd if=/dev/zero of=/media/user/MyUSB/tempfile bs=1M count=1024; sync
?
I think you missed the best software package for this kind of tests. It’s called fio:
https://github.com/axboe/fio/
It’s not accurate. The second sync does not influence the measurement (it’s being run after dd reports the results) and thus it’s influenced by caching. If you try the same test with 4096 or 8192 megs, you’ll have worse results (but closer to the reality).
One way to correct for this is measuring the whole process with the time command and then doing the division manually. E.g.:
# time (sync; dd if=/dev/zero of=tempfile bs=1M count=8192; sync)
You’ll see that dd will report a higher throughput, but you can then divide 8192 with whatever seconds time comes up with.
You need `conv=fdatasync` in your dd commands to include flush and sync time. Otherwise the results will be way too high, as others have mentioned.
/dev/sdb2:
Timing cached reads: 16830 MB in 1.99 seconds = 8454.99 MB/sec
Timing buffered disk reads: 434 MB in 3.01 seconds = 144.27 MB/sec
great post:) keep simple
Hello, after doing some tests with different “GB” my storage on NVMe was filled with 7% (56GB), can I delete that storage or stay there permanently?
Источник
Скорость Диска (Чтения/Записи): Тест HDD, SSD в Linux
dd: ТЕСТ Скорости ЗАПИСИ Диска
Выполните следующую команду для определения скорости ЗАПИСИ на накопитель:
dd: ТЕСТ Скорости ЧТЕНИЯ Диска
Файл tempfile , сгенерированный предыдущей командой, был закэширован в буфер и скорость его чтения будет намного выше чем реальная скорость чтения непосредственно с жесткого диска.
Чтобы получить реальную скорость, необходимо предварительно очистить кэш.
Выполни следующую команду, чтобы узнать скорость ЧТЕНИЯ из буфера:
Очистите кэш и измерьте реальную СКОРОСТЬ чтения непосредственно с жесткого диска:
dd: ТЕСТ Скорость Чтения/Записи Внешнего Накопителя
Для проверки производительности какого-либо внешнего HDD, SSD, USB Флэшки либо другого съемного носителя или удаленной файловой системы, просто перейдите в точку монтирования и выполните приведенные выше команды.
Либо, вместо tempfile , можно непосредственно прописать путь к точке монтирования, например:
Напоминание: Все приведенные выше команды используют временный файл tempfile . Не забудьте удалить его по окончанию тестов.
hdparm: Проверка Производительности HDD, SSD, USB Флэш Накопителья
hdparm — это утилита для командной строки в Linux, которая позволяет просматривать и менять параметры жестких дисков.
Так же она может использоваться в качестве простой утилиты для сравнительного анализа, которая позволяет быстро узнать скорость ЧТЕНИЯ с диска.
hdparm доступен из стандартных репозиториев в большинстве Linux дистрибутивах.
Установите hdparm , в зависимости от вашего Linux дистрибутива.
В Linux Mint, Ubuntu, Debian:
Источник
Linux and Unix Test Disk I/O Performance With dd Command
- dd command : It is used to monitor the writing performance of a disk device on a Linux and Unix-like system.
Tutorial details Difficulty level Intermediate Root privileges Yes Requirements dd Est. reading time 15m - hdparm command : It is used to get/set hard disk parameters including test the reading and caching performance of a disk device on a Linux based system.
In this tutorial you will learn how to use the dd command to test disk I/O performance .
Use dd command to monitor the reading and writing performance of a disk device:
- Open a shell prompt.
- Or login to a remote server via ssh.
- Use the dd command to measure server throughput (write speed) dd if=/dev/zero of=/tmp/test1.img bs=1G count=1 oflag=dsync
- Use the dd command to measure server latency dd if=/dev/zero of=/tmp/test2.img bs=512 count=1000 oflag=dsync
The dd command is useful to find out simple sequential I/O performance.
Understanding dd command options
In this example, I’m using RAID-10 (Adaptec 5405Z with SAS SSD) array running on a Ubuntu Linux 14.04 LTS server. The basic syntax is as follows to find out server throughput:
Fig.01: Ubuntu Linux Server with RAID10 and testing server throughput with dd
Finding server latency time
In this example, 512 bytes were written one thousand times to get RAID10 server latency time:
Please note that server throughput and latency time depends upon server/application load too. So I recommend that you run these tests on a newly rebooted server as well as peak time to get better idea about your workload. You can now compare these numbers with all your devices.
But why the server throughput and latency time are so low?
Low values does not mean you are using slow hardware. The value can be low because of the HARDWARE RAID10 controller’s cache.
Use hdparm command to see buffered and cached disk read speed
I suggest you run the following commands 2 or 3 times Perform timings of device reads for benchmark and comparison purposes:
To perform timings of cache reads for benchmark and comparison purposes again run the following command 2-3 times (note the -T option):
- No ads and tracking
- In-depth guides for developers and sysadmins at Opensourceflare✨
- Join my Patreon to support independent content creators and start reading latest guides:
- How to set up Redis sentinel cluster on Ubuntu or Debian Linux
- How To Set Up SSH Keys With YubiKey as two-factor authentication (U2F/FIDO2)
- How to set up Mariadb Galera cluster on Ubuntu or Debian Linux
- A podman tutorial for beginners – part I (run Linux containers without Docker and in daemonless mode)
- How to protect Linux against rogue USB devices using USBGuard
Join Patreon ➔
OR combine both tests:
Fig.02: Linux hdparm command to test reading and caching disk performance
Use dd command on Linux to test read speed
To get accurate read test data, first discard caches before testing by running the following commands:
Linux Laptop example
Run the following command:
Apple OS X Unix (Macbook pro) example
GNU dd has many more options but OS X/BSD and Unix-like dd command need to run as follows to test real disk I/O and not memory add sync option as follows:
So I’m getting 635346520 bytes (635.347 MB/s) write speed on my MBP.
Not a fan of the command line tools…?
You can use disk utility (gnome-disk-utility) on a Linux or Unix based system to get the same information. The following screenshot is taken from my Fedora Linux v22 VM and Ubuntu 20.04 desktop:
Graphical method
Click on the “Activities” or press the “Super” key to switch between the Activities overview and desktop. Type “Disks”
Fig.03: Start the Gnome disk utility
Fig.04: Benchmark disk/partition
Fig.05: Final benchmark result
Running Disks tool under Ubuntu 20.04 LTS:
- First, open Disks from the Activities overview.
- Next choose the disk from the list in the left pane.
- Select the menu button and select Benchmark disk… from the menu.
- Click Start Benchmark… and adjust the Transfer Rate and Access Time parameters as desired.
- Finally click Start Benchmarking to test how fast data can be read from the disk. Administrative privileges may be required. Enter your password, or the password for the requested system administrator account.
Test the performance of your hard disk using ‘Disks’
Which method and command do you recommend to use to test disk I/O performance?
- I recommend dd command on all Unix-like systems ( time sh -c «dd if=/dev/zero of=/tmp/testfile bs=100k count=1k && sync»
- If you are using GNU/Linux use the dd command ( dd if=/dev/zero of=/tmp/testALT.img bs=1G count=1 conv=fdatasync )
- Make sure you adjust count and bs arguments as per your setup to get a good set of result.
- The GUI method is recommended only for Linux/Unix laptop users running Gnome 2 or 3 desktop.
- For detailed I/O performance benchmarking use the fio command
- We use the IOzone. It is a filesystem benchmark tool. The benchmark generates and measures a variety of file operations.
Conclusion
You learned how to use the dd under Linux or Unix for testing simple and sequential I/O performance measurement. For detailed I/O performance benchmarking try the «The Flexible I/O Tester (FIO)» for Unix or Linux. See How To Linux Check IDE / SATA Hard Disk Transfer Speed and man pages: hdparm(1) for more information.
🐧 Get the latest tutorials on Linux, Open Source & DevOps via
| Category | List of Unix and Linux commands |
|---|---|
| Documentation | help • mandb • man • pinfo |
| Disk space analyzers | df • duf • ncdu • pydf |
| File Management | cat • cp • less • mkdir • more • tree |
| Firewall | Alpine Awall • CentOS 8 • OpenSUSE • RHEL 8 • Ubuntu 16.04 • Ubuntu 18.04 • Ubuntu 20.04 |
| Linux Desktop Apps | Skype • Spotify • VLC 3 |
| Modern utilities | bat • exa |
| Network Utilities | NetHogs • dig • host • ip • nmap |
| OpenVPN | CentOS 7 • CentOS 8 • Debian 10 • Debian 8/9 • Ubuntu 18.04 • Ubuntu 20.04 |
| Package Manager | apk • apt |
| Processes Management | bg • chroot • cron • disown • fg • glances • gtop • jobs • killall • kill • pidof • pstree • pwdx • time • vtop |
| Searching | ag • grep • whereis • which |
| Shell builtins | compgen • echo • printf |
| Text processing | cut • rev |
| User Information | groups • id • lastcomm • last • lid/libuser-lid • logname • members • users • whoami • who • w |
| WireGuard VPN | Alpine • CentOS 8 • Debian 10 • Firewall • Ubuntu 20.04 |
Comments on this entry are closed.
looking at that strange uneven graph I think that Virtualbox can be blamed maybe? ,, but the numbers are impresive nevertheless 🙂 Thanks for great post
Hi,
Very useful article
Thanks a lot
As a file system developer, I believe there should be a special place in hell for people who test storage performance using dd. At its very best, it tells you about one rarely-relevant kind of performance – sequential single-stream write bandwidth. It won’t reveal anything about performance with multiple threads or deeper queues, latency, variability, etc. “I tested with dd and it was
Agreed but dd is still a good place to start.
AGREEED. and that place will be full of “DD peoples” thinking why they are there!
This type of dd checks are useless… if you do it, in 99% of cases you will see a wonderfull timings and you finish thinking why you still having poor performace in your app or service…
DO NOT USE DD if you want REAL data of I/O or FILE benchmarks! USE FIO!
Not if you’re shuffling around mainly large files, like multimedia, one at a time (like a file manager will for a mechanical HDD). I very much care for this use case and I’m almost sure that DD approximates this well with file sizes that are >2 GB.
JDarcy, you are an idiot. Seriously? Are you “that” upset.
Источник


