- Восстановление удаленных файлов в Linux с помощью TestDisk
- Шаг 1: Создание файла журнала данных TestDisk
- Шаг 2: Выбор диска для восстановления
- Шаг 3: Выбор типа таблицы разделов
- Шаг 4. Выбор раздела диска с удаленным исходным файлом
- Шаг 5: Проверка каталога с удаленным исходным файлом
- Шаг 6: Восстановление удаленного файла
- Шаг 7: Вставка восстановленного файла в каталог
- How to Recover Deleted Files Using TestDisk in Linux
- Step 1: Creating TestDisk Data Log File
- Step 2: Choose Your Recovery Drive
- Step 3: Selecting the Partition Table Type
- Step 4: Select the Deleted File Source Drive Partition
- Step 5: Check the Deleted File Source Directory
- Step 6: Restore Deleted File in Linux
- Step 7: Paste the Recovered File to Directory
- If You Appreciate What We Do Here On TecMint, You Should Consider:
- How to Install and Use TestDisk Data Recovery Tool in Linux
- What Can TestDisk do?
- How to Install TestDisk on Linux
- Install TestDisk on Debian and Ubuntu
- Install TestDisk on RHEL and CentOS
- Install TestDisk on Fedora and Arch Linux
- How to Run and Use TestDisk in Linux
- If You Appreciate What We Do Here On TecMint, You Should Consider:
- Related Posts
- 10 thoughts on “How to Install and Use TestDisk Data Recovery Tool in Linux”
Восстановление удаленных файлов в Linux с помощью TestDisk
Оригинал: How to Recover Deleted Files Using TestDisk in Linux
Автор: James Kiarie
Дата публикации: 13 сентября 2019 года
Перевод: А. Кривошей
Дата перевода: ноябрь 2019 г.
Все мы знаем, что такое искать файл, и не найти его даже в корзине. Проблемы, связанные с потерей файлов и данных, можно попытаься решить с помощью TestDisk — бесплатной программе с открытым исходным кодом, которая изначально была разработана для восстановления разделов и решения проблем с загрузкой системы. Она хорошо подходит для восстановления данных из разделов, которые повреждены человеческими ошибками или вирусами.
В этой статье мы покажем вам, как восстанавливать удаленные файлы в Linux с помощью утилиты восстановления данных TestDisk. Чтобы установить testdisk в вашей системе Linux, вы можете использовать нашу статью: How to Install and Use TestDisk Data Recovery Tool in Linux.
Установив TestDisk в Linux, вы можете проверить его версию с помощью команды:
Отлично! Это подтверждает, что мы успешно установили testdisk.
Шаг 1: Создание файла журнала данных TestDisk
Чтобы восстановить удаленные файлы, сначала необходимо создать файл testdisk.log, так как данные журнала важны, поскольку содержат полезную информацию для восстановления ваших данных позже.
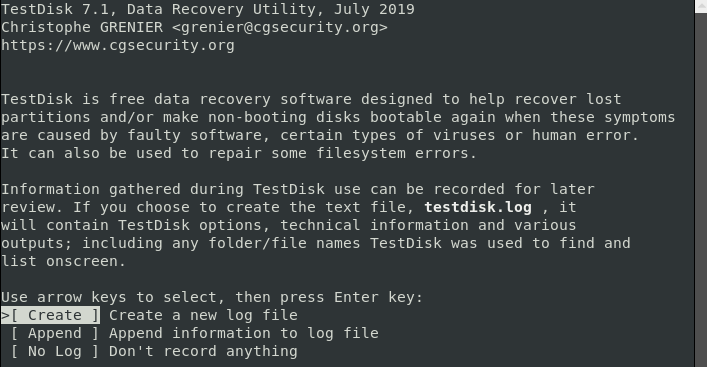
Экран описания утилиты имеет три опции, подробно описанные ниже:
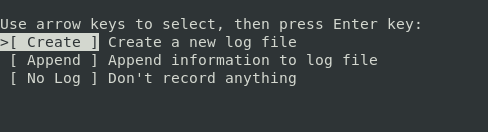
Create — опция позволяет создавать новый лог-файл.
Append — эта опция позволяет вам добавить дополнительную информацию в отчет за предыдущие сессии.
No log — выберите этот вариант, если вы не хотите записывать журналы для последующего использования.
Примечание. Утилита Testdisk удобна для начинающих, она предлагает варианты по параметрам на каждом экране. Выберите рекомендуемые параметры (выделено). Ниажимайте клавиши со стрелками, чтобы переключаться между различными вариантами.
Выберите опцию «Create», так как нам нужно создать новый файл журнала. В зависимости от настроек безопасности системы компьютер может запросить пароль sudo для продолжения восстановления.
Шаг 2: Выбор диска для восстановления
Testdisk отобразит диски, подключенные к вашей системе. Система отображает общий объем памяти каждого диска и его свободное пространство. Выберите диск, на котором хранится ваш файл, затем используйте клавиши со стрелками для навигации и выберите «Proceed». Далее нажмите клавишу ENTER. В данном случае это внешняя флешка на /dev/sdb.
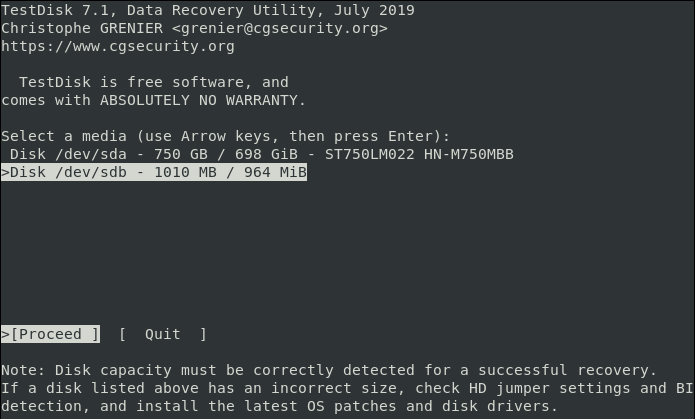
В зависимости от разрешений безопасности ваша система может не отображать некоторые диски. В таких случаях кликните «Sudo option», которая находится рядом с опциями «Proceed» и «Quit».
Откройте Sudo и введите свой пароль. После успешной проверки пароля система отобразит все подключенные диски с их характеристиками.
Шаг 3: Выбор типа таблицы разделов
После выбора диска следующая задача — определить правильную таблицу разделов. Новичкам может быть сложно определить правильный тип таблицы разделов, но вам не нужно беспокоиться об этом. Система автоматически предскажет и выделит лучший выбор.
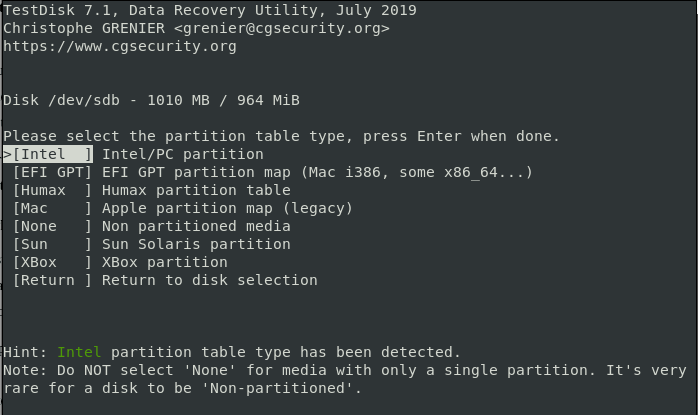
Далее, кликните ‘ENTER‘ для продолжения.
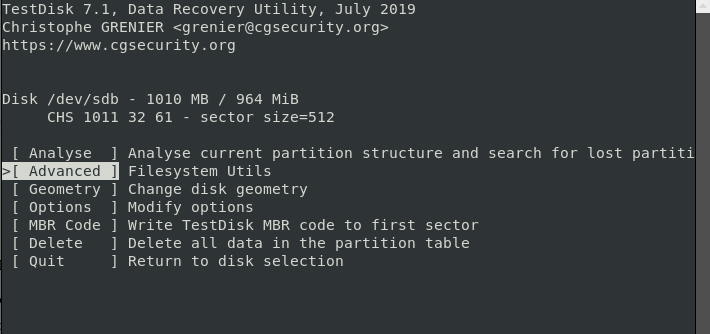
После указания правильного диска и типа раздела в следующем окне отобразится список опций восстановления. Вы можете выбрать любую из опций на экране в зависимости от ваших предпочтений. Поскольку мы восстанавливаем удаленный файл, мы выберем опцию «Advanced».
Шаг 4. Выбор раздела диска с удаленным исходным файлом
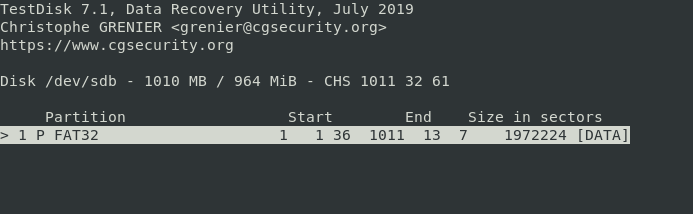
Экран на скриншоте позволяет вам выбрать раздел, если на вашем компьютере их много. Выберите нужный и нажмите ‘ENTER‘, чтобы продолжить. В данном случае я использую съемную флешку только с 1 разделом FAT32.
Шаг 5: Проверка каталога с удаленным исходным файлом
После того, как утилита отобразит системные каталоги для всех разделов, перейдите к тому каталогу, в котором вы потеряли или удалили свой файл. Например, если ваш файл был сохранен в каталоге «Documents», перейдите на вкладку «Documents».
Совет: используйте стрелку «назад», чтобы вернуться туда, где вы потеряли свои файлы.
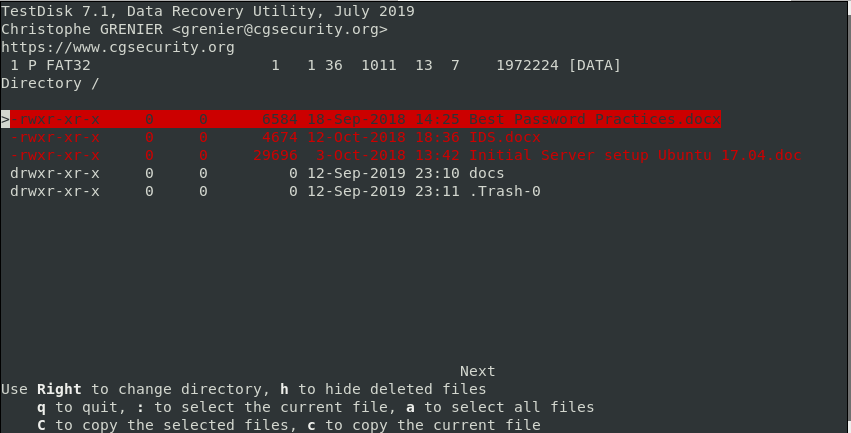
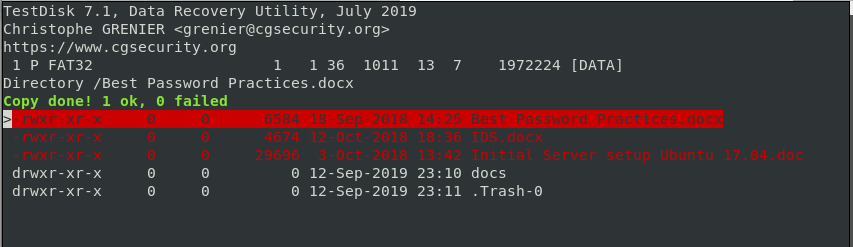
После перехода в исходный каталог вы найдете удаленные файлы, выделенные красным цветом. Найдите файл в раскрывающемся списке и выделите его.
Шаг 6: Восстановление удаленного файла
Скопируйте файл, который вы хотите восстановить, нажав клавишу «c» на клавиатуре. На предыдущем скриншоте удаленный файл, который я хочу восстановить, называется «Best Password Practices.docx».
Чтобы скопировать файл, просто нажмите букву «c» на клавиатуре.
Шаг 7: Вставка восстановленного файла в каталог
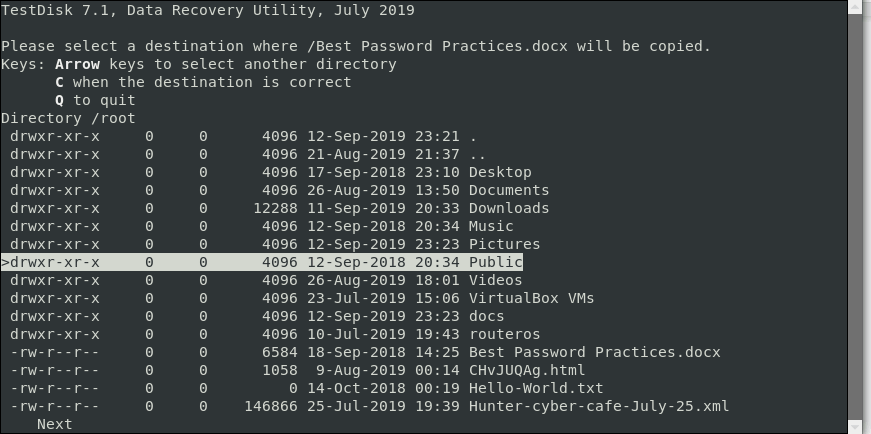
Затем утилита Testdisk отобразит список мест, в которые вы можете вставить скопированный файл, чтобы восстановить его. Опять же, выберите пункт назначения с помощью прокрутки и, как и прежде, нажмите «C», чтобы вставить его. В моем случае файл копируется в каталог «Public».
Если все прошло хорошо, вы должны получить уведомление, что файлы были успешно скопированы.
Чтобы выйти из утилиты Testdisk, выберите «Quit» и нажмите ENTER. Это вернет вас к предыдущему экрану. Выберите «Quit» и нажмите ENTER. Опять же, вы вернетесь назад и, как и прежде, выберите «Quit» и нажмите ENTER, чтобы полностью выйти из TestDisk.
Так вы можете восстановить удаленный файл в Linux с помощью утилиты testdisk. Если вы случайно удалите файл в своей системе, не паникуйте, testdisk придет вам на помощь.
Источник
How to Recover Deleted Files Using TestDisk in Linux
We all know the feeling of looking for a file and not finding it, even in the trash. The trauma that comes with file and data loss should end thanks to the TestDisk – is a free, open-source software that was initially designed for recovering memory partitions and making non-bootable disks bootable again. It is useful for recovering data from partitions that are caused by human errors or viruses.
In this article, we will show you how to recover deleted files in Linux using the TestDisk data recovery tool. To use testdisk, you must have TestDisk installed on your Linux system using our article: How to Install and Use TestDisk Data Recovery Tool in Linux.
Once you’ve TestDisk installed on your Linux, you can verify the version of testdisk using the command.
Sample Output
Great! This confirms that we have successfully installed testdisk. Now proceed further to learn how to recover deleted files in Linux.
Step 1: Creating TestDisk Data Log File
To recover deleted files, first you need to create a testdisk.log file, as this log data is essential as it contains useful information for recovering your data later.
![]() Create TestDisk Data Log File
Create TestDisk Data Log File
The utility description screen has three options mentioned in detail below:
Create
create
- ” option allows you to create a new log file.
Note: The Testdisk utility tool is beginner-friendly; it offers suggestions to the options on each screen. Choose the recommended options (highlighted). Press up and arrow keys to switch between the different options.
Select the ‘Create’ option as we need to create a new log file. Depending on the system security, the computer might prompt for sudo password to proceed with the recovery.
![]() Create New Log File
Create New Log File
Step 2: Choose Your Recovery Drive
Testdisk will then display the disks attached to your system. The system displays each drive’s total storage space and its free space. Choose the drive where your file is stored then use the right and left arrow keys to navigate and select ‘Proceed‘. Next, press the ENTER button. In this case, the drive is an external flash drive labelled /dev/sdb .
![]() Select Recovery Drive
Select Recovery Drive
Depending on the security permissions, your system may not display some drives. For such cases, click the “Sudo option”, which is beside the Proceed and Quit options.
Open the Sudo and enter your password. After successful password verification, the system will display all attached drives with their specs.
Step 3: Selecting the Partition Table Type
After selecting your drive, the next task is to identify the correct partition table. For beginners, it can be hard to identify the correct partition table type but you need not worry about this. The system will automatically predict and highlight the best choice.
![]() Select Partition Table
Select Partition Table
Next, click ‘ENTER‘ to continue.
After indicating the correct drive and the partition type, the next screen window displays a list of recovery options. You can select any of the options from the screen depending on your preferences. Because we are recovering a deleted file, we will select the ‘Advanced’ option.
![]() Advance File Recovery Options
Advance File Recovery Options
Step 4: Select the Deleted File Source Drive Partition
The screen in our picture allows you to choose the partition if your computer has many. Select your choice and hit ‘ENTER‘ to proceed. In this case, I’m using a removable flash drive with only 1 FAT32 partition.
![]() Select Deleted File Partition
Select Deleted File Partition
Step 5: Check the Deleted File Source Directory
After the utility displays the system directories for all partitions, navigate to the specific directory you lost or deleted your file. For instance, if your file was saved in the “Documents” file, navigate to the Documents tab.
![]() Select Deleted Source Directory
Select Deleted Source Directory
Tip: use the “back” arrow to navigate back to where you lost your files.
After navigating to the source directory, you will find the deleted files highlighted in red. Browse your file from the drop-down list and highlight or check it.
Step 6: Restore Deleted File in Linux
Copy the file you want to restore by pressing the letter c on your keyboard. In the previous image, the deleted file that I want to restore is called Best Password Practices.docx.
To copy the file, simply press the letter c on the keyboard.
Step 7: Paste the Recovered File to Directory
Testdisk utility will then display a list of locations that you can paste your copied file in order to recover it. Again, select the destination by scrolling and just like before, press C to paste it. In this case, the file is copied into the Public directory.
![]() Recover Deleted File in Linux
Recover Deleted File in Linux
If all went well, you should get a notification below that the files were successfully copied.
![]() Recovered Deleted File
Recovered Deleted File
To exit from Testdisk utility, select Quit, and press ENTER. This will take you back to the previous screen. Select Quit and press ENTER. Again, this takes you back and just like before, select Quit and press ENTER to exit completely from TestDisk.
And that’s how you can recover a deleted file in Linux using the testdisk utility tool. If you ever accidentally delete a file on your system, don’t panic, testdisk will come to your rescue.
If You Appreciate What We Do Here On TecMint, You Should Consider:
TecMint is the fastest growing and most trusted community site for any kind of Linux Articles, Guides and Books on the web. Millions of people visit TecMint! to search or browse the thousands of published articles available FREELY to all.
If you like what you are reading, please consider buying us a coffee ( or 2 ) as a token of appreciation.

We are thankful for your never ending support.
Источник
How to Install and Use TestDisk Data Recovery Tool in Linux
TestDisk is a free and opensource, command-line data recovery tool that is used to recover data from deleted or lost partitions. Further, you can use it to revive non-bootable partitions which can be caused by factors such as accidental deletion of partition tables, and malware attacks to mention a few.
The command-line software was written in C programming languages by Christophe Granier and licensed under the GNU/GPLv2 license. TestDisk is a cross-platform tool and runs on almost any desktop operating system: Linux, Windows, macOS, FreeBSD, OpenBSD, and even NetBSD.
What Can TestDisk do?
TestDisk is a powerful, and lightweight software tool that comes with a myriad of data recovery applications as outlined below:
- TestDisk is able to repair a corrupt or damaged partition table.
- It can seamlessly recover a deleted disk partition.
- It restores files from Windows filesystems such as NTFS, FAT, FAT32, exFAT and ext2 Linux filesystem.
- It can copy files from deleted or corrupt Windows filesystems such as NTFS, FAT32, and exFAT and Linux partitions (ext2, ext3, and ext4).
- TestDisk can recover and rebuild the NTFS, FAT32 and FAT16 boot sectors from their backups.
- TestDisk can also repair corrupt FAT32 tables as well as the MFT by riding with the help of the MFT mirror.
In this article, we will show you how to install the TestDisk data recovery utility to recover an unbootable partition on Linux.
How to Install TestDisk on Linux
The package TestDisk is available to install from the default system repositories in most Linux distribution using the default package manager as shown.
Install TestDisk on Debian and Ubuntu
To start off, update the system packages and install TestDisk as shown.
![]() Install Testdisk on Ubuntu and Debian
Install Testdisk on Ubuntu and Debian
To verify that Testdisk is installed and display more information by running the following dpkg command.
![]() Verify TestDisk on Ubuntu
Verify TestDisk on Ubuntu
Install TestDisk on RHEL and CentOS
To install TestDisk, first, enable EPEL repository and then install TestDisk as shown.
![]() Install TestDisk on CentOS and RHEL
Install TestDisk on CentOS and RHEL
To verify that Testdisk is installed and display more information about the TestDisk tool run the following rpm command.
![]() Verify TestDisk on CentOS
Verify TestDisk on CentOS
Install TestDisk on Fedora and Arch Linux
For Fedora systems run.
For Arch Linux run:
If no suitable package is found for your Linux distribution, download TestDisk from its official site.
How to Run and Use TestDisk in Linux
Since testdisk is run from the command line, run the command below to display the partitions on your system.
![]() TeskDisk Check Partitions
TeskDisk Check Partitions
Now, assume your Linux partition table is lost or corrupt. To restore the Linux partition using TestDisk first run.
![]() Run TestDisk on Linux
Run TestDisk on Linux
Select ‘Create‘ and hit ENTER. This will display a list of partitions to choose from. In your case, your partitions will be different from what is displayed below.
![]() TestDisk Select Partition
TestDisk Select Partition
Next, select the ‘Proceed‘ at the bottom to go on to the next options.
![]() Proceed to Recover Partition
Proceed to Recover Partition
Your system will automatically detect the partition table type you are using. In my case, it is ‘Intel‘. Hit ENTER to continue.
![]() TestDisk Select Partition Table
TestDisk Select Partition Table
In the next section, select the ‘Analyse‘ option for the testdisk utility to probe your partition structure.
![]() TestDisk Analyze Partition
TestDisk Analyze Partition
If No bootable partition is found on the Disk, the error below will be printed.
Select ‘Proceed‘ option.
A list of available partitions will be displayed on the next screen. Hit ‘ENTER‘ to continue to the next screen.
Select the ‘write‘ option on the next screen. This option will trigger TestDisk to write on the partition table.
Next, press Y to confirm as shown below.
TestDsk will prompt you to reboot your system for the changes to take effect.
Select the OK option.
On the next screen select ‘Quit‘ to leave the menu and finally select ‘Quit‘ again to exit the TestDisk program.
All you have to do now is to reboot your system. If all went well, the new partition table should allow the system to boot normally.
Conclusion
TeskDisk is an ideal tool when you want to unerase data from corrupt partitions or revive unbootable partitions and get them to boot as expected. It supports a vast range of file systems and can work in any operating system: from Windows to Linux.
In this guide we illustrated how to recover an unbootable partition using TestDisk, however, the tool can be used for so much more!
If You Appreciate What We Do Here On TecMint, You Should Consider:
TecMint is the fastest growing and most trusted community site for any kind of Linux Articles, Guides and Books on the web. Millions of people visit TecMint! to search or browse the thousands of published articles available FREELY to all.
If you like what you are reading, please consider buying us a coffee ( or 2 ) as a token of appreciation.
We are thankful for your never ending support.
Related Posts
![]()
![]()
10 thoughts on “How to Install and Use TestDisk Data Recovery Tool in Linux”
I intended to work exclusively with /dev/sdb (the second drive attached to my MSI PC which has a complicated layout with GRUB2 installed) and I was using “fdisk“. I think it might be a great idea to have a lock option on “fdisk” to restrict the write/save things to a specific drive unless you know for sure where you are writing the new partition layout.
I had been working on a recovery operation for several hours – when I made my mistake. So I removed the USB disk drive and plugged in a spare device – 256 GB SAMSUNG.
I was able to install the PenDrive software on it. The PenDrive installation software only runs under Windows but the resulting PenDrive is then bootable and supports whatever you have installed (by a selection tree).
There is a wide selection of things you can install from the internet. So I installed “Hirens” and “LXLE” and I am now writing this using the LINUX LXLE installed on my PenDrive
I did the install using the “apt” admin toolset as LXLE supports the “apt” command set. The system was able to download the “universe” if it was not installed earlier.
It needed to run ‘apt update‘ before you could run ‘apt install testdisk‘.
Right now I’m using SeaMonkey to browse the internet. The terminal service is called “Sakura“. Testdisk is running Analysis and is up to about 20% in its search. If I lose the whole drive due to this big MISTAKE I will learn from it, and backup ALL the drives partition layouts before I start FIXING things.
In SUMMARY – it was my mistake on my machine while working on producing a PenDrive on that USB3.1 SAMSUNG 256GB.
The USB backup solution would have been “so easy” to recover – I lost time and I lost my pride, but I keep learning.
![]()
To verify that Testdisk is installed and display more information by running the following dpkg command.
You need a space between dpkg and -l .
Thanks, corrected the command in the article..
![]()
Using “Synaptic Package Manager,” Testdisk installed very easily onto Debian 9. It was in the database.
![]()
If it “requires no installation whatsoever”, why all the installation instructions? Your article “How to Recover Deleted Files Using TestDisk in Linux” specifically instructs the user to use this article as a guide to INSTALL TestDisk before attempting to undelete lost files.
Источник


