- A Complete Guide For Installing TFTP Server In CentOS 7
- 1. Install tftp-server
- 2. Enable TFTP Service
- 3. Configure SELinux
- 4. Configure firewalld
- Русские Блоги
- linux centos установить и настроить tftp-сервер
- Установка tftp сервера на CentOS 8 или RedHat 8
- ITalchemy – Pick my brain
- Python, Cisco, Linux, VMware, Microsoft and IT Labs
- 3. Install and configure TFTP server in Red Hat/Centos 7.5 Linux
- Installing and Configuring TFTP Server on CentOS 7
- Installing and Configuring TFTP Server:
- Known Issues:
A Complete Guide For Installing TFTP Server In CentOS 7
Since CentOS 7(or RedHat 7) is quite different from CentOS 6.x, most notes online for installing TFTP server in CentOS are obsolete already. This post not only summarizes the procedure of installing & configuring TFTP server, but also introduces a general strategy of configuring network services in CentOS 7.
1. Install tftp-server
TFTP server can be installed using following command, where xinetd is necessary.
Then edit /etc/xinetd.d/tftp — set disable to no and add -c option into server_args if you need to upload files to TFTP server from client.
In the above config file, the default TFTP root directory is set to /tftpboot/ . So you need to create it before starting TFTP server:
2. Enable TFTP Service
The CentOS 7 services( systemd ) can be configured from files under /usr/lib/systemd/system/ . Go to this dir, and edit tftp.service as follows:
If the default tftp.service doesn’t have the [Install] unit, add it as above, because it’s required by systemd . Besides, the tftpd options also need to be changed in the ExecStart entry.
Then start services xinetd and tftp :
Command systemctl enable xxxx creates permanent link to services. So that services can be automatically started after reboot.
Although service commands are deprecated in CentOS 7, they are still available but simply redirected to systemctl . So you still can use service xinetd start and service tftp start to start xinetd and TFTP.
3. Configure SELinux
In CentOS 7, the SELinux is not supposed to be disabled(the system will abort booting if you disable SELinux). So the TFTP read and write must be allowed in SELinux. By default, the SELinux uses enforcing policy, which does not accept any change. To make any change to SELinux, first modify /etc/selinux/config and change the policy to permissive :
Then reboot the system. After system boot up, check SELinux status:
Then check the tftp permissions in SELinux:
If the TFTP write is off as shown above, enable it with setsebool command:
Above changes to SELinux are permanent, so no need to change any SELinux config files any more.
4. Configure firewalld
Unlike CentOS 6.x, the firewalld is used to replace iptables as default firewall in CentOS 7. Fortunately, iptable config file /etc/sysconfig/iptables is also used by firewalld . So to allow TFTP services, following line should be added to /etc/sysconfig/iptables
To allow TFTP port in firewalld , run command
To allow TFTP service:
Where the —permanent option is used to permanently enable the TFTP port.
Then restart firewalld using command firewall-cmd —reload . Actually this command is needed every time changing the firewall config.
To check the status or enable firewalld , following commands can be used:
Источник
Русские Блоги
linux centos установить и настроить tftp-сервер
Система ПК: Win7 Виртуальная машина Linux система: centosx86
1. Введение в tftp
TFTP (Trivial File Transfer Protocol, простой протокол передачи файлов) — это протокол в наборе протоколов TCP / IP для простой передачи файлов между клиентом и сервером, обеспечивающий несложные и недорогие услуги передачи файлов. Номер порта 69.
TFTP — это простой протокол для передачи файлов, реализованный на основе протокола UDP, но мы не можем быть уверены, что некоторые протоколы TFTP основаны на других протоколах передачи. Этот протокол предназначен для передачи небольших файлов. Следовательно, он не имеет многих функций обычного FTP. Он может только получать или записывать файлы с файлового сервера, не может перечислять каталоги и не выполняет аутентификацию. Он передает 8-битные данные.
При разработке встроенных систем tftp-сервер часто используется для загрузки файлов на плату разработки через каталог tftp ПК-сервера, который будет записан или запущен. Операция удобна, а скорость также приемлема.
2. Установка tftp под linux
Сначала проверьте, установлен ли в системе программный пакет tftp:
]$ rpm -qa | grep tftp
tftp-server-0.49-8.el6.i686
Если установка не отображается, используйте для установки sudo yum install -y tftp-server.
3. Создайте основной рабочий каталог службы tftp.
Используйте команду mkdir для создания основного рабочего каталога tftp (этот каталог используется для хранения файлов, передаваемых между хостом и целевой машиной при использовании tftp)

4. Настроить tftp
Служба tftp в Linux устанавливается xinetd (и другими службами, такими как openbsd-inetd), а tftp по умолчанию отключен. Поэтому измените файл конфигурации tftp и включите службу tftp.
Файл конфигурации tftp находится в /etc/xinetd.d/tftp:
Примечание: измените элемент server_args = -s
может быть изменен на корневой каталог вашего tftp-сервера, параметр -s указывает chroot, а -c указывает, что файл может быть создан.
5. Включите службу xinetd.
Используйте команду: sudo service xinetd restart, чтобы изменения вступили в силу.

Используйте команду netstat, чтобы просмотреть порт 69 и убедиться, что служба tftp включена.

Если появляется udp 0 0 0.0.0.0:69 0.0.0.0:* 3092 /, запуск прошел успешно.
6. Изменение политики SeLinux
Если SeLinux останется включенным, система может заблокировать загрузку tftp-клиента. Вы можете временно отключить его:
] $ sudo setenforce 0 # Здесь 0 означает установить SeLinux в разрешающий режим, 1 означает установить SeLinux в принудительный режим
Вы можете использовать команду getenforce для просмотра статуса SeLinux
Если вы хотите полностью отключить SeLinux, измените его файл конфигурации, чтобы отключить его.
7. Изменение политики межсетевого экрана.
Если брандмауэр включен, загрузка клиента tftp может быть заблокирована.Мы можем включить tftp в правилах брандмауэра, и нужно только включить порт 69, используемый tftp.
Просмотр статуса брандмауэра
Если вы хотите, чтобы брандмауэр не запускался при запуске системы, мы можем использовать ntsysv для отключения службы брандмауэра, и в то же время вы также можете настроить включение службы tftp при запуске системы.
8. Проверьте работу tftp-сервера на этом компьютере.
Сначала создайте файл в корневом каталоге tftp, который вы настроили ранее. Моя собственная — создать файл с vim tt.c в / home / zzx / tftp / и написать «привет, zzx!» Используйте ifconfig для просмотра локального IP-адреса. адрес

Войдите в командный режим tftp с помощью команды tftp 192.168.127.128, введите команду help, чтобы просмотреть команды, поддерживаемые tftp, и используйте команду get tt.c, чтобы загрузить файл tt.c в / home / zzx / tftp в текущий каталог (мой текущий В каталоге / home / zzx /), используйте команду ls, чтобы проверить, существует ли tt.c в текущем каталоге, и используйте cat tt.c для проверки содержимого tt.c


1. Нет команды tftp!

Решение: пакет сервера tftp установлен, но пакет команд tftp не установлен
Используйте команду sudo yum install -y tftp для установки
После установки у меня следующее

Примечание: если версии tftp и tftp сервера совпадают!
2. Используйте tftp, чтобы получить тайм-аут.

Решение: оказалось, что мой предыдущий SeLinux настроен неправильно, и приведенная выше конфигурация является правильной.
Источник
Установка tftp сервера на CentOS 8 или RedHat 8
Сегодня статья будет маленькая. Вообще, на мой взгляд всё довольно просто, но поскольку CentOS8 вышел недавно, гайдов на него мало, а конкретно про tftp под CentOS я видел в Интернете много откровенно вредных советов, поэтому постараюсь задать трэнд на исправление ситуации прямо с момента выхода новой версии. Итак, приступим (к набору тёх жалких пяти команд, которые нам нужны). Для начала установим все требующиеся пакеты:
Теперь создадим (или исправим) файл конфигурации xinetd так, чтобы он запускал сервер tftp при обращении к соответствующему порту, это можно делать через стандартный редактор vi, через nano, который большинству людей привычнее или через vim, отличающийся от входящего в состав системы по умолчанию vi тем, что имеет более широкий функционал, включая подсветку синтаксиса. Я предпочитаю последний пункт, поэтому последним словом в приведенной выше команде был именно этот редактор. Если кого-то устраивают имеющиеся в системе редакторы, vim можно не ставить (хотя помимо использования дополнительных 60 МБ дискового пространства, хуже он тоже не сделает).
Тут надо перейти в режим вставки текста (набрать :set paste и ввод), потом редактирования (клавиша Insert на клавиатуре), потом выделить приведенный ниже конфигурационный файл, скопировать и вставить в окно терминала.
Когда будете редактировать текст конфига, обратите пожалуйста внимание на аргумент server_args. В конце строки задан путь к каталогу, где будут лежать файлы, отдаваемые по tftp. Поменяйте этот каталог на тот, который должен использоваться у вас. Также сразу хочу сказать, что на работу с этим каталогом надо будет настроить tftp сервер в SeLinux, конфигурации «по умолчанию» для tftp сервера в CentOS’е нет. Сейчас я про настройку SeLinux писать не буду, потому что потом как-нибудь подготовлю отдельную статью на эту тему.
Далее, нажать Esc, а потом «:wq» и ввод.
Теперь включаем сервер:
Да, вешать в автозагрузку tftpd не требуется, хоть это и не совсем очевидно.
Далее, надо проверить, что всё работает. Создаём какой-нибудь файл и пытаемся его скачать (я делал для популярного пути хранения файлов, если он у вас другой — измените его тут):
Если в консоли появилось слово «passed», значит сервер работает. Если из локальной сети он при этом будет не доступен — разбирайтесь с зонами в firewalld, мы сделали доступ для зоны public, не всем доступ к tftp нужен именно из неё.
Источник
ITalchemy – Pick my brain
Python, Cisco, Linux, VMware, Microsoft and IT Labs

3. Install and configure TFTP server in Red Hat/Centos 7.5 Linux
Step 1: Install, enable and start firewalld
sudo yum install firewalld
sudo systemctl enable firewalld ‘ExecStart’line as below:
sudo nano /usr/lib/systemd/system/tftp.service
ExecStart=/usr/sbin/in.tftpd -c -v -u tftp -p -U 117 -s /tftpdata
Step 7: Reload the system daemon & TFTP services
sudo systemctl daemon-reload
sudo systemctl start xinetd
sudo systemctl enable xinetd
sudo systemctl start tftp
sudo systemctl enable tftp
Step 8: Check UDP port 69 is in listening mode
netstat -na | grep udp6

Use ‘netstat –lu’ for all UDP listening ports/services

Use ‘netstat –ap | grep tftp’ to check the service.
Check that firewall is allowing udp port 69.
netstat –tupan | grep 69

Step 9: Check connection and download a demo.txt file. Using another server/router/switch. Download a demo.txt from TFTP server.
- On TFTP server (192.168.47.135), create demo.txt file under tftpdata directory.

- On another Linux host (IP: 192.168.47.131), download demo.txt file.

Now verification has been completed and you have a working TFTP server.
Источник
Installing and Configuring TFTP Server on CentOS 7
In this article, I am going to show you how to install and configure TFTP server on CentOS 7. So, let’s get started.
Installing and Configuring TFTP Server:
First, update the YUM package repository cache with the following command:

Now, install TFTP server and client packages with the following command:
NOTE: The TFTP client package tftp is installed to test the TFTP server after configuration.

Now, press y and then press to continue.
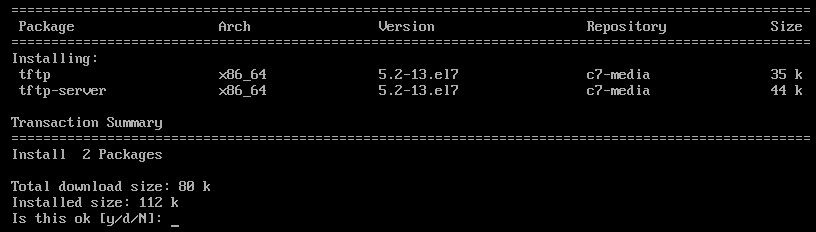
TFTP client and server packages should be installed.

TFTP uses systemd by default. But, it’s not a good idea to modify the default systemd service files. So, I am going to copy the systemd service files of tftp server to /etc/systemd/system directory just to be safe.
To copy the default tftp.service file to /etc/systemd/system directory, run the following command:

The new tftp service file is called tftp-server.service which we can modify as much as we want.

Also copy the tftp.socket file to /etc/systemd/system directory with the following command:

The new socket file is tftp-server.socket which we can work on.

Now, open the tftp-server.service file for editing with the following command:

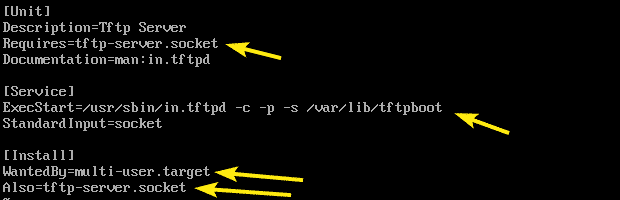
tftp-server.service file should be opened. Now, you have to modify the lines as marked in the screenshot below.
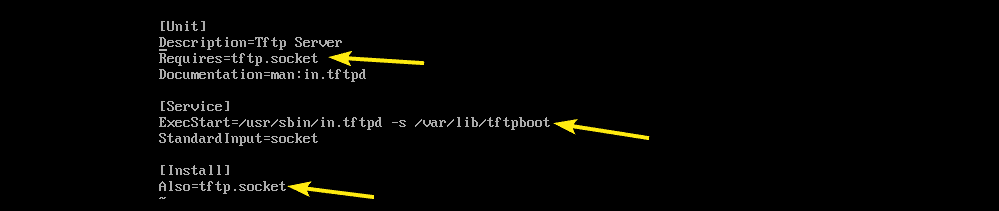
I replaced tftp.socket with tftp-server.socket. I also changed the command (ExecStart) that starts the TFTP daemon. The -c TFTP option will let you upload files to the server, the -p option will solve many of the permission issues, and the -s option sets /var/lib/tftpboot as the directory which you can access via TFTP.
Also add WantedBy=multi-user.target in the [Install] section as marked in the screenshot below.
This is the final tftp-server.socket file. Now, save the file.
Now, open the tftp-server.socket file for editing with the following command:

Now, add BindIPv6Only=both line in the [Socket] section as marked in the screenshot below and save the file.

In order to enable anonymous upload to the TFTP server, you need to do some SELinux configuration.
For SELinux configuration, install the policycoreutils-python package with the following command:

Now, press y and then press to continue.
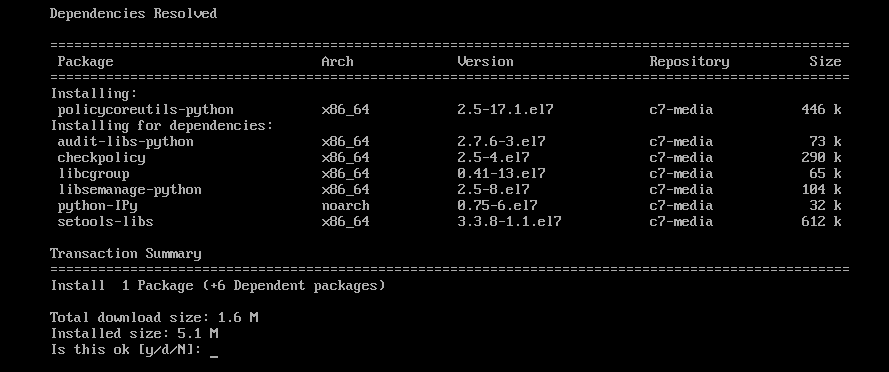
policycoreutils-python package should be installed.

Now, enable SELinux TFTP anonymous write with the following command:

The TFTP directory is /var/lib/tftpboot. It needs to have read, write and executable permission for the directory owner, group and others in order for TFTP upload and download to work. Otherwise, you will get permission error.
You can assign the required directory permissions to the /var/lib/tftpboot directory with the following command:

Now, try to start the tftp-server service with the following command:

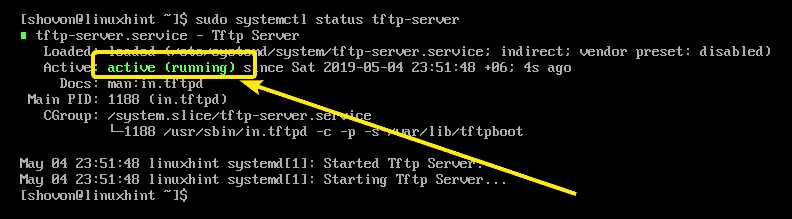
Now, check whether the tftp-server service is running with the following command:

As you can see, the service is active or running. So, TFTP should be configured correctly.
Now that TFTP service is running, we have to test the TFTP server to see whether it works or not.
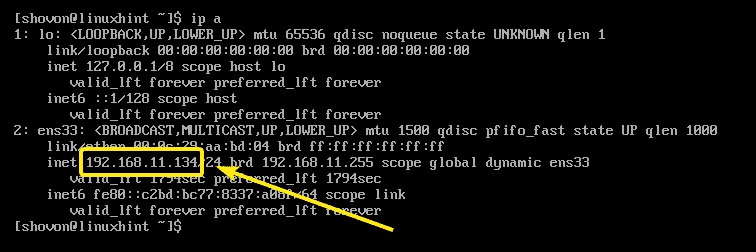
First, run the following command to find the IP address of your TFTP server.
As you can see, the IP address is 192.168.11.134. It will be different for you. So, make sure to replace it with yours from now on.
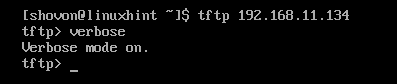
Now, connect to the TFTP server with the following command:

You should be connected.

Now, enable verbose mode as follows:
Now, try to upload a file (let’s say hello.txt) to the TFTP server as follows:
As you can see, the file is successfully uploaded to the TFTP server.

Now, exit out of the TFTP command prompt.

Now that everything is working correctly, add the tftp-server service to the system startup with the following command:

Now, configure firewalld firewall program to allow TFTP requests to the server with the following command:

Now, reload firewalld for the changes to take effect with the following command:

TFTP server should be configured.
Known Issues:
When you try to upload files to the TFTP server from your computer, you may see Transfer timed out error as marked in the screenshot below. This is a known issue on CentOS and RHEL systems. TFTP uses UDP port to communicate and for some reason the client firewall blocks it. This is the reason for this error.

To fix the problem, disable firewall on the client and try to upload the file again. It should work as you can see in the screenshot below.

So, that’s how you install and configure TFTP server on CentOS 7. Thanks for reading this article.
Источник


