- Установка TFTP сервера (tftpd) в Ubuntu Linux
- Установка сервера tftpd и службы openbsd-inetd
- Настройка tftpd
- Перезапуск службы inetd
- Проверка работы TFTP сервера, использование TFTP клиента
- Рука помощи
- 13.11.2017
- TFTP сервер на базе Ubuntu
- 1. Создание каталога для хранения данных tftp-сервера
- 2. Установка сервера
- 2.1 Установка tftpd-hpa
- 2.2 Установка atftpd
- 2.3 Установка и настройка tftpd
- 3. Устранение возможных проблем
- Заключение
- Ubuntu Documentation
- Introduction
- Installation
- Configuration
- Edit tftpd-hpa Configuration File
- Modify Permissions on TFTP Root Directory
- Restart the tftpd-hpa Service
- Additional Information
- External Links
- How To Install, Configure, and Run Linux Tftp Client?
- Install Tftp
- Ubuntu, Debian, Mint, Kali:
- Fedora, CentOS, RedHat:
- tftp Command Syntax
- tftp Command Help
- Connect TFTP Server From Command Line
- TFTP Server Command Line Interactive Shell
- Upload or Put File To The TFTP Server
- Download or Get File From TFTP Server
- Show TFTP Connection Status
- Disconnect From TFTP Server by Exiting From TFTP Shell
- Verbose Mode
- Installing and Configuring TFTP Server on Ubuntu
- Installing TFTP Server:
- Configuring TFTP Server:
- Testing TFTP Server:
Установка TFTP сервера (tftpd) в Ubuntu Linux
 TFTP — простой протокол для передачи файлов по сети, использует протокол UDP (по порту 69), не поддерживает аутентификацию и шифрование. TFTP часто используется для загрузки файлов (прошивок, конфигураций) на устройства (маршрутизаторы, мини-АТС и другие), но его можно использовать и для простой пересылки файлов по сети между компьютерами. Для Linux доступно несколько TFTP демонов (серверов): tftpd, atftpd, tftpd-hpa. Вы можете использовать любой из них. Я расскажу, как устанавливать tftpd.
Помимо tftpd нужно будет установить службу inetd. inetd — представляет собой сетевую службу, которая обрабатывает входящие соединения (TCP, UDP) и запускает соответствующую программу для обработки запроса. Я буду использовать службу openbsd-inetd. Есть еще служба xinetd, вы можете ее использовать, но настраивается она несколько иначе.
Установка сервера tftpd и службы openbsd-inetd
Установим сервер tftpd и openbsd-inetd, для этого выполним команду:
По завершении установки вы увидите сообщения вида:
Настройка tftpd
По умолчанию TFTP сервер настроен на использование директории /srv/tftp. Мы настроим TFTP сервер так, чтобы он использовал для работы директорию /tftpboot. В этой директории будут храниться файлы, которые мы можем скачать с сервера или же закачать в нее. Отредактируем файл /etc/inetd.conf.
В файле найдите строки вида:
Аргумент /srv/tftp команды in.tftpd указывает на каталог в котором будут храниться файлы TFTP сервера. Заменим /srv/tftp на /tftpboot.
Создадим директорию /tftpboot:
Изменим права доступа:
Перезапуск службы inetd
Чтобы новые настройки вступили в силу, перезапустим службу inetd:
На этом установка TFTP сервера завершена, проверим его работу.
Проверка работы TFTP сервера, использование TFTP клиента
Для начала установим TFTP клиент, чтобы можно было подключаться к TFTP северу. Для установки TFTP клиента выполните в терминале команду:
Теперь создадим на сервере в директории /tftpboot какой-нибудь файл, например, myfile. Для создания файла myfile и записи в него текста «This is my file» выполните в терминале команду:
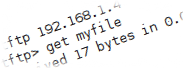
Теперь мы можем запустить TFTP клиент командой tftp. Команда tftp принимает в качестве параметра IP адрес сервера. Если вы запускаете клиент на локальном компьютере, то укажите IP адрес 127.0.0.1, если же на удаленном компьютере, то укажите IP адрес сервера.
Когда клиент запустится, вы попадете в режим ввода команд для клиента TFTP. Выполните команду get myfile, которая означает получить файл с именем myfile с сервера.
В случае, если вы все сделали правильно, файл myfile загрузится с TFTP сервера. Для выхода из TFTP клиента введите команду quit.
Источник
Рука помощи
13.11.2017
TFTP сервер на базе Ubuntu
TFTP – простой протокол передачи файлов. В нем, в отличии от FTP, отсутствует авторизация. Используется в большей части для загрузки обновлений и конфигураций в сетевые устройства. В моей практике широко используется в работе с коммутаторами, также известно, что ряд АТС и телефонных аппаратов требуют наличия TFTP сервера для проверки обновлений и получения конфигурации при загрузке.
Предлагаю рассмотреть развертывание TFTP сервера на базе Ubuntu с учетом того, чтобы была возможность изменять его файлы посредством обычного FTP.
В Ubuntu доступно несколько TFTP-серверов, рассмотрим установку и настройку tftpd-hpa, atftpd и tftpd. Работать одновременно на 69 порту они не могут, так что Вам необходимо выбрать, какой именно сервер будет использоваться или в конфигурации указывать номер порта для каждого сервиса.
1. Создание каталога для хранения данных tftp-сервера
Я предлагаю пойти довольно простым путем. Создать пользователя tftp и в его домашней директории создать каталог, с которым будет работать tftp-сервера. Это обеспечит доступ по FTP при условии, если у Вас установлен FTP-сервер
Добавляется пользователь «tftp» .
Добавляется новая группа «tftp» (1002) .
Добавляется новый пользователь «tftp» (1001) в группу «tftp» .
Создаётся домашний каталог «/home/tftp» .
Копирование файлов из «/etc/skel» .
Введите новый пароль UNIX:
Повторите ввод нового пароля UNIX:
passwd: password updated successfully
Changing the user information for tftp
Enter the new value, or press ENTER for the default
Full Name []: TFTP User
Данная информация корректна? [Y/n] y
# sudo mkdir /home/tftp/tftp
# sudo chown tftp:tftp /home/tftp/tftp/
Пароль, который Вы укажете при создании пользователя, в дальнейшем используется при доступе по FTP для пользователя tftp
2. Установка сервера
2.1 Установка tftpd-hpa
В файле /etc/default/tftpd-hpa изменяем путь к tftp-каталогу и опции работы. Пример файла конфигурации
TFTP_USERNAME=»tftp» #Имя нашего пользователя
TFTP_DIRECTORY=»/home/tftp/tftp» #Путь к каталогу
TFTP_ADDRESS=»:69″ # IP-адрес и порт на котором работает сервер
TFTP_OPTIONS=»—secure —create» #—create – дает возможность производить запись, если ее не указать возможно только чтение
Перезапускаем сервис, чтобы изменения вступили в силу
2.2 Установка atftpd
sudo touch /var/log/atftpd
Правим файл конфигурации /etc/default/atftpd на
OPTIONS=»—tftpd-timeout 300 —retry-timeout 5 —mcast-port 1758 —mcast-addr 239.239.239.0-255 —mcast-ttl 1 —maxthread 100 —verbose=5 —port 69 —user tftp –group tftp —logfile /var/log/atftpd /home/tftp/tftp»
И перезапускаем сервис
В примере конфигурационного файла указано ведение логов в файл /var/log/atftpd, если это Вам не нужно, уберите —logfile /var/log/atftpd
2.3 Установка и настройка tftpd
Это наиболее простой tftp-сервер, работает, как сервис inetd
В файле конфигурации /etc/inetd.conf
tftp dgram udp wait nobody /usr/sbin/tcpd /usr/sbin/in.tftpd /srv/tftp
tftp dgram udp wait tftp /usr/sbin/tcpd /usr/sbin/in.tftpd -s /home/tftp/tftp
Данный TFTP-сервер «умеет» только отдавать файлы, но не принимает их.
3. Устранение возможных проблем
Посмотреть сервис, который занимает порт tftp
Если при работе сервера возникают ошибки, возможно, проблемы с правами доступа к каталогу. Для исправления прав доступа выполните:
sudo chown -R tftp:tftp /home/tftp/tftp/ && chmod -R 666 /home/tftp/tftp/
Заключение
Для работы я предлагаю выбирать tftpd-hpa или atftpd, они имеют возможность «тонкой настройки», позволяя легко и быстро добиться нужного результата. В примере настроек, описанных выше, Вы сможете, как получать файлы, так и записывать их на TFTP-сервер, что полезно в случае, если необходимо хранить резервные копии конфигурации сетевого оборудования.
Если у Вас возникли вопросы, задавайте их в комментариях.
Источник
Ubuntu Documentation
A network administrator may find the need to deploy a TFTP server quickly and cost effectively. The reader may find that there is more than one TFTP server package available for Ubuntu systems.
including tftpd, atftpd, and tftpd-hpa. tftpd-hpa was chosen in this scenario because of its relative «up-to-date-ness» and availability of documentation.
Introduction
This document will guide the reader on how to setup a TFTP server that will allow clients to both download and upload files.
(This process has been completely tested and verified on 11/18/2015 using Ubuntu 14.04.3 Server and the latest version of tftpd-hpa available from the apt repositories (tftpd-hpa_5.2-7ubuntu3_amd64.deb))
Installation
Once the installation is complete, you will have a running TFTP server on your system that will be listening on all active network interfaces, on both IPv4 and IPv6. All you will be able to do is download files from the TFTP server. Uploading will not work. We will fix that in the Configuration section below.
You can confirm this by running.
The default configuration file for tftpd-hpa is /etc/default/tftpd-hpa.
The default root directory where files will be stored is /var/lib/tftpboot.
Configuration
Edit tftpd-hpa Configuration File
As mentioned before, all you will be able to do at this point is download files from the TFTP server. If you want to upload to the TFTP server, read on. To begin with, make a copy of the default tftpd-hpa configuration file.
Then, edit the tftpd-hpa configuration file.
and change the line that reads.
and save the file and exit the vi editor.
Modify Permissions on TFTP Root Directory
The root directory where files must be stored in order to access them via TFTP is /var/lib/tftpboot. If you want to be able to upload to that directory, then perform the following command.
Restart the tftpd-hpa Service
To make the changes take effect, the tftpd-hpa service must be restarted. This can be accomplished by performing the following command.
At this point you should now have a TFTP server that allows you to both download and upload files.
Additional Information
tftpd-hpa seems to be somewhat tied to traditional tftpd. For more information try.
External Links
An external links section can be used to point users towards general information about the subject matter of the page, such as a wikipedia entry or project homepage. This section is optional.
http://chschneider.eu/linux/server/tftpd-hpa.shtml — The first «how to» that I used to go through this process.
TFTP (последним исправлял пользователь tony-fischer 2015-11-19 21:50:29)
The material on this wiki is available under a free license, see Copyright / License for details
You can contribute to this wiki, see Wiki Guide for details
Источник
How To Install, Configure, and Run Linux Tftp Client?
Tftp (Trivial File Transfer Protocol) is a very simple client-server protocol used to transfer data and files over the network. Ftp is a very popular protocol but it has a lot of features that may not be needed always. Tftp is a lightweight alternative to Ftp protocol. We can say that Tftp is a featureless protocol because it only downloads and uploads files.
- Tftp has no authentication or authorization mechanism.
- Tftp protocol does not have a file listing feature.
- Tftp is clear text or not encrypted protocol
- Tftp is fast and simple to implement
- TFTP uses generally UDP
Install Tftp
The installation of Tftp tools is as simple as the protocol. As TFTP lightweight there is no dependency for other libraries.
Ubuntu, Debian, Mint, Kali:
We will install tftp for Debian, Mint, Ubuntu and Kali like below.
Fedora, CentOS, RedHat:
We can install tftp with the following command on Fedora, CentOS, RedHat.
tftp Command Syntax
We will use following syntax for tftp command in normal command-line usage.
tftp Command Help
Connect TFTP Server From Command Line
Connecting to the Tftp server is very easy. As stated at the beginning of the post Tftp does not have any authentication and authorization mechanisms. so Just providing the hostname of the server of IP address is enough to connect the Tftp server. In this example, we will connect 192.168.122.239 IP address.
TFTP Server Command Line Interactive Shell
After connection to the Tftp server, we will get an interactive shell. In this shell, we will issue commands to get information about status of the connection, download or get files, upload, or put files to the server. We can list available commands provided by Tftp shell with ? .
Upload or Put File To The TFTP Server
We can upload or put files to the TFTP server with the put command. In the example, we upload a file named body.txt
Download or Get File From TFTP Server
We can also download or get files from the Tftp server to get command. In the example, we get a file named body.txt from the Tftp server.
Show TFTP Connection Status
As TFTP works generally on the UDP protocol there is no session like TCP. But we can query current connection status with the status command. This status command will provide us information about the connected server IP address, current working mode, Rexmt-interval, Max-timeout, etc.
Disconnect From TFTP Server by Exiting From TFTP Shell
In order to quit from the Tftp shell we need to issue the q command.
Verbose Mode
While making transfer we may need more information about the transmission. We can get more information about the transfer with the verbose mode.
Источник
Installing and Configuring TFTP Server on Ubuntu
TFTP is used in places where you don’t need much security. Instead, you need a way to easily upload files to and download files from the server. CISCO devices use TFTP protocol to store configuration files and CISCO IOS images for backup purposes. The network boot protocols such as BOOTP, PXE etc uses TFTP to boot operating systems over the network. Thin clients also use TFTP protocol for booting operating systems. Many electronics circuit boards, microprocessors also use TFTP to download firmware into the chip. Overall, TFTP has many uses even today.
In this article, I am going to show you how to install and configure TFTP server on Ubuntu. So, let’s get started.
Installing TFTP Server:
In this article, I am going to install the tftpd-hpa TFTP server package on Ubuntu (Ubuntu 19.04 in my case). The package tftpd-hpa is available in the official package repository of Ubuntu. So, you can easily install it with the APT package manager.
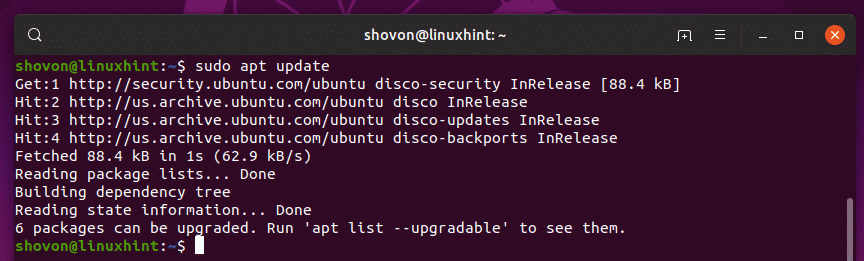
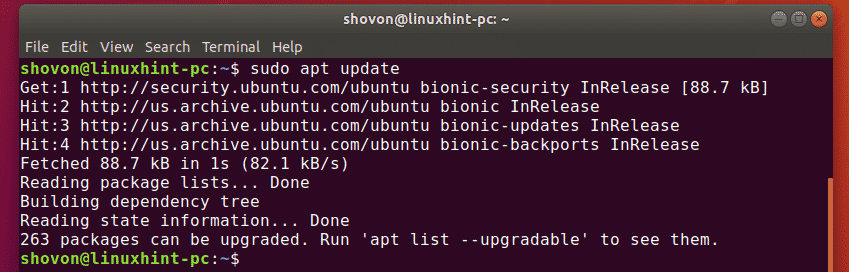
First, update the APT package repository cache with the following command:

The APT package repository cache should be updated.
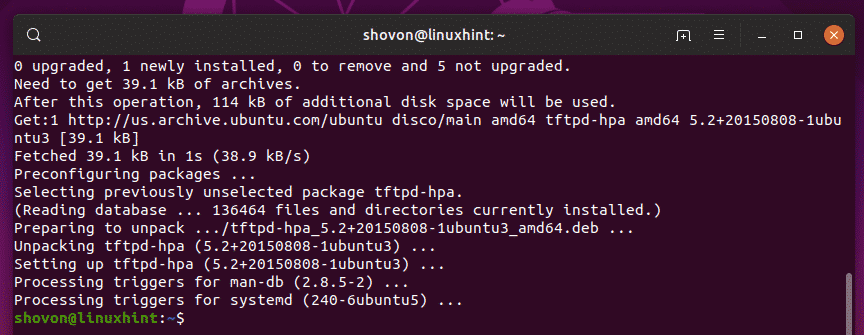
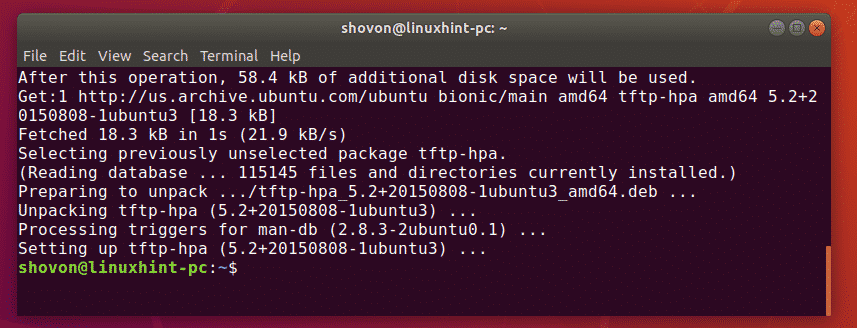
Now, install the tftpd-hpa package with the following command:

tftpd-hpa package should be installed.
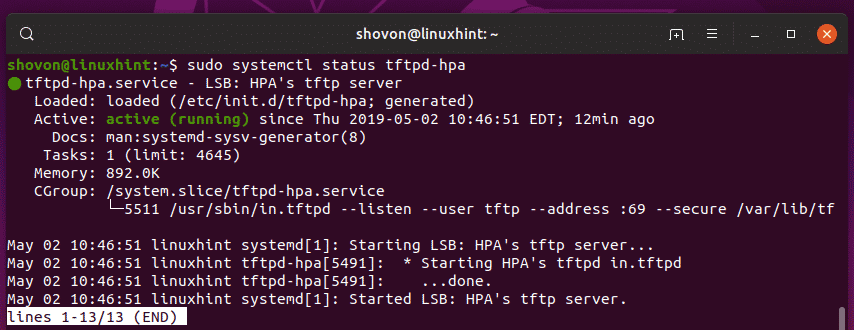
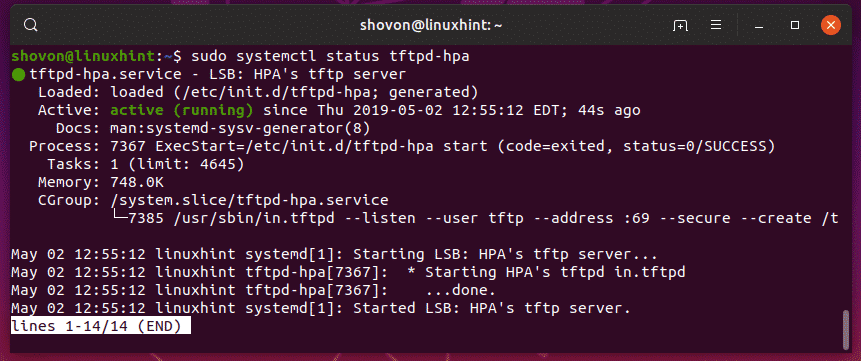
Now, check whether the tftpd-hpa service is running with the following command:

The tftpd-hpa service is running. So, TFTP server is working just fine. In the next section, I will show you how to configure it.
Configuring TFTP Server:
The default configuration file of tftpd-hpa server is /etc/default/tftpd-hpa. If you want to configure the TFTP server, then you have to modify this configuration file and restart the tftpd-hpa service afterword.
To modify the /etc/default/tftpd-hpa configuration file, run the following command:

The configuration file should be opened for editing. This is the default configuration of the TFTP server.
Here, TFTP_USERNAME is set to tftp. It means the TFTP server will run as the user tftp.
TFTP_DIRECTORY is set to /var/lib/tftpboot. It means /var/lib/tftpboot is the directory on this server which you will be able to accessing via TFTP.
TFTP_ADDRESS is set to :69. It means TFTP will run on port 69.
TFTP_OPTIONS is set to –secure. This variable sets the TFTP options. There are many options that you can use to configure how the TFTP server will behave. I will talk about some of them later. The –secure option means change the TFTP directory to what is set on the TFTP_DIRECTORY variable when you connect to the TFTP server automatically. This is a security feature. If you hadn’t set the –secure option, then you would have to connect to the TFTP server and set the directory manually. Which is a lot of hassle and very insecure.
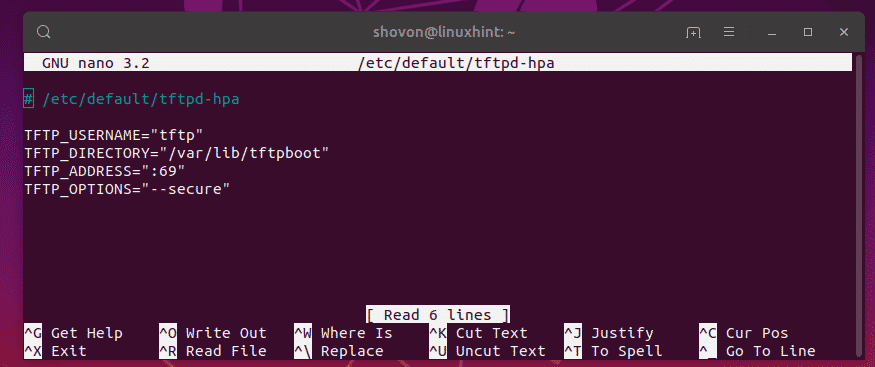
Now, I only want to change the TFTP_DIRECTORY to /tftp and add the –create option to the TFTP_OPTIONS. Without the –create option, you won’t be able to create or upload new files to the TFTP server. You will only be able to update existing files. So, I think the –create option is very important.
The final configuration file should look as follows. Now, press + x followed by y and then to save the changes.

Now, you have to create a new directory /tftp. To do that, run the following command:

Now, change the owner and group of the /tftp directory to tftp with the following command:

Now, restart the tftpd-hpa service with the following command:

Now, check whether the tftpd-hpa service is running with the following command:

As you can see, the tftpd-hpa service is running. So, the configuration is successful.
Testing TFTP Server:
Now, to access the TFTP server, you need a TFTP client program. There are many TFTP client programs out there. You most likely will not need one other than for testing the TFTP server because the devices that will use the TFTP server will have the client program already installed on it. For example, CISCO routers and switches already have a TFTP client program installed.
For testing, I am going to use the tftp-hpa TFTP client in this article. I am going to upload an ISO image to the TFTP server and retrieve it later just to verify whether the TFTP server is working as expected.
To install the tftp-hpa TFTP client on Ubuntu, run the following commands:

The tftp-hpa client program should be installed.
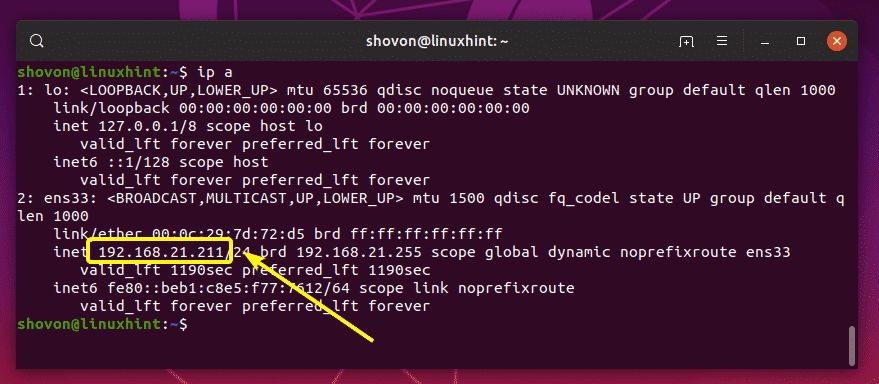
Now, run the following command on your TFTP server to find the IP address of the TFTP server.
As you can see, the IP address of my TFTP server is 192.168.21.211. It will be different for you, so make sure to replace it with yours from now on.
Now, from your other computer, connect to the TFTP server with the following command:

You should be connected.

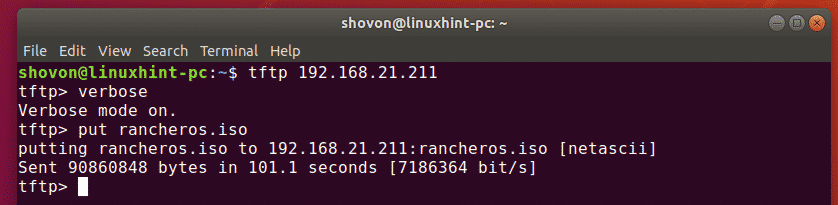
Now, enable verbose mode with the following command:

Now, to upload a file (rancheros.iso) from the current working directory (from where you ran tftp command), run the following command:
As you can see, the file is being uploaded to the TFTP server.

The file is uploaded.
I removed the file from my computer. Now, let’s try to download it from the tftp server.
To download the file (rancheros.iso) from the tftp server, run the following command:
The file is being downloaded.

The file is downloaded.

The TFTP server is working as expected.
Finally, run the following command to exit out of the tftp shell.

So, that’s how you install and configure TFTP server on Ubuntu. Thanks for reading this article.
Источник


