- Linux Professional Institute LPIC-1
- The world’s largest and most recognized Linux certification
- LPIC-1 Linux Professional Institute Certification Study Guide
- Скачать книгу
- О книге «LPIC-1 Linux Professional Institute Certification Study Guide»
- LPIC-1 Exam 101
- Version: 5.0
- First Lesson
- LPI is a non-profit organization.
- Start Here
- Linux Professional Institute Certification (LPIC-1) Study Guide
- 101.1 Determine and configure hardware settings (2)
- 101.2 Boot the System (3)
- 101.3 Change runlevels / boot targets and shutdown or reboot the system (3)
- 102.1 Design hard disk layout (2)
- 102.2 Install a boot manager (2)
- 102.3 Manage shared libraries (1)
- 102.4 Use Debian package management (3)
- 102.5 Use RPM and YUM package management (3)
- 103.1 Work on the command line (4)
- 103.2 Process text streams using filters (3)
- 103.3 Perform basic file management (4)
- 103.4 Use streams, pipes and redirects (4)
- 103.5 Create, monitor and kill processes (4)
- 103.6 Modify process execution priorities (2)
- 103.7 Search text files using regular expressions (2)
- 103.8 Perform basic file editing operations using vi (3)
- 104.1 Create partitions and filesystems (2)
- 104.2 Maintain the integrity of filesystems (2)
- 104.3 Control mounting and unmounting of filesystems (3)
- 104.4 Manage disk quotas (1)
- 104.5 Manage file permissions and ownership (3)
- 104.6 Create and change hard and symbolic links (2)
- 104.7 Find system files and place files in the correct location
- 105.1 Customize and use the shell environment (4)
- 105.2 Customize or write simple scripts (4)
- 105.3 SQL data management (2)
- 106.1 Install and configure X11 (2)
- 106.2 Setup a display manager (1)
- 106.3 Accessibility (1)
- 107.1 Manage user and groups accounts and related system files (5)
- User Limits
- 107.2 Automate system administration tasks by scheduling jobs (4)
- 107.3 Localisation and internationalization (3)
- 108.1 Maintain system time (3)
- 108.2 System logging (3)
- 108.3 Mail Transfer Agent (MTA) basics (3)
- 108.4 Manage printers and printing (2)
- 109.1 Fundamentals of internet protocols (4)
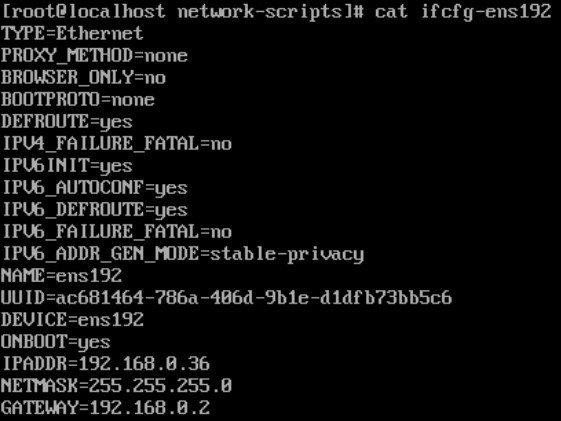
- 109.2 Basic network configuration (4)
- 109.3 Basic network troubleshooting (4)
- 109.4 Configure client side DNS (2)
- 110.1 Perform security administration tasks (3)
- 110.2 Setup host security (3)
- 110.3 Securing data with encryption (3)
Linux Professional Institute LPIC-1
The world’s largest and most recognized Linux certification
LPIC-1 is the first certification in the multi-level Linux professional certification program of the Linux Professional Institute (LPI). The LPIC-1 will validate the candidate’s ability to perform maintenance tasks on the command line, install and configure a computer running Linux and configure basic networking.
The LPIC-1 is designed to reflect current research and validate a candidate’s proficiency in real world system administration. The objectives are tied to real-world job skills, which we determine through job task analysis surveying during exam development.
Current version: 5.0 (Exam codes 101-500 and 102-500)
Prerequisites: There are no prerequisites for this certification.
Requirements: Passing the 101 and 102 exams. Each 90-minute exam is 60 multiple-choice and fill-in-the-blank questions.
Validity period: 5 years unless retaken or higher level is achieved.
Cost: Click here for exam pricing in your country.
Languages for exam available in VUE test centers: English, German, Japanese, Portuguese (Brazilian), Chinese (Simplified), Chinese (Traditional), Spanish (Modern)
Languages for exam available online via OnVUE: English, Japanese, Portuguese (Brazilian), Spanish
To become LPIC-1 certified the candidate must be able to:
- understand the architecture of a Linux system;
- install and maintain a Linux workstation, including X11 and setup it up as a network client;
- work at the Linux command line, including common GNU and Unix commands;
- handle files and access permissions as well as system security; and
- perform easy maintenance tasks: help users, add users to a larger system, backup and restore, shutdown and reboot.

LPI is committed to providing the IT community with exams of the highest quality relevance and accuracy.
Источник
LPIC-1 Linux Professional Institute Certification Study Guide
Скачать книгу
О книге «LPIC-1 Linux Professional Institute Certification Study Guide»
Thorough LPIC-1 exam prep, with complete coverage and bonus study tools
LPIC-1Study Guide is your comprehensive source for the popular Linux Professional Institute Certification Level 1 exam, fully updated to reflect the changes to the latest version of the exam. With 100% coverage of objectives for both LPI 101 and LPI 102, this book provides clear and concise information on all Linux administration topics and practical examples drawn from real-world experience. Authoritative coverage of key exam topics includes GNU and UNIX commands, devices, file systems, file system hierarchy, user interfaces, and much more, providing complete exam prep for the LPIC-1 candidate. Get access to invaluable study tools, including bonus practice exams, electronic flashcards, and a searchable PDF of key terms featured on the exam.
Linux is viewed by many companies and organizations as an excellent, low-cost, secure alternative to expensive operating systems, such as Microsoft Windows. The LPIC-1 tests a candidate’s understanding and familiarity with the Linux Kernel. This book provides comprehensive preparation and review, helping readers face the exam with confidence.
Review the system architecture, Linux installation, and package management
Understand shells, scripting, and data management more completely
Practice administrative tasks and essential system services
Brush up on networking fundamentals and security issues
As the Linux server market share continue to grow, so too does the demand for qualified and certified Linux administrators. Certification holders must recertify every five years, but LPI recommends recertifying every two years to stay fully up to date with new technologies and best practices. As exam day approaches, LPIC-1Study Guide is the one source you will want by your side.
На нашем сайте можно скачать книгу «LPIC-1 Linux Professional Institute Certification Study Guide» в формате fb2, rtf, epub, pdf, txt или читать онлайн. Здесь так же можно перед прочтением обратиться к отзывам читателей, уже знакомых с книгой, и узнать их мнение. В интернет-магазине нашего партнера вы можете купить и прочитать книгу в бумажном варианте.
Источник
LPIC-1 Exam 101
Version: 5.0
LPIC-1 is the first certification in LPI’s multi-level Linux professional certification program. The LPIC-1 will validate the candidate’s ability to perform maintenance tasks on the command line, install and configure a computer running Linux and configure basic networking.

First Lesson
101.1 Determine and configure hardware settings (101.1 Lesson 1)
Linux Professional Insitute Inc. All rights reserved. Visit the Learning Materials website: https://learning.lpi.org
This work is licensed under the Creative Commons Attribution-NonCommercial-NoDerivatives 4.0 International License.
LPI is a non-profit organization.
© 2021 Linux Professional Institute (LPI) is the global certification standard and career support organization for open source professionals. With more than 200,000 certification holders, it’s the world’s first and largest vendor-neutral Linux and open source certification body. LPI has certified professionals in over 180 countries, delivers exams in multiple languages, and has hundreds of training partners.
Our purpose is to enable economic and creative opportunities for everybody by making open source knowledge and skills certification universally accessible.
Spot a mistake or want to help improve this page? Please let us know.
© 1999–2021 The Linux Professional Institute Inc. All rights reserved.
Источник
Start Here
Linux Professional Institute Certification (LPIC-1) Study Guide
LPIC certifications are reviewed by a group of Linux experts whom are not bound to any particular distro or company, meaning that if you certified as an LPIC, your knowledge (the whole point of getting certified, to prove your knowledge) can be exported to any other distro running a Linux kernel. that includes Red Hat. So, start small but solid, and continue relentlessly: let’s get LPIC-1 certified! 🙂 Modularity and Flexibility are features of the command line, where one tool does one task and does it well. For this exam you will need two applications: putty and WinSCP
This article contains my exam notes, the study guide I followed to structure the exam’s objectives for each of the LPIC-1 exams. Yes, there are 2 exams (level 1 known as 101 and level 2 known as 102) that you need to pass both in order to get your LPIC-1 certification
Those are the objective for exam 2, you can find a deep description of them here: http://www.lpi.org/our-certifications/exam-102-objectives The items with a weight of 4/5 need to be known by heart!
101.1 Determine and configure hardware settings (2)
The kernel is the mediator between the applications and hardware. To find out which kernel you’re running on your system, executes uname -r (or uname -a ), you can also search /etc/ for *.release files. Cat the file /proc/cpuinfo for the processor info, for memory the /proc/meminfo. Execute cat /etc/os-release on any distro to see where it comes from. On CentOS you can do cat etc/redhat-release to see version number. Issue yum install redhat-lsb-core to get the lsb_release -a command
The procfs (/proc folder) contains processes information (like ACPI power, CPU and devices information) so that all other programs can refer to. With time the /proc folder started accumulating system information which is not process information, therefore the /proc folder became messy and confusing
- From kernel 2.5; the folder sysfs (/sys folder) was introduced to contain information specifically about the system (devices, cpu, etc), which before was stored in /proc
- From kernel 2.6; the udev system was introduced, which populates the /dev folder.; udev provides persistent device names for all devices in the Linux system, it supports hotplugging; the dbus was also introduced which send signals to desktop application from the system /dev folder, so that devices that are plugged-in are shown and interact with the desktop. The correct order that udev will use to read rules of the system (rules that you may want to modify yourself) is:
- /etc/udev/rules.d
- /run/udev/rules.d
- usr/lib/udev/rules.d
In Linux, just like in Unix, everything is treated as a file
sudo lshw -C network ;will list your network adapter, to see if they have been loaded; lshw list hardware on the Debian (Ubuntu) systems
sudo rmmod uvcvideo ;remove the video module of the webcam, sudo modprobe uvcvideo will add it again, hopefully the webcam will work this time!
101.2 Boot the System (3)
After the POST (Power On Self Test) the system runs GRUB (Grand Unified Bootloader) from the MBR (Master Boot Record, the first 512KB of the drive). Back on the day, I remember very well, it used to be LiLo (Linux Loader) the default loader, which was really clunky (it uses the /etc/lilo.conf file, remember that if you make changes to this file, you need to run the lilo utility, else changes won’t be effective). Whichever bootloader you use, it always launches the initrd (initial ram disk) that loads a little kernel into ram to detect all hardware and load only the modules needed for the system to run efficiently; it is the initrd tiny kernel the one that mounts the hard drive. Once initrd loads, it then loads the beginning of the Linux kernel called » init » (which has a process number of 1, being the first process that runs), it is then init the one who initializes the Linux kernel. The file /proc/cmdline passes the parameters from the bootloader (grub) to the kernel.
Modern Linux distributions have these 3 different types of init programs (there is a fourth one called «BSD init» but not many distros use this one, because is not very flexible)
- SysV; around for a long time; it uses numerical order to start the systems one at a time; it can run at level 1 (single user mode), run level 3 (console mode) or run level 5 (GUI mode) etc; the first program SysVinit usually starts is /sbin/init. To disable the crtl-alt-delete configuration edit the file /etc/inittab. On systsemd systems, this setting is configured by usr/lib/systemd/system/ctrl-alt-del.target The correct order for processes running during SysVinit startup is: kernel loaded > init > rc.sysinit > runlevel scripts
- Upstart; developed by Ubuntu, start the system by working out dependencies, therefore it loads faster with this mode because different programs can start at the same time
- Systemd; the new guy, use by Ubuntu and RedHat, compatible with SysV but not compatible with other systems, and it may need «systemctl enable____» or «systemctl start _____» to load the systems; Systemd uses binary code, and not just scripts like «SysVinit» and «Upstart»
To disable a service, depending on the system you’re using, you can use the following:
«SuperServers» used to be files on the Linux distributions that used to control everything (it used to be the /etc/inetd.d or the /etc/inetd.conf file). What we still have is the /etc/xinetd.d/ where they are lots of files (daemons) all run by the /etc/xinetd.conf which basically says to run all files inside the xinetd.d directory
sudo service xinetd restart ;to restart the parent process once you enable any of its services, then run netstat -tuna to verity the services like FTP servers, etc are listening. Check the /etc/hosts.allow or / etc/hosts.deny to add or remove IP addresses (allow takes precedence) and then restart xinetd to prevent certain computers from accessing the relevant services; this method of allowing/denying IP address is called TCP Wrappers, though it is not in use anymore
initramfs ; At boot time, the boot loader loads the kernel and the initramfs image into memory and starts the kernel. The kernel checks for the presence of the initramfs and, if found, mounts it as / and runs /init. The init program is typically a shell script. Note that the boot process takes longer, possibly significantly longer, if an initramfs is used.
101.3 Change runlevels / boot targets and shutdown or reboot the system (3)
Here is a table comparison of the run levels usage between different systems; just to note that run level 4 doesn’t exist, and that Debian/Ubuntu have put all-the-run-levels on level 2
| Run Level (Boot target) | CentOS / Suse | Debian/ Ubuntu | Description | ||||||||||||||||||||||||||||||||||||||||||||||||||||||||||||||||||||||||
| 0 (power off) | Halt | Halt | The system is completed stop | systemclt isolate poweroff.target | |||||||||||||||||||||||||||||||||||||||||||||||||||||||||||||||||||||||
| 1 (rescue) | Single User Mode | Single User Mode | Only one user can logon, to change the root passwd for example | systemctl isolate rescue.target | |||||||||||||||||||||||||||||||||||||||||||||||||||||||||||||||||||||||
| 2 | Mutli User, no network | Full, multiuser, GUI is available if installed | To troubleshoot the system ; for Debian and Ubuntu everything is at run level 2 | ||||||||||||||||||||||||||||||||||||||||||||||||||||||||||||||||||||||||
| 3 (multi-user non-gui) | Multi User, with network | n/a | On CentOS, level 3 is console with net access | systemctl isolate multiuser.target | |||||||||||||||||||||||||||||||||||||||||||||||||||||||||||||||||||||||
| 4 | n/a | n/a | Not use at all | ||||||||||||||||||||||||||||||||||||||||||||||||||||||||||||||||||||||||
| 5 (GUI) | Multi user with GUI | n/a | With the fully GUI loaded | systemctl isolate graphical.target | |||||||||||||||||||||||||||||||||||||||||||||||||||||||||||||||||||||||
| 6 (reboot) | Reboot | Reboot |

| Run level | Boot target | Command |
| 0 | poweroff | telinit 0 |
| 1 | rescue, no network | telinit 1 OR telinit s |
| 3 | multi-user, with network | |
| 5 | graphical | |
| 6 | reboot | telinit 6 |
How to shutdown your Linux box? Oh well, just as a start, please don’t pull the plug! To shutdown your system, switch to one of these run levels:
If your system is frozen, you may try «reboot -f now» (not recommended, unless, of course, system is frozen); by using the -f flag you force the reboot, obviously all data and integrity is lost and compromise, and there is not warranty at all that the system may boot up normally again. You can also use these different variations to shutdown your system:
To display a message to all your buddies who are connected to the console, use the » wall » command with the pipe (|) operator
102.1 Design hard disk layout (2)
/var ;keep it if possible on a separate hard drive or partition, with fast access, as this folder is in constant use and it tends to be filled quickly with logs, etc
/swap ;this is a partition that acts as the page file in windows
LVM (Logical Volume Manager) adds all drives together on a pool, where you can expand it by adding drives as you go along, giving you in that way lots of flexibility. LVM provides no redundancy at all, therefore underneath the LVM some kind of RAID1 (mirror) or RAID5 (parity) must be established if you want to provide resilience to your system. LVM uses the following acronyms:
- PV ;represent Physical Volumes ( pvdisplay )
- VG ;represent Volume Groups, collectioManaging Linux Swapn of 1 or more PVs
- LV ;represent Logical Volumes, collection of 1 or move VGs ( lvdisplay )
- For example: sudo vgcreate VolumeG1 /dev/sda3 /dev/sda4 ;then create a new LV from the VG by doing sudo lvcreate -n Volume1 VolumeG1 ;and finally scan for changes by doing lvscan
Remember that, on a MBR drive, only 4 partitions are possible; if you need more than 4 partitions you need to start using extended partitions
Directories that may need their own partition during installation are:
- /usr ;because it contain all the commands, libraries, man pages, documentation and static files
- /tmp ;because every user can write to this directory
The FHS (File Hierarchy Standard) is organised as follows:
102.2 Install a boot manager (2)
Grub vs Grub2: They both stand for «GRand Unified Boot system», and both application work by inserting themselves on the MBR of the drive, then loading from there the boot sector of the Linux OS. The /etc/grub.conf gives the location of GRUB stage 2 to GRUB stage 1
| Grub | Grub2 | |||||||||||||||||||||||||||||||||||||||||||||||||||||
| Enterprise Linux 6 and before use only grub |
| RPM | Debian |
| Doesn’t autoconfigure | Autoconfigures |
| Doesn’t autostart services | Autostarts services |
| Doesn’t prompt the user | Prompt the users |
| Used on the majority of commercial Linux server installations | Used on the majority of Linux desktop installations |
| Packages complex to create | Packages easy to create |
| Repository easy to create and mirror | Repository complex to create and mirror |
In Debian there are basically 3 ways of installing software:
- apt ;is the newest program and is the one to be use
- aptitude ;is older and still work, but should not be use as doesn’t work well with dependencies
- apt-get ;the oldest and superseed by apt
- dpkg ;Debian Package, should not be use because it does not check for dependencies at all
APT/YUM ;searches, downloads software from repository and manage dependencies
To find out what online repositories your system is using, visit the file /etc/apt/sources.list (some Ubuntu distros also includes the folder etc/apt/sources.list.d to hold information about the repos, when you add a file into the sources.list.d folder it will automatically populate to the the sources.list file. The different types of repos that can be activated on an Ubuntu server/desktop, can be classified as follows:
- main ;store the official supported software
- restricted ;officially supported but not completely free, in other words not truly open source
- universe ;community supported
- multiverse ;these repos contain restricted software by copyright or legality like for example video codecs
Each repo has a ‘deb http’ for the pre-compible binary and a ‘deb-src’ for the source code
aptitude is the package manager that provides a front-end for Advance Package Tool (apt) infrastructure in Debian/GNU Linux systems. Use the following commands to interact with apt:
The first thing to do is to run » sudo apt-get update «, which will sync your repo with the online repos to ensure you have the latest packages entries in your cache, basically updating your system. The dpkg configuration file is kept in /etc/dpkg/dpkg.cfg
- apt-cache search apache2 ;searches the cache for applications that contains the word apache2
- apt-cache show apache2 ;shows information about the apache2 program
- sudo apt-get install apache2 ;will install apache2 program and any dependencies that it may have, as well as suggested packages
- sudo aptitude remove apache2 ,it will remove the app, we could have used the apt-get tool if we wanted to
- sudo dpkg-reconfigure tzdata ;reconfigure existing installation of packages by running the start wizard if applicable
- sudo dpkg -s vim ;shows you details of the vim package
A nice utility to install is tree, issue sudo apt-get install tree ; if you don’t know the name of the package you’d like to install, use the GUI utility called Synaptic
dkpg ;package utility for Debian systems, -P to purge the application and delete configuration files, -p display package details including version number (OMG, -P is purge and -p is info, so close!), -R to install a package recursively, -r remove the package but not its configuration files,
102.5 Use RPM and YUM package management (3)
The distros that use RPM are Red Hat, Fedora, CentOS and openSUSE; Zipper is used by SuSe Linux and Mandriva has Urpmi. A «spec file» determines how to compile and build an RPM package, the process is complex but could be make easier by macros. In the order hand, creating a YUM repository package is very easy, all you need is a Web/FTP server and the use of the createrepo command. YUM is a smart application that check for dependencies whenever you install a RMP package, checking the Internet and your local cache before actually installing anything, always keeping it updated. RPM mostly manages and can query installed packages or files thanks to its database rpm -qa | sort will -query -all packages in the whole system.
To configure YUM edit these two files:
- /etc/yum.conf (set keepcache=1 if you want to keep the packages locally, not needed though), ensure gpgcheck=1 to ensure packages are md5 verified;
- /etc/yum.repos.d/
yum update —security ;only updates the security packages
yum update-minimal —security ;these commands in red hat works, but on CentOS it will download the buggy ones too
yum changelog updates ;shows all changes logs or yum changelog firefox shows only for firefox
yum install -y epel-release ;add the epl repository, once added install yum install -y yumex which gives you a GUI extender for yum
rpm ;also install packages, -ql query and list the all the files of a package, qi query and display name, version and description of a package
- rpm -I —nodeps package1.0.3.rpm ;notice the double dash (—) for the no dependencies option
- rpm -qc -dump firefox ;display information regarding the configuration files of firefox; -c display configuration files; -dump parameter must be use with either -l -c or -d (the -q must support the -dump too)
- rpm -qd yum ;query yum for the location of documentation files
- rpm -qa Group=»System Environment/Shells» ;query for packages that fall in this category
- rpm -qa —last ;query for packages that were installed recently
- rpm -q —changelog firefox ;will show you all the changes that have happened to the package
- rpm -qpi httpd-2.4.centos.x64.rpm ;to query a packages for info you must use the -p switch, otherwise it will query the rpm database instead
- To upgrade an installation use the -F string (freshen)
- To verify an installation use the -V specifying only the name of the package
- To perform an MD5 checksum use the -K switch
- Capital -F (Freshen) will only updates the packages that are already installed
- To find information about a package use rpm -qi bash
- rpm -qi centos-release ;shows you the exact version you’re running
rpm tags ;you can issue this command to query tags rpm —querytags and you’ll see all the tags that you can use on your commands, then you can be creative and constructs nice queries like, need to surrounder in curly braces and percents:
- rpm -qa —queryformat «%
% \n» | sort ;notice that double dash for —queryformat and the curly braces - rpm -q —queryformat «[%
% \n»] firefox ;put the expression between square brackets and will list you the files - rpm -q —queryformat «%
% - rpm -q —queryformat «[%
\n]» firefox ;show you the permission of each of the files
rpm2cpio ;extracts cpio archives from rpm packages
yumdownloader ;download rpm packages from yum repositories, use rpm -ivh httpd2.4xxxx.rpm to install a package
If a file get damaged and you need to extract the config file again, do as follows:
- rpm -qcp httpd xxx.rpm ;the -q for query, the -c for contents and the -p for package, this will list the .conf files of the package
- rpm2cpio httpdxxx.rmpm | cpio -id ;this will extract the contents of the package, run ls to verify
The package database contain the attributes of the package, which are SM5DLUGTC ;to verify a package use rpm -V firefox if nothing is shown it means the package has not been modified, use rpm -Vv firefox with the lower -v to verbose mode so it can verify all files of the package; the rpm -Va will verify your whole OS
- S ;file size
- M ;file permission mode
- 5 ;file digest or checksum
- D ;device major or minor numbers
- L ;link path
- U ;user ownership
- G ;group ownership
- T ;last modified time
- C ;and capabilities
rmp -K —nosignature httpd-2.4xxxx.rpm ;you should get an ok saying signature is okay
Sometimes the RPM database may become corrupt, to recover it first do an archive of it by visiting /var/lib and typing tar -czvpf rpmdb.tar rpm ;once the backup is created delete the current database using rm /var/lib/rpm/__db* and do after a rebuild by rpm —rebuilddb ;you can also use rpm to restore permissions to files by rpm —ssetperms firefox and will put the permissions as default
yum —showduplicates list samba-test-libs ;it will show you duplicates samba packages that you have
yum —showduplicates list available ;it will show you on colour code
yum list installed ;shows all the installed packages, showing you in the 3rd column the repository (anaconda is for the CD) the color code of the packages listed is as follows: bold (update in repository), bold and underlined (current kernel) red (package doesn’t exist in repository) and yellow (newer than package in repository)
- yum group install system-admin-tools —setopt=group_package_types=mandatory,default,optional
yum groups hidden ;shows you the hidden installed packages; yum groups list ids ;will show all groups
yum groups info «Development Tools» ;shows you info of the packages group; to properly remove a group (all of its packages) use yum autoremove development-tools
yum localinstall whoishxxx.rmp ;this is how to use yum to install already downloaded rpm packages, the yum reinstall whatever.rpm will reinstall the package
yum reinstall —skip-broken whateverxxx.rpm ;will skip the dependencies packages that are faulty or can’t be downloaded, use yum remove package.rmp to re-install a package
yum install -y yum-utils ;install utility for yum, from where you can issue package-cleanup —leaves ;so this will tell you which packages are no longer needed
Repositories ;all repos have to end in .repo otherwise yum will ignore them. To disable a repository add «enabled=0″ to the repo file; yum repolist shows you what you have yum repolist disable ; yum repoinfo ;shows you the size of the repos; visit here to add more repositories if needed: https://li.nux.ro/repos.html The command yum —disablerepos»*» —enablerepos=»centosplus» list available disables all repos but the centosplus
103.1 Work on the command line (4)
Here there are some tricks that you can use while operating a Linux machine, note that you can invoke the | by pressing Shift + backslash
apropos «string» ;use the apropos command to find out what other commands can do stuff in Linux
stat ;find out the statistics of your file, eg stat file.txt
Login Shell ;after you logon the system reads the following configuration files and path variables
The /etc/bashrc loads the /etc/profile (this is where the #path is located), where one of the lines will load any scripts files found in /etc/profile.d/* ; then it will go the user home folder and executes the relevant files on this ‘specific’ order:
- /home/user/.bash_profile
- /home/user/.bash_login
- /home/user/.profile
- /home/user/.bashrc
Interactive Shell ;in that shell you’re not prompted for username/password, and the only loaded on this mode are:
You can create your own scripts under /etc/profile.d so they don’t get overwritten when there is a system update. The two main files system-wide locations to look for are «/etc/profile » and «/etc/bash.bashrc «
If you want to do customization (aliases, etc) you will do it in the /home/user/.bashrc
export ;the export command makes the value of a varialbe available across varios subshells
unset ;destroy a previously exported variable
env ;see a list of current variables (bash shell only), NOT local variables values or functions
set ;display the values of shell variables, INCLUDING local variables and functions
- set +o history ;turn off history
- set -o history ;turn on history
setenv ;similar to env but for tsch sell
.bash_history ;this file keep your history, check it out by cat
/.bash_history The command !! recalls the entire last line which is quite useful if you have entered a command and then realised that needed to put «sudo» at the front, you can just do sudo !! , the commnad !-4 will execute the command numbered 4 beginning from the bottom
reverse-i-search ;you can enter this mode by typing crtl-r , and it will call from the history a matching of the commands you enter; if you keep pressing crtl-r the reverse-i-search will jump to the next line in the history file
HISTCONTROL ;you can use this variable to hide some commands from the history, first of all type export HISTCONTROL=ignorespace and then all the commands that you enter with a space at the front won’t be recorded, cool ah? If you type HISTCONTROL=ignoredup s the history won’t record duplicated entries, and if you type HISTCONTROL=erasedups it will delete from the history the duplications, to do both use HISTCONTROL=erasedups:ignorespace . To keep certain lines from being recorded you can keep it in the history ignore variable, e.g. the following will not record the history or ls commands itself export HISTIGNORE=»history*:ls» .If you would like to add date and time to your history command type export HISTTIMEFORMAT=»%h %d %H: %M: %S:> » Type man stftime to see other possibilities for customisation. Type export HISTSIZE=10000 to increase the number of lines in the history entries, if you set the HISTSIZE to zero it will not record anything and if you set it to a negative value it will be infinite
103.2 Process text streams using filters (3)
man ;the famous manual pages, use grep to find a particular item, use its switches (man 5 passwd) to find a particular category of the enquired command, as follows: 1 (user commands), 2 (system calls), 3 (subroutines), 4 (services), 5 (file formats), 6 (games), 7 (miscellaneous), 8 (system administration), l (local) and n (new). Use man 1 intro to start with Linux.The —help is also built-in on almost every command (for commands built-in into the shell itself, use instead help command, eg.help cd). You can also use the info command, e.g. info crontab. You can also use «BROWSER=firefox man -H crontab» to open html help files.The -k switch is a similar to apropos, so by using it the man will display all manual related to the entered string man -k passwd
cd ;takes you to the folder you wish. if you type only «cd» it takes you to your home folder ( cd
also takes you back home), once at home do less .bash_history
- cd — ;takes you to the previous folder you were working on
- cd ../../folder1 ;takes you to that folder1
cat ; short for concatenate, use to display the file on the screen and to merge more than 2 files
cut ;on this example use the delimiter as: to chop the file, thereafter only print the first field of every line cut -d: -f1 /etc/passwd (-d is use to change the delimiter from TAB designation to the DELIM designation, while -f specify the column, the -c specify the characters to be displayed, while -b specify the bytes)
less ;similar to cat, use the «f» and «b» keys to travel around, press «h» to see the command available
more ;display file page by page, but you can only move forward
fmt ;format files in different way, this will start a new line every 60 character fmt -w 60 file1
pr ;modifies the file before display, the -d adds a double space while -l x add maximum number of lines pr -d -l 10 /etc/passwd
sed ;allows you to edit a file on the fly, without actually interacting with it; sed most use string is «s» for substitute where you can replace a given string with a different one, remember to use the «g» for global string at the end, so that the replacement occurs recursively in the whole file
- The way it works is like this: sed ‘s/string1/string2/g’ file1.txt ;this will replace string1 with string2 inside file1.txt, don’t forget the ‘g’ for global
- You can also replace more than 1 string at the same time: sed ‘s/string1/string2/g’ file1.txt | sed ‘s/string3/string4/g’
- You can also use regular expressions, on this example it will look for a capital/lower case S on string1: sed ‘s/[Ss]tring1/string2/g’ file1.txt
- In this example ^ symbol means that the substitution will occur only if string1 is at the beginning of the line: sed ‘s/^String1/String2/g’ file1.txt
tr ;translate command, use to delete or replace characters in a file, eg echo ‘Hello World’ | tr -d aeiou will actually display Hll Wrld
head ;give you the first 10 lines only by default of a file, handy to see the first entries on a log file for example. To modify the number of lines that you want to see use the -n switch head -n 15 file1.txt
tail ;same as «head», but only gives you the last 10 lines tail file1.txt
split ;create several files from a single one, depending on how many lines (-) you want on each file split -l 5 file1.txt file_ ;this will create file_aa, file_ab, file_ac, etc, where each file contains only 5 lines in sequential order from the parent file
nl ;number of lines, very useful command that helps you create a file of a given file listing the number of lines this file had, very handy when a script it has an error in line number 273 and you had no idea what line is that
- nl -b a context.xml > context.lines ;this creates a file called ‘context.lines’ that contains all lines (a switch) of all the body (-b switch) of the context.xml file
paste and join ;they both work by merging data together from 2 x files, but they do it on different way paste/join file1.txt file2.tx > file3.txt
- paste ;copy the files line-by-line into a single file, separating them by tabs; with the -s will print them sequentially paste -s file1 file2
- join ;combine the lines depending on the fields identifier, so you can bind line 1 with line 3 as long as you identify these two lines with the same number (let’s say 2)
expand ;converts a tabbed-file into a spaced-file, so the lines won’t have any tabs but spaces instead; expand file1.txt > expanded.txt or you can use the other way around unexpand -a unexpanded.txt
sort ;sort lines of text files, input sort -k2n file to organise the data by column 2 (k2) and in numerical order
- sort -u file ;removes the duplicated lines
uniq ;only print lines that are unique on the file, with the -u will only display lines that are never repeated uniq -u /etc/passwd
od ;the od command displays the contents of non-ASCII files
wc ;provides lines, words and number of character (LWC), don’t worrry for the number of characters if they don’t match, wc always add one extra character to them, the \n line character.
103.3 Perform basic file management (4)
ls ;list of the files on current directory
- ls -lh * ;list of files and its properties, with the size ready for humans understanding. oh yeah!
- ls -s ;list the size of the files
- ls -a ;list hidden files and directories, in Linux a file/directory is hidden when it starts with a dot (.)
- ls -R ;recursive mode, list all contents of all stuff, a kind of similar to the tree command
- ls —color=always ;to see the colour of the files
- ls -1 | wc -l ;notice the number 1 after ls and the «l» after wc, that command will tell you the number of files you have in a directory
mkdir ;creates a directory, use it with the -p to also create the parent directory at the same time: mkdir -p folder3/folder2/folder1
rm ;deletes files, use * for all; if you type rm file? it will delete all files called file1, file2, file3, etc, the question mark stands for 1 character. The combination rm -rf is very dangerous as it deletes everything without asking; rm *.txt deletes all these extensions while rm * deletes all files
rmdir; removes folders only if they are empty
touch ;creates an empty file, touch
cp ;copy files, use the combination copy -R to copy all contents inside the folder
mv ;move files and folders, you can use this command to rename a file mv file1.txt file2.txt
dd ;copy files at the block level, it uses the structure input file > output file > block size (4k normally)
- dd if=/dev/sda out=/dev/sdb ;it copies all of the blocks from the drive sda (input file, if) to the drive sdb (output file, of), byte by byte
tar ;copy files at the file level, it stands for tape archive, always use the switches -cvf (c f or create, v for verbose and f for file, always put f last)
- tar -cvf file1.tar /home/user1/stuff ;that will includes all the contents of the «stuff» folder into the file1.tar
- tar -xvf file1.tar ;extract the contents of the file1.tar to the current directory you are working on, notice the -x switch that stand for extract
gzip ;older compression command, for better compression use bzip2, they work exactly the same
- gzip file1.txt ;compresses file1.txt by deleting that file and leaving it file1.txt.gz
- gunzip file1.txt.gz ;uncompressed the file
bzip2 ;the newer compression command
- bzip2 file1.txt ;it created the compressed file with the extension bz2
- bunzip2 file1.txt.bz2 ;uncompress the file
Both gzip and bzip2 can only compress files, that’s why you have to use tar to compress folders into a file, and then gzip/bzip2 that file
With gzip do as follows:
- tar -zcvf file1.tar.gz /home/user1 ;use the -c (compress) will create the specified tar file that will contain all stuff into the user1 folder
- tar -zxvf file1.tar.gz ;this will extract (use the -x for extraction) the contents of file1.tar.gz (could also have the extension tgz) into your current folder
With bzip2, do as follows, it uses the -j to say you are using the bzip2 command
- tar -jcvf file1.tar.bz2 /home/user1 ;to compress
- tar -jxvf file1.tar.bz2 ;to extract
xz ;similar compression program as gzip and bzip2 (.xz format), the *.lzma is a legacy format
cpio ;(copy in copy out) an older version of the tar command, rarely use nowadays, because is not as flexible as tar, you actually have to pipe the data into cpio in order to user it. To uncompress a cpio archive, you need to use the gunzip utility. The cpio program copy all the files and put them on a kind of zip file with the extension .cpio, then that .cipo file is package with a description and dependencies of the files to create the .rmp file. The way to extract the contents of a .rpm package is therefore as follows:
- ls | cpio -ov > file.cpio ; gathers the data from ls and pipe into the cpio program, who outputs it (the o switch) to a file
- cpio -idv
- rmp2cpio package.rpm ; this will extract all the files that are inside the rpm package, one of those files would be a .cpio file
- cpio -idv packagefile.cpio ;this will extract the original file structure
- cpio is useful mostly when you use the find command to search for files that you want, and then pipe them into a single .cpio file
find ;search for stuff in real-time, (#find / -name ping)
- find / -type f -perm u+rwx -ls ;find and display all the files whose owner has rwx permissions
- fin . ; return files on current directory, no filter being applied
- find /home/user1 -size +50M ;find files that are bigger than 50MB in size
- find . -mtiime +1 ;show files that have been modified more than one day ago (yesterday)
- find . -mtime -2 ;show files that have been modified less than 2 days ago
- find . -size +50M -mtime +1 ;show files bigger than 50MB that were modified yesterday
file ;determines the file type in use, file * in any directory to see
rev ;for reverse, prints the file on the screen the other way around
tac ;prints it out from the bottom up, it is the reverse of cat
103.4 Use streams, pipes and redirects (4)
/ ;use it to cancel a space/special character in a folder/file name, for example: ls «folder 2» or ls folder/ 2
Operators ; and $$
- ls ; ls ;the semicolon allows to enter 2 commands independently
- ls && ls ;the double ampersand executes the 2nd command only if the 1st one succeed
All Linux commands have 3 streams opened for them: STDIN (numerical value of 0), STDOUT (1) and STDERR (2)
read VAR ;this command will stop at the cursor and wait for you to type anything, and once you type it the string will be stored in the variable VAR
- ls > test-out-pipe ;this redirects the output by creating a file called «test-out-pipe», that will contain the result of the command ls
2> Redirects to STDERR
- ls myfolderA 2> error ;this command will try to list the contents of «myfolderA», but because it doesn’t exist will give an error through the STDERR pipe, which in this case will be captured by the directected parameter «2>» and put into a file called «error»
- ls > out 2> error ;this example create the «out» file from the STDOUT pipe and the «error» file from the STDERR pipe
- tar cvf backup.tar /dev/sda1 2> errors.txt ;this will keep all the error of trying to backup a hard drive, handy ha?
>> Append all standard output to a file that already contain data
&> This operator creates a new file that contain both standard output and standard error
&1 ;this operator redirects the input into the output, like a look, for example:
- ls myfolderA > results.txt 2>&1 ;the error generated by the lack of existence of this folder will be take from the STDERR and put it in STDIN by &1
2>&1 This operator redirects standard error as standard output to the same place
1>&2 This operator redirects standard output to standard error
<> use the same file as both standard input and standard output
With the concept of standard input/output, we can manipulate data so that the output of an application becomes the input of another, for example
- ls > file1.txt ;will create a file called file1.txt with the listing result from ls
- grep is file1.txt ;will search for the string «is» on the file1.txt and display the result on the screen
- You can do this command, with the pipe operator, to get the output of ls and piped into the input of grep, cool ah? ls | grep is
xargs ;is a program that listens in STDOUT and executes the data as an input to another command, for example
- ls | xargs rm -rf ;this get the STDOUT from ls and pipe it to xargs, which executes the rm command, just like if you typed: rm -rf
- sudo find. -maxdepth 4 -name «*.txt» | xargs tar cvf textfiles.tar ;this will find all *.txt files within 3 directory levels and compress them on a file
tee ;similar command to xgars, get the output of a command and pipe it into another, plus shows in the screen the output
- echo «print this» | tee file.txt ;the tee command will get the output from the each and put it in the screen, creating in addition the file.txt
103.5 Create, monitor and kill processes (4)
Every single process in Linux has a number (process ID — PID — that identifies itself; these are the different signal commands with their signaling number
| Name | Number | Description |
| SIGHUP | 1 | Hang-up, instruct the program to reinitialize itself, including reading configuration files |
| SIGINT | 2 | Interrupt, this is done also by Crtl + C |
| SIGKILL | 9 | Kill the process immediately |
| SIGTERM | 15 | Terminates a program, it is doesn’t terminate you can kill it by using the «9» signal |
& ;by putting the ampersand at the end of a command it sends the job to the background but they are only there in the terminal window that you are working on, the minute you close that terminal all background commands are stopped; to stop jobs just use the popular Crtl+Z
- sleep 60 & ;
- jobs ;allows you to see what jobs are running in the background
- fg %2 ;allows you to bring to the foreground (fg) the job id number 2; when you see the + next to a job number that indicates that this is the most recent command you sent to the foreground, meaning that if you just type «fg» it will bring back the one with the plus
nohup ;it sends jobs to the background too, but they will stay running in the system even if you close the terminal window
- nohub sleep 60 & ;creates a background job just like before, but it will stay on even if you close the terminal window
- ps aux | grep sleep ;allow you to see the background jobs on a different window
disown ;detach from a terminal window a background job
pgrep ;look up for a signal process base on its name or other attributes
103.6 Modify process execution priorities (2)
In the Linux world, the priority level of a particular process is refer to as the «nice» level, and a process can have a priority level anywhere from -20 (takes a lot of the pizza of the CPU) to +19 (only takes a tiny slice of the CPU pizza), being 0 (zero) the default «nice» level of a process. The reason that the high priority level is in negative, is because the process that fall into negative are not «nice» to the system because they use lots of CPU
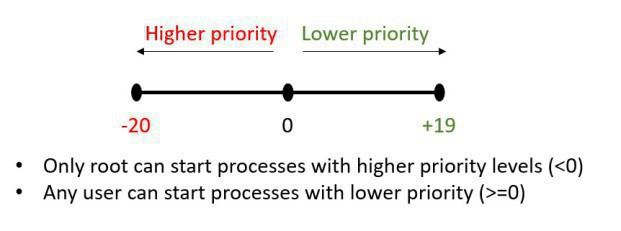
renice ;it changes the already assigned priority level of a process that was started with nice. A user DO NOT have the access to renice any process to higher priority, they only can lower the priority of the given processes
103.7 Search text files using regular expressions (2)
grep ;search for string inside a file, here we have some examples of using the grep command:
egrep ;extender version of the grep command
- egrep ‘^[a-m]’ file1.txt ; find all words at the beginning of a line that start with either «a» or «m»
- egrep ‘^[P|p]’ file1.txt ; find the words at the beginning of the line that start with either capital P or lower p
fgrep ;similar to grep but faster (for f) as it doesn’t evaluate any expressions like $$ or special character
- . (dot) — a single character
- ? — the preceding character matches 0 or 1 times only
- * — the preceding character matches 0 or more times
- + — the preceding character matches 1 or more times
— the preceding character matches exactly n times - [agd] — the character is one of those included within the square brackets.
- [^agd] — the character is not one of those included within the square brackets.
- [c-f] — the dash within the square brackets operates as a range. In this case it means either the letters c, d, e or f.
- () — allows us to group several characters to behave as one.
- | (pipe symbol) — the logical OR operation.
- ^ — matches the beginning of the line.
- $ — matches the end of the line.
Character Sets ;they are included within square brackets [], if you put an hyphen it means that is range 7 otherwise it will treat the character individually. If you put an exclamation mark inside the set, that means not to match whichever character will folow after [!0-9] ;the character classes matches one character of a certain type [:digit:], [:lower:],[:alpha:], etc, meanint that 3 is equal to [:digit:]
Extended globs ;ensure extglob is enable by typting shopt -s extglob, you can created more defined queries and group matches like this !(+(photo|file)*(.jpgl.gig)) = all files that do no have photo or file and don’t end with jpef or gif.
Single quote ‘ tell the shell to present the character inside literally, and all special characters inside ‘ have no meaning
Double quote » tell the shell to interpret waht is insiss
103.8 Perform basic file editing operations using vi (3)
vi ; use the keys H-J-K-L (K for kites go up) to navigate through vi if needed. When starting vi you always start in Command mode, press INSERT to switch to Insert mode, you can also press «i» and vi will allow you to insert text just before the cursor; shift + i let you insert text at the beginning of the line. Refer to this for more info: http://www.lagmonster.org/docs/vi.html
- :wq = write and quit
- :wFile2.txt = write to a new file called File2.txt
- :q! ;quit without saving
- :e! ;reads the original file back again and starts all over
- :sh ;open the shell so you can enter commands while the file is open, press Crt+D to return to the file
- :g/heart/p ;displays all lines containing the word heart
- :!ls -l ;this will run the command ls -l while maintaining the file open
- ZZ ;writes the file if it has been modified and then exit the application
- /string ;that will search for the string «string» forward in the document
- :%s/Love/Dragoste ;substitute the string «Love» for «Dragoste» in the entire document (because you have used the % operator); if you add the «/gic» at the end it will do g (global, will find all matches), i (makes case in-sensitive) and c (will confirm for each replacement)
- . ;the dot command repeat the last command
- a ;insert text After the character at the current position
- b ;navigates to the Beginning of a word
- c ;insert a character Before the cursor
- B ;navigates to the beginning of a White-Space delimiting word
- dw ;deletes the word immediately after the cursor
- d$ ;deletes from the insertion point to the end of the line
- dl ;deletes a character
- d5l ;deletes 5 characters
- dd ;deletes the entire current line
- D ;deletes the rest of the current line from the cursor position
- cw ;deletes the current word, and automatically enter INSERT mode so you can type a replacement word
- e ;navigates to the End of a word
- E ;navigates to the end of a White-Space delimiting word
- u ;undo the most recent command in the vi editor
- U ;(capital u) redo the last recent operation
- h ;moves left one character
- j ;moves down one line
- J ;join two lines
- k ;moves up one line (kites go up!)
- l ;moves right one character
- 0 ;(zero) moves to the start of the current line
- o ;opens a new line under the current line
- p ;inserts the text deleted in the last deletion operation after current cursor location
- yy ;copy one single line to clipboard (yank) the current line, if you want to copy 4 x lines use 4yy
- y5y ;yank five lines, if you press «p» after it will copy whichever lines/s you copied
- x ;deletes a character at the cursor
- X ;deletes a character before the cursor
- I = navigate right one character
- $ = navigate to the end of the current line
- H = navigate to the first line of the text
- M = navigate to the middle of the text
- L = navigate to the last line of the text
- G = move to a specific line to perform an editing operation
- :sh allows you to go back to the shell to write commands, use Crtl+D to return to the file, so cool!
- Crtl + U = moves half a screen up
- Crtl + D = moves half a screen down
- Crtl + F = moves down almost a full screen
- Crtl + B = moves up almost a full screen
- Crtl + E = scroll down one line and Crtl + Y scroll up one line
- To go to a specific line, pres ESC, then enter the line number you want to go to (you’ll see nothing on the screen) and finally press Shift+g to go to the line
nano ;user friendly text editor, crtl+a moves you to start of a line, crtl+e moves you at the end
Thanks to Langmonster for his/her great «vi Cheat Sheet»: http://www.lagmonster.org/docs/vi.html
104.1 Create partitions and filesystems (2)
Extended file systems are these:
- ext2 ;max partition 32TB, no journal but good for lower write actions (like USB drives)
- ext3 ;max partition 32TB, journaled
- ext4 ;max partition 1EB, journaled
- BTRFS ;snapshot, compression and auto-defrag
- ReiserFS ;very space efficient with small files, but the developer apparently is in jail so the filesystem is not in use that much
- XFS ;good for large partitions
When running fdisk, do first «o» to create an MBR, then n to start creating partitions. Press «L» to list the code (83 = Linux partition, 82 = Linux swap partition)
mkswap ;creates a swap partition
mkfs.ext2 ;creates a ext2 partition, use mkfs.ext3 to create a ext3 partition, use -t to define the type mkfs -t ext4 /dev/sda1
mke2fs ;creates a ext2 partition, use mke2fs -j to create a ext3 partition; the valid settings for file systems with the mke2fs are small, news (creates 1 x inode per 4-kb block) largefile (creates 1 x inode per megabyte) and largefile-4 (creates 1 x inode per 4MB block)
- mkfs ;create most filesystems
- mkfs, msdos, mkdosfs or mkfs.vfat ;creates a DOS FAT filesystem
- mkfs.ext2 or mke2fs ;creates an ext2 filesystem
- mkfs.ext3 or mke2fs -j creates an ext3 filesystem
- mkisofs ;creates a CD-ROM filesystem
- mkfs,reiserfs or mkreiserfs ;creates a reiserFS filesystem
e2fsck ;ensures that a ext2 file system that was improperly shutdown is error-free
parted ;shows you the partitions that you have on your system
xfs_growfs ;this command is used to expand an existing XFS file system
- xfs_growfs -n ;returns information of the file system geometry
- xfs_info /dev/sda1 ;also returns information of the file system geometry
lsblock ;shows you the attached block devices of your system (hard drives), very handy
fdisk is for MBR while gdisk is for GPT partition tables
104.2 Maintain the integrity of filesystems (2)
Use the fsck (pronounced ‘fisk’) to check for errors on a file system (ensure the drive is unmounted), you can do fsck.ext2 (but you’re screw if the filesystem is ‘ext3), so thanks God fsck will auto-detect the file system. Note that fsck should always run in single-user mode.
- Use the -N switch and it will show you the file format it has detected on the partition
Use the xfsprogs (on Ubuntu) to check for error of XFS file format, like xfs_repair, xfs_check (not recommended, run repair first)
For the xfs file system you have to use the xfs command to check it, a kind of beast on his own way
tune2fs ;change ext2 to ext3, so you add journal, remember to modify the /etc/fstab to reflect the new file system, changes are effective after a reboot. Tune2fs also allows you to view block counts for a file system, allowing you to adjust the number of mounts or days (-i for interval) after which a volume will be checked by e2fsck
- tune2fs -0 has_journal /dev/sda1 ;another way of converting an ext2 to an ext3 file system
- tune2fs -0 ^has_journal /dev/sda1 ;this will do the opposite, converting ext3 to ext2
dumpe2fs ;shows all superblock info
debugfs ;interactive filesystem editor, if you use this you’re definitely a professional
Use du / -hd1 (h for human, to show detail level 1 only) to see the space of different folders
df ;shows disk free, use the -h for human, use the option -T to show the file type system
104.3 Control mounting and unmounting of filesystems (3)
Use mount or umount to mount hard drives into empty folders, if you want the mount to be permanent then add it to the /etc/fstab
Use smbmount to mount a samba filesystem
The first partition of the first SCSI drive is /dev/sda1
The first SCSI tape drives load with /dev/st0
The first Parallel port is /dev/lp0 while the 2nd parallel port would be /dev/lp1
The first RAID volume is referred as /dev/md0
mount -t iso9660 image.img /dev/mnt/image ;this mount the .img file as if it was a partition
104.4 Manage disk quotas (1)
If we want to have quotas on a drive, we need to add the options » usrquota,grpquota » on the entry in /etc/fstab for the drive, quite easy, add both entries if you want to have quotas for both users and groups
Once the quota is enable on the drive, it will display the «aquota.group» and «aquota.user» files on the root of the drive
104.5 Manage file permissions and ownership (3)
In Linux the listing of permissions are the user-owner (u) of the file, the group the owner belongs to (g) and the group others-everyone (o), the string (a) applies permission to ALL
- chmod ugo+w file1.txt ;u(users) g(grouip) o(other), set every to write for the given file
- chmod u+rw,g+rw,o-rwx ;set user and the group to be rw but remove the rw access from the other
Octal Notation, most common values:
- 7 = rwx 777 = a+rwx = rwxrwxrwx
- 6 = rw 755 = u+rwx,g=rx,o=rx = rwxr-xr-x
- 5 = rx 644 = u=rw,g=r,o=r = rw-r—r—
- 4 = r 700 = u=rwx,g-rwx,o-rwx = rwx——
-(file) d(directory) | owner | group permissions | other, anybody who is not the owner or does not belong to the group
The umask is the default permission that are assigned when you create a file or directory ( umask -S to see values), the umask is set in /etc/profile /etc/bashrc or /etc/login.defs and the way it works is by subtracting the value from the default all-permissions, for example if you execute the umask 077, the effective permissions created during the session would be:
- 600 for files (rw only, as-)
- 777 for directories (rwx)

The special permissions are set on the «executable» bit of the relevant user, group or everybody (other). The sticky bit is set ONLY in the other field. When you see the lower case «s» it means that the executable bit has also been set, while if you see only the capital «S» the executable bit is not set
SUID ;[set user id](value of 4) executes with permissions of the file owner, like for example ping, or the /usr/bin/passwd file, that runs with the root credentials even if you are a user (it will display with an «s» e.g. passwd = -rwsr-xr-x.
GUI ;(value of 2) the file is executed with the permission of the group ID, this option is not used very much, however any new files created on the folder will be executed with the permission of the group
Sticky bit (value of 1);nowadays the sticky bit is set on a folder, and that means that the files inside that folder can only be deleted by the owner
setfacl ;use this command to configure extended ACL permissions to a file (chmod cannot configure ACL), use getfacl filename to get current info of a file/directory, using getfacl -t filename gives you a different view. Linux permission have got some limitations, only 1 x user and only 1 x group can own the file/directory, while other could be anybody; this is where ACL comes into place
- setfacl -m user:bob:rwx filename ;this will set tbob as a user in addition to whichever user is the user of the ‘filename’ file. if you type ls-l that will show you a ‘+’ at the end, inficationg ACL permissions have been set
- setfacl -m u:bob:rwx,g:accouting:rw filename ;another way of doing it, the -m switch is for modify
- ACL are turn on on CentOS but only on the / partition!
- To remove ACL use these switches
- -x remove specific ACLs; setfacl -x bob filename or setfacl -x group:marketing filename
- -k remove all default ACLs
- -b remove all ACLs
chown ;change the ownership of files chown user:group -R /myfolder will assign the ownership to the user and the group, use it without the -R if you want to take ownership of a file only
chattr ;if you set the immutable feature on, those files cannot even be deleted by the root chattr -i scritp.sh
104.6 Create and change hard and symbolic links (2)
Hard links are files pointing to the inode of the hard drive, you cannot create hard links in between 2 x disks
Soft links are just shortcuts in between files, you update the master and the shortcut gets updated. If you move the original file (mv command) the soft link will be broken
104.7 Find system files and place files in the correct location
locate ;similar to find, a bit quicker but works by creating a database which is updated once a day ( sudo updatedb updates de locate database)
- sudo vi /etc/updated.conf ;contain the setting for the locate database
which ;use to find binary files (#which pint)
whereis ;similar to «which», also find the binary file together with the man pages
105.1 Customize and use the shell environment (4)
Working on the command line, Alt+b moves one character back, while Alt+f moves it forward. The shell allows you to execute OS command by sending them to the kernel; when a command is entered in the terminal, the command execution order is the following:
- The Shell will check if it’s a built-in command
- The Shell will check if it’s an alias of a command configured by the OS or another user
- The Shell will check if the command is on the hard drive, and will display command not found if all of the above is false
There is a standard to write scripts, so they can be portable, called POSIX-compliant shell ;bash shell is currently version 4 but there are other popular shells like cash (for debian, using less memory and faster execution than bash), fish -friendly interactive shell- is designed for interactivity and only available in third-party EPEL software repository, Zsh is very similar to bash but with a wonderful command completion. Most of the shells can be installed using yum install -y zsh / ksh /csh To switch shell use chsh then type the path /bin/zsh for the desired shell, then logout and log back in again
- Environment variables are defined for the current shell and inherited by any child shells or process, printenv to see those ones
- Shell variables are contained exclusively within the shell in which they were define; use set to see shell variables as well as functions, to see them without the functions use set -o posix and then set | less ;to include a variable as part of the environment use the export command (use the export -n to unset it); if what you want is to unset shell variables use the unset command instead. You can see all the sell options by typing set -o (or set +o) and if you like you can for example set posix off by typing set -o posix ,however the changes of this bash variables values only last for your current logon, once you log out all is back to normal, to make these configuration persistent we need to add them to one of the bash files
Logon Process ;when a user logs into an interactive shell, the Linux OS process the logon as follows:
- /etc/profile ;this file loas, which in term load all the scripts under /etc/profile.d/*.sh ; both contain System environment and Shell variables
/.bash_profile ;this file loads, containing the user environment and shell variables; in CentOS this file also execute the
/bashrc that contain the user aliases and shell functions specific to the user
When you need to add aliases to the
/.bashrc file you must add them to the end of the file, after /etc/bashrc has been called so that you override systemwide aliases and functions
The commands in Linux normally are Command + Options + Arguments. When a login shell launches, it reads the files in this order:
- /etc/profile first ;either it exist or not
Non-login shell will read only the /etc/bash.bashrc and then the
/.bashrc files. To change shells in the middle of your session use the dot (.) command . bashrc will switch you to the bashrc shell. The PS1=» \$» environment variable can be set in either /etc/profile or /etc/bash_profile, this will cause the prompt to look like user \u @ host \h with \s and \w representing shell name and pwd respectively
Any content found in the /etc/skel directory will be copied to the home directories of newly created users; the file
/.bash_logout runs when you exit from a session
Run echo $BASH_VERSION to find out what release of bash you have (4.2.46 r2 at the time of writing). Bash stands for Bourne Again BAsh, since 1989 https://tiswww.case.edu/php/chet/bash/bashtop.html
#!/interpreter ;this is called the «Shebang», (the command interpreter) meaning that this is the interpreter (executable) that will run that particular script; if you don’t specify a «Shebang» interpreter, the script will be execute on whichever bash you are
Conditionals and loops
- if [conditional statement] then
else fi - for VAR in [some sequence] do
done ;in this loop the sequence statement gets accumulative to the VAR, if 1 then 2, then 3, etc
While loops ; while [conditional loop] do
declare ;when you declare variables you can use -i (specify it is an integer, therefore can do math) or -r (read-only)
alias as=»ls -lha;cat timezone» ;this alias will perform those two commands, to remove it use unalias as .Functions are a bit more complicated, like for example function listd() < ls -lha $1>;to remove an alias use unalias and to remove a function use unset
105.2 Customize or write simple scripts (4)
Testing values, notice the operator NOT equal to ( != ), you can use other ones like lt (less than) gt (greater than), etc
The if statement works well if there are only 2 choices to choose from, but if you have 3 or more choices, you better use the «case» statement (notice that it ends with the clause esac, meaning case in reverse)
Loops are scripts that required a repeated action like while or until a certain condition is met
This next example is an «until» script; «while» continues until the condition is TRUE, and until continues «until» the condition IS NOT true
for loop ;a loop constructed with the for will take all the values returned by a command and act on them one at a time
seq ;the sequence command produces number in sequence, for example seq 5 14
exec ;the exec command is use to launch Linux shell commands written in other languages like C, PHP or Perl, for example exec(«dir», $output, $return);
105.3 SQL data management (2)
Run the following to install MySQL in Ubuntu (do not forget the ‘sudo’ in front of the commands):
#MySQL -u sa -p food ;this will use the username «sa» to connect to a database «food» and will prompt for a password «-p» to login to it
In MySQL interactive mode you can use the following commands:
- mysqlL> SHOW TABLES;
- mysql> SELECT * FROM fruit;
- mysql> SELECT name FROM fruit; [select the column name from table fruit]
- mysql> SELECT * FROM fruit WHERE color = «yellow»;
- mysql> SELECT * FROM fruit JOIN vegetable ON fruit.color = vegetable.color;
106.1 Install and configure X11 (2)
xorg.conf file is a historically file that existed in /etc/X11 and by default is not in the new distributions, nowadays everything is automatically detected. Back on the day computers used to be so slow that there was a font server to load the fonts and renders them on the computer. If in the xorg.conf file the driver for the card is «visa», most likely means that the card is not supported.
- xwininfo ;tool that give you info about the monitor/graphics setting
- xdpyinfo ;another tool with tons of information
- xhost ;if you type «xhost +» that means that the X11 can listen to connections, however the nowadays X11 server do not longer listen to connections!
- xhost +192.168.0.11 ;if the X Server was listening for external connections, the computer 192.168.0.11 will be able to connect
- export DISPLAY=192.168.0.130:0.0 ;old stuff, how everything used to work, but this used to display your screen to the IP 192.168.0.130
- ssh -X manuel@uranus ;this command is used nowadays! once you logon to URANUS you go and type «xeyes» and the graphical display in Uranus will be displayed on your computer
Display Managers; there are a few (lightdm ,KDM, XDM, GDM). with Ubuntu you get lightdm, the config files for it are in «/etc/lihgtdm» and «/etc/lightdm.conf.d». To make changes to the configuration edit «/etc/lightdm/lidghdm.conf.do/10-xubuntu.conf»
- apt-cache search lightdm | grep greeter ;shows you the greeter that you can use in Ubuntu
- Edit «/etc/default/grup» and set to ‘text’ the GRUB_CMDLINE_LINUX_DEFAULT=»text» , then issue «sudo update-grub» and the Ubuntu will default to text mode. For CentoOS you just edit the default.target
106.2 Setup a display manager (1)
In CentOS only GNOME3 (default desktop) and KDE 4.10 are supported, though you can install many more desktop by using repositories. Cinamon desktop comes from GNOME2; other popular is Xfce which uses less memory and CPU cycles than other desktops. Go to http://www.kde.org/applications to get new goodies, but ensure you donwload them using yum so you’re using the right repos
GNOME3 uses hot corners, you put your mouse in a corner and the «Overview» is launched, this is a feature that GNOME Classic does not have. To install MATE Desktop you need to add a third-party repository, like this:
106.3 Accessibility (1)
Description: Demonstrate knowledge and awareness of accessibility technologies.
Key Knowledge Areas: Basic knowledge of keyboard accessibility settings (AccessX), Basic knowledge of visual settings and themes, Basic knowledge of assistive technology (ATs)
- Sticky/Repeat Keys
- Slow/Bounce/Toggle Keys
- Mouse Keys
- High Contrast/Large Print Desktop Themes
- Screen Reader
- Braille Display
- Screen Magnifier
- On-Screen Keyboard
- Gestures (used at login, for example GDM)
- Orca
- GOK
- emacspeak
107.1 Manage user and groups accounts and related system files (5)
Execute su (substitute ) to change the user (su -l root). It is obviously NOT GOOD PRACTISE to logon with the root account.
- sudo -k ;give up the privileges after using sudo, logging out and leaving the user logon
- sudo -s ;switch over to fully root account, notice how the prompt changes to the hash sign (#) so you know you are root, type ‘exit’ to go back the ($) user-sign
- Just remember when using su that the echo $PATH would be pointing to the logged on user
Type «passwd» to change your own password. Type «sudo passwd bob» to change bob password.
lastb ;display a list of the most recent bad login attempts
useradd ; -m (create home directory), -d /home/user (specify home directory) -G group1,group2 (add user to groups) -c string (comment, puts the name of the user); type useradd alone to see all the options
usermod ;almost as above, but modify the user like -L (lock account) -U (unlock account) -aG (add user to additional group)
userdel ; with the -r you delete the files in home folder along with the account
cat /etc/passwd ;all users need to be able to read this file; the password will appear as «x», meaning that you need to look at the shadow file to see the password. The /etc/shadow file is only readable by the root user, the password will show as encrypted, but this is where the system looks for the passwords.
| Column | ||
| 1 | Username | Username |
| 2 | Password enconding file, an ‘x’ indicates the password is stored in /etc/shadow | |
| 3 | Numeric userID (0-900 for System Accounts, 100+ for user accounts) | Days between 1-Jan-1970 and the most recent password change |
| 4 | Numeric primary groupID | Number of days before the password can be change; 0 means it can be change at anytime |
| 5 | Comment Field to store comments | Number of days before the password must be change, 99999 is about 274 years |
| 6 | Home directory | Number of days to warn the users of an expiring password, default 7 days |
| 7 | Default login shell | Number of days after the password has expired that the account is disabled, default 7 days |
| 8 | Number of days between 1-Jan-1970 and the date the account was disabled |
Accounts with the shell /bin/false cannot login, this normally relates to deamon or service accounts; cat etc/shells shows you the shells installed on the system. The hashtag of the /etc/shadow file can be changed using the /etc/login.defs or by using the autoconfig command. Salt is a set of ramdon characters that are appended to the password before it is hash, thus making it impossible for diccionary attacks, note that the portion to the left-hand-side of the dollar sign is the salt; use the command gpasswd to set a password for a group
yum install shadow-utils ;just in case the shadow utilities are not installed; the commands pwconv and pwunconv will allow you to convert the passwd to shadow file; grpconv and grpunconv for the gpasswd file
chage (for CHange AGe), tool use to change the password expiration for users
cat /etc/group ;shows the group memebership. The /etc/gshadow is similar to /etc/shadow ; the third column gives you the groupID, while the 4th columns shows you the users that belong to that group. Groups can have password, to prevent users from adding themselves to the group
cat userpassword | chpasswd ;changes all the users password with whichever password is in the «userpassword» file, that file must be in the format username:password, and you can use the -e switch to tell chpasswd that the file is encrypted
etc/security/pwquality.conf ;configure the password requirements using this file
User Limits
ulimit ;type with -a to see all the limits that have been set, how many open files, etc
To make limits changes that are global for everybody edit /etc/security/limits.conf so you can comment out and set limits per users or groups (nproc is number of processes that are allowed)
who ;it shows you who is login into the system (working in the console) whoami ;tells you who you are, but use the logname to find out who logs on to the system. id ; shows you more info about the user, like group memebership, etc, type groups to see the groups of the current user
w ;it shows what the users are doing in the system
last ;shows you what users have been doing in the system, as well as the reboot times, etc, great command, use it with the -F to see Full info
lastlog ;shows you last logged on users; lsof ;list open files, use it with the -i switch
visudo ;edit this file to manage the access users have when using the sudo commands, the lines with % are active, and notice that members of the group wheel have got ALL access
| sudo | su |