- Solved: The Disk Is Write Protected in Windows 10
- Help! The disk is write protected!
- Why a disk becomes write-protected?
- How to remove disk write protection in Windows 10?
- Solution 1: remove disk write protection using CMD
- Solution 2: disable write protection by editing the registry
- Solution 3: remove write protection via a freeware
- Summary
- How to Remove Write Protection from USB in Windows 10/8/7?
- What is write protection on USB?
- How to remove write protection from USB drive effectively?
Solved: The Disk Is Write Protected in Windows 10
You may get an error that says the disk is write protected when formatting a USB or SD card in Windows 10. Then, how to remove write protection from a disk?

By Lily  / Last Updated December 14, 2020
Quick Navigation:
Help! The disk is write protected!
Currently, USB drives (flash drives or pen drives) and SD cards (micro SD or memory cards) are widely used by computer users to store and transfer data. However, some users are confronted with write protection error. Here is one scenario:
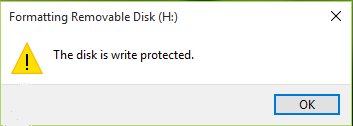
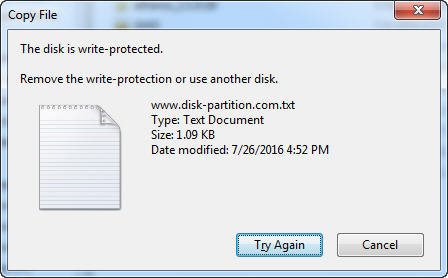
“I used my Sandisk Cruizer Edge (32GB) on Windows 10 x64 and Mac Os X 10.7.x for a long time, but from some days I’m unable to add, change or delete files on both OS. I’ve checked on the Disk Management (under Windows) and I’ve noticed that the flash-pen is «Read Only» but I’m unable to change that status.
I can’t format it, because I receive the error «The disk is write protected». so, now I’m trying to change files status (I see that «Archive» is checked), but again in some files, I receive the same error.
It’s very weird. even because I’m able to read everything on it. so the flash-pen works. I’ve tried to disable and uninstall it, but again, when Windows recognize it, present the same error. ”
Such experience sounds annoying!
Why a disk becomes write-protected?
When you encounter the write protection error, you must be curious about possible causes. Some of the causes are listed below:
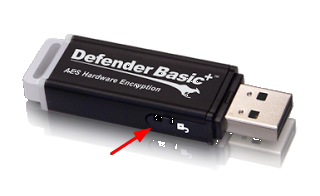
в—Џ There is a physical write protection switch on some USB drives and SD cards. If this is the situation, then simply move the switch to the unlocked position.
в—Џ The USB drive or SD card is attacked by viruses. If you do find a virus, eliminate it using your antivirus software.
в—Џ The USB drive or SD card stick is full.
It seems difficult to fix write protection error in the third case for you can’t simply move or delete files on the USB drive or SD card. In this condition, you may try solutions offered in the next part.
How to remove disk write protection in Windows 10?
Do you find the disk is write protected in Windows 10 and don’t know what to do? Don’t worry! Windows built-in features or a trustworthy write protection removal software can rescue you. For detailed steps about removing write protection from disk in Windows 10, refer to the following content.
Solution 1: remove disk write protection using CMD
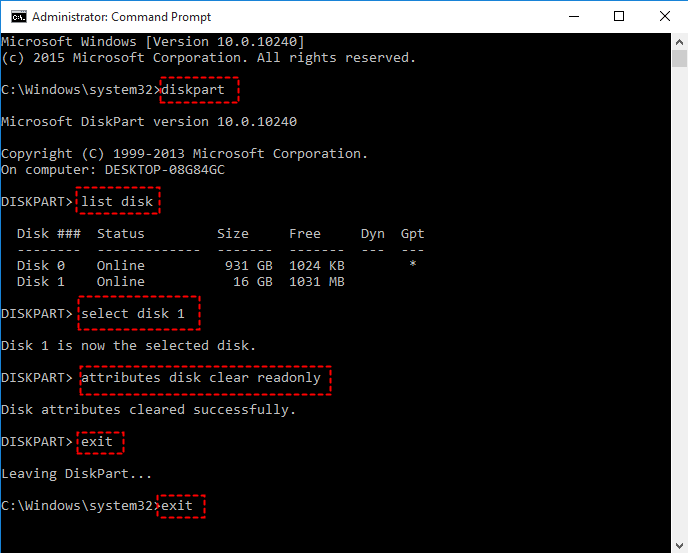
1. Hit Windows Key + X on your keyboard, and select Command Prompt (Admin) from the menu.
2. Type diskpart and press Enter.
3. Type list disk and press Enter.
4. Type select disk #(ex: Disk 1) to select the disk which is write protected and press Enter.
5. Type attributes disk clear readonly to change the disk’s properties so that it is no longer read-only and press Enter.
6. Type exit and press Enter twice to exit Diskpart and Command Prompt continuously. Re-plug your USB flash drive to check if the write protection error is solved.
Solution 2: disable write protection by editing the registry
1. Press Windows Key + R to open the Run dialogue. Type regedit and press Enter or click “OK” to open the Registry Editor.
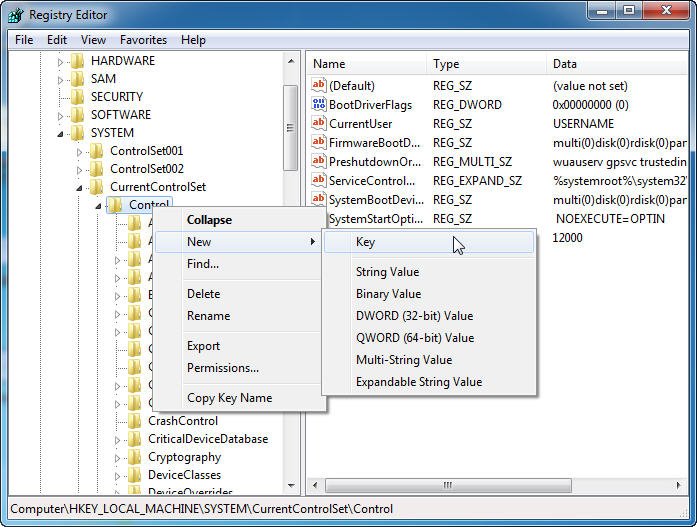
2. Expand the entries on the left-hand pane to navigate to the following path:
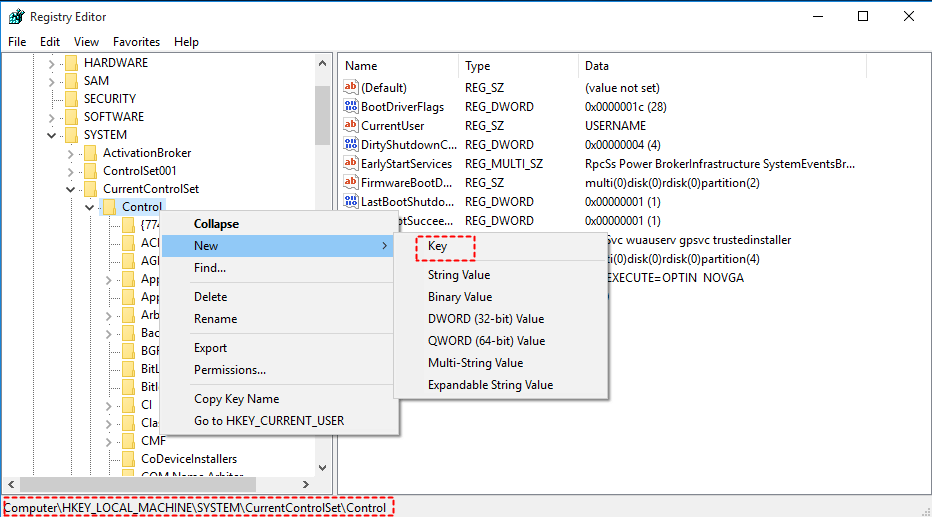
HKEY_LOCAL_MACHINE\SYSTEM\CurrentControlSet\Control
3. Right click the Control (folder) key, select New, and click on Key. Name the new key StorageDevicePolicies.
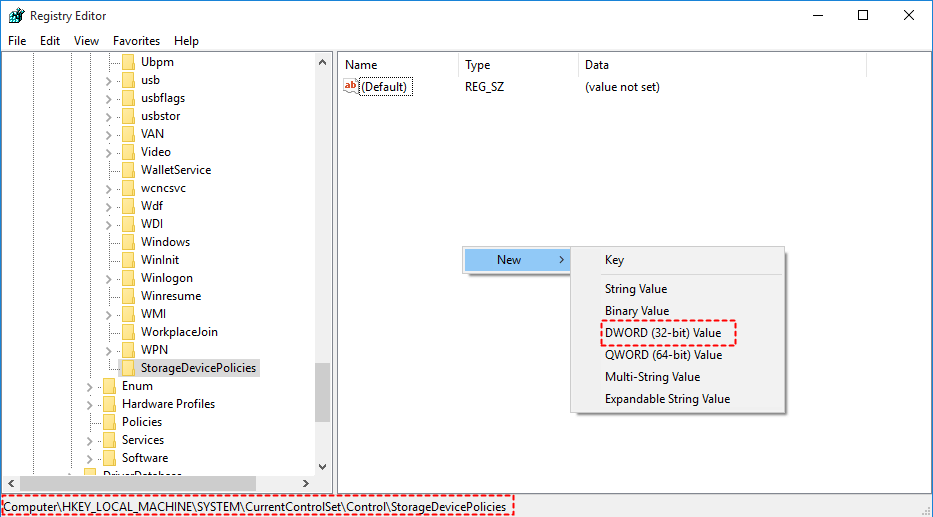
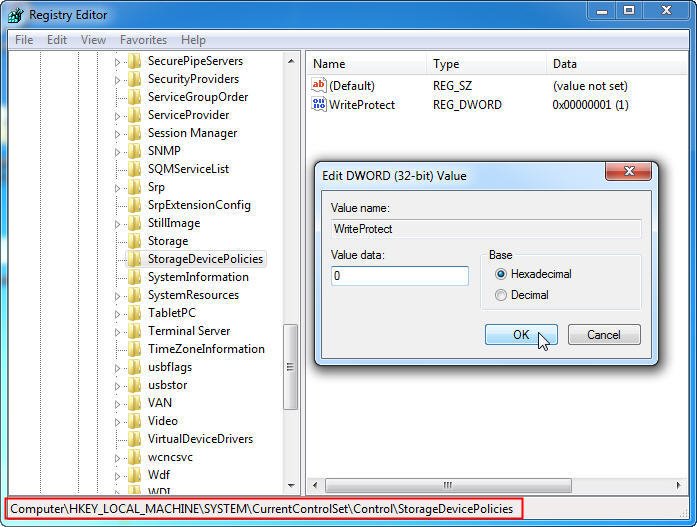
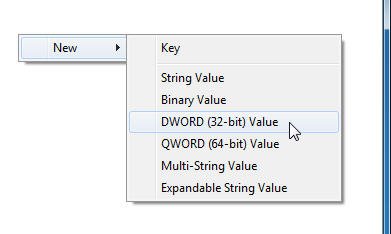
4. Select the newly created key, and right click on the white space at the right-hand pane. Select New, and click on DWORD (32-bit) Value. Name the new DWORD WriteProtect.
5. Double click the newly created DWORD and change its value from 1 to 0. Click “OK” to apply the change.
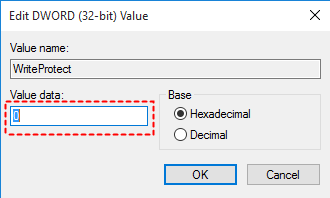
Tips: 1 means “Yes, write protect my USB storage devices.” Conversely, 0 means “No, don’t write protect my USB storage devices.”
6. Close Registry Editor and restart your computer.
Solution 3: remove write protection via a freeware
If you’ve tried the above two solutions and still can’t remove the write protection from USB drive or SD card, formatting the disk is a last resort. AOMEI Partition Assistant Standard is a free partition manager software and disk management tool for computers running 32-bit or 64-bit version of Windows 10, Windows 8.1/8, Windows 7, Vista and XP.
Keep in mind that formatting a partition will destroy all the data on the partition, so it’s essential to back up all the important files and data before you do. Follow the guidance below to remove write protection from USB in Windows 10 easily:
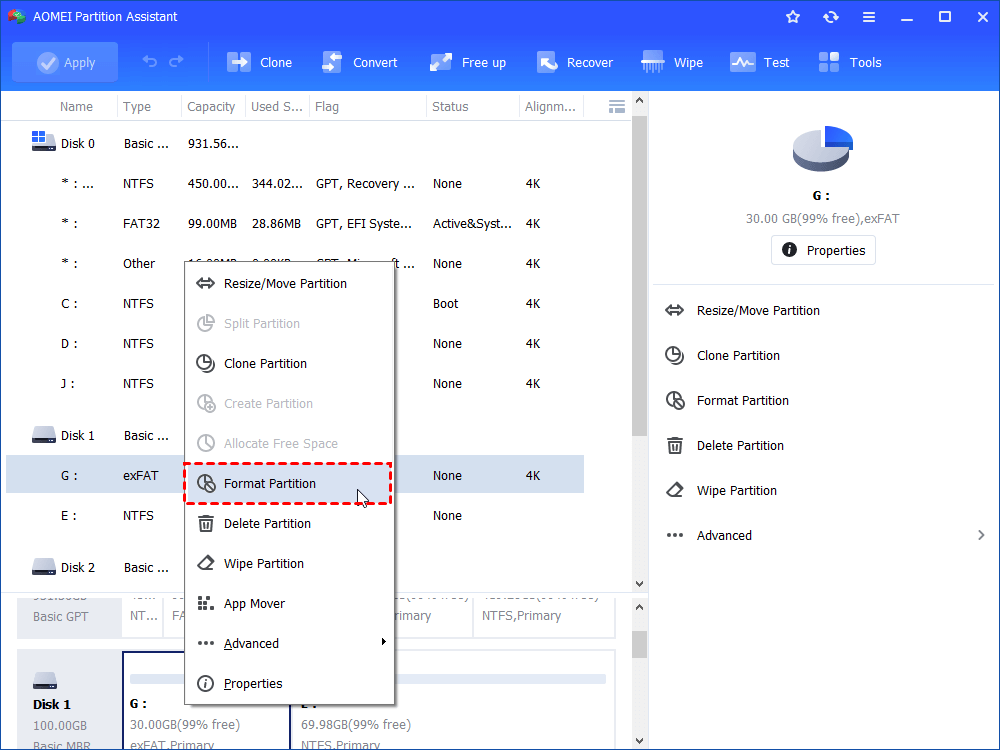
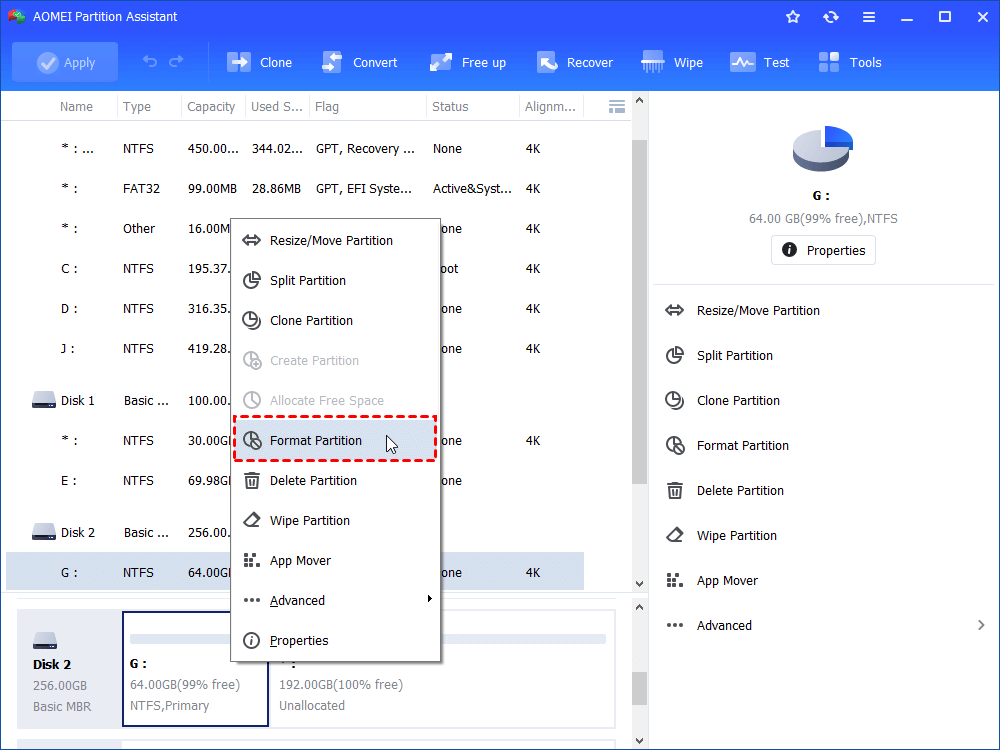
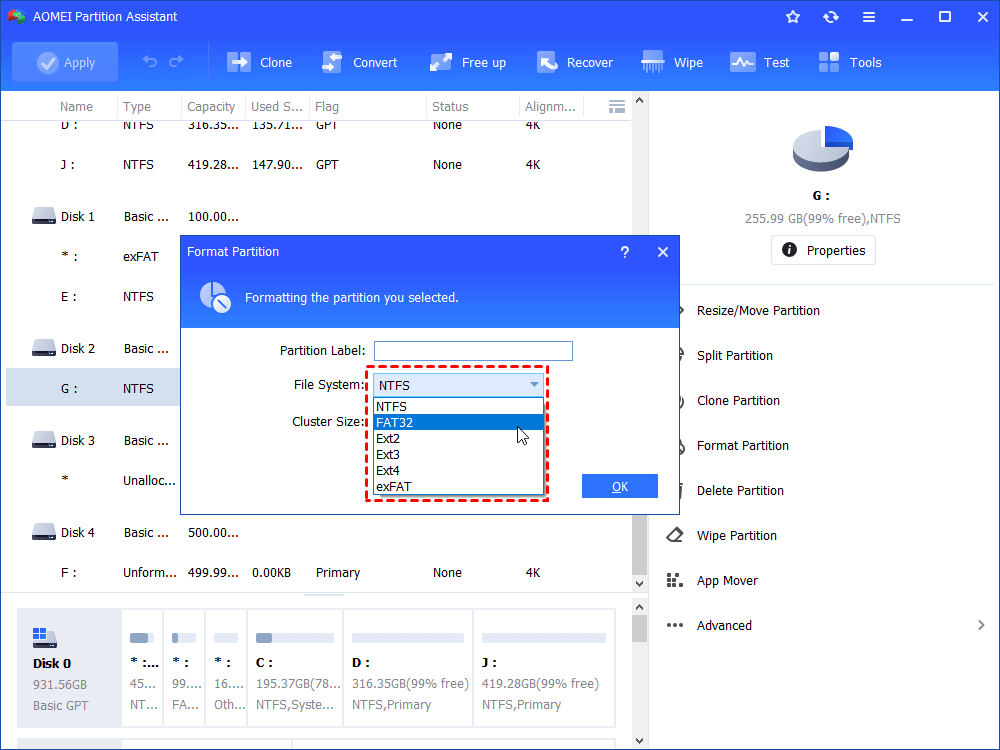
Step 1. Download, install and launch AOMEI Partition Assistant. Right-click on the USB partition and select “Format Partition”.
Step 2. In the pop-up window, you can name the USB drive by editing “Partition Label” and change file system based on your needs. Click “OK” to continue.

Tips: FAT32 ensures cross-platform compatibility while NTFS supports single file size up to 4GB.
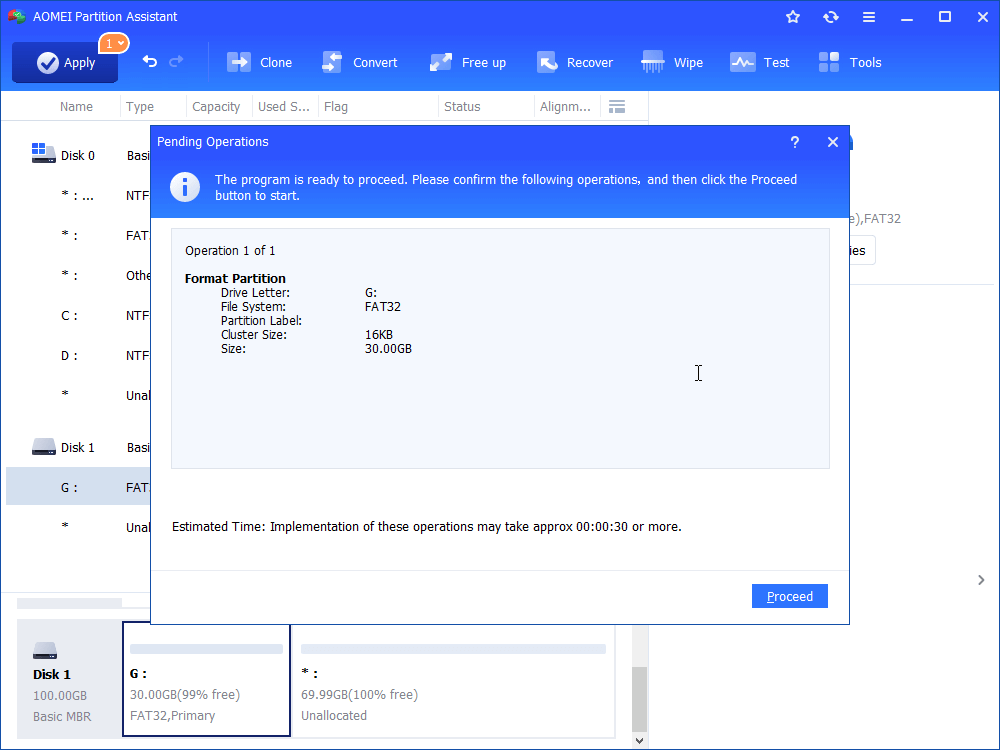
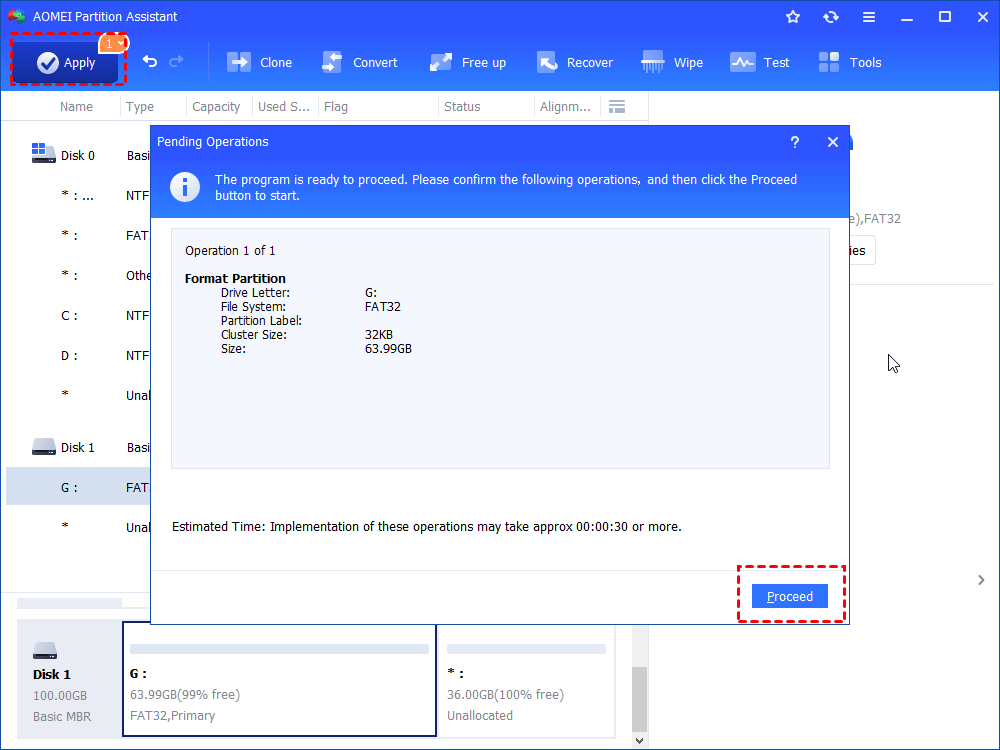
Step 3. Confirm “Pending Operations” and click “Apply” to execute the operation.
Note: To enjoy more advanced features, such as converting system disk into GPT without data loss, you can upgrade to Professional version.
Summary
There are different solutions offered in this article to help you resolve the disk is write protected in Windows 10: write protection switch, antivirus software, CMD, Registry Editor, and AOMEI Partition Assistant. When you find the disk is write-protected in Windows 7, you can also remove write protection using these solutions. Apart from formatting partitions, AOMEI Partition Assistant also enables you to write zeros to a hard drive. Give it a shot right now!
How to Remove Write Protection from USB in Windows 10/8/7?
Refer to this post to learn how to remove write protection from USB drive in Windows 10/8/7, if your Windows 10 may get an error saying that the disk is write-protected when copying files to USB.

By AOMEI / Last Updated March 16, 2021
Nowadays, most of us have one or more USB flash drives, which are usually used to store and transfer data among computers, create Windows To Go workspace, install and run portable applications, connect to a wireless network, and backup files. Some users who often use USB drives may have come across the following error messages.
в–Є Error during formatting USB: «When I format my USB pen drive, it shows the error message — The disk is write protected. I have tried various methods to solve this but all are not working. There is no write protection switch on it. It is a SanDisk Cruzer Edge 8GB USB. I am using Windows 7. Please give me solution to fix it.»
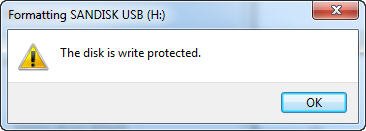
в–Є Error during copying file to USB: «While trying to transfer files from my Windows 10 PC to a Kingston DataTraveler 32GB USB flash drive, I received an error message — The Disk is write-protected. Remove the write-protection or use another disk. Now I can neither copy files to the USB drive nor create new files from the USB drive. The PC is upgraded from Windows 8.1. How do I disable the write protection?»
What is write protection on USB?
Write protection (also called read-only) can be physical or virtual. A USB drive is enabled with write protection has the ability to prevent new files from being written or old files being changed. Typically, this means you can only read the data which are already stored on the USB, but you can’t delete or modify them. By using write protection, you can make ensure data is not accidentally overwritten or erased.
How to remove write protection from USB drive effectively?
If you are reading this post, you must be one of them. Deep breath and stay calm. No matter whether you are using Windows 7, Windows 8 or Windows 10, I am going to walk you through a few easy steps to remove write protection and make your USB flash drive or SD card writable again.
Step 1. Check the write protection switch if available
Some USB flash drives have a physical switch which allows you to lock or unlock write protection. The location of a switch on a USB flash drive will be different. Make sure the lock switch is slid up to unlock position. You will not be able to transfer files to the USB drive if it is locked.
If the write protection switch on your USB drive is off and you still get the error message or there is no physical switch on your USB drive, please skip to Step 2.
Step 2. Clear read-only attributes with DiskPart utility
2.1. Press Windows key + R combination on your keyboard. In the pop-up Run dialog box, type diskpart and hit Enter or click «OK» to open the DiskPart Command Prompt.
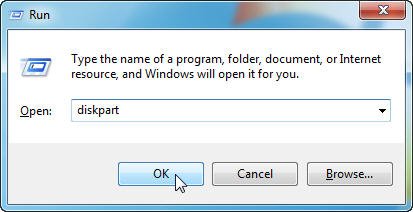
2.2. Type the following commands one by one and hit Enter after each:
в–Є list disk — all of the disks connected to the computer will be displayed, including internal hard drives.
в–Є select disk n — where n is the number of USB flash drive. You can use the Size column to identify which one it is.
в–Є attributes disk clear readonly — change your USB’s properties so that it is no longer read-only.
![]()
2.3. Close DiskPart Command Prompt and re-plug your USB flash driveto check if the write protection error is resolved. If not, please try the next step.
Step 3. remove write protection through editting the registry
3.1. Press Windows key + R combination on your keyboard. In the pop-up Run dialog box, type regedit and hit Enter or click «OK» to open the Registry Editor.
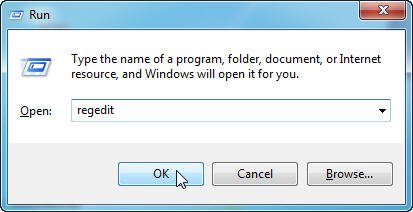
3.2. Expand the entries on the left-hand pane to navigate to the following path:
3.3. On the right-hand pane, double-click on the WriteProtect or right click on it and select «Modify». In the pop-up window, you may find that the «Value data» is set to 1 which means current computer is enabled with write protection on USB storage device. To disable it, you need to change the value from 1 to 0 and click OK to apply the change.
3.4. Close Regedit Editor and connect your USB drive to the computer again, and you should find the USB write protection has been removed. If not, please follow the Step 4.
Tips of Step 3:
в–Є If there is not a «StorageDevicePolicies» folderВ under the «Control» folder, you can right click «Control» folder and choose «New» -> «Key». Name it with StorageDevicePolicies and then open it.
в–Є Right-click on the white space at the right-hand pane and choose «New» -> «DWORD (32-bit) value». Name it with WriteProtect. And then, double-click on it to check if the Value data is set to 0.
Step 4. Format write-protected USB drive with free partition manager
If you’ve tried all steps above and still can’t remove write protection from USB drive, the reason might be corrupted file system. To settle out it, you can try to format the USB drive. The problem is how to format a write-protection USB?
AOMEI Partition Assistant Standard is a free partition manager software and disk management tool for computers running 32-bit or 64-bit version of Windows 10, Windows 8.1/8, Windows 7, Vista and XP. It supports the all types of disk, including mechanical hard drive, SSD, SSHD, external hard drive, USB flash drive, SD card, etc. It enables you to format a USB drive easily and quickly.
To enjoy more advanced features, such as recover lost partition, clone GPT system disk, convert dynamic disk into basic, etc., you can upgrade it to Professional version.
Note: Formatting a USB will delete all data on it. Therefore, make sure that you backup all the data from USB drive to your computer.
4.1. Free download, install and launch AOMEI Partition Assistant Standard. Right click on the USB partition and select «Format Partition«.
4.2. In the pop-up window, you can name the USB drive by editting «Partition Label» and change file system. By default, a USB drive is formatted as FAT32, which ensures cross-platform compatibility. However, FAT32 limits a single file size up to 4GB. If you would like to store larger files on your USB flash drive, you should format it to NTFS. And then, click «OK» to continue.
4.3. Your USB has not been formatted yet. To save the change, you need to click «Apply«.
The formatting progress shouldn’t take too much time. Of course, the more data on the USB, the more time the formatting will take. If there is no physical damage or bad sectors with the USB drive, it will be formatted, cleaned and writeable.
Since the reasons for write protection USB are different, some step may fail to remove write protection from USB drive. If so, please skip the step to try next step. All the steps apply to remove write protection from SD card.
Tips: Besides USB flash drive, the popular cloud drive is also a good choice for data storage, like Google Drive, OneDrive and Dropbox. Being troubled to manage the multiple cloud drives? There is a free multi clouds manager – MultCloud which can help with that, such as directly transfer files from Google Drive to OneDrive.


