- Windows Update: FAQ
- FIX: How to get help in Windows 10 pop-up
- How do I stop How to get help in Windows 10 from popping up?
- 1. Check whether the F1 key jammed or not
- Run a System Scan to discover potential errors
- 2. Remove programs from Windows 10 Startup
- 3. Check the Filter Key and Sticky Key settings
- 4. Turn off the F1 key
- 5. Edit the Registry
- 6. Create a command script file
Windows Update: FAQ
Note: If you’re looking for Microsoft Office update info, see Install Office updates.
In Windows 10, you decide when and how to get the latest updates to keep your device running smoothly and securely. When you update, you’ll get the latest fixes and security improvements, helping your device run efficiently and stay protected. In most cases, restarting your device completes the update. Make sure your device is plugged in when you know updates will be installed.
If other questions come up when you update Windows 10, here are some other areas that might interest you:
When you only want info about updating Windows 10, you’ll find answers to many of your questions here:
When the Windows 10 May 2020 Update is ready for your device, it will be available to download and install from the Windows Update page in Settings. Choose a time that works best for you to download the update. You’ll then need to restart your device and complete the installation. After that, your device will be running Windows 10, version 2004.
To manually check for the latest recommended updates, select Start > Settings > Update & Security > Windows Update > Windows Update .
To get help updating to the latest version of Windows 10, go to the Microsoft software download page and download the Update Assistant.
Some updates may not be available on all devices at the same time—we’re making sure updates are ready and compatible.
To stay up to date, select Start > Settings > Update & Security > Windows Update > Windows Update , and then select Check for updates.
If a feature update is available for your device, it will appear separately on the Windows Update page. To install it, select Download and install now.
Here are a few things you can try if you’re having trouble installing updates:
Make sure that your device is connected to the internet. Downloading updates requires an internet connection.
If you’re connected the internet, try to install the updates manually. Select Start > Settings > Update & Security > Windows Update > Windows Update , and then view available updates.
Check for updates
Run the Windows Update Troubleshooter. Select Start > Settings > Update & Security > Troubleshoot . Under Get up and running, select Windows Update.
The time required to download updates primarily depends on internet connection speed, network settings, and update size. Make sure your device is plugged in and connected to the internet to download updates faster.
You can’t stop updates entirely—because they help keep your device safe and secure, updates will eventually need to be installed and downloaded, regardless of your update settings. Here’s how to temporarily pause updates from being downloaded and installed. Note that after the pause limit is reached, you’ll need to install the latest updates before you can pause updates again.
In the Windows 10 November 2019 Update (version 1909) or later, or in Windows version 1809 for Pro or Enterprise, select Start > Settings > Update & Security > Windows Update . Then choose one of the following options:
Select Pause updates for 7 days.
Select Advanced options. Then, in the Pause updates section, select the drop-down menu and specify a date for updates to resume.
To finish installing an update, your device will need to restart. Windows will try to restart your device when you’re not using it. If it can’t, you’ll be asked to schedule the restart for a more convenient time. Or, you can schedule anytime by following these steps:
Select Start > Settings > Update & Security > Windows Update > Windows Update .
Select Schedule the restart and choose a time that’s convenient for you.
You can set active hours to make sure automatic restarts for updates only happen when you’re not using your device. Learn about active hours for Windows 10.
Try deleting files you don’t need, uninstalling apps you don’t use, or moving files to another drive like an external USB drive or OneDrive. For more tips on freeing up disk space, see Free up drive space in Windows 10.
We recommend keeping devices like laptops and tablets plugged in when you’re not using them. This way, if updates are installed outside active hours, your device will have enough power to complete the installation. Windows updates don’t consume more battery than other typical system processes.
An update history is available so you can see which updates were installed, and when. You can also use this list to remove specific updates, although we don’t recommend this unless it’s necessary.
Select Start > Settings > Update & Security > Windows Update > Windows Update > View update history .
For more info about what’s included in updates for Windows 10, see Windows 10 update history.
We don’t recommend that you remove any installed updates. However, if you must remove an update, you can do so in update history.
Select Start > Settings > Update & Security > Windows Update > View update history > Uninstall updates.
Select the update you want to remove, then select Uninstall.
Feature updates are typically released twice per year and include new functionality and capabilities as well as potential fixes and security updates. Quality updates are more frequent and mainly include small fixes and security updates. Windows is designed to deliver both kinds of updates to devices through Windows Update.
To double check that your device is up to date, open Settings > Update & Security > Windows Update and see your update status and available updates.
To find which version of Windows you’re running, see Which version of Windows operating system am I running?
Reserved storage is not automatically turned on by Windows in any update scenarios. It is only turned on for new devices with the Windows 10 May 2019 Update (version 1903) or later preinstalled, or devices on which a clean install was performed.
Note: If you’re looking for Microsoft Office update info, see Install Office updates.
The best way to keep Windows 8.1 up to date is to turn on automatic updates. With automatic updates, you don’t have to search for updates online or worry about missing critical fixes or device drivers for your PC. Instead, Windows Update automatically installs important updates as they become available.
To turn on automatic updates:
Open Windows Update by swiping in from the right edge of the screen (or, if you’re using a mouse, pointing to the lower-right corner of the screen and moving the mouse pointer up), select Settings > Change PC settings > Update and recovery > Windows Update. If you want to check for updates manually, select Check now.
Select Choose how updates get installed, and then, under Important updates, select Install updates automatically (recommended).
Under Recommended updates, select Give me recommended updates the same way I receive important updates.
Under Microsoft Update, select Give me updates for other Microsoft products when I update Windows, and then select Apply.
Click the questions below to see answers about how Windows Update keeps your device up to date.
Note: If your PC is connected to a network where updates are managed by Group Policy, you might not be able to change settings related to Windows Update. For more info, contact your organization’s technical support.
Open Windows Update by swiping in from the right edge of the screen (or, if you’re using a mouse, pointing to the lower-right corner of the screen and moving the mouse pointer up), select Settings > Change PC settings > Update and recovery > Windows Update. To check for updates manually, select Check now.
An update history is available so you can see which updates were installed, and when. You can also use this list to remove specific updates, although we don’t recommend this unless it’s necessary.
To see your PC’s update history, open Windows Update by swiping in from the right edge of the screen (or, if you’re using a mouse, pointing to the lower-right corner of the screen and moving the mouse pointer up), select Settings > Change PC settings > Update and recovery > Windows Update > View your update history.
We don’t recommend that you remove any installed updates. However, if you must remove an update, you can do so in update history.
Open Windows Update by swiping in from the right edge of the screen (or, if you’re using a mouse, pointing to the lower-right corner of the screen and moving the mouse pointer up), select Settings > Change PC settings > Update and recovery > Windows Update > View your update history.
Select the update you want to remove, then select Uninstall.
Here are a few things to try if you’re having problems installing updates:
Make sure that your PC is connected to the internet. Some updates can’t be installed if you’re using a metered internet connection.
If you’re connected the internet and updates aren’t installed automatically, wait a few minutes and then try to install the updates manually.
See the Fix Windows Update errors guided walkthrough to try to fix the problem.
Support for Windows 7 ended on January 14, 2020
We recommend you move to a Windows 10 PC to continue to receive security updates from Microsoft.
Click the questions below to see answers about how Windows Update keeps your device up to date.
FIX: How to get help in Windows 10 pop-up

- The How to get help in Windows 10 pop up is fairly common in Windows 10 users.
- In order to remove it, all you need to do is check whether your F1 key is jammed or pressed.
- Removing programs from Startup or modifying your registry has also been proven to help.
- Continue reading below if How to get help in Windows 10 keeps popping up.

- Download Restoro PC Repair Tool that comes with Patented Technologies (patent available here).
- Click Start Scan to find Windows issues that could be causing PC problems.
- Click Repair All to fix issues affecting your computer’s security and performance
- Restoro has been downloaded by 0 readers this month.
The How to get help in Windows 10 Bing search pop up opens within your default browser when you press the F1 key on the Win 10 desktop.
Yet, some users have stated on forums that the Windows 10 help pop up automatically pops up with regularity on their Windows desktops.
Why does Windows 10 Help keep opening? Sometimes, your Help key may get stuck and this could trigger the ‘Get help’ alerts. This issue may also occur due to incorrect system settings.
In this guide, we’ll cover both these situations as well as other particular cases.
These are a few resolutions that might fix a How to get help in Windows 10 search pop up that opens automatically.
How do I stop How to get help in Windows 10 from popping up?
- Check whether the F1 key is jammed or not
- Remove programs from the Windows 10 Startup
- Check the Filter Key and Sticky Key settings
- Turn off the F1 key
- Edit the Registry
- Create a command script file
1. Check whether the F1 key jammed or not

It might be the case that you need to fix your keyboard. The get help in Windows 10 pop up will open if the F1 key is stuck in any way.
Run a System Scan to discover potential errors


So, check the F1 key. The Windows 10 help pop up might not automatically pop up with an alternative desktop keyboard. You can unplug a desktop keyboard to see if the pop up still opens.
2. Remove programs from Windows 10 Startup
- Open the Win + X menu with the Windows key + X hotkey.
- Select to open Task Manager.
- Select the Start-up tab shown in the shot directly below.

- You can disable a startup program by selecting it and pressing the Disable button.
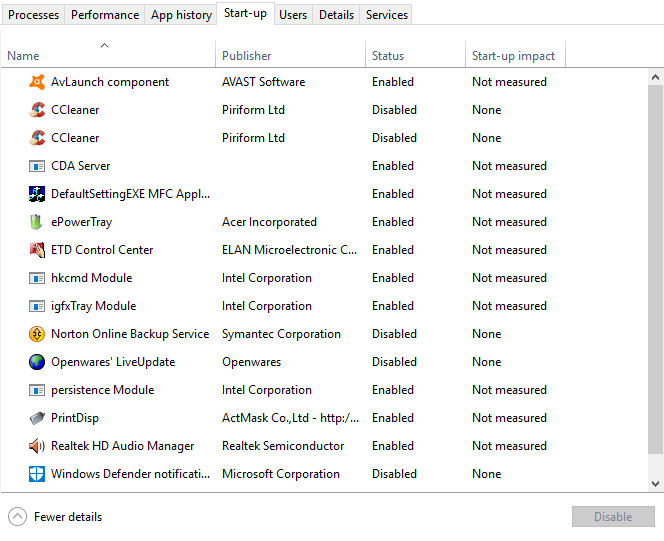
Keyboard macro programs can automatically press the F1 keys with their macros. As such, it’s worth checking if you have any startup software that might be opening the get help in Windows 10 pop up.
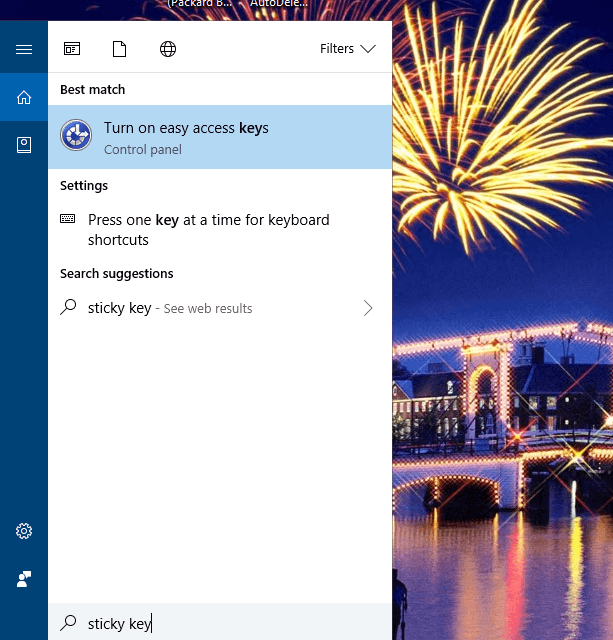
3. Check the Filter Key and Sticky Key settings
- Press the Type here to search Cortana button on the taskbar.
- Input the keyword Sticky Key in the search box.
- Select Turn on easy access keys to open the Control Panel as shown directly below
- Deselect the Turn on Sticky Keys option if it’s selected.
- Uncheck the Turn on Filter Keys setting.
- Click Apply and OK to confirm the new settings and close the window.
- The get help in Windows 10 pop up might open if you’ve set up F1 as a Filter Key or Sticky Key. To deselect those options in Win 10, follow the steps in the next solution.

4. Turn off the F1 key

- Press Download on the editor’s page to save the SharpKeys ZIP to your HDD.
- Open the SharpKeys ZIP in File Explorer, and press the Extract all button.
- Click Browse to select a folder to extract SharpKeys to, and click the Extract button.
- Open the SharpKeys window, and select F1 in the Map this key list.
- Select Turn Key Off in the To this key list and press the OK button.
- Then select the Write to Registry option and restart your desktop or laptop.
Turning the F1 key off will probably ensure that the How to get help in Windows 10 search pop up doesn’t open. You can deactivate the F1 key with keyboard-mapping software.
SharpKeys is freeware keyboard-mapping software you can turn off most keyboard keys with.
5. Edit the Registry
- Press Windows key + R keyboard shortcut.
- Input regedit in Run and press the OK button.
- Then open to this registry key in the Registry Editor: HKEY_LOCAL_MACHINE\SYSTEM\CurrentControlSet\Services\NlaSvc\Parameters\Internet
- Double-click EnableActiveProbing to open the window shown directly below.
- Then enter 0 in the Value data box to replace the current 1 value.
- Press the OK button and close the Registry Editor.
- Select Restart to restart Windows.
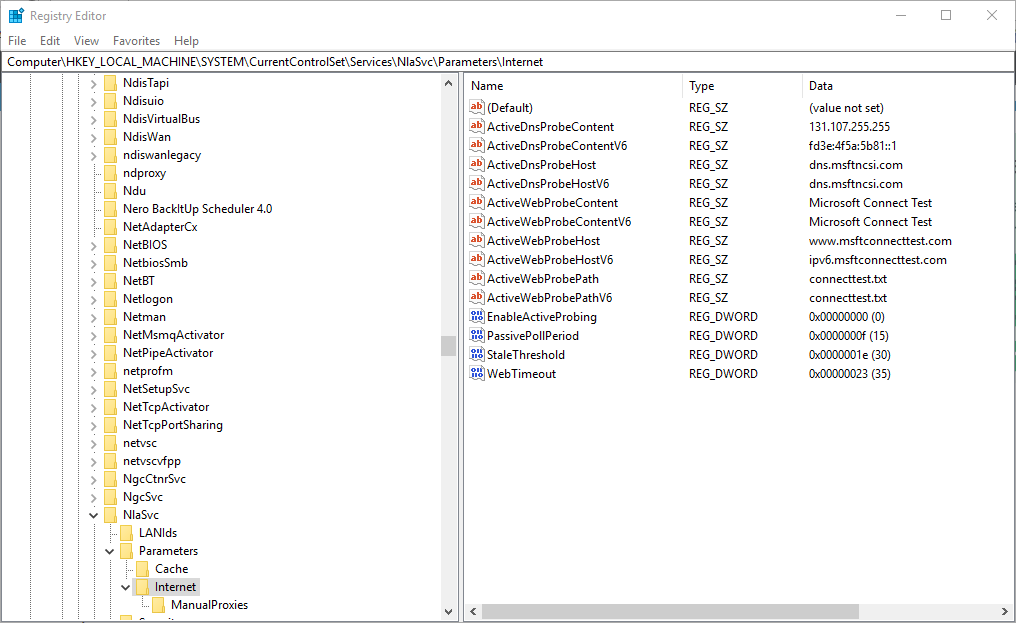
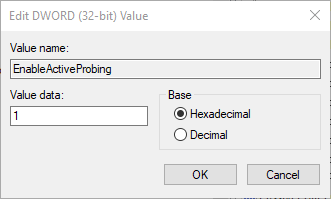
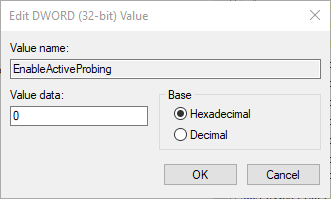
Some users have also fixed the get help in Windows 10 pop up automatically opening by editing the EnableActiveProbing DWORD value with the Registry Editor.
6. Create a command script file
- Open Notepad.
- Paste in the following script and save the file anywhere as script.cmd (make sure it is a CMD file not a txt file)
- @echo off
taskkill /f /im HelpPane.exe
takeown /f %WinDir%\HelpPane.exe
icacls %WinDir%\HelpPane.exe /deny Everyone:(X)
- @echo off
- Double click on the command script file to run it.
This solution was suggested by one of our readers and it works like a charm so make sure you give it a try. If it doesn’t work for you, just delete the cmd script.
One of those resolutions will probably fix the get help in Windows 10 Bing search pop up. If you have any further fixes for the Windows 10 help pop up, feel free to share them below.


