- Create users and groups on Oracle Linux 8
- Introduction
- Objectives
- What Do You Need?
- (Hands-on Lab) Connect to the Compute Instance
- Administer User Accounts
- Administer Group Accounts
- Implement User Private Groups
- Option 1: Grant Elevated Privileges to a User
- Option 2: Grant Elevated Privileges to a User
- Learn More
Create users and groups on Oracle Linux 8
Introduction
The following tutorial provides step-by-step procedures to perform user and group administration on Oracle Linux 8. You will create users and groups, implement user private groups, and grant user elevated privileges.
Objectives
In this lab, you’ll:
- Create a new user and explore user’s home directory
- Create a new group and add user to group
- Utilize the user private group scheme and implement write access to a directory
- Administer the sudo command for granting root privileges
What Do You Need?
- A system with Oracle Linux 8 installed
(Hands-on Lab) Connect to the Compute Instance
Note: This step is specific to the Oracle provided free lab environment.
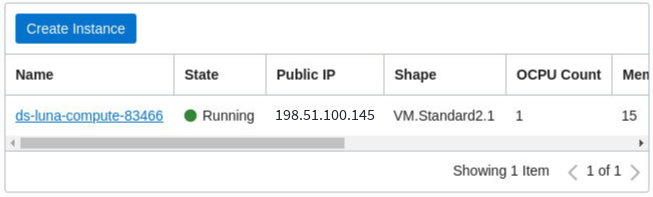
To access the lab compute instance, first connect to the Oracle Cloud Infrastructure (OCI) Console and copy the compute instance Public IP address.
- Sign in to OCI Console, and select your Compartment.
- Click Instances.
Copy the Public IP to a temporary location (such as a text file) on your computer.
To copy, highlight the IP address with the mouse and press Ctrl+C.
Connect to the instance.
Where is the IP address copied from the OCI Console.
Accept the ECDSA key fingerprint.

You are now connected to the compute instance for this lab.

Administer User Accounts
In this section, you use command-line utilities to create a new user account, view files that are updated when adding a new user, modify a user account, set a password for the new user, and log in as the new user.
- Open a terminal and connect to your Oracle Linux 8 instance.
Become the root user.
As the root user, add a user named alice.
The user is added to the /etc/passwd file.
View the alice entry in the /etc/passwd file.

The output shows:
- The new user’s UID and GID are the same ( 1001 ).
- A home directory was created for the new user ( /home/alice ).
- The default shell for the new user is /bin/bash .
View the home directories.

In this example, the opc user already existed.
A home directory was created for the new user because the CREATE_HOME parameter in /etc/login.defs is set to yes .
View the CREATE_HOME parameter in the /etc/login.defs file.

View the default settings for a new user, stored in /etc/default/useradd .
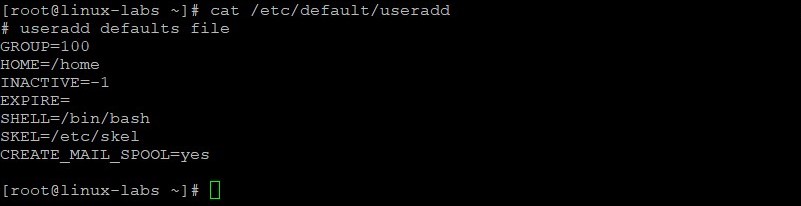
The SKEL parameter is set to /etc/skel .
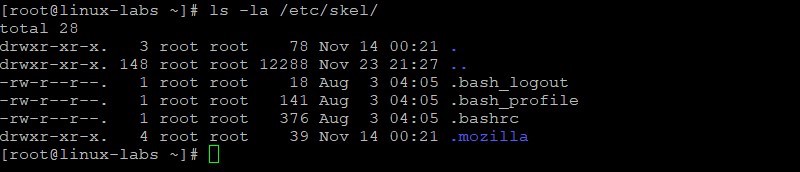
View the contents of the /etc/skel directory.
View the contents of the alice home directory.
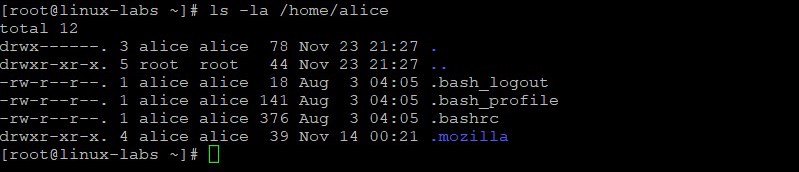
The contents of SKEL ( /etc/skel ) are copied to the new user’s home directory.
View the new alice entry in the /etc/group file.

Because Oracle Linux 8 uses a user private group (UPG) scheme, a new private group (alice, GID=1001) was created when the alice user was created.
Modify GECOS information for the alice user. View the alice entry in the /etc/passwd file before and after modifying GECOS information.

Create a password of AB*gh246 for the alice user. View the alice entry in the /etc/shadow file before and after creating a password for alice.
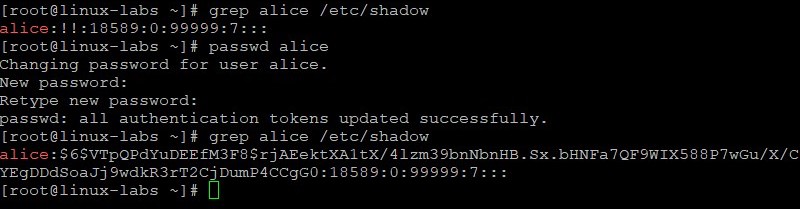
The !! for alice is replaced with a hashed password value.
Exit the root login and login as the alice user. Provide the password of AB*gh246 when prompted.

Verify you are the alice user and your current directory is the alice user’s home directory.

Exit the alice user’s shell and become the root user.

As the root user, add a user named oracle which is used later in this lab.
Create a password of XY*gh579 for the oracle user.

Administer Group Accounts
In this section, you create a new group account and add a user to this new group.
As the root user, add a group named staff.
The group is added to the /etc/group file.
View the last 10 entries in the /etc/group file.
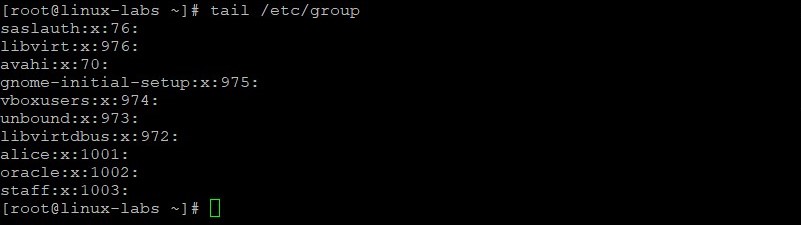
The GID ( 1003 ) for the new group is incremented by one.
Add the alice user to the staff group. View the staff group entry in the /etc/group file.

The alice user has a secondary group membership in the staff group.
View the primary group membership for alice.

The alice user’s primary group is still 1001 .
Implement User Private Groups
In this section, you use the User Private Groups scheme to give different users write access to files in a single directory.
As the root user, create the /staff directory.
View the /staff directory and its permissions.

Change group ownership for the /staff directory to the staff group. The -R option (recursive) sets the group for files and directories within /staff . View the /staff directory and its permissions after changing the group ownership.

The owner of the /staff directory is still root, but the group is now staff.
Set the setgid bit on /staff directory. Then view the permissions on the /staff directory.

The group permissions on the /staff directory have changed.
Add the oracle user to the staff group. View the staff entry in the /etc/group file after adding the oracle user.

Both alice and oracle users have secondary group membership in the staff group.
Become the oracle user. You are not prompted for the oracle user’s password because you currently are the root user. Verify you are the oracle user and your current directory is the oracle user’s home directory.

Display group membership for the oracle user.

The oracle user belongs to two groups — oracle and staff.
Change to the /staff directory. Create a new file in the /staff directory named oracle_file . Display the permissions and ownership of the new file.

The permissions are read/write for the staff group.
Become the alice user. Provide the password of AB*gh246 when prompted. Verify you are the alice user.

Display group membership for the alice user.

The alice user belongs to two groups — alice and staff.
Change to the /staff directory. Create a new file in the /staff directory named alice_file . Display the permissions and ownership of the new files.

The permissions are read/write on both files for the staff group.
As the alice user, use the touch command to update the time stamp on the oracle_file . View the files to verify the time has changed.

Updating the time stamp implies write permissions on the file as the alice user, even though the file was created by the oracle user.
Exit both the alice user’s shell, and the oracle user’s shell, to return to the root user’s shell. Verify that you are the root user.

Option 1: Grant Elevated Privileges to a User
In this section, you grant sudo privileges to a user by adding an entry to the /etc/sudoers file.
Become the alice user. You are not prompted for alice password because you currently are the root user. Verify you are the alice user.

As the alice user, attempt to add newuser.

The alice user does not have permission to add newuser.
Insert the sudo command before the previous useradd command to add newuser. Provide the password of AB*gh246 when prompted.

The attempt to issue this administrator command without proper authorization is reported in the /var/log/secure file.
Exit the alice user’s shell to return to the root user’s shell. View sudoers entries in the /var/log/secure file.
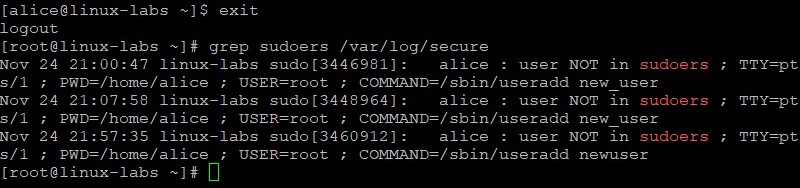
The alice : user NOT in sudoers entry for the attempted use of the /sbin/useradd command is in the /var/log/secure file. Multiple entries are shown in the example. You might only have a single entry.
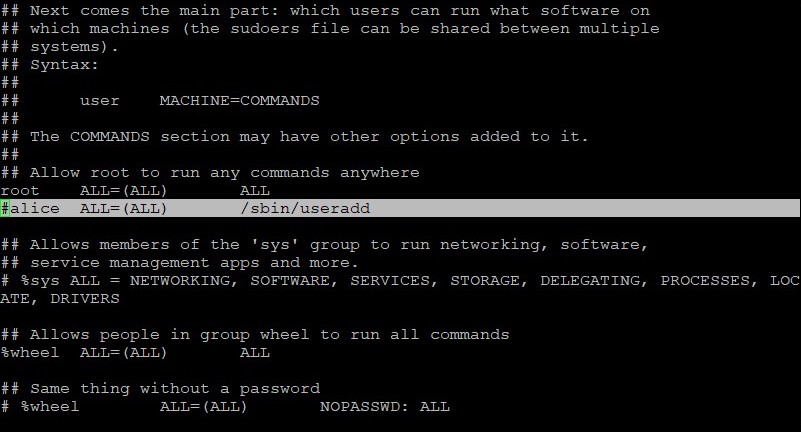
As the root user, edit the /etc/sudoers file by using the visudo command.
This command opens the /etc/sudoers file using the vim editor.
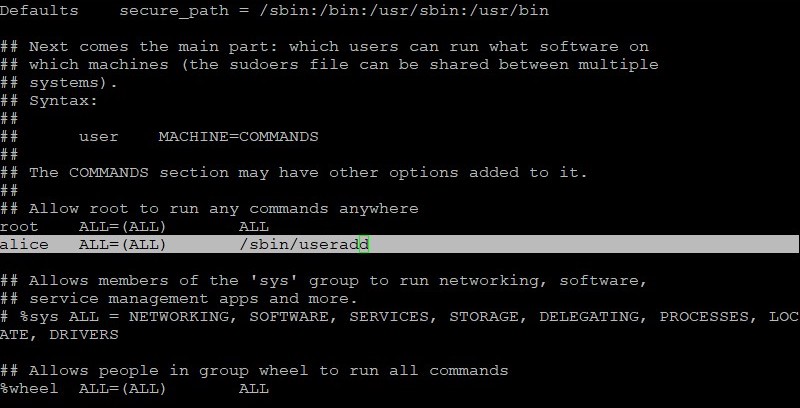
In the /etc/sudoers file, add the following line to grant the alice user permission to run the /sbin/useradd command.
The new entry is highlighted. Save your changes and exit the visudo command.
Become the alice user. Attempt to add newuser without the sudo command. Insert the sudo command and attempt to add newuser a second time. Provide the password of AB*gh246 when prompted.

Verify newuser was added.
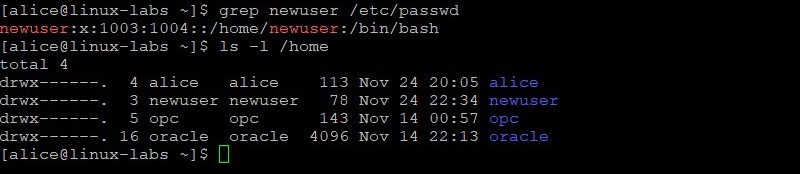
The newuser now exists. With the alice entry in the /etc/sudoers file, the alice user has sudo privileges to run the /sbin/useradd command.
Exit the alice shell to return to the root shell. Use the visudo command and delete the alice entry from the /etc/sudoers file that you added earlier in this lab.
The entry to delete is highlighted. Delete the entire line, or as in this example, insert the # character to comment out the line. Save your changes and exit the visudo command.
Verify the alice user can no longer add a new user. Become the alice user. Attempt to add anotheruser with the sudo command.

The attempt to issue this administrator command without proper authorization is reported in the /var/log/secure file.
Exit the alice user’s shell to return to the root user’s shell.
Option 2: Grant Elevated Privileges to a User
In this section, you grant sudo privileges by adding a user to the wheel group.
As the root user, view the wheel entry in the /etc/sudoers file.

The %wheel ALL=(ALL) ALL entry in the /etc/sudoers file allows any member of the wheel group to execute any command, when preceded by sudo .
Add the alice user to the wheel group. Confirm the alice user is in the wheel group.

User alice has a secondary group membership in the wheel group.
Become the alice user. You are not prompted for alice password because you currently are the root user. Verify you are the alice user.
As the alice user, add thirduser using the sudo useradd command. Provide the password of AB*gh246 if prompted.

Verify thirduser was added. The ls command fails until you insert sudo and provide alice password. This confirms the alice user has sudo privileges.

Learn More
Explore other labs on docs.oracle.com/learn or access more free learning content on the Oracle Learning YouTube channel. Additionally, visit education.oracle.com/learning-explorer to become an Oracle Learning Explorer.
For product documentation, visit Oracle Help Center.
Create users and groups on Oracle Linux
Copyright © 2021, Oracle and/or its affiliates.
This software and related documentation are provided under a license agreement containing restrictions on use and disclosure and are protected by intellectual property laws. Except as expressly permitted in your license agreement or allowed by law, you may not use, copy, reproduce, translate, broadcast, modify, license, transmit, distribute, exhibit, perform, publish, or display any part, in any form, or by any means. Reverse engineering, disassembly, or decompilation of this software, unless required by law for interoperability, is prohibited.
The information contained herein is subject to change without notice and is not warranted to be error-free. If you find any errors, please report them to us in writing.
If this is software or related documentation that is delivered to the U.S. Government or anyone licensing it on behalf of the U.S. Government, then the following notice is applicable:
U.S. GOVERNMENT END USERS: Oracle programs, including any operating system, integrated software, any programs installed on the hardware, and/or documentation, delivered to U.S. Government end users are «commercial computer software» pursuant to the applicable Federal Acquisition Regulation and agency-specific supplemental regulations. As such, use, duplication, disclosure, modification, and adaptation of the programs, including any operating system, integrated software, any programs installed on the hardware, and/or documentation, shall be subject to license terms and license restrictions applicable to the programs. No other rights are granted to the U.S. Government.
This software or hardware is developed for general use in a variety of information management applications. It is not developed or intended for use in any inherently dangerous applications, including applications that may create a risk of personal injury. If you use this software or hardware in dangerous applications, then you shall be responsible to take all appropriate fail-safe, backup, redundancy, and other measures to ensure its safe use. Oracle Corporation and its affiliates disclaim any liability for any damages caused by use of this software or hardware in dangerous applications.
Oracle and Java are registered trademarks of Oracle and/or its affiliates. Other names may be trademarks of their respective owners.
Intel and Intel Xeon are trademarks or registered trademarks of Intel Corporation. All SPARC trademarks are used under license and are trademarks or registered trademarks of SPARC International, Inc. AMD, Opteron, the AMD logo, and the AMD Opteron logo are trademarks or registered trademarks of Advanced Micro Devices. UNIX is a registered trademark of The Open Group.
This software or hardware and documentation may provide access to or information about content, products, and services from third parties. Oracle Corporation and its affiliates are not responsible for and expressly disclaim all warranties of any kind with respect to third-party content, products, and services unless otherwise set forth in an applicable agreement between you and Oracle. Oracle Corporation and its affiliates will not be responsible for any loss, costs, or damages incurred due to your access to or use of third-party content, products, or services, except as set forth in an applicable agreement between you and Oracle.
Источник


