- Fix graphics device problems with error code 43
- Overview of the Windows Graphics Architecture
- Hardware Acceleration
- Transparency and Anti-aliasing
- Vector Graphics
- 990x.top
- Простой компьютерный блог для души)
- Graphic Device в биосе — что это за пункт?
- The windows graphics device
- Usage
- Arguments
- Details
- Value
- Resizing options
- Fonts
- Conventions
Fix graphics device problems with error code 43
This error occurs when your graphics device driver has notified Windows that the device isn’t working properly. This may mean that the device has a hardware problem, or that the driver or driver software is failing. To fix this error, try the following:
Driver updates for Windows 10 and many devices (such as network adapters, monitors, printers, and video cards) are automatically downloaded and installed through Windows Update. Though it’s likely you already have the most recent driver, if you’re having trouble with a device, you can try fixing it by updating the driver.
Tap and hold or right-click the Start button, and then select Device Manager.
On the list of devices, find the device that’s having driver problems (it will often have a yellow exclamation point next to it). Then tap and hold or right-click the device and select Properties.
Select Driver, and then select Update Driver.
Select Search automatically for updated driver software.
If a driver update is found, it will install automatically. Select Close when it finishes installing.
If Windows doesn’t find a new driver, you can try looking for one on the device manufacturer’s website and follow their instructions to install it.
If an update was recently installed, or you updated your device driver or driver software, you may be able to fix the problem by rolling back the driver to the previous version.
Note: Windows 10 installs drivers automatically, so you don’t have to choose which updates are needed. In rare cases, a specific driver might temporarily cause problems on your device. In this situation, you can prevent the problematic driver from reinstalling automatically the next time Windows updates by rolling back to a previous version.
Tap and hold or right-click the Start button and select Device Manager.
On the list of devices, find the device that’s having driver problems (it will often have a yellow exclamation point next to it). Then tap and hold or right-click the device and select Properties.
Select Driver, and then select Roll Back Driver.
In some cases, uninstalling and reinstalling the driver fixes the error:
Select the Start button. Type device manager in the search box, and select Device Manager from the list of results.
On the list of devices, find the device that’s having driver problems (it will often have a yellow exclamation point next to it). Then tap and hold or right-click the device and select Uninstall > OK.
After the driver uninstalls, tap and hold or right-click the name of your PC (found at the top of the device list) and select Scan for hardware changes. This reinstalls the device driver.
To see if this fixed the problem, tap and hold or right-click the name of the device again. On the General tab under Device status, you should see the message “This device is working properly.” If you don’t see this message, see the device documentation or contact the manufacturer.
Overview of the Windows Graphics Architecture
Windows provides several C++/COM APIs for graphics. These APIs are shown in the following diagram.
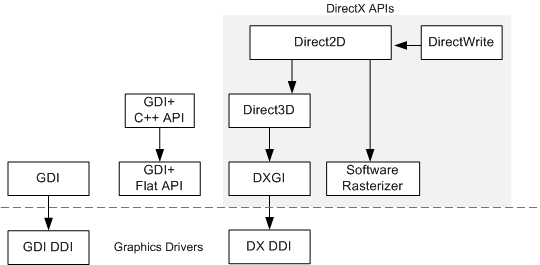
- Graphics Device Interface (GDI) is the original graphics interface for Windows. GDI was first written for 16-bit Windows and then updated for 32-bit and 64-bit Windows.
- GDI+ was introduced in WindowsВ XP as a successor to GDI. The GDI+ library is accessed through a set of C++ classes that wrap flat C functions. The .NET Framework also provides a managed version of GDI+ in the System.Drawing namespace.
- Direct3D supports 3-D graphics.
- Direct2D is a modern API for 2-D graphics, the successor to both GDI and GDI+.
- DirectWrite is a text layout and rasterization engine. You can use either GDI or Direct2D to draw the rasterized text.
- DirectX Graphics Infrastructure (DXGI) performs low-level tasks, such as presenting frames for output. Most applications do not use DXGI directly. Rather, it serves as an intermediate layer between the graphics driver and Direct3D.
Direct2D and DirectWrite were introduced in WindowsВ 7. They are also available for WindowsВ Vista and Windows ServerВ 2008 through a Platform Update. For more information, see Platform Update for Windows Vista.
Direct2D is the focus of this module. While both GDI and GDI+ continue to be supported in Windows, Direct2D and DirectWrite are recommended for new programs. In some cases, a mix of technologies might be more practical. For these situations, Direct2D and DirectWrite are designed to interoperate with GDI.
The next sections describe some of the benefits of Direct2D.
Hardware Acceleration
The term hardware acceleration refers to graphics computations performed by the graphics processing unit (GPU), rather than the CPU. Modern GPUs are highly optimized for the types of computation used in rendering graphics. Generally, the more of this work that is moved from the CPU to the GPU, the better.
While GDI supports hardware acceleration for certain operations, many GDI operations are bound to the CPU. Direct2D is layered on top of Direct3D, and takes full advantage of hardware acceleration provided by the GPU. If the GPU does not support the features needed for Direct2D, then Direct2D falls back to software rendering. Overall, Direct2D outperforms GDI and GDI+ in most situations.
Transparency and Anti-aliasing
Direct2D supports fully hardware-accelerated alpha-blending (transparency).
GDI has limited support for alpha-blending. Most GDI functions do not support alpha blending, although GDI does support alpha blending during a bitblt operation. GDI+ supports transparency, but the alpha blending is performed by the CPU, so it does not benefit from hardware acceleration.
Hardware-accelerated alpha-blending also enables anti-aliasing. Aliasing is an artifact caused by sampling a continuous function. For example, when a curved line is converted to pixels, aliasing can cause a jagged appearance.[3] Any technique that reduces the artifacts caused by aliasing is considered a form of anti-aliasing. In graphics, anti-aliasing is done by blending edges with the background. For example, here is a circle drawn by GDI and the same circle drawn by Direct2D.

The next image shows a detail of each circle.

The circle drawn by GDI (left) consists of black pixels that approximate a curve. The circle drawn by Direct2D (right) uses blending to create a smoother curve.
GDI does not support anti-aliasing when it draws geometry (lines and curves). GDI can draw anti-aliased text using ClearType; but otherwise, GDI text is aliased as well. Aliasing is particularly noticeable for text, because the jagged lines disrupt the font design, making the text less readable. Although GDI+ supports anti-aliasing, it is applied by the CPU, so the performance is not as good as Direct2D.
Vector Graphics
Direct2D supports vector graphics. In vector graphics, mathematical formulas are used to represent lines and curves. These formulas are not dependent on screen resolution, so they can be scaled to arbitrary dimensions. Vector graphics are particularly useful when an image must be scaled to support different monitor sizes or screen resolutions.
990x.top
Простой компьютерный блог для души)
Graphic Device в биосе — что это за пункт?
 Ноутбук — такое устройство, где наравне с производительностью важно чтобы автономная работа была как можно дольше. Если вы особо ничем не нагружаете ноут, то и нет смысла использовать его сильные стороны — например мощная производительная видеокарта.
Опция Graphic Device позволяет выбрать режим работы видеокарт в ноутбуке:
- Switchable / Switchable Graphics / NVIDIA Optimus — система сама будет переключать графику при необходимости (автоматически), то есть будет использоваться или встроенная в процессор или отдельная (дискретная).
- Integrated / UMA Only / UMA Graphic — работать будет только встроенное видеоядро процессора (например Intel HD).
У опции могут быть другие названия, например Graphic Device, Graphic Adapter.
Дополнительно можете прочитать информацию здесь.
Вообще эта функция чаще всего встречается в ноутбуах, где присутствует две видеокарты.
Мало кто знает, но если например вы купили ноутбук и вам важно чтобы он работал как можно дольше, то дискретную (отдельную видеокарту) можно отключить. Потому что встроенное графическое ядро процессора — явно меньше использует электроэнергии. Но отлично подходит для обычного использования ноута, если не играть в игры, не работать с тяжелыми графическими приложениями.
Вот собственно сама опция в BIOS:

Также опция может содержать три пункта — только встроенная видеокарта (Integrated), только дискретная (Discrete) или автоматическое переключение (Switchable):
 Как понимаю — все зависит от модели ноутбука.
На этом все. Надеюсь информация оказалась полезной. Удачи и добра, до новых встреч друзья!
The windows graphics device
Available only on Windows. A graphics device is opened. For windows , win.graph , x11 and X11 this is a window on the current Windows display: the multiple names are for compatibility with other systems. win.metafile prints to a file and win.print to the Windows print system.
Usage
Arguments
the (nominal) width and height of the canvas of the plotting window in inches. Default 7 .
the default pointsize of plotted text, interpreted as big points (1/72 inch). Values are rounded to the nearest integer: values less than or equal to zero are reset to 12 , the default.
logical: sets the initial state of the flag for recording plots. Default FALSE .
character, one of c(«R», «fit», «fixed») . Controls the action for resizing of the device. Default «R» . See the ‘Resizing options’ section.
double. Pixels per inch, horizontally and vertically. Default NA_real_ , which means to take the value from Windows.
color. The initial background color. Default «transparent» .
color. The color of the canvas which is visible when the background color is transparent. Should be a solid color (and any alpha value will be ignored). Default «white» .
gamma correction fudge factor. Colours in R are sRGB; if your monitor does not conform to sRGB, you might be able to improve things by tweaking this parameter to apply additional gamma correction to the RGB channels. By default 1 (no additional gamma correction).
integer. Position of the top left of the window, in pixels. Negative values are taken from the opposite edge of the monitor. Missing values (the default) mean take the default from the ‘ Rconsole ’ file, which in turn defaults to xpos = -25, ypos = 0 : this puts the right edge of the window 25 pixels from the right edge of the monitor.
logical. Should the screen output be double-buffered? Default TRUE .
character string, up to 100 bytes. With the default «» , a suitable title is created internally. A C-style format for an integer will be substituted by the device number.
the name of the output file: it will be an enhanced Windows metafile, usually given extension ‘ .emf ’ or ‘ .wmf ’. Up to 511 characters are allowed. The page number is substituted if an integer format is included in the character string (see postscript for further details) and tilde-expansion (see path.expand ) is performed. (The result must be less than 600 characters long.) The default, «» , means the clipboard.
The name of a printer as known to Windows. The default causes a dialog box to come up for the user to choose a printer.
logical: see the ‘Details’ below. Defaults to FALSE for screen devices.
logical: if true confirmation of a new frame will be by clicking on the device rather than answering a problem in the console. Default TRUE .
logical controlling the polygon fill mode: see polygon for details. Default TRUE .
A length-one character vector specifying the default font family. See section ‘Fonts’.
A length-one character vector, requesting control over font antialiasing. This is partially matched to «default» , «none» , «cleartype» or «gray» . See the ‘Fonts’ section.
Details
All these devices are implemented as variants of the same device.
All arguments of windows have defaults set by windows.options : the defaults given in the arguments section are the defaults for the defaults. These defaults also apply to the internal values of gamma , xpinch , ypinch , buffered , restoreConsole and antialias for win.graph , x11 and X11 .
The size of a window is computed from information provided about the display: it depends on the system being configured accurately. By default a screen device asks Windows for the number of pixels per inch. This can be overridden (it is often wrong) by specifying xpinch and ypinch , most conveniently via windows.options . For example, a 13.3 inch 1280×800 screen (a typical laptop display) was reported as 96 dpi even though it is physically about 114 dpi.
The different colours need to be distinguished carefully. Areas outside the device region are coloured in the Windows application background colour. The device region is coloured in the canvas colour. This is over-painted by the background colour of a plot when a new page is called for, but that background colour can be transparent (and is by default). One difference between setting the canvas colour and the background colour is that when a plot is saved the background colour is copied but the canvas colour is not. The argument bg sets the initial value of par(«bg») in base graphics and gpar(«fill») in grid graphics
Recorded plot histories are of class «SavedPlots» . They have a print method, and a subset method. As the individual plots are of class «recordedplot» they can be replayed by printing them: see recordPlot . The active plot history is stored in variable .SavedPlots in the workspace.
When a screen device is double-buffered (the default) the screen is updated 100ms after last plotting call or every 500ms during continuous plotting. These times can be altered by setting options(«windowsTimeout») to a vector of two integers before opening the device.
Line widths as controlled by par(lwd =) are in multiples of 1/96inch. Multiples less than 1 are allowed, down to one pixel width.
For win.metafile only one plot is allowed per file, and Windows seems to disallow reusing the file. So the only way to allow multiple plots is to use a parametrized filename as in the example. If the filename is omitted (or specified as «» ), the output is copied to the clipboard when the device is closed.
The restoreConsole argument is a temporary fix for a problem in the current implementation of several Windows graphics devices, and is likely to be removed in an upcoming release. If set to FALSE , the console will not receive the focus after the new device is opened.
There is support for semi-transparent colours of lines, fills and text on the screen devices. These work for saving (from the ‘File’ menu) to PDF, PNG, BMP, JPEG and TIFF, but will be ignored if saving to Metafile and PostScript. Limitations in the underlying Windows API mean that a semi-transparent object must be contained strictly within the device region (allowing for line widths and joins).
Value
A plot device is opened: nothing is returned to the R interpreter.
Resizing options
If a screen device is re-sized, the default behaviour ( «R» ) is to redraw the plot(s) as if the new size had been specified originally. Using «fit» will rescale the existing plot(s) to fit the new device region, preserving the aspect ratio. Using «fixed» will leave the plot size unchanged, adding scrollbars if part of the plot is obscured.
A graphics window will never be created at more than 85% of the screen width or height, but can be resized to a larger size. For the first two rescale options the width and height are rescaled proportionally if necessary, and if rescale = «fit» the plot(s) are rescaled accordingly. If rescale = «fixed» the initially displayed portion is selected within these constraints, separately for width and height. In MDI mode, the limit is 85% of the MDI client region.
Using strwidth or strheight after a window has been rescaled (when using «fit» ) gives dimensions in the original units, but only approximately as they are derived from the metrics of the rescaled fonts (which are in integer sizes)
The displayed region may be bigger than the ‘paper’ size, and area(s) outside the ‘paper’ are coloured in the Windows application background colour. Graphics parameters such as «din» refer to the scaled plot if rescaling is in effect.
Fonts
The fonts used for text drawn in a Windows device may be controlled in two ways. The file R_HOME\etc\Rdevga can be used to specify mappings for par(font =) (or the grid equivalent). Alternatively, a font family can be specified by a non-empty family argument (or by e.g. par(family =) in the graphics package) and this will be used for fonts 1:4 via the Windows font database (see windowsFonts ).
How the fonts look depends on the antialiasing settings, both through the antialias argument and the machine settings. These are hints to Windows GDI that may not be able to be followed, but antialias = «none» should ensure that no antialiasing is used. For a screen device the default depends on the machine settings: it will be «cleartype» if that has been enabled. Note that the greyscale antialiasing that is used only for small fonts (below about 9 pixels, around 7 points on a typical display).
When accessing a system through Remote Desktop, both the Remote Desktop settings and the user’s local account settings are relevant to whether antialiasing is used.
Some fonts are intended only to be used with ClearType antialiasing, for example the Meiryo Japanese font.
Conventions
This section describes the implementation of the conventions for graphics devices set out in the ‘R Internals’ manual.
The default device size is 7 inches square, although this is often incorrectly implemented by Windows: see ‘Details’.
Font sizes are in big points.
The default font family is Arial.
Line widths are as a multiple of 1/96 inch, with a minimum of one pixel.
The minimum radius of a circle is 1 pixel.
pch = «.» with cex = 1 corresponds to a rectangle of sides the larger of one pixel and 0.01 inch.
Colours are interpreted via the unprofiled colour mapping of the graphics card – this is assumed to conform to sRGB.
x11() , X11() and win.graph() are simple wrappers calling windows() , and mainly exist for compatibility reasons.
Further, x11() and X11() have their own help page for Unix-alikes (where they also have more arguments).


