- PHP: Hypertext Preprocessor
- PHP For Windows
- PECL For Windows
- Which version do I choose?
- Apache
- VC15 & VS16
- TS and NTS
- What is PGO?
- amd64 (x86_64) Builds
- Long and multibyte path
- Archives
- Как установить PHP на Windows
- Скачать PHP:
- Установка PHP:
- Тест PHP:
- Установка в системах Windows
- Содержание
- User Contributed Notes 12 notes
- Install and Configure PHP
- Install PHP
- Windows Installer
- Zip File Installation
- Extensions
- PHP.INI File Settings
- Required Settings
- Optional Settings
- Enable PHP Session State
PHP: Hypertext Preprocessor
Are you seeing a warning from Windows Defender? Check out this info.
PHP For Windows
This site is dedicated to supporting PHP on Microsoft Windows. It also supports ports of PHP extensions or features as well as providing special builds for the various Windows architectures.
If you like to build your own PHP binaries, instructions can be found on the Wiki.
PECL For Windows
PECL extensions for Windows is being worked on. Windows DLL can be downloaded right from the PECL website.
The PECL extension release and snapshot build directories are browsable directly.
Which version do I choose?
If you are using PHP as FastCGI with IIS you should use the Non-Thread Safe (NTS) versions of PHP.
Apache
Please use the Apache builds provided by Apache Lounge. They provide VC15 and VS16 builds of Apache for x86 and x64. We use their binaries to build the Apache SAPIs.
With Apache, using the apache2handler SAPI, you have to use the Thread Safe (TS) versions of PHP.
VC15 & VS16
More recent versions of PHP are built with VC15 or VS16 (Visual Studio 2017 or 2019 compiler respectively) and include improvements in performance and stability.
— The VC15 and VS16 builds require to have the Visual C++ Redistributable for Visual Studio 2015-2019 x64 or x86 installed
TS and NTS
TS refers to multithread capable builds. NTS refers to single thread only builds. Use case for TS binaries involves interaction with a multithreaded SAPI and PHP loaded as a module into a web server. For NTS binaries the widespread use case is interaction with a web server through the FastCGI protocol, utilizing no multithreading (but also for example CLI).
What is PGO?
Profile Guided Optimization is an optimization feature available in Microsoft’s Visual C++ compiler that allows you to optimize an output file based on profiling data collected during test runs of the application or module.
Links:
amd64 (x86_64) Builds
PHP 7 provides full 64-bit support. The x64 builds of PHP 7 support native 64-bit integers, LFS, 64-bit memory_limit and much more.
x64 builds are recommended (almost all Windows installations support x64).
Long and multibyte path
PHP 7.1+ supports long and UTF-8 paths. See the manual for details.
Archives
Past releases are available from our archives, older versions not found there can be found at the Museum.
Как установить PHP на Windows

В этой статье вы узнаете как установить php 7.0 и выше на Windows 10, очень просто, надеюсь эта статья будет полезна для вас.
Скачать PHP:
Сначала вам надо скачать PHP 7 для Windows 10 c сайта или для Windows 7, для этого заходим по ссылки, там нажимаем на Zip.

Как можете заметить, я скачиваю тут x64 битную, но не переживаете, там также вы можете скачать x32 битную версию, для этого надо прокрутить чуть ниже и найти, где будет написано x86, если в друг у вас архитектура не x64.
Установка PHP:
После того как скачали сам PHP, пришло время его установить, для архивируем архив который скачали, и создаём папку куда положим все файлы.

Как можете заметить, я поместил все файлы в папку в документах, но это ещё не всё.
Теперь на надо добавить PHP в path, чтобы была возможность запускать PHP скрипты из командной строки, для этого заходим в «Этот компьютер» и там нажимаем правой кнопкой мыши, выбираем «Свойства».

Дальше в открывшемся окне с боку выбираем «Дополнительные параметры системы».

В открывшемся окне нажимаем на кнопку «Переменные среды…».

В открывшемся окне выбираем внизу «Path» и нажимаем кнопку изменить.

Нажимаем «Создать» и вписываем путь, куда вы архивировали ваш PHP, на этом всё и заканчивается, поздравляю вас, вы установили и подключили PHP.
Тест PHP:
Теперь не большой тест, что бы наперника проверить что мы правильно установили PHP, для этого открываем блокнот и делаем не большую PHP программу.
Установка в системах Windows
Содержание
Установка PHP в современных операционных системах Microsoft Windows и рекомендуемая конфигурация под распространённые веб-серверы.
Если вы ищете информацию о старых версиях операционных систем: Windows XP, 2003, 98 или Apache 1.x, обратитесь к разделу руководства Установка на старых версиях ОС Windows.
Официальные релизы PHP для Windows рекомендованы для использования в промышленной эксплуатации. Однако, вы также можете собрать PHP из исходных кодов. Вам потребуется окружение Visual Studio. Обратитесь к разделу » Пошаговое руководство по сборке для получения более полной информации.
Установка PHP на Azure App Services (он же Microsoft Azure, Windows Azure, или (Windows) Azure Web Apps).
User Contributed Notes 12 notes
If you make changes to your PHP.ini file, consider the following.
(I’m running IIS5 on W2K server. I don’t know about 2K3)
PHP will not «take» the changes until the webserver is restarted, and that doesn’t mean through the MMC. Usually folks just reboot. But you can also use the following commands, for a much faster «turnaround». At a command line prompt, type:
and that will stop the webserver service. Then type:
net start w3svc
and that will start the webserver service again. MUCH faster than a reboot, and you can check your changes faster as a result with the old:
in your page somewhere.
I wish I could remember where I read this tip; it isn’t anything I came up with.
You can have multiple versions of PHP running on the same Apache server. I have seen many different solutions pointing at achieving this, but most of them required installing additional instances of Apache, redirecting ports/hosts, etc., which was not satisfying for me.
Finally, I have come up with the simplest solution I’ve seen so far, limited to reconfiguring Apache’s httpd.conf.
My goal is to have PHP5 as the default scripting language for .php files in my DocumentRoot (which is in my case d:/htdocs), and PHP4 for specified DocumentRoot subdirectories.
Here it is (Apache’s httpd.conf contents):
—————————
# replace with your PHP4 directory
ScriptAlias /php4/ «c:/usr/php4/»
# replace with your PHP5 directory
ScriptAlias /php5/ «c:/usr/php5/»
AddType application/x-httpd-php .php
Action application/x-httpd-php «/php5/php-cgi.exe»
# populate this for every directory with PHP4 code
Action application/x-httpd-php «/php4/php.exe»
# directory where your PHP4 php.ini file is located at
SetEnv PHPRC «c:/usr/php4»
# remember to put this section below the above
# directory where your PHP5 php.ini file is located at
SetEnv PHPRC «c:/usr/php5»
—————————
This solution is not limited to having only two parallel versions of PHP. You can play with httpd.conf contents to have as many PHP versions configured as you want.
You can also use multiple php.ini configuration files for the same PHP version (but for different DocumentRoot subfolders), which might be useful in some cases.
Remember to put your php.ini files in directories specified in lines «SetEnv PHPRC. «, and make sure that there’s no php.ini files in other directories (such as c:\windows in Windows).
And finally, as you can see, I run PHP in CGI mode. This has its advantages and limitations. If you have to run PHP as Apache module, then. sorry — you have to use other solution (the best advice as always is: Google it!).
Hope this helps someone.
If you are installing PHP on Vista just go to David Wang’s blog. http://blogs.msdn.com/david.wang/
archive/2006/06/21/HOWTO-Install-and-Run-PHP-on-IIS7-Part-2.aspx
I made the mistake of setting a ‘wildcard application map’ for PHP on a Windows 2003 / IIS 6.0 / PHP ISAPI installation.
This resulted in «No input file specified» errors whenever I tried to load the default page in my site’s directories. I don’t know why this broke things, but it did.
If anyone has the same problem, this may be the cause.
IIS setup: 403 forbidden error.
We had installed two separate different PHP versions — PHP 5.1.4 followed by 5.2.5.
We configured 5.2.5 php5isapi.dll to be loaded as the .php file type extension.
Despite this, php version 5.1.4 was being loaded. We renamed 5.1.4’s folder and then PHP was not loading at all.
There were no visible references to 5.1.4 in the IIS configuration, but in the file \webConfig.xml, there was a reference to 5.1.4’s isapi under IISFilters.
To fix this problem, we added version 5.2.5’s php5isapi.dll to the ISAPI Filter category for the web site, in the IIS control panel.
I installed by Microsoft Installer, manually, whatever I always received de same error from IIS7.
HTTP Error 404.3 — Not Found
The page you are requesting cannot be served because of the extension configuration. If the page is a script, add a handler. If the file should be downloaded, add a MIME map.
The IIS7 interface is quite diferent and are not all together like IIS6
The 5.3 version have not any of those files: php5stdll, php5isapi.dll. etc.
The installer puts others files in handlers and I decided to use them as substitutes. Nothing done!
After that, I discovered that installer do not install these files within the sites, but in the root default site configuration of IIS7.
So, I copied the root configuration to my site and them it worked (all others procedures were done e.g. copy php.ini to windows folder)
If you get 404 page not found on Windows/IIS5, have a look at C:\SYSTEM32\INETSRV\URLSCAN
There is a .ini file there that prevents some files from being served by IIS, even if they exist, instead IIS will give a 404. The urlscan logfile (same place) should give you some insight into what parameter is preventing a page from loading, if any.
Here’s how to run dual PHP instances with PHP 5.2 and any previous PHP on Windows 2003:
1. Right-click My Computer, go to Advanced tab, and click on Environment Variables.
Add the two installations and their EXT directories to the Path variable. For example, add:
c:\php;c:\php\ext;c:\TMAS\php;c:\tmas\php\ext;
Then, add the newer PHP version’s directory as a variable called PHPRC. For example:
Variable:PHPRC
Value: C:\PHP
Click OK to close the Environment Variables window, and click OK to close System Properties.
2. In registry, under HKEY_LOCAL_MACHINE>SOFTWARE>PHP, add a REG_SZ key called iniFilePath and give it a value
of the directory where the older PHP is installed. For example:
C:\TMAS\PHP
3. In IIS, go to the Web Service Extensions. Add both versions’ ISAPI module separately to the extensions
list, and allow both.
4. In IIS, go to each website utilizing the PHP versions. Set an ISAPI filter if needed. On the Home Directory
tab, click Configuration, and add .php, .php3, .phtml, and any other extensions needed (perhaps .html?) to
be filtered through PHP, and specify the ISAPI module version needed for each website.
You can now run two versions of PHP. This is because the order of where to look for the .ini file changed
between previous PHP versions and PHP 5.2, as documented at http://us2.php.net/ini:
* SAPI module specific location (PHPIniDir directive in Apache 2, -c command line option in CGI and CLI, php_ini parameter in NSAPI, PHP_INI_PATH environment variable in THTTPD)
* The PHPRC environment variable. Before PHP 5.2.0 this was checked after the registry key mentioned below.
* HKEY_LOCAL_MACHINE\SOFTWARE\PHP\IniFilePath (Windows Registry location)
* Current working directory (for CLI)
* The web server’s directory (for SAPI modules), or directory of PHP (otherwise in Windows)
* Windows directory (C:\windows or C:\winnt) (for Windows), or —with-config-file-path compile time option
—————————————————-
PHP 5.2.9.2 Install on XP Pro IIS 5.1 — phpinfo( ) results incorrect
Testing Date: 05.15.09
Background:
For several days now I, as a newbie, have been unsure if I had installed PHP correctly, or not. No matter what I did phpinfo( ) reported «Configuratin File Path» as: “C:\WINDOWS”. I was left to wonder what was wrong.
To help resolve the phpinfo() “issue”, I conducted a series of tests using two scripts:
The first is “test-php-ini-loaded.php”; it is stored in c:\inetpub\wwwroot, and has the following code:
if ( $inipath ) <
echo ‘Loaded php.ini: ‘ . $inipath ;
> else <
echo ‘A php.ini file is not loaded’ ;
>
?>
The second script is simply calls phpinfo( ). It is named test.php, is stored in “c:\inetpub\wwroot”, and has the following code:
( ); ?>
My Dev Environment:
1. Windows XP Pro SP3
2. IIS 5.1 / MMC 3.0
3. PHP 5.2.9.2 – phpMyAdmin not yet installed
4. (plus MySQL 5.1, etc.)
5. Install location is on my local E: drive
Install and Configure PHP
The fastest and easiest way to install PHP on Internet Information Services (IIS) is by using the MicrosoftВ® Web Platform Installer (Web PI). Web PI completely automates setting up IIS, FastCGI, and the latest version of PHP from the php.net Web site. With Web PI, you can navigate to the «Web Platform» tab and select «PHP» under «Framework and Runtimes» customize link. Alternately, use the instructions that follow as guidance for installing PHP with WindowsВ® Installer or using a compressed (Zip) file installation.
There are two builds for each PHP version: one is thread-safe, and one is not (referred to as the non-thread-safe [NTS] version). The thread-safe version is designed for environments where the Web server core can keep the PHP engine in memory, running multiple treads of execution for different Web requests simultaneously. The architecture of IIS and the FastCGI extension provide an isolation model that keeps requests separate, removing the need for a thread-safe version. The NTS version does not have any of the code that allows PHP to manage multiple threads. As a result, there is a performance improvement on IIS when using the NTS version when compared to the tread-safe version because the NTS version avoids unnecessary thread-safety checks (FastCGI ensures a single-threaded execution environment).
Install PHP
There are two main ways to install PHP on a WindowsВ®-based computer: download the Windows Installer or use the Windows Zip file from the PHP Web site. Either method will get PHP working, but both have some extra steps that are needed to make PHP work well.
Windows Installer
The Windows Installer version can get a complete PHP environment up and running, but the installation of extensions can be confusing. By default, no extensions are installed, and this can adversely affect the usefulness of the PHP installation. Alternately, all of the extensions can be installed; this results in an unstable system because some of the extensions can conflict with others. It is generally easier to use the Zip file installation.
Zip File Installation
To use the Zip file installation, follow the instructions in Using FastCGI to Host PHP Applications on IIS 7.0 and Above. The Zip file installation installs many of the extensions that are available for the Windows Installer version; however, none of the extensions are enabled until their entries in the Php.ini file are set up.
Download the latest non-thread-safe Zip file package with binaries of PHP. Under Windows Binaries, click on the most current PHP non-thread-safe Zip package to download the PHP files.
Unpack the files to a directory of your choice (for example, C:\PHP ) on your IIS server.
Rename the Php.ini-recommended to php.ini.
Open the Php.ini file in a text editor, then uncomment and modify settings as follows:
Set fastcgi.impersonate = 1.
FastCGI under IIS supports the ability to impersonate security tokens of the calling client. This allows IIS to define the security context that the request runs under.
Set cgi.fix_pathinfo = 0
The cgi.fix_pathinfo provides PATH_INFO/PATH_TRANSLATED support for Common Gateway Interface (CGI). Setting this to 1 will cause PHP CGI to fix its paths to conform to the specification.
Set cgi.force_redirect = 0.
Set open_basedir to point to a folder or network path where the content of the Web site(s) is located.
Set extension_dir to point to a location where PHP extensions reside. For PHP 5.2.X, this is typically extension_dir = «./ext».
Set error_log=»C:php_errors.log»
This can help with troubleshooting.
Enable the required PHP extension by un-commenting corresponding lines. More information follows in the section, Extensions.
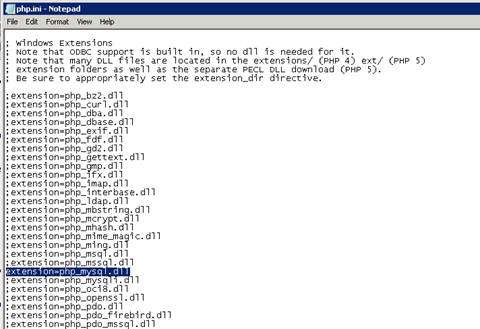
Figure 1 Windows extensions
Click on Start, Settings, Control Panel, and then double-click on the System icon (using the class view).
Click on the Advanced system settings link in the left column.
From the System Properties window, click on the Advanced tab, and then click on the Environment Variables button at the bottom.
Select the Path variable from the System Variables section, and then click on Edit. Add: c:\php to your system path.
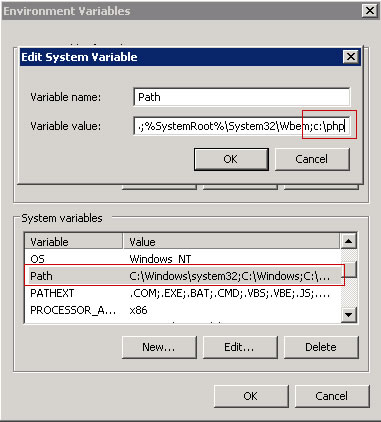
Figure 2: Edit System Variable
Click OK until you have exited the System Properties window.
Start IIS Manager by clicking on Start, Programs, Administrative Tools, and then Internet Information Services (IIS) Manager.
From the IIS Manager, click on the hostname of your server in the Connections panel on the left.
Double-click on the Handler Mappings icon.

Figure 3: Internet Information Services (IIS) Manager
From the Handler Mappings Actions panel, click on Add Module Mapping.

Figure 4: Handler Mappings
Type the following information into the appropriate text boxes, and then click OK.
- Request path: *.php
- Module : FastCGImodule
- Executable: C:\php\php-cgi.exe
- Name: FastCGI

Figure 5: Add Script Map
Click OK, and then c lick Yes.
In the left panel, click on your server’s hostname, and then double-click on the Default Document icon.
From the Actions panel on the right, click Add.
Enter index.php as the new default document name, and then click OK.
Enter default.php as the new default document name, and then click OK.
In the left panel, click on your server’s hostname.
In the Actions panel on the right, click Restart.
Create a new text document, and save it as c:\inetpub\wwwroot\phpinfo.php with the following content:
You should now see the PHP information page at http://localhost/phpinfo.php .

Figure 6: PHP information page
Extensions
It is important to determine which extensions are needed by the applications that will be running and then to limit the installed extensions to only those. For a typical open-source application installation, for example, the following extensions are installed:
- Database Extensions — Most open-source applications that use MySQL for a database engine use either the php_mysql or the php_mysqli extensions. For new development work, either of these extensions work well, or consider using the PDO versions of the MySQL driver (PDO is a PHP extension providing a data-access abstraction layer that can be used with a variety of databases); this extra layer of abstraction provides a richer set of object database functionality and controls. If Microsoft® SQL Server® (or an express version, such as Microsoft® SQL Server® 2008 Express or Microsoft® SQL Server® 2005 Express Edition) is the database engine, use the php_mssql extension for open-source applications. For new development work, use the PDO version of the SQL driver.
- Image Handling Extensions — Many of the open-source applications that enable work with images make use of the GD2 extension – php_gd2, which has a number of good basic image manipulation application programming interfaces (APIs). Some applications use the ImageMagick application and libraries. There is also a php_exif library for working with the extended information that modern digital cameras store within the images.
- Internationalization and Localization Extensions &mdash- The two most commonly used extensions for i18n and l10n are php_mbstring (Multi-Byte String) and php_gettext (Native Language Support). Many of the open-source applications use one or both of these.
- Web Services Extensions — Choose the Web services extensions based on the services desired. For PHP, the SOAP extension is widely used. The XML-RPC extension is often used in conjunction with SOAP and other services.
PHP.INI File Settings
The Php.ini file provides PHP with configuration and environmental information. Below are a number of settings for the Php.ini file that help PHP work better with Windows.
Required Settings
The extension_dir needs to point to the directory where the PHP extensions are stored. The path can be fully qualified (for example, C:\PHP\ext ) or relative (for example, .\ext). Extensions that are specified lower in the Php.ini file need to be located in the extension_dir. If the extensions specified are not in the extension_dir, then PHP will give a warning message at the start of script execution, and the application may show errors because of the missing functionality.
C:\inetpub\temp\php-errors.log ). That puts the log in a place that IIS can use, and also keeps the log close to where PHP applications are running.
Optional Settings
- max_execution_time=## This directive sets the maximum amount of time that can be taken executing any given script. The default is 30 seconds. Some applications need more time to process batch operations (for example, Gallery2 loading multiple images from a remote location). However, setting the execution time higher than 300 seconds is not advised because there are often other parts of the connection that cannot support such a long execution time.
- memory_limit=###M The amount of memory available for the PHP process (in MB). The default is 128 MB, which is appropriate for most PHP applications.
- display_errors=Off This directive determines whether to include any error messages in the stream that it returns to the Web server. If turned on, PHP will send the classes of errors that are defined with the error_reporting directive back to IIS as part of the error stream. Many of the open-source applications bypass error reporting by executing commands prefaced with @. This allows the applications to control error handling.
- Mail functions PHP is configured by default to send outbound mail through an SMTP server located on the same system as the Web server. Note that most Windows installations usually have the Web and mail servers on separate systems.
Enable PHP Session State
In WindowsВ® Explorer, create the session subdirectory in the PHP installation directory.
Right-click the session directory, and select Properties.
In the Security tab, click Edit.
Click Add, and enter IIS_IUSRS for Enter the object names to select.
Click OK.
Select the Modify permission check box, and click OK.

Figure 7: Permissions for session folder
Click OK in the Session Properties window.
Open php.ini in the PHP installation directory, and set the session.save_path setting to the session subdirectory:
Save and close the file.
Click Start, and then select Command Prompt.
Type runas /user:administrator cmd.exe to enable elevated permissions.
Type iisreset at the command prompt, and then press the ENTER key.

Figure 8: IISRESET command
Note that PHP uses file-based session state by default. You can modify a number of additional session settings, including whether cookie or URL sessions should be used, and whether sessions are created on the first request or need to be explicitly created.
Test the session state by using Windows Explorer, navigate to C:\inetpub\wwwroot .
Create a folder and rename it phpapp.
Create session.php in the phpapp directory.
Paste the following into it:
Save and close the file.
Start Internet Explorer, and navigate to http://localhost/phpapp/session.php .

Figure 9: Using session state
Observe that the counter is 1.
Request http://localhost/phpapp/session.php again, or press F5.
Figure 10: Using session state
Observe that the counter is 2.
This article uses information from «Using FastCGI to Host PHP Applications on IIS 7.0 and Above» by Ruslan Yakushev, published on December 5, 2007.


