- Windows 10 update history
- Updates for Windows 10, version 2004 and Windows Server, version 2004
- Current status of Windows 10, version 2004 and Windows Server, version 2004
- Known issues
- Notes and messages
- General
- Troubleshooting
- Needs Windows 7 service Pack 1 Platform Update что делать, если вышла ошибка
- Что значит «Needs Windows 7 service Pack 1 Platform Update»?
- Установите обновление платформы Виндовс 7 SP1
- Установите Сервис Пак 1 для Виндовс 7
- Переустановите игровую программу
- Заключение
- Windows Update: FAQ
Windows 10 update history
Windows 10, version 2004 and Windows Server, version 2004
Updates for Windows 10, version 2004 and Windows Server, version 2004
Windows 10 is a service, which means it gets better through periodic software updates.
The great news is you usually don’t have to do anything! If you have enabled automatic updates, new updates will automatically download and install whenever they’re available, so you don’t have to think about it.
On the left side of this page, you’ll find a list of all the updates released for this version of Windows. You can also find more information about releases and any known issues. Installing the most recent update ensures that you also get any previous updates you might have missed, including any important security fixes.
For more information about the update and how to get it, see:
Current status of Windows 10, version 2004 and Windows Server, version 2004
For the most up-to-date information about Known Issues for Windows and Windows Server, please go to the Windows release health dashboard.
Known issues
Certain Japanese half-width Katakana and full-width Katakana characters that have a consonant mark aren’t interpreted as the same character. When you use the CompareStringEx() function with the NORM_IGNOREWIDTH flag to compare them, these characters are evaluated as different because of an issue in the sorting rule . This issue affects all the updates starting on June 9, 2020 for Windows 10, version 2004.
Open the Command Prompt window ( cmd.exe) with elevated privileges.
Run “reg add HKEY_LOCAL_MACHINE\SYSTEM\CurrentControlSet\Control\Nls\Sorting\Versions /ve /d 0006020F /f”
Restart the computer or processes to see the full effect.
Important If you have not installed KB4586853or later on the computer, setting an invalid value in this registry might prevent the computer from starting up.
This workaround reverts the National Language Support (NLS) sorting rule to version 6.2, which is used in Windows 10, version 1909 and earlier. When sharing data between systems, consider applying the workaround consistently. If you use this workaround, conduct sufficient testing and evaluations to mitigate problems caused by different sorting rule versions on multiple systems.
Notes and messages
General
IMPORTANT Release notes are changing! To learn about the new URL, metadata updates, and more, see What’s next for Windows release notes.
IMPORTANT Starting in July 2020, we will resume non-security releases for Windows 10 and Windows Server, version 1809 and later. There is no change to the cumulative monthly security updates (also referred to as the «B» release or Update Tuesday release). For more information, see the blog post Resuming optional Windows 10 and Windows Server non-security monthly updates.
IMPORTANT Starting in July 2020, all Windows Updates will disable the RemoteFX vGPU feature because of a security vulnerability. For more information about the vulnerability, seeCVE-2020-1036 and KB4570006. After you install this update, attempts to start virtual machines (VM) that have RemoteFX vGPU enabled will fail, and messages such as the following will appear:
If you re-enable RemoteFX vGPU, a message similar to the following will appear:
“The virtual machine cannot be started because all the RemoteFX-capable GPUs are disabled in Hyper-V Manager.”
“The virtual machine cannot be started because the server has insufficient GPU resources.”
«We no longer support the RemoteFX 3D video adapter. If you are still using this adapter, you may become vulnerable to security risk. Learn more (https://go.microsoft.com/fwlink/?linkid=2131976)”
Troubleshooting
If you have questions or need help activating or troubleshooting Windows, see our help topics below:
For information about how to update, see Update Windows 10.
If you have questions about manually installing or removing an update, see Windows Update: FAQ.
Getting an error message when updating? See Troubleshoot problems updating Windows 10.
If you need to activate Windows, see Activation in Windows 10. If you’re having trouble with activation, see Get help with Windows activation errors.
To get the latest major update to Windows 10, see Get the Windows 10 October 2020 Update.
Needs Windows 7 service Pack 1 Platform Update что делать, если вышла ошибка
При запуске какой-либо игры (обычно это популярная «H1Z1») последняя может выдать сообщение «Needs Windows 7 Service Pack 1 Platform Update», после чего запуск игры становится невозможен. Указанным месседжем программа сообщает, что для её нормального запуска необходима установка в системе специализированного обновления платформы ОС Виндовс 7 со встроенным «Service Pack 1». Попытки же пользователя установить указанное обновление часто оканчиваются безрезультатно. Что же предпринять в данной ситуации? Ниже я разберу, в чём сущность данной дисфункции, и как её исправить.
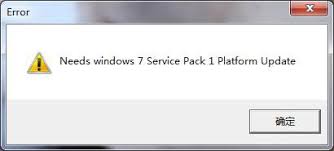
Что значит «Needs Windows 7 service Pack 1 Platform Update»?
В переводе данное сообщение выглядит как «Необходимо обновление платформы Сервис Пак 1 для Виндовс 7». Обычно подобная проблема возникает в ситуации, когда на пользовательском ПК с Виндовс 7 не установлен требуемый Сервис Пак 1, или отсутствует необходимое для данной ОС обновление платформы для Виндовс 7.
Попытки пользователя обновить свою систему через загрузку и запуск указанного Service Pack 1 с сайта Майкрософт (или обновления платформы Виндовс 7) обычно не дают какого-либо результата. Появляется табличка запуска процесса обновления, после чего указанный процесс может продолжаться часами без каких-либо изменений.
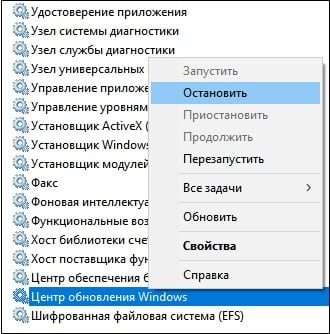
Подобная ситуация связана с некорректно работающей службой «Центр обновления Виндовс» (Windows Update) блокирующей установку необходимого апдейта платформы Виндовс 7 СП 1.
Данная дисфункция также часто идентифицируется кодом ошибки «g34», встречающейся на пользовательских ПК.
Для решения ошибки «Needs Windows 7 service Pack 1 Platform Update» необходимо выполнить ряд способов, которые я перечислю ниже.
Установите обновление платформы Виндовс 7 SP1
Поскольку в большинстве случаев на компьютерах пользователей установлена ОС Виндовс с SP1, то нам будет необходимо провести ряд шагов для установки затребованного системой апдейта платформы Виндовс 7. Выполните следующее:
- Скачайте обновление платформы Виндовс 7 с сайта Майкрософт. Перейдите по указанной ссылке, нажмите на «Скачать». Вы увидите два файла, с упоминанием x64 – для 64-битной ОС, и x86 – для 32-битной. Выберите файл, который соответствует вашей ОС, и скачайте его на ваш ПК (но не запускайте).
 Выберите файл, соответствующий вашей системе
 Если вы не в курсе, какой разрядности ваша ОС (32 или 64), тогда нажмите сочетание кнопок Win+Pause, и в появившемся окне просмотрите значение параметра «Тип системы»;
Установите Сервис Пак 1 для Виндовс 7
В случае, если ваша Виндовс 7 не имеет установленного Сервис Пак 1, тогда рекомендуется установить его с сайта Майкрософт. При этом он уже будет включать в себя необходимое «Обновление платформы Виндовс 7».
Переустановите игровую программу
Если вы выполнили перечисленные выше шаги, но ошибка продолжает появляться, рекомендуется переустановить саму игру. Часто это позволяет избавиться от ошибки g34 на вашем ПК.
Заключение
Сообщение «Needs Windows 7 service Pack 1 Platform Update» обычно возникает в ситуации отсутствия в системе необходимого обновления платформы Виндовс 7 SP1. Рекомендуется скачать и установить требуемое обновления (перед тем остановив Центр обновления Виндовс), что позволит исправить ошибку g34 на вашем компьютере.
Windows Update: FAQ
Note: If you’re looking for Microsoft Office update info, see Install Office updates.
In Windows 10, you decide when and how to get the latest updates to keep your device running smoothly and securely. When you update, you’ll get the latest fixes and security improvements, helping your device run efficiently and stay protected. In most cases, restarting your device completes the update. Make sure your device is plugged in when you know updates will be installed.
If other questions come up when you update Windows 10, here are some other areas that might interest you:
When you only want info about updating Windows 10, you’ll find answers to many of your questions here:
When the Windows 10 May 2020 Update is ready for your device, it will be available to download and install from the Windows Update page in Settings. Choose a time that works best for you to download the update. You’ll then need to restart your device and complete the installation. After that, your device will be running Windows 10, version 2004.
To manually check for the latest recommended updates, select Start > Settings > Update & Security > Windows Update > Windows Update .
To get help updating to the latest version of Windows 10, go to the Microsoft software download page and download the Update Assistant.
Some updates may not be available on all devices at the same time—we’re making sure updates are ready and compatible.
To stay up to date, select Start > Settings > Update & Security > Windows Update > Windows Update , and then select Check for updates.
If a feature update is available for your device, it will appear separately on the Windows Update page. To install it, select Download and install now.
Here are a few things you can try if you’re having trouble installing updates:
Make sure that your device is connected to the internet. Downloading updates requires an internet connection.
If you’re connected the internet, try to install the updates manually. Select Start > Settings > Update & Security > Windows Update > Windows Update , and then view available updates.
Check for updates
Run the Windows Update Troubleshooter. Select Start > Settings > Update & Security > Troubleshoot . Under Get up and running, select Windows Update.
The time required to download updates primarily depends on internet connection speed, network settings, and update size. Make sure your device is plugged in and connected to the internet to download updates faster.
You can’t stop updates entirely—because they help keep your device safe and secure, updates will eventually need to be installed and downloaded, regardless of your update settings. Here’s how to temporarily pause updates from being downloaded and installed. Note that after the pause limit is reached, you’ll need to install the latest updates before you can pause updates again.
In the Windows 10 November 2019 Update (version 1909) or later, or in Windows version 1809 for Pro or Enterprise, select Start > Settings > Update & Security > Windows Update . Then choose one of the following options:
Select Pause updates for 7 days.
Select Advanced options. Then, in the Pause updates section, select the drop-down menu and specify a date for updates to resume.
To finish installing an update, your device will need to restart. Windows will try to restart your device when you’re not using it. If it can’t, you’ll be asked to schedule the restart for a more convenient time. Or, you can schedule anytime by following these steps:
Select Start > Settings > Update & Security > Windows Update > Windows Update .
Select Schedule the restart and choose a time that’s convenient for you.
You can set active hours to make sure automatic restarts for updates only happen when you’re not using your device. Learn about active hours for Windows 10.
Try deleting files you don’t need, uninstalling apps you don’t use, or moving files to another drive like an external USB drive or OneDrive. For more tips on freeing up disk space, see Free up drive space in Windows 10.
We recommend keeping devices like laptops and tablets plugged in when you’re not using them. This way, if updates are installed outside active hours, your device will have enough power to complete the installation. Windows updates don’t consume more battery than other typical system processes.
An update history is available so you can see which updates were installed, and when. You can also use this list to remove specific updates, although we don’t recommend this unless it’s necessary.
Select Start > Settings > Update & Security > Windows Update > Windows Update > View update history .
For more info about what’s included in updates for Windows 10, see Windows 10 update history.
We don’t recommend that you remove any installed updates. However, if you must remove an update, you can do so in update history.
Select Start > Settings > Update & Security > Windows Update > View update history > Uninstall updates.
Select the update you want to remove, then select Uninstall.
Feature updates are typically released twice per year and include new functionality and capabilities as well as potential fixes and security updates. Quality updates are more frequent and mainly include small fixes and security updates. Windows is designed to deliver both kinds of updates to devices through Windows Update.
To double check that your device is up to date, open Settings > Update & Security > Windows Update and see your update status and available updates.
To find which version of Windows you’re running, see Which version of Windows operating system am I running?
Reserved storage is not automatically turned on by Windows in any update scenarios. It is only turned on for new devices with the Windows 10 May 2019 Update (version 1903) or later preinstalled, or devices on which a clean install was performed.
Note: If you’re looking for Microsoft Office update info, see Install Office updates.
The best way to keep Windows 8.1 up to date is to turn on automatic updates. With automatic updates, you don’t have to search for updates online or worry about missing critical fixes or device drivers for your PC. Instead, Windows Update automatically installs important updates as they become available.
To turn on automatic updates:
Open Windows Update by swiping in from the right edge of the screen (or, if you’re using a mouse, pointing to the lower-right corner of the screen and moving the mouse pointer up), select Settings > Change PC settings > Update and recovery > Windows Update. If you want to check for updates manually, select Check now.
Select Choose how updates get installed, and then, under Important updates, select Install updates automatically (recommended).
Under Recommended updates, select Give me recommended updates the same way I receive important updates.
Under Microsoft Update, select Give me updates for other Microsoft products when I update Windows, and then select Apply.
Click the questions below to see answers about how Windows Update keeps your device up to date.
Note: If your PC is connected to a network where updates are managed by Group Policy, you might not be able to change settings related to Windows Update. For more info, contact your organization’s technical support.
Open Windows Update by swiping in from the right edge of the screen (or, if you’re using a mouse, pointing to the lower-right corner of the screen and moving the mouse pointer up), select Settings > Change PC settings > Update and recovery > Windows Update. To check for updates manually, select Check now.
An update history is available so you can see which updates were installed, and when. You can also use this list to remove specific updates, although we don’t recommend this unless it’s necessary.
To see your PC’s update history, open Windows Update by swiping in from the right edge of the screen (or, if you’re using a mouse, pointing to the lower-right corner of the screen and moving the mouse pointer up), select Settings > Change PC settings > Update and recovery > Windows Update > View your update history.
We don’t recommend that you remove any installed updates. However, if you must remove an update, you can do so in update history.
Open Windows Update by swiping in from the right edge of the screen (or, if you’re using a mouse, pointing to the lower-right corner of the screen and moving the mouse pointer up), select Settings > Change PC settings > Update and recovery > Windows Update > View your update history.
Select the update you want to remove, then select Uninstall.
Here are a few things to try if you’re having problems installing updates:
Make sure that your PC is connected to the internet. Some updates can’t be installed if you’re using a metered internet connection.
If you’re connected the internet and updates aren’t installed automatically, wait a few minutes and then try to install the updates manually.
See the Fix Windows Update errors guided walkthrough to try to fix the problem.
Support for Windows 7 ended on January 14, 2020
We recommend you move to a Windows 10 PC to continue to receive security updates from Microsoft.
Click the questions below to see answers about how Windows Update keeps your device up to date.


