- File sharing over a network in Windows 10
- Share content in a meeting in Teams
- Share content on a Mac
- Include computer sound
- Navigate using the grid view
- Give and take control of shared content
- Give control
- Take control
- Zoom in to shared content
- Share content
- Zoom in to shared content
- Use your phone as a companion device in a meeting
- Add a companion device to a meeting
- 7 Best Ways to Fix When Window 10 File Sharing Isn’t Working
- Mehvish
- 1. Restart Your Computer
- 2. Use File Sharing Properly
- Enable File Sharing
- Share Files
- Verify If the Folder Is Shared or Not
- 3. Turn Password Protection Off and On
- 4. Use Correct Login Details
- 5. Switch Between File Sharing Connections
- 6. Allow File and Printer Sharing in Firewall Settings
- 7. Disable Antivirus on Your PC
- Tip: Identify Shared Folders
- Sharing Made Easy
- Read Next
- 5 Best Fixes for Windows 10 File Explorer Search Not Working
- How to Set Up Local Folder Sharing Between Windows and Mac
- Top 5 Things About Microsoft’s Windows Terminal That You Should Know
- Top 12 Ways to Fix OneDrive Won’t Stop Syncing Error on Windows 10
- 5 Best Fixes for Force Quit Not Working on Mac
- How to Link Microsoft Your Phone App to iPhone on Windows
- Top 8 Fixes for OneDrive Sync Issues on Mac
- How to Access Shared Windows Folders On Android Over WiFi
- Did You Know
File sharing over a network in Windows 10
In Windows 10, some features of file and folder sharing over a network have changed, including the removal of HomeGroup. Read on for answers to common questions about other changes to file and folder sharing in Windows 10.
To share a file or folder in File Explorer, do one of the following:
Right-click or press a file, select Give access to > Specific people.

Select a file, select the Share tab at the top of File Explorer, and then in the Share with section select Specific people.

If you select multiple files at once, you can share them all in the same way. It works for folders, too—share a folder, and all files in it will be shared.
To stop sharing in File Explorer, do one of the following:
Right-click or press a file or folder, then select Give access to > Remove access.

Select a file or folder, select the Share tab at the top of File Explorer, and then in the Share with section select Remove access.

File Explorer shows the «Remove access» option («Stop sharing» in older versions of Windows 10) for all files, even those that aren’t being shared over a network.
Open File Explorer, then type \\localhost into the address bar.
Note: When you’ve shared a file from a folder in your user profile and you go to \\localhost, you’ll see your user profile and all its files there. This doesn’t mean that all of your files are shared—just that you have access to all your own files.
If you open File Explorer, go to Network, and see an error message («Network discovery is turned off….»), you’ll need to turn on Network discovery to see devices on the network that are sharing files. To turn it on, select the Network discovery is turned off banner, then select Turn on network discovery and file sharing.

To troubleshoot problems with sharing files or folders, follow the steps below on all computers from which you’re trying to share.
Make sure the computers are on the same network. For example, if your computers connect to the internet through a wireless router, make sure they all connect through the same wireless router.
If you’re on a Wi-Fi network, set it to Private. To find out how, read Make a Wi-Fi network public or private in Windows 10.
Turn on network discovery and file and printer sharing, and turn off password protected sharing.
Select the Start button, then select Settings > Network & Internet , and on the right side, select Sharing options.
Under Private, select Turn on Network discovery and Turn on file and printer sharing.
Under All Networks, select Turn off password protected sharing.
Make sharing services start automatically.
Press the Windows logo key + R.
In the Run dialog box, type services.msc, and then select OK.
Right-click each of the following services, select Properties, if they’re not running, select Start, and next to Startup type, select Automatic:
Share content in a meeting in Teams
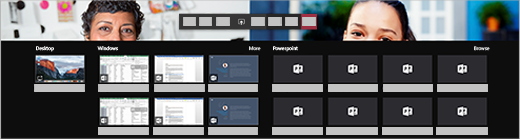
To share your screen in a meeting, select Share content  in your meeting controls. Then, choose to present your entire desktop, a window, a PowerPoint file, or a whiteboard.
Note: If you’re using Teams on the web, you’ll only be able to share your screen if you’re using Google Chrome or the latest version of Microsoft Edge.
Show your entire screen, including notifications and other desktop activity.
You need to seamlessly share multiple windows.
Show just one window, and no notifications or other desktop activity.
You only need to show one thing and want to keep the rest of your screen to yourself.
Present a PowerPoint file others can interact with.
You need to share a presentation and want others to be able to move through it at their own pace.
For info on PowerPoint sharing, see Share PowerPoint slides in a Teams meeting.
Collaborate with others in real time.
You want to sketch with others and have your notes attached to the meeting.
When you’re done sharing, go to your meeting controls and select Stop sharing.
Note: Window sharing isn’t available for Linux users.
Share content on a Mac
If you’re using a Mac, you’ll need to grant permission to Teams to record your computer’s screen before you can share.
You’ll be prompted to grant permission the first time you try to share your screen. Select Open System Preferences from the prompt.
If you miss the prompt, you can do this anytime by going to Apple Menu > System Preferences > Security & Privacy.
Under Screen Recording, make sure Microsoft Teams is selected.
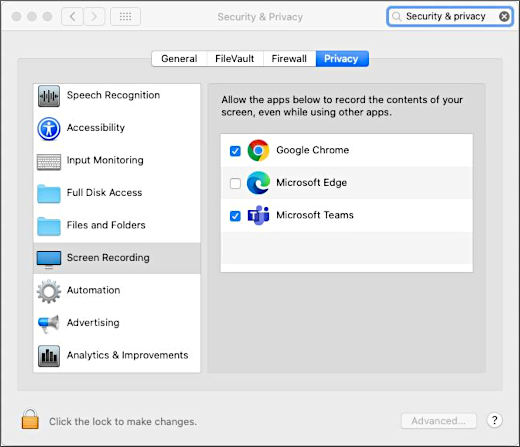
Go back to your meeting and try sharing your screen again.
Note: If you’re using Teams on the web, make sure you’ve also granted screen recording permission to your browser.
Include computer sound
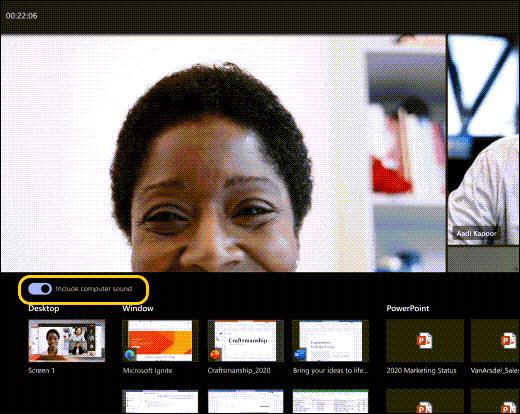
Sharing computer sound lets you stream audio from your computer to meeting participants through Teams. You can use it to play a video or audio clip as part of a presentation.
To share sound, select Share content in your meeting controls and then Include computer sound (it’s the switch on the top left of your sharing options). All sound from your computer, including notifications, will be audible in the meeting.
Navigate using the grid view
Select Go to slide  in the lower left of the PowerPoint presentation (or select the G key) to view thumbnails of all the slides.
Select a thumbnail to jump to that slide.
Give and take control of shared content
Give control
If you want another meeting participant to change a file, help you present, or demonstrate something, you can give control to that person. You will both be in control of the sharing, and you can take back control anytime.
Note: When you’re sharing an app, only give control to people you trust. People you give control to may send commands that could affect your system or other apps. We’ve taken steps to prevent this but haven’t tested every possible system customization.
On the sharing toolbar, select Give control.
Select the name of the person you want to give control to.
Teams sends a notification to that person to let them know you’re sharing control. While you’re sharing control, they can make selections, edits, and other modifications to the shared screen.
To take control back, select Take back control.
Take control
To take control while another person is sharing, select Request control. The person sharing can then approve or deny your request.
While you have control, you can make selections, edits, and other modifications to the shared screen.
When you’re done, select Release control to stop sharing control.
Zoom in to shared content
Want to get a better look at shared content?
Click and drag to see different areas.
And to zoom in or out, try the following:
Pinch in or out on your trackpad
Use the keyboard shortcuts Control + Plus sign and Control + Minus sign
Hold the Control key and scroll with your mouse
Note: Mac trackpads don’t support zoom in meetings. If you’re on a Mac, use one of the other options. If you’re using Linux, giving and taking control of shared content isn’t available at this time.
Share content
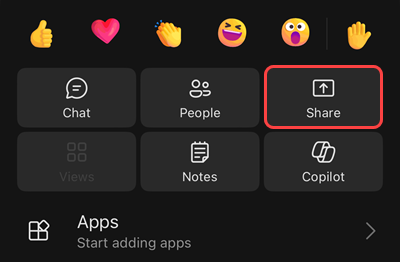
To share content from your mobile device, just select More options  > Share in your meeting controls. You can choose to present a photo, video, PowerPoint, or your entire screen.
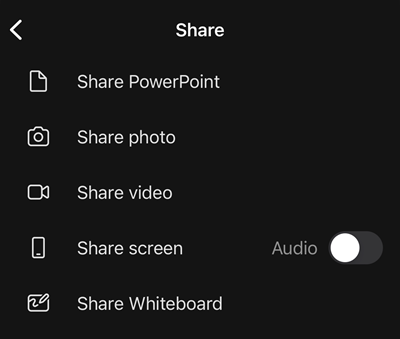
Take a photo to share or choose one from your gallery.
Share live video from your camera.
Present a PowerPoint file others can interact with.
Show your entire screen, including notifications and other activity.
When you’re ready to share, tap Start presenting at the bottom of your screen. Hit Stop presenting when you’re done.
To go forward and back in a PowerPoint presentation, swipe in the direction you’d like to go, or tap the forward and back buttons on the bottom of your screen.
Although whiteboard sharing isn’t available on mobile yet, you can collaborate on a whiteboard shared from another device.
Zoom in to shared content
Want to get a better look at shared content?
Pinch in or out to zoom, and tap and drag to see different areas.
Use your phone as a companion device in a meeting
Join a meeting on more than one device for more collaboration and content-sharing options.
If you’re already in a meeting on your laptop, for example, you can add your phone as a companion device to present files, share live video, and much more. Any device with the Teams mobile app can be added as a companion device—just make sure the devices you’re using are signed in to the same Teams account.
There’s a lot you can do when you add a companion device to your meeting experience:
Use mobile video to show things that are out of view for remote participants.
Take a photo to share with everyone, or pick one from your camera roll.
Use your phone to control a presentation.
Share your mobile screen.
If you can see it on your phone, you can share it in the meeting!
Add a companion device to a meeting
Open Teams on your mobile phone when you’re already in a meeting on another device.
You’ll see a message at the top of your mobile screen with an option to join the meeting. Tap Join to add your phone as a companion device.

If you join this way, we’ll mute your companion device’s mic and speaker to avoid causing an echo effect.
When you’re ready to share something from the companion device, tap Start presenting at the bottom of the screen. On your other device, you’ll be able to see what you’re sharing, just like everyone else in the meeting.
When you’re finished, tap Stop presenting, or simply hang up. Your other device will still be connected to the meeting.
7 Best Ways to Fix When Window 10 File Sharing Isn’t Working
Mehvish
27 May 2019
In the past few years, Microsoft has simplified file sharing on Windows a lot. Now, you just need to click a button or two to make your files visible to other users on the same network. Interestingly, the file sharing isn’t limited to just Windows computers for you can even view your files on an Android phone.

Sometimes, the file sharing stops working abruptly, or you aren’t able to view your files on other devices properly. That can get quite frustrating.
But, no need to worry as we will help you fix the issue. Here, you will find 7 solutions that will bring back the Windows 10 file sharing on the right track.
1. Restart Your Computer
Don’t be surprised. If you haven’t tried restarting your computer yet, it would be a good choice to do it right away.

2. Use File Sharing Properly
It’s important to follow all the steps correctly to make sure file sharing works as it is supposed to be. First, you need to enable file and network sharing. Secondly, you need to share the files. Here are the steps for both of them.
Enable File Sharing
Even though file sharing is enabled by default on Windows 10 for private networks, you should start by confirming the same. For that, follow these steps:
Step 1: Search for Control Panel in Windows Search and open it.
Step 2: Click on Network and Sharing Center.

Step 3: Click on Change Advanced Settings from the left sidebar.

Step 4: Under Private (current profile), ensure Turn on network discovery and Turn on file and printer sharing are checked.

Also on Guiding Tech

5 Best Alternatives to Windows 10 Photos App
Share Files
Just enabling the network discovery and file sharing doesn’t mean the computers on your network will have access to all your files automatically. You need to manually share the item, which can be a folder or a drive.
For that, follow these steps:
Step 1: Right-click on the item that you want to share. Click on Properties.

Step 2: Go to the Sharing tab and click on Advanced Sharing.

Step 3: Enable Share this folder and click on Apply followed by Ok. By default, the permissions are set to read only. That is, others can only view the folder and cannot modify it. To change the permissions, click on Permissions and alter them as per your need.

The above step makes your folder visible to all the users in your local network. To share it with a selected few people only, click on Share in step 2. From the drop-down box, select the user with whom you want to share the file.
Now, you will be able to access the folder on other computers. Similarly, repeat the steps for other files and folders.
Verify If the Folder Is Shared or Not
Right-click on any folder and go to ‘Give access to’ and you will see the Remove access option. That doesn’t mean the folder is being shared. By default, the option is available for all folders.
To verify if the folder is being shared, right-click on it and go to Properties. Then, click on the Sharing tab. Under Network File and Folder Sharing, you will see the Shared label along with its path.

3. Turn Password Protection Off and On
When Password protected sharing is turned on, then other users either need to have a user account on your PC or they should be familiar with your username and password.
You can try disabling this feature and see if the sharing works. To turn it off, go to Control Panel > Network and Sharing Center > Change advanced sharing settings (from the left pane).
Then, under All Networks, check the box next to Turn off password protected sharing.

Also on Guiding Tech
# troubleshooting
4. Use Correct Login Details
If you want to use the password, then make sure you are entering the right password on other computers. Try with both your local username and password and your Microsoft account details. To confirm the username, go to C Drive followed by Users. Here, the folder names represent the various users on your PC.


5. Switch Between File Sharing Connections
While the recommended way is to go with 128-bit encryption, some devices support 40 or 56-bit encryption. So, try switching to the other and see if that fixes the problem.
To do so, open Control Panel > Network and Sharing Center > Change advanced sharing settings (from the left sidebar). Under All Networks > File sharing connections, try both alternatively.

6. Allow File and Printer Sharing in Firewall Settings
To do so, follow these steps:
Step 1: Go to Control Panel followed by Windows Defender Firewall.

Step 2: Click on Allow an app or feature through Windows Defender Firewall.

Step 3: Make sure File and Printer Sharing is enabled in the list.

7. Disable Antivirus on Your PC
Sometimes, antivirus is also responsible for the erratic behavior of file sharing. So, try disabling it temporarily and see if it solves the issue. If file sharing works properly after disabling antivirus, check if an update is available for the antivirus or you might need to use a different one.
Tip: Identify Shared Folders
To find out the folders that are currently being shared, type \\localhost into the address bar of your File Explorer and press Enter.

Alternatively, go to the Network from the left pane in the File Explorer. Here, click on your computer name.

Also on Guiding Tech

What to Do When Windows 10 Nearby Sharing Doesn’t Work
Sharing Made Easy
We hope the above solutions would have helped you fix the file sharing issue. If you are trying to share files between PC and Android, you can take the help of third-party apps too. For file sharing between PC and iOS, third-party apps also come to the rescue.
Next up: You must have noticed the Focus Assist icon in the Action Center. What is it? How is it helpful? Read the next post to find all the answers.
Last updated on 15 Jan, 2020
The above article may contain affiliate links which help support Guiding Tech. However, it does not affect our editorial integrity. The content remains unbiased and authentic.
Read Next

5 Best Fixes for Windows 10 File Explorer Search Not Working
Can’t locate files on your computer because the # Windows 10 # File Explorer # Search isn’t working? Check out the fixes highlighted in this guide to resolve the issue.

How to Set Up Local Folder Sharing Between Windows and Mac
Are you looking to set up local # folder # sharing between your PC and # Mac? Here’s a solution to setup a local # folder # sharing between # Windows and # Mac.

Top 5 Things About Microsoft’s Windows Terminal That You Should Know
# Microsoft’s new # Windows # Terminal is an all-in-one app for command line user and has some many new features and options on offer.

Top 12 Ways to Fix OneDrive Won’t Stop Syncing Error on Windows 10
A complete guide on how to fix # OneDrive won’t stop syncing error on # Windows 10 computers. Everything you need to know.

5 Best Fixes for Force Quit Not Working on Mac
Are you unable to close applications on your # Mac because the Force Quit function isn’t working? Refer to the # troubleshooting tricks in the guide to get the issue fixed.

How to Link Microsoft Your Phone App to iPhone on Windows
Unable to connect # Microsoft Your Phone app on # Windows to # iPhone? Know how to link iPhone to Windows via the Your Phone app.

Top 8 Fixes for OneDrive Sync Issues on Mac
Here’s how to fix # OneDrive sync issues on # Mac by following these 8 easy fixes in this troubleshooting guide.

How to Access Shared Windows Folders On Android Over WiFi
Find Out How to Access Shared # Windows Folders On # Android Over # WiFi.
Did You Know
Microsoft Edge was initially code-named Project Spartan.


