- Working with threads in windows service [closed]
- 1 Answer 1
- Threading in a Windows Service
- 2 Answers 2
- How to stop worker threads in a multithreaded Windows service on service stop
- 7 Answers 7
- How to properly stop a multi-threaded .NET windows service?
- Tutorial: Create a Windows service app
- Create a service
- Rename the service
- Add features to the service
- Add custom event log functionality
- Define what occurs when the service starts
- Polling
- Define what occurs when the service is stopped
- Define other actions for the service
- Set service status
- Implement service pending status
- Add installers to the service
- (Optional) Set startup parameters
- To add startup parameters
- Build the service
- Install the service
- Start and run the service
- Verify the event log output of your service
- Clean up resources
- Next steps
Working with threads in windows service [closed]
Want to improve this question? Add details and clarify the problem by editing this post.
Closed 7 years ago .
Question? I have a win service that every minutes executes a method, sample code:
OK, now the method SEND_DATA_TO_CLIENT(); is a method that collects data from database and sends it to a client, I have to have a second method PROCESS_DATA(); a method that process data before sending it to the client, but the problem is that those both methods work simultaneously on same tables in database so I don’t want to get database lock or some other database error and with timers is a chance that methods get into a collision, one method processes data and the other one sends that data to client, but they have to work simultaneously and also separately, is there a way to do this kind of thing with threads and how?
1 Answer 1
An idea of how to get rid of your problem may be a double buffered threading loop. This is a nice concept for implementing a game loop, but it may be also satisfy your needs.
You will have one thread that executes the PROCESS_DATA in an endless loop and another thread that executes SEND_DATA_TO_CLIENT in an endless loop. And you have two buffers. This can be any kind of class or a structure holding the information returned by the PROCESS_DATA method.
The SEND_DATA_TO_CLIENT loop is at first locked until the buffer_1 one is filled by the PROCESS_DATA thread. Then the PROCESS_DATA releases the lock on SEND_DATA_TO_CLIENT and swaps the buffers. Now SEND_DATA_TO_CLIENT owns the filled buffer and does with the data whatever it wants. While this is going on, the PROCESS_DATA simultaneously processes the next data and waits for either the SEND_DATA_TO_CLIENT to finish or unlocks the SEND_DATA_TO_CLIENT to swap the buffers.
I hope you understand what I mean. If not, I can provide you with a picture.
I hope this little tricky example will help you.
Threading in a Windows Service
I’ve created an app which uses Observable Lists. I’ve made the ObservableList class threadsafe (I think) and it’s working fine now in my application.
Now I’m trying to install my application as a service. This works fine as well, up untill the point something gets added to the list. I think the thread there just dies. I’ve got the following code:
While debugging, I’ve seen the Collection.Add(object) being called. It starts the DoDispatchedAction function, and the last thing the debugger hits, is _currentDispatcher.Invoke(DispatcherPriority.DataBind, action); . After this, the application continues but the code after Collection.Add(object) doesn’t get executed anymore. The code which initially added the item to an ObservableList doesn’t continue neither. That’s why I think the Thread dies or something like that.
When checking the action in the debugger, I found out that the following message was there:
ApartmentState = ‘_currentDispatcher.Thread.ApartmentState’ threw an exception of type ‘System.Threading.ThreadStateException’
How can I solve this problem? Am I even thinking in the right direction?
2 Answers 2
As this is a hardware dependent service, this is a little bit different from the usual LOB-style application. The difference is: the changes which should trigger events come from the backend of the application, while the whole UI framework and service architecture is intended to be used so that the frontend asks for data which the backend provides.
You could bring the two together by creating some sort of «neutral ground» where they meet.
In the hardware handling component, I would have a background thread which runs continually or runs triggered by hardware interrupts, and updates its data structures with whatever data it collects from the hardware. Then, I would have a synchronized method which can create a consistent snapshot of the hardware data at the point of time when it is called.
In the WPF client, there would be a dispatcher timer which calls this method in set intervals and updates the ObservableCollections using the data snapshots. This is possible, because it would happen on the UI thread. Actually, if possible you should try to add and remove items from the ObservableCollections, not create new collection instances, unless the data in the collection changes completely from one call to the next.
The WCF client would only be a wrapper around the method which creates data snapshots: it would only send back such a snapshot when it is called.
The WPF client for the WCF service would work as the local WPF client, only it would call the service instead of the hardware library directly, and probably I’d choose a longer interval for the DispatcherTimer, in order to avoid excessive network traffic. You could further optimize this by returning a special code which means «nothing has changed», in order to avoid sending the same data several times, or have separate methods for asking whether data has changed and retrieving the changed data.
How to stop worker threads in a multithreaded Windows service on service stop
I have a Windows service that uses the producer/consumer queue model with multiple worker threads processing tasks off a queue. These tasks can be very long running, in the order of many minutes if not hours, and do not involve loops.
My question is about the best way to handle the service stop to gracefully end processing on these worker threads. I have read in another SO question that using thread.Abort() is a sign of bad design, but it seems that the service OnStop() method is only given a limited amount of time to finish before the service is terminated. I can do sufficient clean-up in the catch for ThreadAbortException (there is no danger of inconsistent state) so calling thread.Abort() on the worker threads seems OK to me. Is it? What are the alternatives?

7 Answers 7
Indeed, Abort should be avoided. It would be best to give them some time to exit gracefully — then perhaps after a timeout, maybe consider aborting them — but ultimately, service stop can do that just the same by killing the process instead.
I would try to have a signal in my queues that says «flush and exit» — much like the Close method here, but with some kind of signal when complete.
If you resort to Abort — consider the process fatally wounded. Kill it ASAP.

Create a task type for «shutdown» and inject that into your producer/consumer queue once for each worker thread.
Then use Thread.Join (with a timeout) to ensure shutdown has completed.
With .NET 4.0 you can utilize the System.Threading.Tasks namespace to take advantage of the Task object. In a nutshell, you can assign a CancellationToken to more gracefully handle cancellations/aborts in tasks, be it long or short running.
See here for more details from MSDN.
The question as amended actually has less to do with threading and more to do with how to stop long running actions. Personally I always use APM for lengthy stream and communications activities such as large file transfers. Each callback runs on an IO completion pool thread and completes quickly, processing a modest chunk and scheduling the next pass. Pending operations can be cancelled simply by calling Close() on the socket object. This is a great deal cheaper and more efficient than DIY thread management.
As already mentioned, Abort() is bad karma and should be avoided.
The material below was written prior to exclusion of the looping case from the question.
When long running processes loop they should all include an exit flag in their loop condition so that you can signal them to exit.
Strictly you ought to use volatiles but since only the control logic ever sets the flag it doesn’t matter. Technically a race condition exists but that just means you might go round one more time.
How to properly stop a multi-threaded .NET windows service?
I have a windows service written in C# that creates a truck load of threads and makes many network connections (WMI, SNMP, simple TCP, http). When attempting to stop the windows service using the Services MSC snap-in, the call to stop the service returns relatively quickly but the process continues to run for about 30 seconds or so.
The primary question is what could be the reason that it is taking 30+ seconds to stop. What can I look for and how do I go about looking for it?
The secondary question is why is the service msc snap-in (service controller) returning even though the process is still running. Is there a way to get it to only return when the process is actually killed?
Here is the code in the OnStop method of the service
Edit in response to Thread cleanup answers
Many of you have answered that I should keep track of all my threads and then clean them up. I don’t think that is a practical approach. Firstly, i don’t have access to all managed threads in one location. The software is pretty big with different components, projects and even 3rd party dlls that could all be creating threads. There is no way I can keep track of all of them in one location or have a flag that all threads check (even if i could have all threads check a flag, many threads are blocking on things like semaphores. When they are blocking they can’t check. I will have to make them wait with a timeout, then check this global flag and the wait again).
The IsBackround flag is an interesting thing to check. Again though, how can I find out if I have any forground threads running arround? I will have to check every section of the code that creates a thread. Is there any other way, maybe a tool that can help me find this out.
Ultimately though, the process does stop. It would only seem that i need to wait for something. However, if i wait in the OnStop method for X ammount of time, then it takes the process approximately 30 seconds + X to stop. No matter what i try to do, it seems that the process needs approximately 30 seconds (its not always 30 seconds, it can vary) after the OnStop returns for the process to actually stop.
Tutorial: Create a Windows service app
This article demonstrates how to create a Windows service app in Visual Studio that writes messages to an event log.
Create a service
To begin, create the project and set the values that are required for the service to function correctly.
From the Visual Studio File menu, select New > Project (or press Ctrl+Shift+N) to open the New Project window.
Navigate to and select the Windows Service (.NET Framework) project template. To find it, expand Installed and Visual C# or Visual Basic, then select Windows Desktop. Or, enter Windows Service in the search box on the upper right and press Enter.

If you don’t see the Windows Service template, you may need to install the .NET desktop development workload:
In the New Project dialog, select Open Visual Studio Installer on the lower left. Select the .NET desktop development workload, and then select Modify.
For Name, enter MyNewService, and then select OK.
The Design tab appears (Service1.cs [Design] or Service1.vb [Design]).
The project template includes a component class named Service1 that inherits from System.ServiceProcess.ServiceBase. It includes much of the basic service code, such as the code to start the service.
Rename the service
Rename the service from Service1 to MyNewService.
In Solution Explorer, select Service1.cs, or Service1.vb, and choose Rename from the shortcut menu. Rename the file to MyNewService.cs, or MyNewService.vb, and then press Enter
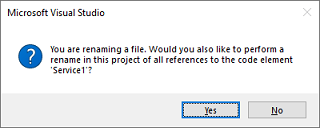
A pop-up window appears asking whether you would like to rename all references to the code element Service1.
In the pop-up window, select Yes.
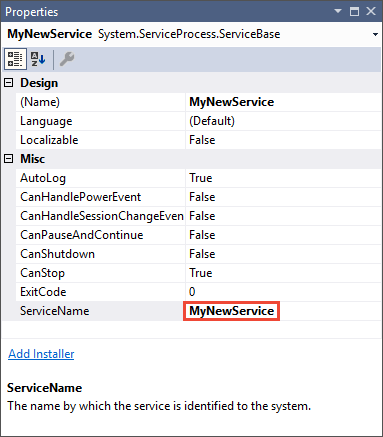
In the Design tab, select Properties from the shortcut menu. From the Properties window, change the ServiceName value to MyNewService.
Select Save All from the File menu.
Add features to the service
In this section, you add a custom event log to the Windows service. The EventLog component is an example of the type of component you can add to a Windows service.
Add custom event log functionality
In Solution Explorer, from the shortcut menu for MyNewService.cs, or MyNewService.vb, choose View Designer.
In Toolbox, expand Components, and then drag the EventLog component to the Service1.cs [Design], or Service1.vb [Design] tab.
In Solution Explorer, from the shortcut menu for MyNewService.cs, or MyNewService.vb, choose View Code.
Define a custom event log. For C#, edit the existing MyNewService() constructor; for Visual Basic, add the New() constructor:
Add a using statement to MyNewService.cs (if it doesn’t already exist), or an Imports statement MyNewService.vb, for the System.Diagnostics namespace:
Select Save All from the File menu.
Define what occurs when the service starts
In the code editor for MyNewService.cs or MyNewService.vb, locate the OnStart method; Visual Studio automatically created an empty method definition when you created the project. Add code that writes an entry to the event log when the service starts:
Polling
Because a service application is designed to be long-running, it usually polls or monitors the system, which you set up in the OnStart method. The OnStart method must return to the operating system after the service’s operation has begun so that the system isn’t blocked.
To set up a simple polling mechanism, use the System.Timers.Timer component. The timer raises an Elapsed event at regular intervals, at which time your service can do its monitoring. You use the Timer component as follows:
- Set the properties of the Timer component in the MyNewService.OnStart method.
- Start the timer by calling the Start method.
Set up the polling mechanism.
Add the following code in the MyNewService.OnStart event to set up the polling mechanism:
Add a using statement to MyNewService.cs, or an Imports statement to MyNewService.vb, for the System.Timers namespace:
In the MyNewService class, add the OnTimer method to handle the Timer.Elapsed event:
In the MyNewService class, add a member variable. It contains the identifier of the next event to write into the event log:
Instead of running all your work on the main thread, you can run tasks by using background worker threads. For more information, see System.ComponentModel.BackgroundWorker.
Define what occurs when the service is stopped
Insert a line of code in the OnStop method that adds an entry to the event log when the service is stopped:
Define other actions for the service
You can override the OnPause, OnContinue, and OnShutdown methods to define additional processing for your component.
The following code shows how you to override the OnContinue method in the MyNewService class:
Set service status
Services report their status to the Service Control Manager so that a user can tell whether a service is functioning correctly. By default, a service that inherits from ServiceBase reports a limited set of status settings, which include SERVICE_STOPPED, SERVICE_PAUSED, and SERVICE_RUNNING. If a service takes a while to start up, it’s useful to report a SERVICE_START_PENDING status.
You can implement the SERVICE_START_PENDING and SERVICE_STOP_PENDING status settings by adding code that calls the Windows SetServiceStatus function.
Implement service pending status
Add a using statement to MyNewService.cs, or an Imports statement to MyNewService.vb, for the System.Runtime.InteropServices namespace:
Add the following code to MyNewService.cs, or MyNewService.vb, to declare the ServiceState values and to add a structure for the status, which you’ll use in a platform invoke call:
The Service Control Manager uses the dwWaitHint and dwCheckpoint members of the SERVICE_STATUS structure to determine how much time to wait for a Windows service to start or shut down. If your OnStart and OnStop methods run long, your service can request more time by calling SetServiceStatus again with an incremented dwCheckPoint value.
In the MyNewService class, declare the SetServiceStatus function by using platform invoke:
To implement the SERVICE_START_PENDING status, add the following code to the beginning of the OnStart method:
Add code to the end of the OnStart method to set the status to SERVICE_RUNNING:
(Optional) If OnStop is a long-running method, repeat this procedure in the OnStop method. Implement the SERVICE_STOP_PENDING status and return the SERVICE_STOPPED status before the OnStop method exits.
Add installers to the service
Before you run a Windows service, you need to install it, which registers it with the Service Control Manager. Add installers to your project to handle the registration details.
In Solution Explorer, from the shortcut menu for MyNewService.cs, or MyNewService.vb, choose View Designer.
In the Design view, select the background area, then choose Add Installer from the shortcut menu.
By default, Visual Studio adds a component class named ProjectInstaller , which contains two installers, to your project. These installers are for your service and for the service’s associated process.
In the Design view for ProjectInstaller, select serviceInstaller1 for a Visual C# project, or ServiceInstaller1 for a Visual Basic project, then choose Properties from the shortcut menu.
In the Properties window, verify the ServiceName property is set to MyNewService.
Add text to the Description property, such as A sample service.
This text appears in the Description column of the Services window and describes the service to the user.

Add text to the DisplayName property. For example, MyNewService Display Name.
This text appears in the Display Name column of the Services window. This name can be different from the ServiceName property, which is the name the system uses (for example, the name you use for the net start command to start your service).
Set the StartType property to Automatic from the drop-down list.
When you’re finished, the Properties windows should look like the following figure:

In the Design view for ProjectInstaller, choose serviceProcessInstaller1 for a Visual C# project, or ServiceProcessInstaller1 for a Visual Basic project, then choose Properties from the shortcut menu. Set the Account property to LocalSystem from the drop-down list.
This setting installs the service and runs it by using the local system account.
The LocalSystem account has broad permissions, including the ability to write to the event log. Use this account with caution, because it might increase your risk of attacks from malicious software. For other tasks, consider using the LocalService account, which acts as a non-privileged user on the local computer and presents anonymous credentials to any remote server. This example fails if you try to use the LocalService account, because it needs permission to write to the event log.
(Optional) Set startup parameters
Before you decide to add startup parameters, consider whether it’s the best way to pass information to your service. Although they’re easy to use and parse, and a user can easily override them, they might be harder for a user to discover and use without documentation. Generally, if your service requires more than just a few startup parameters, you should use the registry or a configuration file instead.
A Windows service can accept command-line arguments, or startup parameters. When you add code to process startup parameters, a user can start your service with their own custom startup parameters in the service properties window. However, these startup parameters aren’t persisted the next time the service starts. To set startup parameters permanently, set them in the registry.
Each Windows service has a registry entry under the HKEY_LOCAL_MACHINE\SYSTEM\CurrentControlSet\Services subkey. Under each service’s subkey, use the Parameters subkey to store information that your service can access. You can use application configuration files for a Windows service the same way you do for other types of programs. For sample code, see ConfigurationManager.AppSettings.
To add startup parameters
Select Program.cs, or MyNewService.Designer.vb, then choose View Code from the shortcut menu. In the Main method, change the code to add an input parameter and pass it to the service constructor:
In MyNewService.cs, or MyNewService.vb, change the MyNewService constructor to process the input parameter as follows:
This code sets the event source and log name according to the startup parameters that the user supplies. If no arguments are supplied, it uses default values.
To specify the command-line arguments, add the following code to the ProjectInstaller class in ProjectInstaller.cs, or ProjectInstaller.vb:
Typically, this value contains the full path to the executable for the Windows service. For the service to start up correctly, the user must supply quotation marks for the path and each individual parameter. A user can change the parameters in the ImagePath registry entry to change the startup parameters for the Windows service. However, a better way is to change the value programmatically and expose the functionality in a user-friendly way, such as by using a management or configuration utility.
Build the service
In Solution Explorer, choose Properties from the shortcut menu for the MyNewService project.
The property pages for your project appear.
On the Application tab, in the Startup object list, choose MyNewService.Program, or Sub Main for Visual Basic projects.
To build the project, in Solution Explorer, choose Build from the shortcut menu for your project (or press Ctrl+Shift+B).
Install the service
Now that you’ve built the Windows service, you can install it. To install a Windows service, you must have administrator credentials on the computer where it’s installed.
In Developer Command Prompt for Visual Studio, navigate to the folder that contains your project’s output (by default, the \bin\Debug subdirectory of your project).
Enter the following command:
If the service installs successfully, the command reports success.
If the system can’t find installutil.exe, make sure that it exists on your computer. This tool is installed with the .NET Framework to the folder %windir%\Microsoft.NET\Framework[64]\ . For example, the default path for the 64-bit version is %windir%\Microsoft.NET\Framework64\v4.0.30319\InstallUtil.exe.
If the installutil.exe process fails, check the install log to find out why. By default, the log is in the same folder as the service executable. The installation can fail if:
- The RunInstallerAttribute class isn’t present on the ProjectInstaller class.
- The attribute isn’t set to true .
- The ProjectInstaller class isn’t defined as public .
Start and run the service
In Windows, open the Services desktop app. Press Windows+R to open the Run box, enter services.msc, and then press Enter or select OK.
You should see your service listed in Services, displayed alphabetically by the display name that you set for it.

To start the service, choose Start from the service’s shortcut menu.
To stop the service, choose Stop from the service’s shortcut menu.
(Optional) From the command line, use the commands net start and net stop to start and stop your service.
Verify the event log output of your service
In Windows, open the Event Viewer desktop app. Enter Event Viewer in the Windows search bar, and then select Event Viewer from the search results.
In Visual Studio, you can access event logs by opening Server Explorer from the View menu (or press Ctrl+Alt+S) and expanding the Event Logs node for the local computer.
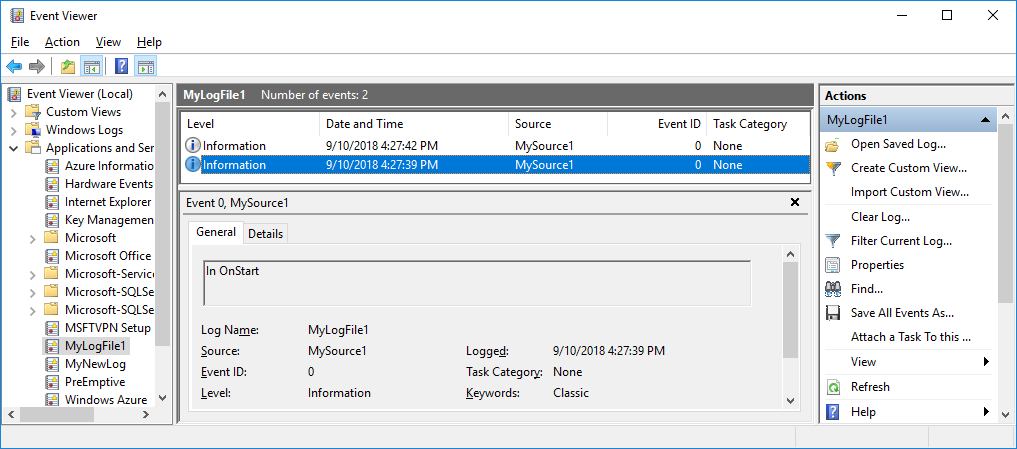
In Event Viewer, expand Applications and Services Logs.
Locate the listing for MyNewLog (or MyLogFile1 if you followed the procedure to add command-line arguments) and expand it. You should see the entries for the two actions (start and stop) that your service performed.
Clean up resources
If you no longer need the Windows service app, you can remove it.
Open Developer Command Prompt for Visual Studio with administrative credentials.
In the Developer Command Prompt for Visual Studio window, navigate to the folder that contains your project’s output.
Enter the following command:
If the service uninstalls successfully, the command reports that your service was successfully removed. For more information, see How to: Install and uninstall services.
Next steps
Now that you’ve created the service, you can:
Create a standalone setup program for others to use to install your Windows service. Use the WiX Toolset to create an installer for a Windows service. For other ideas, see Create an installer package.
Explore the ServiceController component, which enables you to send commands to the service you’ve installed.
Instead of creating the event log when the application runs, use an installer to create an event log when you install the application. The event log is deleted by the installer when you uninstall the application. For more information, see EventLogInstaller.


