- STEP BY STEP TIGERVNC SERVER CONFIGURATION – A REMOTE DESKTOP APPLICATION FOR LINUX
- Introduction
- Follow the below steps to configure TigerVNC Server (Remote Desktop Application for Linux)
- Server Side :
- Step : 1 Install Required Packages
- Step : 2 Create Users for TigerVNC Server
- Step : 3 Generate VNC Password Users
- Step : 4 Configure the Resolution for Users in VNC Server
- How to install and Configure VNC (TigerVNC) server in CentOS / RHEL 7
- Installing VNC server
- Configuring VNC server
- Configure firewalld
- Start the Services and set password
- Accessing VNC server with VNC viewer
- Как установить и настроить VNC на CentOS 7
- How to Install and Configure VNC on CentOS 7
- В этом руководстве мы расскажем вам, как установить и настроить VNC-сервер в системе CentOS 7. Мы также покажем вам, как безопасно подключиться к серверу VNC через туннель SSH.
- Установка среды рабочего стола Xfce
- Установка VNC-сервера
- Настройка VNC-сервера
- Создание файла модуля Systemd
- Подключение к VNC серверу
- Настройка SSH-туннелирования в Linux и macOS
- Настройка SSH-туннелирования в Windows
- Подключение с помощью Vncviewer
- Вывод
STEP BY STEP TIGERVNC SERVER CONFIGURATION – A REMOTE DESKTOP APPLICATION FOR LINUX
by Balamukunda Sahu · Published March 4, 2017 · Updated April 18, 2017

TigerVNC Server Configuration – A Remote Desktop Application for Linux
Introduction
I n this article we are going to discuss on How to configure TigerVNC Server in RHEL/CentOS/Fedora. VNC stands for Virtual Network Computing is a open source application used to share the desktop remotely in GUI (Graphical User Interface) format. It uses RFB (Remote Frame Buffer) protocol to transfer data over network. TigerVNC Server is a independent application comes for all kinds of operating systems i.e Windows, Linux, MacOS. VNC was first invented on year 1998 at AT&T lab in Cambridge. Usually the port number of TigerVNC Server is 5901, 5902 but we can customize the port Number. In TigerVNC Server also we need a Server to instalkl Server application and a client from where we can take remote of VNC Server. From client side we have tool called VNC Viewer. Here also we have one disadvantage in TigerVNC Server is it used RFB protocol to transfer data over network which is completely not secure but better then telnet. Like telnet TigerVNC Server not transfers data plain in text format. But we can implement extra security layer for VNC Server.
So Let’s have a look at configuration steps of TigerVNC Server in RHEL/CentOS/Fedora Linux.
Follow the below steps to configure TigerVNC Server (Remote Desktop Application for Linux)
Server Side :
IP Address – 192.168.0.105
First configure the Ethernet Card, Here in my practice Lab its eth0 and IP address is 192.168.0.105 as shown on the output below.
Step : 1 Install Required Packages
Before we start the configuration of TigerVNC Server we have to install required packages and dependencies. So let’s go ahead and install Desktop Environment and X Windows System packages.
Now install TigerVNC Server package using yum repository as shown below.
Step : 2 Create Users for TigerVNC Server
As we can see above TigerVNC Server package installed successfully, now we have to create users for VNC Server. So create users using useradd command as shown below.
Now I am going to create two users i.e. “elinuxbook” and “helpdesk“, Follow the steps below.
Note : Here as an example I have created Two users but you can create as much user you want as per your Scenario and Requirement.
So creating the 1st User i.e. “elinuxbook”
Creating the 2nd User i.e. “helpdesk”
Also Read :
Step : 3 Generate VNC Password Users
Once users created we need to Switch to both users using su command and have to generate password for VNC Server. This password will used to authentication with TigerVNC Server while taking remote.
Generate Password for 1st User i.e. “elinuxbook”
Generate Password for 2nd User i.e. “helpdesk”
Users passwords are stores in a file called passwd which is located at .vnc/passwd.
Note : .vnc is a hidden directory can be seen by using ls -a command and located at home directory of User. Refer the output below.
Step : 4 Configure the Resolution for Users in VNC Server
Now we have to configure the main configuration file of TigerVNC Server i.e. /etc/sysconfig/vncsevers where we have to define users which we created on Step : 3 and also have to set the resolutions. So Follow the below steps to do the same. Configuration parts are highlighted in Red color.
Here we have set Resolution for both user is 800×600 means while we take remote of TigerVNC Server the screen will come in-front of us with 800×600 resolution.
Here I configured user “elinuxbook” with port no.1 and “helpdesk” with port no. 2. You can use different ports as per your requirement.
All required configuration are done, Now we have start the TigerVNC Server service.
After start the VNC Server service it creates script file (xstartup) and log file which is located at .vnc directory as shown on the outout above.
Start the TigerVNC Server service at startup.
Stop the Linux Firewall so that we can take remote of VNC Server from client side.
So we have done with all required configuration from client side, So let’s go ahead and test from client side to confirm if TigerVNC Server is working properly or not.
To take remote of VNC Server just download the VNC client application i.e. VNC Viewer which is freely available. SO download it and install it on your client system.
Now open the VNC Viewer application and enter the IP Address of the TigerVNC Server.
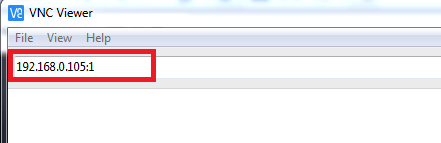
Enter the IP Address of TigerVNC Server
Click on continue button.
Click on Continue Button
Now here TigerVNC server asking for Password, So enter the password of user “eliuxbook” which we have created on Step : 3. Here we are using password of user “elinuxbook” as we are taking the remote of TigerVNC Server using port :1 with IP Address (192.168.0.105:1) which we have configured in /etc/sysconfig/vncservers configuration file on Step : 4.
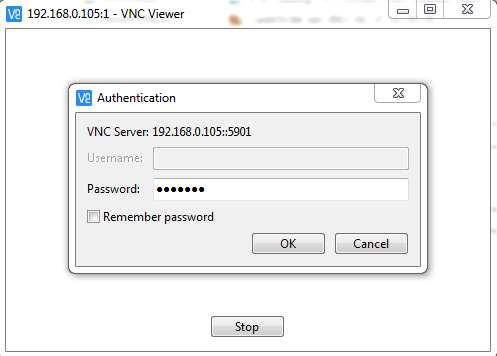
Enter the Password of TigerVNC Server
And we successfully able to take the remote of Linux Operating System using TigerVNC Server Refer the snapshots below.
Here enter the password of user “elinuxbook” to login linux operating system.
Note : This is the normal password to login Linux Operating System which we set after user creating on Step : 2 not that one which we have generated for VNC Server, So dont get confused.
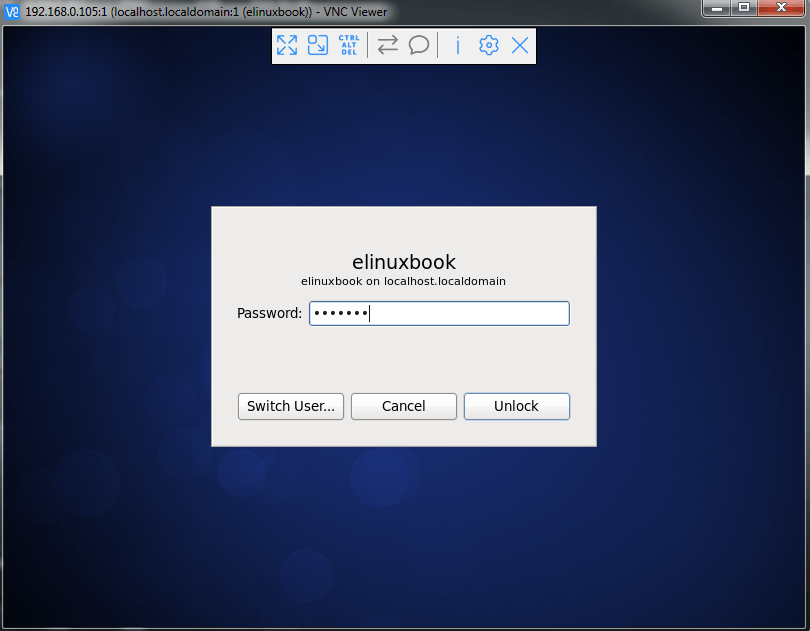
Enter the Password of User

Taken Remote using TigerVNC Server
So This is how we are able to successfully configured TigerVNC Server in RHEL/CentOS/Fedora.
If you found this article useful then Like Us, Share Us, Subscribe our Newsletter OR if you have something to say then feel free to comment on the comment box below.
Источник
How to install and Configure VNC (TigerVNC) server in CentOS / RHEL 7
Virtual Network Computing (VNC) works by capturing the display’s frame buffer and making it available across the network. This post shows you how to install TigerVNC and configure it to provide remote users access to their graphical desktop environment as if they were physically in front of the system.
For the example in this post we will use a CentOS 7 server as VNC server and a local computer with a VNC client to connect to it. It assumes that the remote system is running the OpenSSH SSH server and a graphical desktop environment such as GNOME or KDE. You can refer the post “CentOS / RHEL 7 : How to Install GUI” to install Graphical environment before proceeding.
Installing VNC server
1. Make sure you have access to a local or remote yum repository to install the required packages.
2. Install the GUI desktop package if not already installed to have a GUI access to VNC server.
3. On the VNC server, install the TigerVNC server package:
Configuring VNC server
Copy the configuration file, /lib/systemd/system/vncserver@.service, to the directory /etc/systemd/system/ following the naming of ‘vncserver_[username]@:[port].service‘. For example:
3. Modify the configuration files that have been created for each user (In this example we are going to use root and oracle) :
A. Replace the <USER> placeholder with “root” user that appears in the [Service] for file “vncserver_root@:2.service” and “oracle” for file “vncserver_oracle@:3.service” with vi.
You may also use “sed” to automatically make the username replacement:
B. Add the geometry to the configuration file as well for each user. In this example we are going to add “-geometry 800×800” to the configuration file. This will be at the end of the line starting with “ExecStart”.
4. After making the modifications in step A and B the line we have modified under the configuration file should look similar to these:
For file “vncserver_root@:2.service”
For File “vncserver_oracle@:3.service”
The command specified in the ExecStart entry is invoked when we start the server using systemctl start; it uses runuser to run TigerVNC under the user’s account. The -l argument provides the username and -c specifies the command and its arguments that runuser will execute. The PIDFile entry specifies the directory in which the running process will keep track of its process ID.
/.vnc/ directory. So there will be no need to add those option in the ExecStart line.
Configure firewalld
1. Traffic for the display’s corresponding port should be allowed by the firewall. Display 0 uses port 5900, display 1 uses port 5901, display 2 uses port 5902, and so on. If you’re using FirewallD, the predefined vnc-server service opens ports 5900-5903:
If you need additional ports or if you don’t need to open the entire range, you can open just what you need using –add-port:
2. Reload the firewall to make firewall rules effective.
3. Reload the configuration:
Start the Services and set password
1. We will now enable the vncserver service for each user on the selected port, this will also enable autostart on system boot, with the commands below:
2. Reload systemd’s configuration to make it aware of the new unit files:
3. Configure a password for each user to be used with vncserver.
4. You will need to execute “vncserver” in the command line while logged in as the user. This will automatically ask you to create a new password for the user.
Accessing VNC server with VNC viewer
You can install any VNC viewer software on your client machine to access the VNC server. I am using realVNC software on my MAC to access the VNC server. You can use any of the below VNC viewer softwares according to the OS you are using.
1. TigerVNC: http://tigervnc.org
2. TightVNC: https://www.tightvnc.com/download.php
3. RealVNC: https://www.realvnc.com/en/connect/download/viewer
Use the VNC display :1 for conecting the VNV server.
There you are. You are now connected to the VNC server.
Источник
Как установить и настроить VNC на CentOS 7
How to Install and Configure VNC on CentOS 7
В этом руководстве мы расскажем вам, как установить и настроить VNC-сервер в системе CentOS 7. Мы также покажем вам, как безопасно подключиться к серверу VNC через туннель SSH.
Virtual Network Computing (VNC) — это графическая система общего доступа к рабочему столу, которая позволяет вам использовать клавиатуру и мышь для удаленного управления другим компьютером.
Прежде чем продолжить обучение, убедитесь, что вы вошли в систему как пользователь с привилегиями sudo . Мы будем считать, что вы вошли как пользователь с именем baksdev .
Установка среды рабочего стола Xfce
При установке сервера CentOS часто не устанавливается среда рабочего стола, поэтому мы начнем с установки облегченной среды рабочего стола.
В этом руководстве мы будем устанавливать Xfce . Это быстрый, стабильный и мало системных ресурсов, что делает его идеальным для использования на удаленных серверах.
Пакеты Xfce доступны в репозиториях EPEL. Если на вашем сервере не включен репозиторий EPEL, вы можете сделать это, набрав:
После добавления репозитория установите Xfce на CentOS с помощью:
В зависимости от вашей системы загрузка и установка пакетов и зависимостей Xfce может занять некоторое время.
Установка VNC-сервера
Мы будем использовать TigerVNC в качестве нашего VNC-сервера. TigerVNC — активно поддерживаемый высокопроизводительный VNC-сервер с открытым исходным кодом.
Введите следующую команду для установки TigerVNC на вашем сервере CentOS:
Теперь, когда VNC-сервер установлен, следующий шаг — запустить vncserver команду, которая создаст начальную конфигурацию и установит пароль. Не используйте sudo при выполнении следующей команды:
Вам будет предложено ввести и подтвердить пароль, а также указать, следует ли устанавливать его в качестве пароля только для просмотра. Если вы решите установить пароль только для просмотра, пользователь не сможет взаимодействовать с экземпляром VNC с помощью мыши и клавиатуры.
При первом vncserver запуске команды она создаст и сохранит файл паролей в
/.vnc каталоге, который будет создан, если он отсутствует.
Обратите внимание на :1 после имени хоста в выводе выше. Это указывает номер порта дисплея, на котором работает сервер vnc. В нашем случае сервер работает по TCP-порту 5901 (5900 + 1). Если вы создадите второй экземпляр с vncserver ним, он будет работать на следующем свободном порту, то есть :2 это означает, что сервер работает на порту 5902 (5900 + 2).
Важно помнить, что при работе с серверами VNC :X используется порт дисплея, к которому относится 5900+X .
Прежде чем перейти к следующему шагу, сначала остановите экземпляр VNC, используя vncserver команду с -kill параметром и номером сервера в качестве аргумента. В нашем случае сервер работает в порту 5901 ( :1 ), поэтому мы остановим его:
Настройка VNC-сервера
Теперь, когда Xfce и TigerVNC установлены на нашем сервере CentOS, следующим шагом является настройка TigerVNC для использования Xfce. Для этого откройте следующий файл:
И измените последнюю строку с exec /etc/X11/xinit/xinitrc на exec startxfce4 :
Сохраните и закройте файл. Приведенный выше скрипт будет автоматически выполняться при каждом запуске или перезапуске сервера TigerVNC.
Если вам нужно передать параметры добавления на VNC-сервер, вы можете открыть
/.vnc/config файл и добавить один параметр в каждой строке. Наиболее распространенные параметры перечислены в файле. Раскомментируйте и измените по своему вкусу.
Создание файла модуля Systemd
Мы создадим файл модуля systemd, который позволит нам легко запускать, останавливать и перезапускать службу VNC по мере необходимости, так же, как и любую другую службу systemd.
Скопируйте файл модуля vncserver с помощью cp команды:
Откройте файл в текстовом редакторе и замените его своим настоящим именем пользователя.
Сохраните и закройте файл. Сообщите systemd, что мы создали новый файл модуля с:
Следующим шагом является включение файла модуля с помощью следующей команды:
Число 1 после @ знака определяет порт дисплея, на котором будет работать служба VNC, в нашем случае это значение по умолчанию 1 и сервер VNC будет прослушивать порт, 5901 как мы обсуждали в предыдущем разделе.
Запустите службу VNC, выполнив:
Убедитесь, что служба успешно запущена с:
Подключение к VNC серверу
VNC не является зашифрованным протоколом и может подвергаться перехвату пакетов. Рекомендуемый подход заключается в создании туннеля SSH. который будет безопасно перенаправлять трафик с вашего локального компьютера через порт 5901 на сервер на том же порту.
Настройка SSH-туннелирования в Linux и macOS
Если вы используете Linux, macOS или любую другую операционную систему на основе Unix на своем компьютере, вы можете легко создать туннель с помощью следующей ssh команды:
Вам будет предложено ввести пароль пользователя.
Не забудьте заменить username и server_ip_address своим именем пользователя и IP-адресом своего сервера.
Настройка SSH-туннелирования в Windows
Если вы работаете в Windows, вы можете настроить SSH-туннелирование, используя PuTTY SSH-клиент .
Откройте Putty и введите IP-адрес вашего сервера в Host name or IP address поле.

Под Connection меню разверните SSH и выберите Tunnels . Введите порт VNC-сервера ( 5901 ) в Source Port поле, введите server_ip_address:5901 в Destination поле и нажмите Add кнопку, как показано на рисунке ниже:

Вернитесь на Session страницу, чтобы сохранить настройки, чтобы вам не нужно было вводить их каждый раз. Теперь все, что вам нужно сделать, это выбрать сохраненный сеанс и войти на удаленный сервер, нажав на Open кнопку.
Подключение с помощью Vncviewer
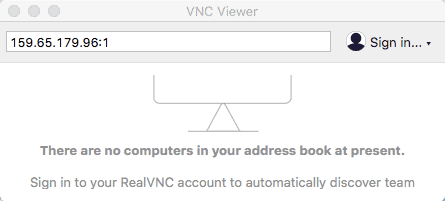
Теперь, когда вы настроили SSH туннелирование, пришло время открыть Vncviewer и подключиться к VNC-серверу по адресу localhost:5901 .
Вы можете использовать любую программу просмотра VNC, такую как TigerVNC, TightVNC, RealVNC, UltraVNC Vinagre и VNC Viewer для Google Chrome. .
В этом примере мы будем использовать TigerVNC. Откройте программу просмотра VNC, войдите localhost:5901 и нажмите Connect кнопку.

Введите пароль при появлении запроса, и вы увидите рабочий стол Xfce по умолчанию. Это должно выглядеть примерно так:

Теперь вы можете начать взаимодействие с удаленным рабочим столом XFCE с локального компьютера с помощью клавиатуры и мыши.
Вывод
К настоящему времени у вас должен быть запущен и запущен сервер VNC, и вы можете легко управлять своим сервером CentOS 7 с помощью графического интерфейса.
Чтобы настроить VNC-сервер для запуска отображения для более чем одного пользователя, создайте начальную конфигурацию и задайте пароль с помощью vncserver команды и создайте новый файл службы, используя другой порт.
Источник


