TightVNC: Home News Download Now! Download (v1.3) Mailing Lists Site Map
Licensing / SDK: Products & SDKs .NET Viewer SDK Server for Windows «> Server for Unix/Linux Server for macOS Dispatcher Java Viewer Tight Decoder
Information: Screen Shots Documentation F.A.Q. What’s New Privacy Policy
Feedback: Report Bugs Suggest Features Contact Us
More Products: Remote Ripple RFB Player VNC Reflector
Server for Unix/Linux/X11
The best features and performance from TightVNC Server are now readily available for implementation into your Linux applications. Controlling your remote desktop with any VNC-compatible client has never been that easy and convenient.
Our latest Server for Unix/Linux (X Window) is developed based on TightVNC version 2.0 with C++ and has a common codebase with Windows and macOS Servers. It supports most of the features available with the latest versions of TightVNC such as file transfer, access lists, additional ports, and built-in web-server.
The Server is fitted with JavaScript client support, such as noVNC and with the realization of WebSocket protocol.
This product is also supporting HTTPs as well as WebSocket Secure, thus allowing channel encryption without a need of using any additional software.
The Server for Unix/Linux is fully compatible with RFB protocol, hence you can create your protocol extensions for all your needs.
Controlling the Server can be accomplished utilizing the configuration file or by the web-interface.
For commercial licensing this product is available for licensing only under a source code license.
Our latest Server for Unix/Linux is not available under free GNU GPL license and is not available for public download and review at our web-site.
The version 1.3 of this Server, available on our site for public download, is outdated and not supported by us.
For more details, please fill in the licensing request form below.
Proceed to Licensing
If you are interested in the commercial licensing option, please fill in the form below and press «Submit Information». Make sure to provide both your real personal name and the company name.
You will be contacted by e-mail so please make sure to enter your valid e-mail address as well. This e-mail address will not be disclosed to any third party and will be used only for correspondence directly related to your request.
If you have problems with filling in this form, please contact us directly.
Источник
Remote GUI access to a Linux computer using Tightvnc with systemd
This is a guide to installing TightVNC on the Raspberry Pi. The latest version of Raspbian now includes the RealVNC which is an alternative remote desktop tool. If you would prefer to use RealVNC then it is easily enabled through the raspi-config tool, this guide will be useful for those wanting to understand about creating other applications to run on start-up through systemd.
The command line is a great way to manage a remote Linux computer if you don’t mind typing in commands, but sometimes you need to be able to view a GUI. Short of a very long cable one of the best ways of doing this is using the VNC protocol (Virtual Network Computing).
TightVNC vs Real VNC
The TightVNC server creates a different virtual window which is replicated on a different machine using the TightVNC client. This differs from RealVNC which normally usually echos the default screen.
When most people think of a remote desktop tool then they usually think of the way that RealVNC operates. In this case when you move the mouse, or launch an application it displays the same output on a physically attached screen (normally HDMI) and on a remote client over the network.
TightVNC is useful if you want to run something different to what is on the main screen. For example you could use it so that you can have a status display on the main screen (via HDMI) with a different display used for the configuration which is displayed on a laptop.
Another advantage of TightVNC is that it is FREE open source software. As such it has no restrictions on use and you can view and modify the source code. Real VNC is a commercial version of VNC and needs to be licensed. Real VNC is free to use for personal use on the Raspberry Pi, but does have restrictions if you want to do other things with it which may require a commercial license. This includes running the Raspbian Desktop image on a PC as that does not included the commercial software.
Installing a start-up script using Systemd
The following are instructions on how to configure this on the Raspberry Pi (Debian based distribution). It should be similar for any other Debian based distribution (eg. Ubuntu) which uses Systemd start-up files. Some other distributions use different software install tools and possibly different init setup tools.
If this is used in combination with the guide to running the Raspberry Pi headless with Debian Linux then it can be used to setup a Raspberry Pi for remote access without ever needing to connect it to a monitor.
Choosing TightVNC
There are several software projects that support VNC. I have chosen to use TightVNC because it is free open source software (GPL2), provides compression to allow it to work over a slow network (Internet) and is readily available in the software repositories.
Client server model
VNC follows the traditional client sever model. The server software runs on the host to be accessed, and client software runs on the local machine that wishes to control the host. The server and client do not have to be the same (eg. the client can be RealVNC when the server is TightVNC), but some features may only work when the same client and server are used.
Install the TightVNC server software
First refresh the software repository information using sudo apt update This is particularly important if you have just installed the operating system as the repository information may be incomplete.
Install the server software from the repositories: sudo apt install tightvncserver
Start server and configure a password
The first time you run the server it will prompt you to set a password. This is the password that you use when connecting remotely.
There is no need to create a view only password, unless you have a specific need.
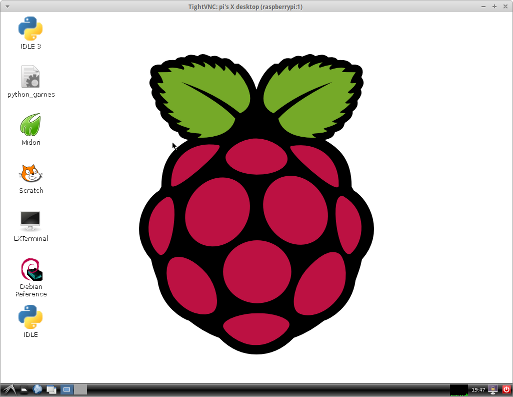
When the server starts it will tell you which virtual desktop has been setup. In this case: New ‘X’ desktop is raspberrypi:1 says that it’s virtual desktop 1. You would connect to this using :1 at the end of the IP address in the client, this is the one we will setup to start automatically later.
You can run multiple instances. Each time you start tightvncserver it will use the next available desktop, but in most cases you will just need one.
Adding Tightvnc to systemd startup
To have Tightvnc startup automatically we need to create a new startup file, which needs to be stored in the /etc/systemd/system/ directory and end with the suffix «.service». I called this tightvncserver.service. This needs to be created as the root user so using sudo sudo nano /etc/systemd/system/tightvncserver.service
You may need to change the user name on line 8. It is currently set to pi which is the default username on the Raspberry Pi Raspbian image. Set this to whatever username you want to login to TightVNC as. Do not put root as the user.
Change the file so it is owned by root sudo chown root:root /etc/systemd/system/tightvncserver.service
Make the file executable by running sudo chmod 755 /etc/systemd/system/tightvncserver.service
It’s a good idea to test the script at this point rather than waiting until after a reboot. This is done using: sudo systemctl start tightvncserver.service Don’t worry if you get the following error message, which is because you’ve already started tightvnc A VNC server is already running as :1
Enable startup at boot using sudo systemctl enable tightvncserver.service
TightVNC will now start at startup. I’d recommend you reboot at this point to make sure it’s working but youc an just stop and start the service using the systemctl command instead.
Note that this is designed for running only one instance of TightVNC on the computer. If you want to be able to start and stop specific instances of TightVNC then you will need to tweak the startup script appropriately.
Installing Tightvnc viewer (VNC client) on a Linux computer
On a Linux computer you can install the viewer with sudo apt install xtightvncviewer or if that is not in the repositories try: sudo apt-get install ssvnc This will work with Debian / Ubuntu based distributions only, for other distributions use the normal package manager.
Note that ssvnc — which is the version I installed on my Kubuntu computer is based on tightvnc, but also has the ability to configure the ssh tunnelling (see later) through the GUI.
Login using xtightvncviewer 192.168.1.6:1 (replace with your own IP address as appropriate)
Installing Tightvnc view on a Windows computer
To access from Windows or using the Java Client download from TightVNC.com
Securing TightVNC
TightVNC allows anyone that knows the password to login as the user that it’s running under. It also does this without encryption so anyone can snoop in on the session. Fortunately there is a secure solution, which is to tunnel the connection over an ssh (secure shell) login.
First step is to restrict Tightvnc to the local computer only. This is done by adding the option -localhost when starting the tightvncserver. To do this edit line 7 in the /etc/systemd/system/tightvncserver.service file to read:
Then restart the server.
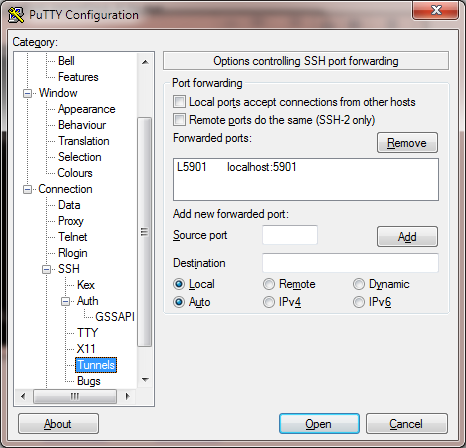
To login using ssh — first login to the host computer using ssh ssh pi@192.168.1.6 -L 5901:localhost:5901
The -L option creates the tunnel, from the current computer (default) port 5901 to the host computer (as localhost) port 5901. Port 5901 is the default port for display 1, 5902 for display 2 etc.
To connect using tightvnc now use the command xtightvncviewer 127.0.0.1:1 Note that your previous terminal will now be logged into the Raspberry Pi so you will need to start a new terminal or tab to run the viewer.
If using Windows then the ssh tunnel can be created from within PuTTY
Then connect using the vnc client using 127.0.0.1:1.
You can now use the GUI to run applications on the Raspberry Pi without needing a monitor or keyboard. If you have port forwarding set on your router you can do this over the Internet.
Starting your window manager
The instructions above are sufficient for the Raspberry Pi running Raspbian (Debian). On other systems you may need to make a further configuration change to start your normal window manager / application launcher. If you get a blank screen when connecting edit the file
/.vnc/xstartup and replace the line /etc/X11/Xsession with one of the following as appropriate.
For instance with Ubuntu you would use the entry for gnome, for xubuntu you would use xfce and for kubuntu use kde. The Raspberry Pi uses lxde, but this is started automatically on the Raspberry Pi there is no need to add it to the xstartup file.
Источник
Tightvnc server ��� linux
This site uses cookies. See more details here:
New Software: MightyViewer 1.2.2
TightVNC: Home News «> Download Download (v1.3) Mailing Lists Site Map
Licensing / SDK: Products & SDKs .NET Viewer SDK Server for Windows Server for Unix/Linux Server for macOS Dispatcher Java Viewer Tight Decoder
Information: Screen Shots Documentation F.A.Q. What’s New Privacy Policy
Feedback: Report Bugs Suggest Features Contact Us
More Products: Remote Ripple RFB Player VNC Reflector
Licensing Terms
There are two licensing options available for TightVNC software:
GNU General Public License version 2 (often abbreviated as GNU GPL). This is the default licensing option. It’s completely free but it does not allow integration with closed-source products. Read the complete text of the license here (opens in a new window).
Commercial source code license. Unlike GPL, it allows integrating the software into proprietary products, although it’s not free. Read more about commercial licensing.
Download TightVNC for Windows (Version 2.8.63)
TightVNC 2.8.63 runs basically on any version of Windows (see more details here).
You can also download TightVNC source code (or purchase a commercial license):
Download TightVNC Java Viewer (Version 2.8.3)
TightVNC Java Viewer works on any system where Java is supported. It requires Java SE version 1.6 or later.
You can also download TightVNC Java Viewer source code (or purchase a commercial license):
Download DFMirage Driver
It’s a recommended add-on if you use TightVNC with Windows 7 or earlier version. It’s not needed with Windows 8 and above .
DFMirage mirror display driver allows TightVNC to gain the best performance under old versions of Windows. With DFMirage, TightVNC Server can detect screen updates and grab pixel data in a very efficient way. If you use TightVNC as free software, DFMirage is FREE for you as well.
Older Versions
If you need a version working in Windows 95/98/ME, Windows NT 4.0, or in Unix-like systems (including Linux), download TightVNC 1.3.10.
Verify the Files
All executable files and packages (.EXE files) are digitally signed by GlavSoft LLC. Make sure to check the digital signatures.
 MightyViewer 1.2.2
  «> Server for Unix/Linux