- How to change lock screen time to 24 hours format on Windows 10?
- Replies (10)
- How to change Lock screen timeout before display turn off on Windows 10
- How to change the time when the display turns off when your PC is locked
- How to change the Lock screen timeout using Command Prompt
- More Windows 10 resources
- The Dell XPS 15 is our choice for best 15-inch laptop
- Halo: MCC’s live service elements make it better, not worse
- Microsoft’s Surface Duo is not ‘failing up’
- These are the best PC sticks when you’re on the move
- Изменение времени блокировки экрана ОС Windows 10 и автоматический тайм аут
- Что это такое и для чего его используют?
- Как включить и выключить автоблокировку экрана
- Установка режима автоблокировки в системном реестре
- Настройка автоблокировки в локальной политике безопасности
- Выключение экрана блокировки
- Как изменить время ожидания
- Блокировка экрана в Электропитании
- Внесение изменений в консоли
How to change lock screen time to 24 hours format on Windows 10?
Could anybody tell me how to change the time in the lock screen to 24 hour, I know how to change it in region, zone etc. for windows 10?
Original title: lock screen time
Replies (10)
![]()
Thank you for posting in Microsoft Community and being a part of Windows 10.
I understand your concern about accessing the 24 hours clock settings on lock screen. We will help you with this issue.
Try the below steps and check if you are able change the clock settings.
- Sign-in as an administrator to your computer.
- Press the
 +R keys from the keyboard to open the Run dialog, type regedit, and click on OK.
 - In Registry Editor, navigate to the location to: HKEY_LOCAL_MACHINE\SOFTWARE\Microsoft\Windows\CurrentVersion\SystemProtectedUserData
- Expand open SystemProtectedUserData, and expand open the long S-1-5-21. subkey for the user account that you want to change their lock screen clock time format.
- Under the long S-1-5-21. subkey for the user in the left pane, expand open AnyoneRead, and select LocaleInfo.
- In the right pane of LocaleInfo, double click on the TimeFormat string value to modify it.
- Type in the time format from the table below you want to display on the lock screen clock for the user, and click/tap on OK.
- When finished, close Registry Editor, and sign out of the Administrator account.
- To test, sign in to the user account that you changed their lock screen clock time format, and lock (+ L) the computer to see the lock screen with the clock’s new time format.
 +R keys from the keyboard to open the Run dialog, type regedit, and click on OK.
 Registry disclaimer: Important this section, method, or task contains steps that tell you how to modify the registry. However, serious problems might occur if you modify the registry incorrectly. Therefore, make sure that you follow these steps carefully. For added protection, back up the registry before you modify it. Then, you can restore the registry if a problem occurs.
Refer to the below article to backup and restore the registry in Windows:
http://support.microsoft.com/kb/322756/
Note: The above links applies to Windows 10 as well.
Hope it helps. Get back to us for further assistance on this issue. We will be happy to help you.
How to change Lock screen timeout before display turn off on Windows 10
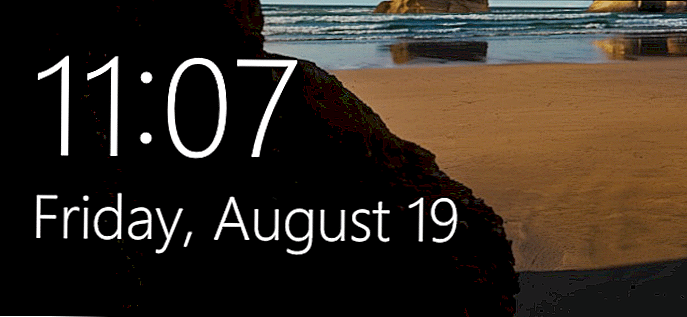
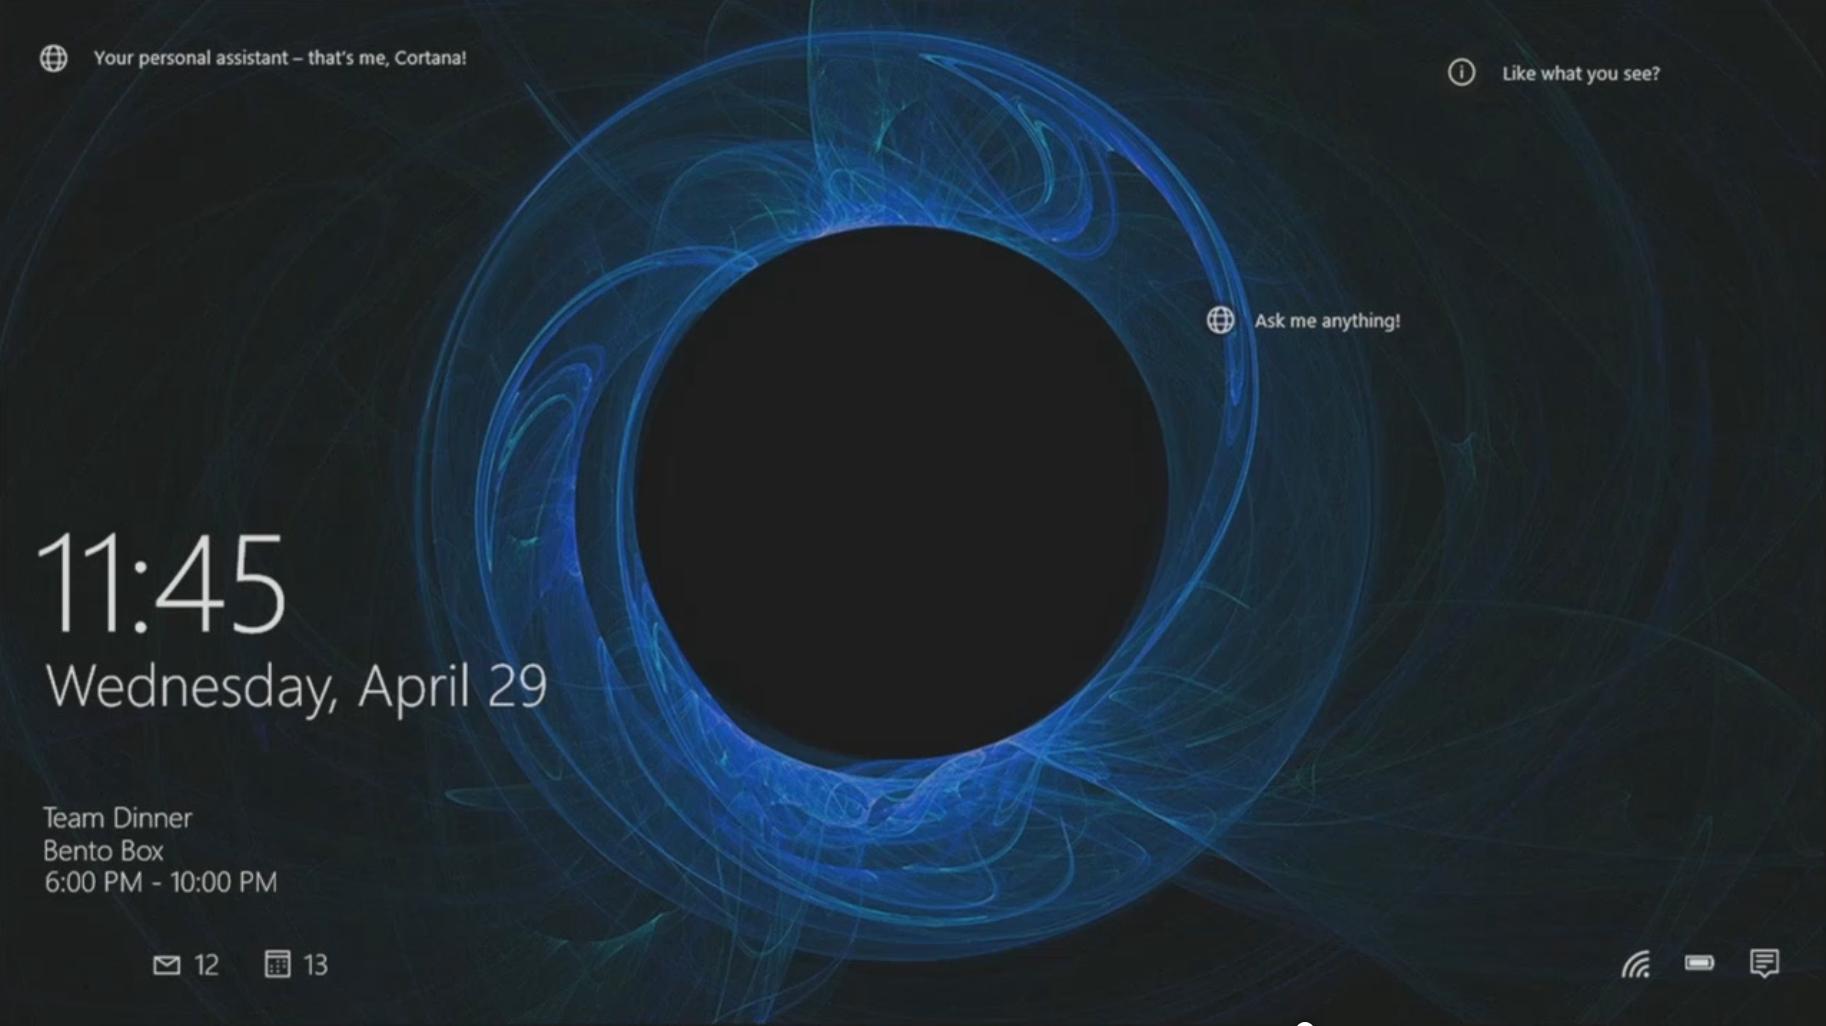
On Windows 10, similar to Windows 8.1, the operating system features a Lock screen before you sign in to your account. The new experience showcases date and time, quick status for apps you choose, and more importantly a background image, which typically, users opt to display personal pictures or those from Windows Spotlight.
While the Lock screen provides useful information and beautiful pictures, you probably noticed that your computer’s display turns off after 60 seconds when you lock your Windows 10 account. This happens even if you change the power options to never turn off the monitor or never put the computer to sleep.
The reason is that by design, the operating system includes a function that detects when the device is locked and waits for 60 seconds. After the time expires, the computer screen goes black. This is a function, which for a mysterious reason, users can’t customize in Control Panel or the Settings app. However, you can modify the Registry to enable a new option in the power settings to change the time to anything you want.
In this Windows 10 guide, we’ll walk you through the steps to tweak the Registry (or Command Prompt) to customize the operating system should way until turning the display off, which will give you more time to see the background, status, and interact with Cortana on the Lock screen.
How to change the time when the display turns off when your PC is locked
Important: Before diving into this guide, it’s worth noting that editing the registry can be dangerous, and it can cause irreversible damage to your system if you don’t do it correctly. It’s highly recommended to make a full backup of your PC before proceeding. You’ve been warned!
- Use the Windows key + R keyboard shortcut to open the Run command, type regedit, and click OK to open the registry.
Browse the following path:
Click OK.

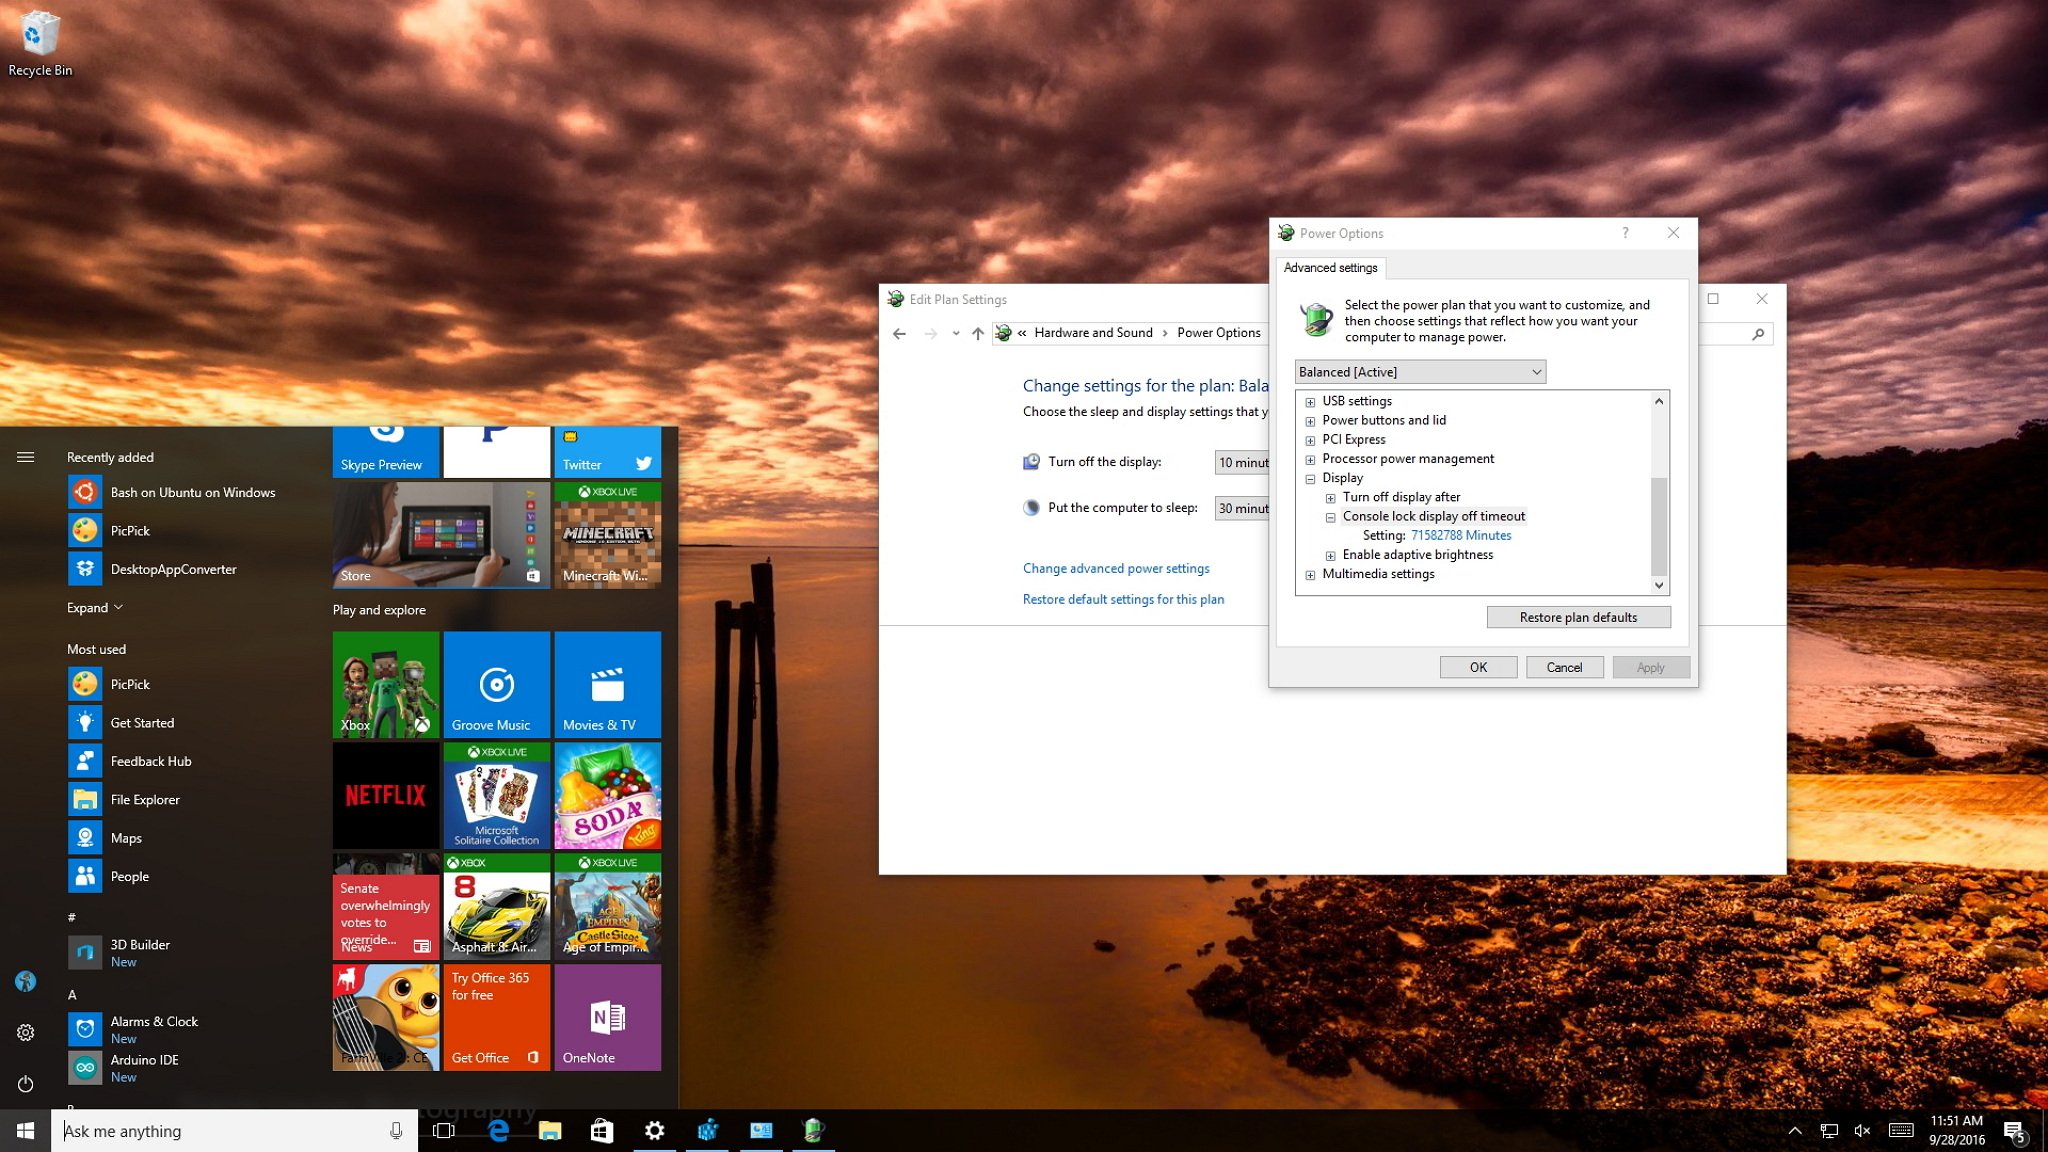
These steps only enabled the option on Windows 10 called «Console lock display off timeout.» Now the only thing left to do is to customize this option to any time you want. To do this, use these instructions:
- Use the Windows key + X keyboard shortcut to open the Power User menu and select Power Options.
Click the Change plan settings link for the selected plan.

Click the Change advanced power settings link.
Click OK to complete the task.
![]()
Once you complete the steps, you can test the new settings by locking your computer (Windows key + L keyboard shortcut), and now the screen shouldn’t turn off until the time you set expires.
At any time, you can revert the changes by following the previous steps, but this time, on step 4 change the registry value key from 2 to 1.
How to change the Lock screen timeout using Command Prompt
The beauty of Windows is that you can configure the same feature in a number of ways. Alternatively, you can use the PowerCfg.exe utility to change you display timeout setting when your computer is locked. When it’s connected to AC power or when your device is running on battery (DC power).
To change the Lock screen timeout using Command Prompt, do the following:
- Use the Windows key + X keyboard shortcut to open the Power User menu and select Command Prompt (admin).
Type the following command and press Enter:
powercfg.exe /SETACVALUEINDEX SCHEME_CURRENT SUB_VIDEO VIDEOCONLOCK 60
Important: You must change «60» in the command-line with the timeout time you want to use, in seconds. For example, if you want the screen to turned on for 5 minutes, then you need to use 300 at the end of the command.
Type the following command and press Enter:
powercfg.exe /SETACTIVE SCHEME_CURRENT

The command mentioned in step 2 will work when your computer is using AC power. You must replace /SETACVALUEINDEX for /SETDCVALUEINDEX if you want to change the timeout setting on your laptop or tablet running on battery.
It’s worth noting that while changing the Registry settings is an advanced task, during my test, I have found that sometimes using the command lines may settings may not work as expected, but it’s an alternative.
On the other hand, changing the Registry worked perfectly, and after making the tweak, I can simply go to the Power Options settings in Control Panel and adjust the Lock screen timeout without having to use any commands.
More Windows 10 resources
For more help articles, coverage, and answers on Windows 10, you can visit the following resources:
![]()
The Dell XPS 15 is our choice for best 15-inch laptop
For a lot of people, a 15-inch laptop is a perfect size that offers enough screen for multitasking, and in a lot of cases, some extra performance from powerful hardware. We’ve rounded up the best of the best at this size.
![]()
Halo: MCC’s live service elements make it better, not worse
Halo: The Master Chief Collection is more popular than ever, but some fans don’t agree with the live service approach 343 Industries has taken with it. Here’s why those elements are, at the end of the day, great for the game and for Halo overall.
![]()
Microsoft’s Surface Duo is not ‘failing up’
Microsoft announced this week that it was expanding Surface Duo availability to nine new commercial markets. While Surface Duo is undoubtedly a work in progress, this is not a sign of a disaster. It’s also doesn’t mean that Surface Duo is selling a ton either. Instead, the reason for the expansion is a lot more straightforward.
![]()
These are the best PC sticks when you’re on the move
Instant computer — just add a screen. That’s the general idea behind the ultra-portable PC, but it can be hard to know which one you want. Relax, we have you covered!
Изменение времени блокировки экрана ОС Windows 10 и автоматический тайм аут

Запуск и вывод ПК из спящего режима сопровождается отображением экрана блокировки (Screen lock). Это окно, в котором пользователь видит некоторую информацию (время, погода, непрочитанные сообщения) еще до входа в ОС. Опция блокировки дисплея перешла в Windows 10 из предыдущих редакций системы. Отключение на работоспособность окон не влияет. Рассмотрим способы включения (отключения) времени блокировки экрана Windows 10.
Что это такое и для чего его используют?
Запуская ПК в работу, юзер видит окно экрана блокировки. Говоря простыми словами – это окно, отображающее определенную информацию из приложений.
Возможности, которыми наделен Screen lock:
- настройка обоев окна блокировки. Среди функций имеется автоматическая смена картинок – спокойные, ненавязчивые, привлекательные изображения, плавно чередующиеся на экране, поднимут настроение, и работа пойдет веселей;
- отображает погоду, время, сообщения из приложений. Что именно будет показано на дисплее, зависит от настроек;
- гарантирует первичную защиту ПК, ведь для того, чтобы войти в систему, понадобится ввести правильную комбинацию символов.
В любой редакции программ Windows 10 присутствует Screen lock, нужно лишь должным образом его настроить.

Как включить и выключить автоблокировку экрана
Разработчики корпорации Microsoft позаботились о тех пользователях, которые из-за загруженности или по забывчивости не включают блокировку дисплея, когда отходят от своего компьютера. Им лучше наладить автоблокировку. Ее включение происходит автоматически спустя определенный промежуток времени.
Установка режима автоблокировки в системном реестре
- Вставьте в строку запроса команду regedit, выполните ввод.

- Проследуйте по пути: HKEY_LOCAL_MACHINE\SOFTWARE\Microsoft\Windows\CurrentVersion\Policies\System=>
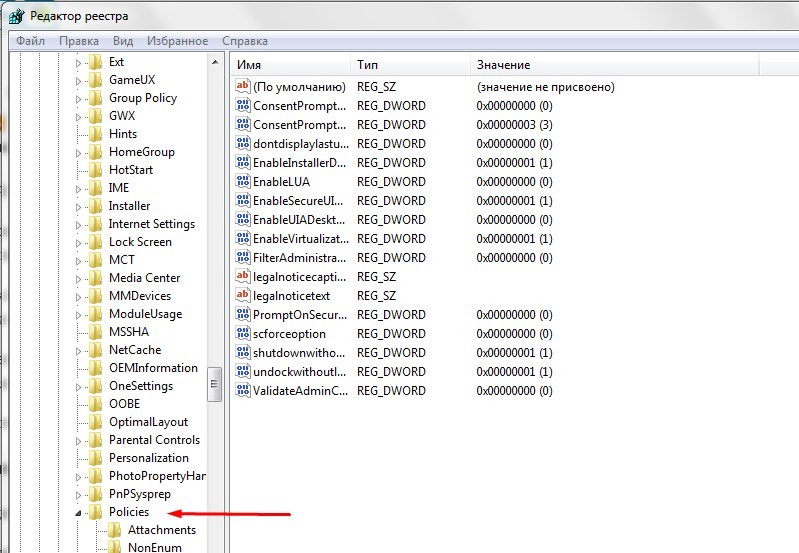
Вспомогательной клавишей мышки (правой) вызовите строку System, зайдите в накопитель данных «Создать», перейдите в «Параметр DWORD (32 бита) и задайте новый параметр Inactivity Timeout Secs.
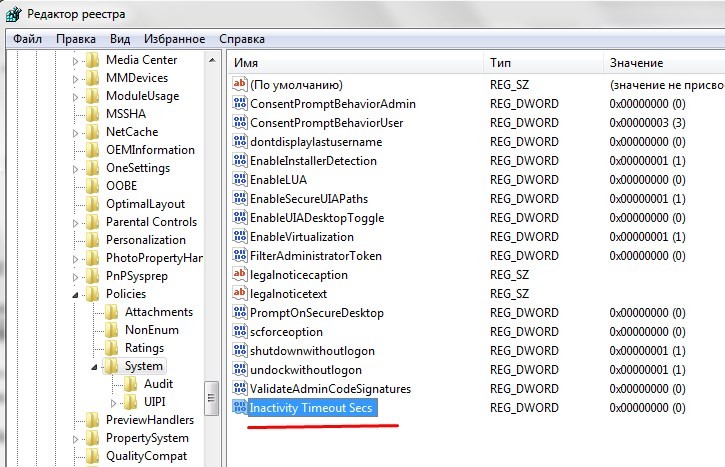
- Открыв обновленный формат, задайте временной период (в секундах), по завершении которого, при условии бездействия, устройство заблокируется. После чего поставьте галочку напротив строки «Десятичная», кликните на клавишу «ОК».

После этого выйдите из системного реестра, перезапустите устройство.
Настройка автоблокировки в локальной политике безопасности
Что необходимо сделать:
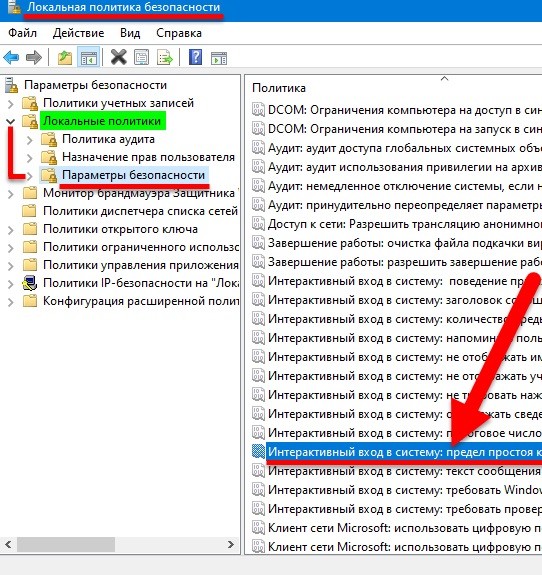
- В строку для выполнения команд задайте secpol.msc, щелкните клавишу ввода команды.
- Войдите в раздел «Локальные политики», разверните «Параметры безопасности», перейдите в «Интерактивный вход в систему: предел простоя компьютера».

- В строке, информирующей о времени блокирования компьютера, задайте отрезок времени, через который, при бездействии, экран автоматически заблокируется.
Закройте окно, перезапустите устройство.
Выключение экрана блокировки
Некоторых юзеров раздражает, что вместо того, чтобы незамедлительно приступить к работе, приходится делать несколько лишних телодвижений, которые убирают Screen lock. К счастью, это окно можно удалить. Специалисты не советуют малоопытным пользователям вносить корректировки. Если пользователь не уверен в своих знаниях, лучше этого не делать, потому как компьютер может сломаться.
Порядок отключения блокировки дисплея посредством редактора групповой политики:
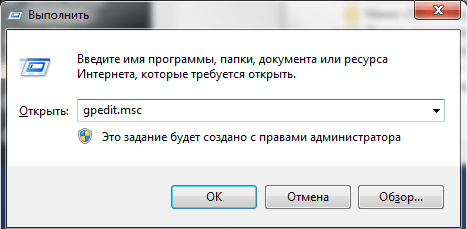
- Откройте окно «Выполнить» (наберите комбинацию Win + R). «Вбейте» код выполняемой операции – gpedit. msc. щелкните «ОК».
- Пройдите путь: Конфигурация компьютера=>Административные шаблоны=>Панель управления=>Персонализация.
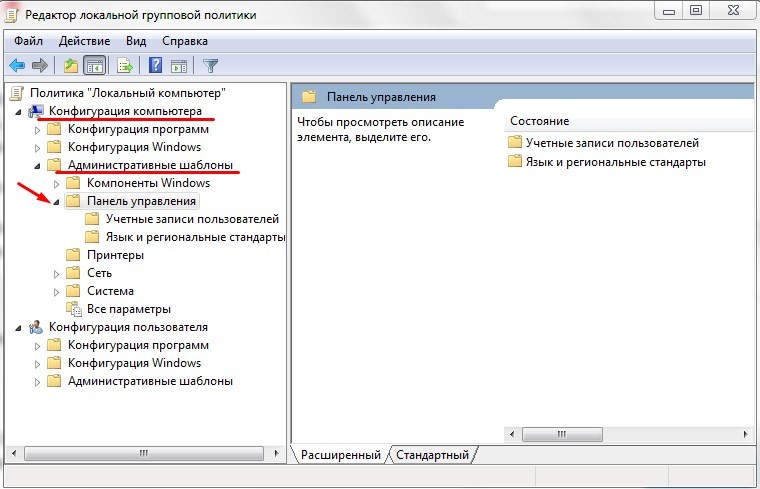
- Кликните на строку настроек запрета отображения Screen lock.
- Установите галочку в графе «Выключить».
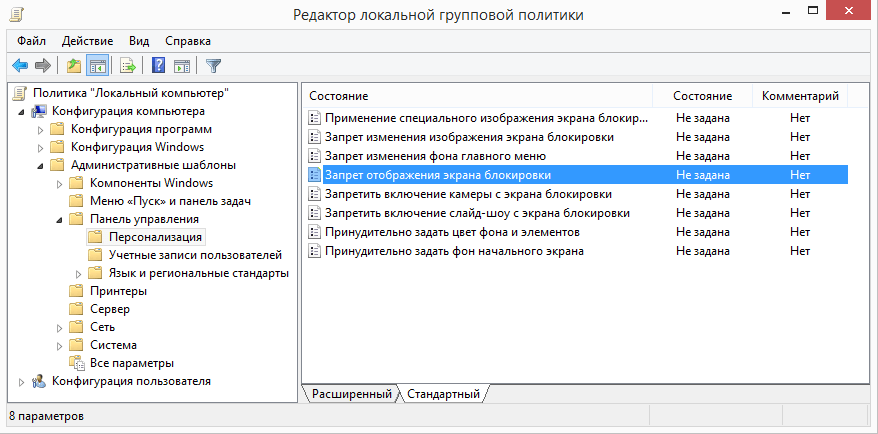
Перезагрузив устройство, пользователь сможет убедиться, что Screen lock отключен.
Как изменить время ожидания
Комбинация клавиш «Win + L» приводит к переходу в окно экрана блокировки. Когда пользователь не производит рабочие операции, спустя 60 с дисплей погаснет. Увеличить временной отрезок, изменить режим работы можно 2 способами.
Блокировка экрана в Электропитании
- Войдите в список команд «Пуск». С помощью правой кнопки мыши вызовите «Выполнить». В открывшейся строке задайте команду control powercfg.cpl,1, нажмите ввод.

- Зайдя в раздел «Экран», отправляйтесь в пункт «Время ожидания до отключения экрана блокировки», откорректируйте период до автоблокировки.
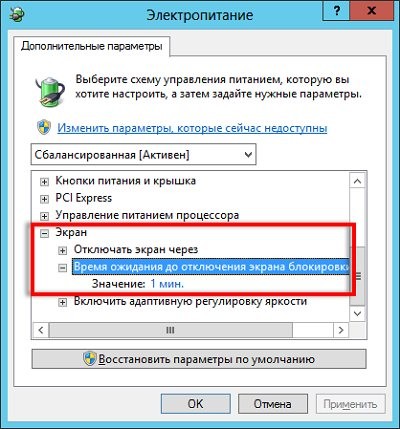
Сохраните изменения, кликнув на «ОК».
Внесение изменений в консоли
- Чтобы отсрочить тайм аут Screen lock, откройте программу, управляющую устройством посредством текстовых команд. Например, набрав комбинацию клавиш «Win + X». Введите в поисковую строку cmd, задайте старт.
- Наберите текстовую команду
powerc f g.exe /SETACVALUEINDEX SCHEME_CURRENT SUB_VIDEO VIDEOCONLOCK секунды.
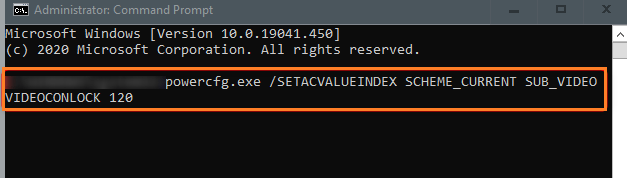
В конце команды, вместо «секунды», задайте время до отключения дисплея.


