- Настройка лимитов (таймаутов) для RDP/RDS сессий в Windows
- How to fix Windows Time service not running on Windows 10
- How do I fix Windows Time service issues?
- 1. Perform SFC and DISM scans
- 2. Set the Windows Time Service to automatic
- 3. Make sure that the Local System account starts the Windows Time service
- 4. Register the W32Time file again
- 5. Check the Windows Time Service in the Task Scheduler
- 6. Use a different time server
- 7. Force Windows to sync the time
- 8. Use sc triggerinfo command
- 9. Check your motherboard battery
Настройка лимитов (таймаутов) для RDP/RDS сессий в Windows
По-умолчанию, когда пользователь со своего компьютера закрывает окно своей RDP/RDS сессией в терминальном клиенте (mstsc, rdcman или rdp html web клиент) простым нажатием по крестику в окне, без выполнения выхода (logoff), его сессия переходит в режим disconnected (разъединённый сеанс). В этом режиме все запущенные пользователем программы, открытые документы и окна продолжают работать на удаленном сервере и потреблять ресурсы.
По-умолчанию в Windows RDP сессия пользователя может находится в состоянии disconnected до перезагрузки компьютера или явного ее завершения пользователем или администратором. Это довольно удобно, т.к. пользователь может в любой момент подключиться к своей старой сессии и продолжить работу с открытыми программами и документами.
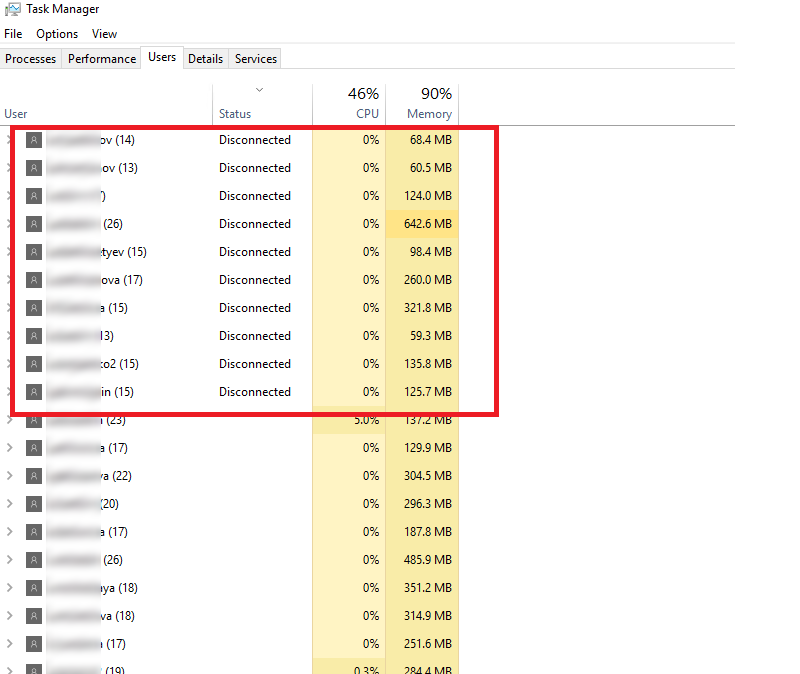
На следующем скриншоте видно, что отключенные сессии пользователей на RDS сервере с Windows Server 2016 используют около 35% памяти сервера. Кроме того незавершенные сессии могут блокировать открытые файлы на файловых серверах, вызывать проблемы с корректным сохранением данных в приложениях, профилях или User Profile Disks.
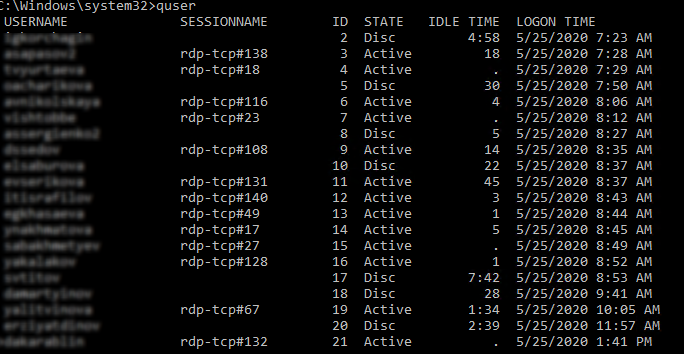
С помощью команды quser можно узнать, когда начата RDP сессия пользователя, длительность простоя и статус сессии.
Для автоматического завершения отключенных RDP/RDS сессий через определенный промежуток времени, вам нужно правильно настроить лимиты (таймауты).
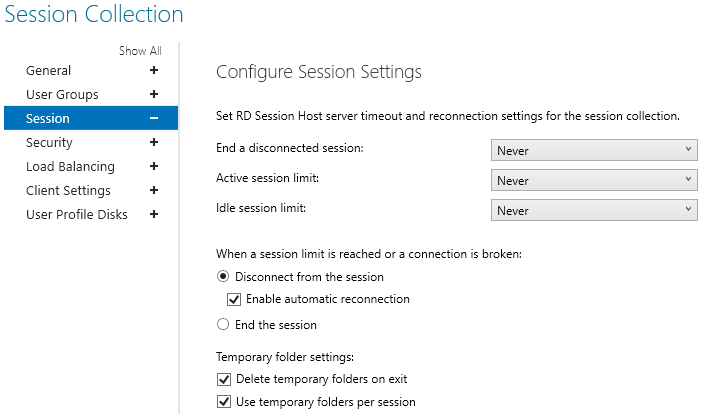
При использовании RDS сервера, вы можете настроить параметры таймаутов сессий в настройках RDS коллекций на вкладке Session.
Укажите время, через которое нужно завершить отключенный сеанс в параметре End a disconnected session (по умолчанию срок сеанса неограничен – never). Также вы можете выставить максимальную длительность активной RDP сессии (Active session limit) и отключение бездействующего сеанса (Idle session limit). Это жесткие таймауты применяются для всех сессий в RDS коллекции.
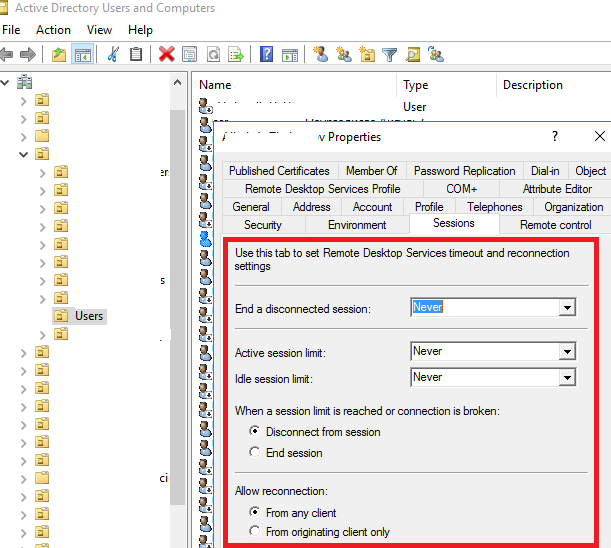
Также можно настроить ограничение времени RDP сессии в свойства локального (консоль lusrmgr.msc) или доменного пользователя (консоль dsa.msc — ADUC).
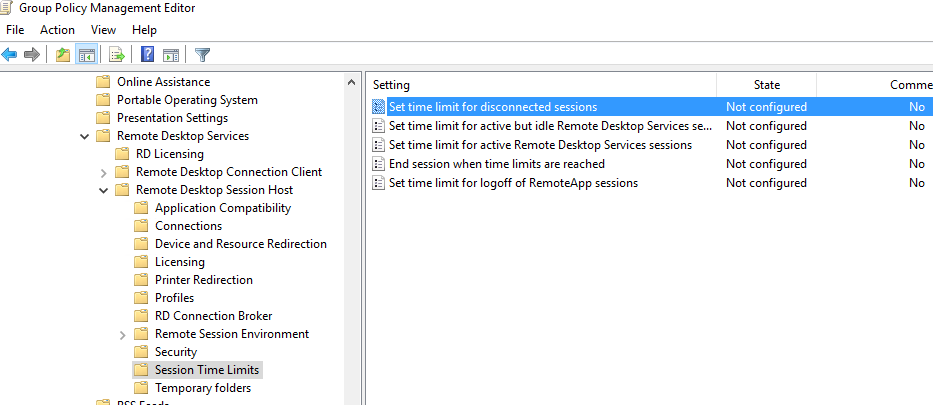
В Windows Server 2012 R2/2016/2019 можно настроить таймауты RDP сессий с помощью групповых политик. Можно использовать как редактор доменных GPO gpmc.msc, так и редактор локальных групповых политик (gpedit.msc) на конкретном RDS сервере или клиенте (если вы используете десктопную Windows в качестве терминального сервера)
Параметры таймаутов RDP сессий находятся в разделе GPO
Computer Configuration -> Policies -> Administrative Templates -> Windows Components -> Remote Desktop Services -> Remote Desktop Session Host -> Session Time Limits (Конфигурация компьютера -> Политики -> Административные шаблоны -> Компоненты Windows -> Службы удаленных рабочих столов -> Узел сеансов удаленных рабочих столов -> Ограничение сеансов по времени). Доступны следующие политики таймаутов:
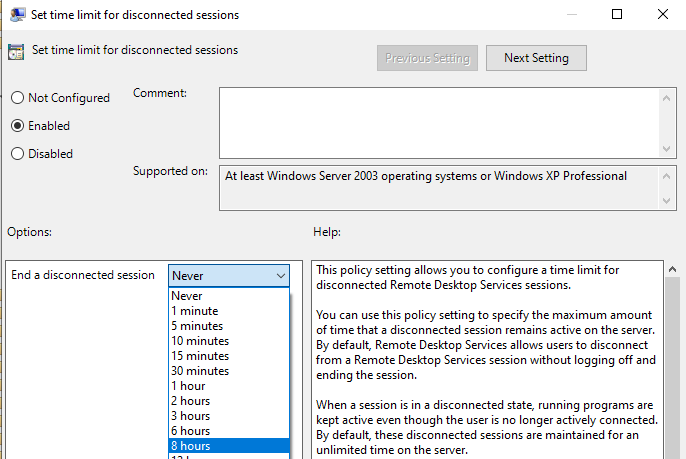
- Set time limit for disconnected session (Задать ограничение по времени для отключенных сеансов)
- Set time limit for active but idle Remote Desktop Services sessions (Задать ограничение времени для активных, но бездействующих сеансов служб удаленных рабочих столов) – политика позволяет завершить простаивающие RDP сессии, в которых отсутствует ввод со стороны пользователя (движение мышкой, ввод символов с клавиатуры)
- Set time limit for active Remote Desktop Services sessions (Задать ограничение по времени для активных сеансов служб удаленных рабочих столов) – максимальный срок для любой (даже активной) RDP сессии пользователя, после которого она переводится в состояние disconnected;
- End Session when time limits are reached (Завершать сеанс при достижении ограничения по времени) – через какое время нужно завершать RDS сессию (logoff) вместо перевода ее в disconnected;
- Set time limit for logoff of RemoteApp sessions (Задать предел для выхода из сеансов RemoteApp)
По умолчанию эти параметры не настроены. Чтобы автоматически завершать отключенные RDP сеансы пользователей через 8 часов, включите политику “Set time limit for disconnected session” = Enabled, и в выпадающем списке выберите 8 часов.
Сохраните изменения и обновите политики сервера (gpupdate /force). Новые настройки таймаутов будут применяться только к новым RDP сеансам, текущие сеансы придется завершить вручную.
- MaxDisconnectionTime
- MaxIdleTime
- MaxConnectionTime
- MaxDisconnectionTime
- RemoteAppLogoffTimeLimit
How to fix Windows Time service not running on Windows 10

- The Windows Time service is a background service that allows the constant syncing between your Windows 10 device and the Internet, even when switching between time zones while traveling.
- Program interferences may cause the Windows Time service to no longer function, and if that happens, simply follow the steps written in the article below.
- This article is just one of many from our hub for troubleshooting System Errors that occur in Windows 10. As such, add it as a bookmark since you may need a similar article in the future.
- Visit our specially created Fix section for more great troubleshooting guides.

The Windows Time Service (W32Time) is a Microsoft service that provides clock synchronization for computers. The tool is implemented in the W32Time.dll file.
The Windows Time Service recently broke down, sending wrong times to computers across the world. Fortunately, Microsoft quickly fixed this problem, and your computer should now display the correct time.
Should the Windows Time Service break down again, we’ve got you covered. In this article, we’re going to list a series of workarounds that you can use to set the correct time on your computer.
How do I fix Windows Time service issues?
Windows Time service can sometimes lead to certain issues if it’s not running properly. Speaking of this service, here are some similar issues that users reported:
- Windows 10 time service not starting, access denied, not working, not found, not showing
- There are various issues that can occur with Windows Time service on Windows 10, but you should be able to fix most of them by using one of our solutions.
- Windows Time service keeps stopping
- According to users, sometimes this service keeps stopping on your PC.
- To fix this problem, be sure to run both SFC and DISM scans and check if that solves the issue.
- Windows Time service missing, not installed
- If this service is missing or if it’s not installed, be sure to reregister the service and check if that solves the problem.
- Windows Time service not starting error 1792, 1290, 1079
- There are various errors that can prevent this service from running, and if you encounter any of these issues, be sure to try some of our solutions.
- Windows Time service could not be started
- This is another common problem with Windows Time service.
- If this issue occurs, you might have to change the Startup type of Windows Time service.
- Windows Time not syncing
- This is another common problem caused by Windows Time service.
- However, you can fix it by checking your scheduled tasks.
1. Perform SFC and DISM scans
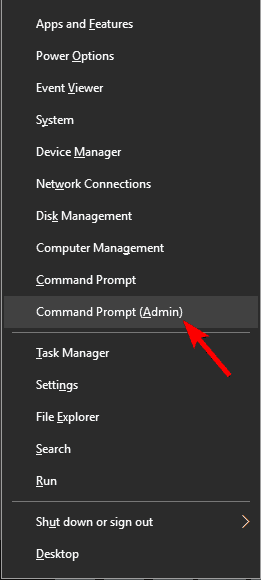
- Press Windows Key + X to open Win + X menu.
- Now choose Command Prompt (Admin) or Powershell (Admin) from the menu.

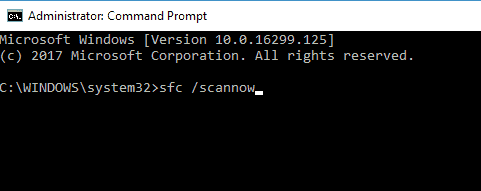
- When Command Prompt opens, enter sfc /scannow and press Enter to run it.
- SFC scan will now start. This scan can take up to 15 minutes, so don’t interfere with it and don’t interrupt it.
If Windows Time service isn’t running, the problem might be your file corruption. Sometimes your system files can get corrupted and that can lead to this and many other errors.
To fix the problem, you need to perform an SFC scan. Once the SFC scan is finished, check if the problem is still there.
If the issue is still present, your next step would be to run DISM scan. To do that, start Command Prompt as administrator and run DISM /Online /Cleanup-Image /RestoreHealth command. 
Once the DISM scan is finished, check if the problem still persists. If the issue is still present, repeat the SFC scan and check if that solves the issue.
2. Set the Windows Time Service to automatic
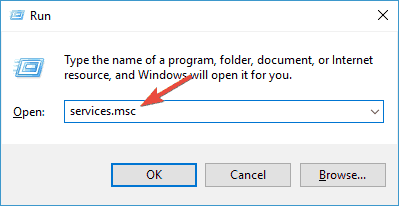
- Press Windows Key + R > type services.msc > hit Enter.
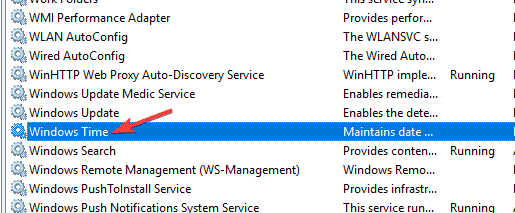
- Scroll down to Windows Time > double-click it.
- Change the startup type to Automatic > click on Apply >OK.
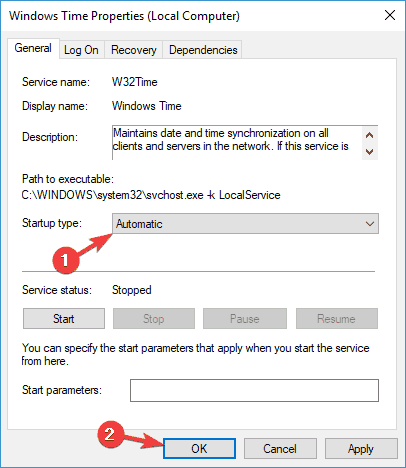
After you change the Startup type, the service should automatically start with Windows and your problem should be resolved. If you have issues with Windows Time service, you need to make sure that Startup type of the service is set to Automatic.
3. Make sure that the Local System account starts the Windows Time service
- Open the Services window.
- Scroll down to Windows Time > double-click it.
- Select the Log On tab > check the Local Systemaccount >click Apply >OK.
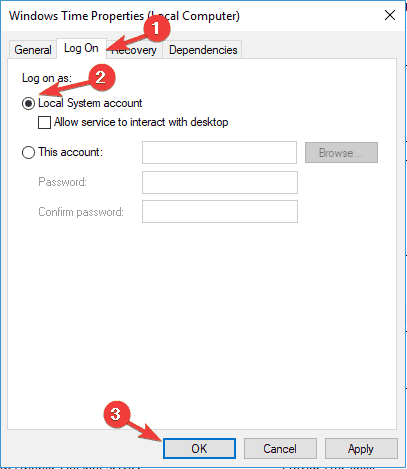
According to users, sometimes issues Windows Time service can occur if it’s not being started properly. After making these changes, the problem should be resolved completely.
4. Register the W32Time file again
- Start Command Prompt as administrator.
- Run the following commands:
- net stop w32time
- w32tm /unregister
- w32tm /register
Sometimes this issue can occur if there’s a problem with W32Time service. To fix the issue, it’s important that you stop the services and unregister it.
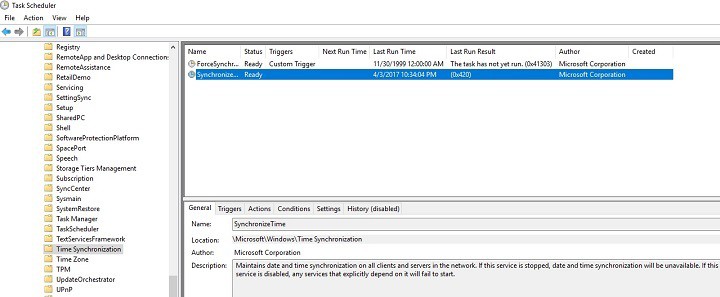
5. Check the Windows Time Service in the Task Scheduler
- Go to the Search menu > type Task Scheduler > select the first result
- In the left hand pane > expand the Task Scheduler Library tree > go to Microsoft > Windows > locate the Time Synchronization feature
- Left click the option > make sure it is enabled.
- To enable Time synchronization> right click the center pane > select Enable.
- Still in the center pane, check the settings from the Triggers tab > set the service to run automatically at startup.
In order for Windows Time Service to work properly, certain scheduled tasks need to be running. If there’s an issue with one of these tasks, you might encounter some problems.
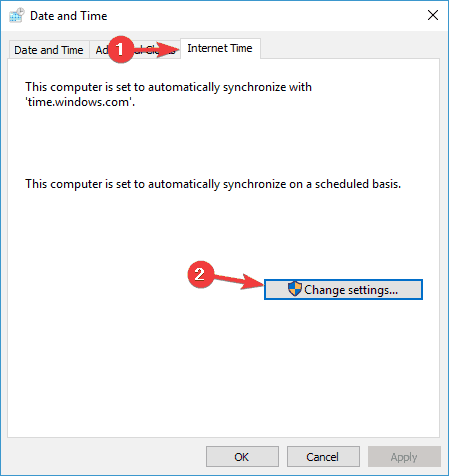
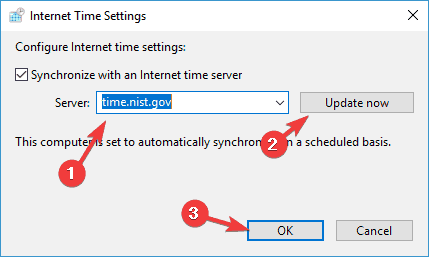
6. Use a different time server
- Open Control Panel and go to Date and Time.
- Go to Internet Time > click the Change settings button.
- Select time.nist.gov as the Server > click the Update now button.
- Also, try using pool.ntp.org as the server, some users reported that this fixed the issue.
- Click OK to save the changes.
In some cases, problems with Windows Time service can occur if there’s an issue with the time server. After changing the time server, check if the issue is still there.
You can also add more servers to the list. Here’s how to do this:
- Open Registry Editor and navigate to the following key in the left pane:
- HKEY_LOCAL_MACHINESOFTWAREMicrosoftWindowsCurrentVersionDateTimeServers
- In the right-hand pane, you’ll see your current list of servers.
- To add a new time server, right-click the empty space and choose New > String Value.
- Enter the appropriate number > double click it > in the Value data field enter the server’s address. Here are some server examples:
-
- time-a.nist.gov
- time-b.nist.gov
- 128.105.37.11
- europe.pool.ntp.org
- clock.isc.org
- north-america.pool.ntp.org
- time.windows.com
- time.nist.gov
4. After you add servers to the registry, simply go to Time and Date settings and choose any of the servers that you added.
7. Force Windows to sync the time
- Start Command Prompt as administrator.
- Now run the following commands:
-
- net stop w32time
- w32tm /unregister
- w32tm /register
- net start w32time
- w32tm /resync
According to users, sometimes you might be able to solve this problem simply by forcing Windows to start the service and sync the time. After doing that, restart your PC and check if the problem is resolved.
8. Use sc triggerinfo command
- Start Command Prompt as administrator.
- Now run the sc triggerinfo w32time start/networkon stop/networkoff command.
According to users, sometimes Windows Time service isn’t triggered properly, and if that’s the case, the service won’t start at all. However, you can fix the problem simply by running a single command in Command Prompt.
After the command is executed, Windows Time service should be fixed and start automatically with your PC in the future.
9. Check your motherboard battery
Sometimes issues with time and date can occur due to your motherboard battery. Your battery provides the power to your PC allowing it to keep the correct time. If your clock isn’t correct, that might be caused by a faulty motherboard battery.
However, you can fix that problem simply by replacing the battery. To do that, power down your PC and disconnect all cables. Now open your computer case, and look for the battery on your motherboard. Gently remove the battery and replace it with a new one.
After replacing the battery, the issues with your clock and Windows Time service should be resolved. Keep in mind that opening your computer case might void your warranty, so it might be better to take your PC to the official repair center if its still under warranty.
There you go, we hope one of these solutions helped you to synchronize your Windows 10 clock.
As always, if you’ve come across other workarounds to fix various Windows Time Service bugs, feel free to list the troubleshooting steps in the comment section below.


