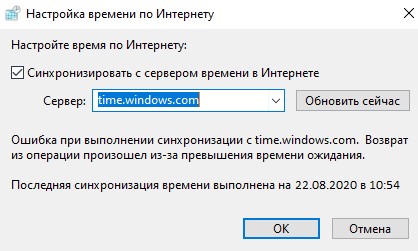
Ошибка при выполнении синхронизации времени в Windows
Ошибка при выполнении синхронизации с time.windows.com, возникает когда пользователь пытается автоматически обновить время в Windows 7. Виновником данной ошибке обычно являются сами сервера microsoft, так как не удается соединиться с NTP сервером для синхронизации времени. В других ситуациях эта старая батарейка на материнской плате, которая не держит уже заряд, и время все время сбивается, когда ПК выключен из розетки. В этой ситуации нужно повторно зарегистрировать время в системе.
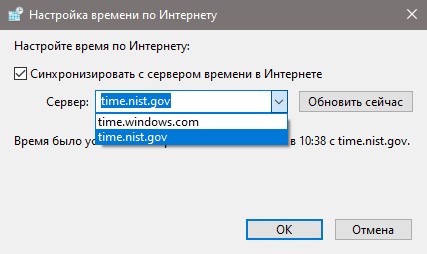
1. Выберите другой сервер
Выберите другой сервер для синхронизации времени.
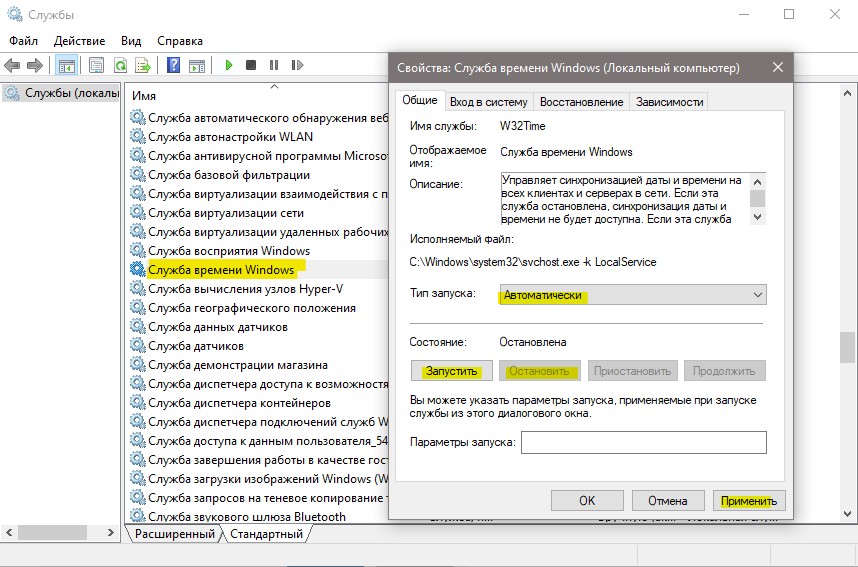
2. Перезапуск службы времени
Нажмите Win+R и services.msc, чтобы открыть службы. Далее найдите «Служба времени Windows» и нажмите по ней два раза мышкой. В новом окне выберите тип запуска «Автоматически«, нажмите «Остановить«, после чего «Запустить«.
3. Новая регистрация W32Time
Запустите командную строку от имени администратора и введите ниже команды:
Time zone changes for Russia in Windows
Summary
In accordance with recently passed Russian law, the following regions in Russia were scheduled to switch time zones on March 27, 2016, at 02:00 local time. Microsoft has released an update to Windows, dated Tuesday, April 12, 2016, to reflect these changes.
Old time zone offset
New time zone offset
Resolution
The update that is described in this article changes the time zone data to accommodate daylight saving time (DST) changes in several countries.
This is a cumulative update rollup that includes all previous Windows time zone changes. For more information about how DST changes may affect other Microsoft products, go to the following Microsoft websites:
When you apply this update, you may receive a message that resembles the following:
Update cannot be installed as a newer or same time zone update has already been installed on the system.This message indicates that either you have already applied the correct update or Windows Updates or Microsoft Update has automatically installed this update. No additional action is required to update the Windows operating system.
How to get this updateThe following files are available for download and installation from the Microsoft Download Center.
All supported x86-based versions of Windows 8.1
 Download the package now.
All supported x64-based versions of Windows 8.1
Download the package now.
All supported x64-based versions of Windows Server 2012 R2
Download the package now.
All supported x64-based versions of Windows Server 2012
Download the package now.
All supported x86-based versions of Windows 7
Download the package now.
All supported x64-based versions of Windows 7
Download the package now.
All supported x64-based versions of Windows Server 2008 R2
Download the package now.
All supported IA-based versions of Windows Server 2008 R2
Download the package now.
All supported x86-based versions of Windows Vista
Download the package now.
All supported x64-based versions of Windows Vista
Download the package now.
All supported x86-based versions of Windows Server 2008
Download the package now.
All supported x64-based versions of Windows Server 2008
Download the package now.
All supported IA-based versions of Windows Server 2008
Download the package now.
For more information about how to download Microsoft support files, click the following article number to go to the article in the Microsoft Knowledge Base:
Microsoft scanned these files for viruses. Microsoft used the most current virus-detection software that was available on the date that the files were posted. The files are stored on security-enhanced servers that help prevent any unauthorized changes to the files.
PrerequisitesWindows 8.1 and Windows Server 2012 R2
To apply this update, you must have update 2919355 installed. For more information about how to get this update, click the following article number to go to the article in the Microsoft Knowledge Base:
No prerequisites are required to apply this update.
Windows 7 and Windows Server 2008 R2
No prerequisites are required to apply this update. The same package installs both on the RTM version and the Service Pack 1 versions of Windows 7 and Windows Server 2008 R2. For more information about how to get a Windows 7 or a Windows Server 2008 R2 service pack, click the following article number to go to the article in the Microsoft Knowledge Base:
To apply this update, you must be running Windows Vista Service Pack 2 (SP2) or Windows Server 2008 SP2.
For more information about how to get a Windows Server 2008 service pack, click the following article number to go to the article in the Microsoft Knowledge Base:
Registry informationTo apply this update, you don’t have to make any changes to the registry.
Restart requirementYou must restart the computer after you install this cumulative update.
Changes to Windows time zone data
This update includes the following changes and additions. Users in the affected regions can switch to these new time zones after the update is installed.
Astrakhan Oblast & Ulyanovsk Oblast
Time zone key / ID
Astrakhan Standard Time
English display name
(UTC+04:00) Astrakhan, Ulyanovsk
Time zone offset (before transition)
Time zone offset (after transition)
Altai Republic & Altai Krai
Time zone key / ID
Altai Standard Time
English display name
(UTC+07:00) Barnaul, Gorno-Altaysk
Time zone offset (before transition)
Time zone offset (after transition)
Time zone key / ID
Transbaikal Standard Time
English display name
Time zone offset (before transition)
Time zone offset (after transition)
Time zone key / ID
Sakhalin Standard Time
English display name
Time zone offset (before transition)
Time zone offset (after transition)
Changes to Existing Time ZonesThese changes affect the display name only. No time changes will be introduced.
Time zone key / ID
Old display name
New display name
Kaliningrad Standard Time
(UTC+02:00) Kaliningrad (RTZ 1)
Russian Standard Time
(UTC+03:00) Moscow, St. Petersburg, Volgograd (RTZ 2)
(UTC+03:00) Moscow, St. Petersburg, Volgograd
Russia Time Zone 3
(UTC+04:00) Izhevsk, Samara (RTZ 3)
(UTC+04:00) Izhevsk, Samara
Ekaterinburg Standard Time
(UTC+05:00) Ekaterinburg (RTZ 4)
North Central Asia Standard Time
(UTC+06:00) Novosibirsk (RTZ 5)
North Asia Standard Time
(UTC+07:00) Krasnoyarsk (RTZ 6)
North Asia East Standard Time
(UTC+08:00) Irkutsk (RTZ 7)
Yakutsk Standard Time
(UTC+09:00) Yakutsk (RTZ 8)
Vladivostok Standard Time
(UTC+10:00) Vladivostok, Magadan (RTZ 9)
Russia Time Zone 10
(UTC+11:00) Chokurdakh (RTZ 10)
Russia Time Zone 11
(UTC+12:00) Anadyr, Petropavlovsk-Kamchatsky (RTZ 11)
(UTC+12:00) Anadyr, Petropavlovsk-Kamchatsky
File informationFor a list of the files that are provided in this update, download the file information for update 3148851.
For an official policy statement about these changes, see the following Microsoft Daylight Saving Time & Time Zone Blog article:
Time Zone Updates for RussiaFor general Windows support for time zone and daylight saving time issues, go to the following Microsoft website:
Windows Update: FAQ
Note: If you’re looking for Microsoft Office update info, see Install Office updates.
In Windows 10, you decide when and how to get the latest updates to keep your device running smoothly and securely. When you update, you’ll get the latest fixes and security improvements, helping your device run efficiently and stay protected. In most cases, restarting your device completes the update. Make sure your device is plugged in when you know updates will be installed.
If other questions come up when you update Windows 10, here are some other areas that might interest you:
When you only want info about updating Windows 10, you’ll find answers to many of your questions here:
When the Windows 10 May 2020 Update is ready for your device, it will be available to download and install from the Windows Update page in Settings. Choose a time that works best for you to download the update. You’ll then need to restart your device and complete the installation. After that, your device will be running Windows 10, version 2004.
To manually check for the latest recommended updates, select Start > Settings > Update & Security > Windows Update > Windows Update .
To get help updating to the latest version of Windows 10, go to the Microsoft software download page and download the Update Assistant.
Some updates may not be available on all devices at the same time—we’re making sure updates are ready and compatible.
To stay up to date, select Start > Settings > Update & Security > Windows Update > Windows Update , and then select Check for updates.
If a feature update is available for your device, it will appear separately on the Windows Update page. To install it, select Download and install now.
Here are a few things you can try if you’re having trouble installing updates:
Make sure that your device is connected to the internet. Downloading updates requires an internet connection.
If you’re connected the internet, try to install the updates manually. Select Start > Settings > Update & Security > Windows Update > Windows Update , and then view available updates.
Check for updates
Run the Windows Update Troubleshooter. Select Start > Settings > Update & Security > Troubleshoot . Under Get up and running, select Windows Update.
The time required to download updates primarily depends on internet connection speed, network settings, and update size. Make sure your device is plugged in and connected to the internet to download updates faster.
You can’t stop updates entirely—because they help keep your device safe and secure, updates will eventually need to be installed and downloaded, regardless of your update settings. Here’s how to temporarily pause updates from being downloaded and installed. Note that after the pause limit is reached, you’ll need to install the latest updates before you can pause updates again.
In the Windows 10 November 2019 Update (version 1909) or later, or in Windows version 1809 for Pro or Enterprise, select Start > Settings > Update & Security > Windows Update . Then choose one of the following options:
Select Pause updates for 7 days.
Select Advanced options. Then, in the Pause updates section, select the drop-down menu and specify a date for updates to resume.
To finish installing an update, your device will need to restart. Windows will try to restart your device when you’re not using it. If it can’t, you’ll be asked to schedule the restart for a more convenient time. Or, you can schedule anytime by following these steps:
Select Start > Settings > Update & Security > Windows Update > Windows Update .
Select Schedule the restart and choose a time that’s convenient for you.
You can set active hours to make sure automatic restarts for updates only happen when you’re not using your device. Learn about active hours for Windows 10.
Try deleting files you don’t need, uninstalling apps you don’t use, or moving files to another drive like an external USB drive or OneDrive. For more tips on freeing up disk space, see Free up drive space in Windows 10.
We recommend keeping devices like laptops and tablets plugged in when you’re not using them. This way, if updates are installed outside active hours, your device will have enough power to complete the installation. Windows updates don’t consume more battery than other typical system processes.
An update history is available so you can see which updates were installed, and when. You can also use this list to remove specific updates, although we don’t recommend this unless it’s necessary.
Select Start > Settings > Update & Security > Windows Update > Windows Update > View update history .
For more info about what’s included in updates for Windows 10, see Windows 10 update history.
We don’t recommend that you remove any installed updates. However, if you must remove an update, you can do so in update history.
Select Start > Settings > Update & Security > Windows Update > View update history > Uninstall updates.
Select the update you want to remove, then select Uninstall.
Feature updates are typically released twice per year and include new functionality and capabilities as well as potential fixes and security updates. Quality updates are more frequent and mainly include small fixes and security updates. Windows is designed to deliver both kinds of updates to devices through Windows Update.
To double check that your device is up to date, open Settings > Update & Security > Windows Update and see your update status and available updates.
To find which version of Windows you’re running, see Which version of Windows operating system am I running?
Reserved storage is not automatically turned on by Windows in any update scenarios. It is only turned on for new devices with the Windows 10 May 2019 Update (version 1903) or later preinstalled, or devices on which a clean install was performed.
Note: If you’re looking for Microsoft Office update info, see Install Office updates.
The best way to keep Windows 8.1 up to date is to turn on automatic updates. With automatic updates, you don’t have to search for updates online or worry about missing critical fixes or device drivers for your PC. Instead, Windows Update automatically installs important updates as they become available.
To turn on automatic updates:
Open Windows Update by swiping in from the right edge of the screen (or, if you’re using a mouse, pointing to the lower-right corner of the screen and moving the mouse pointer up), select Settings > Change PC settings > Update and recovery > Windows Update. If you want to check for updates manually, select Check now.
Select Choose how updates get installed, and then, under Important updates, select Install updates automatically (recommended).
Under Recommended updates, select Give me recommended updates the same way I receive important updates.
Under Microsoft Update, select Give me updates for other Microsoft products when I update Windows, and then select Apply.
Click the questions below to see answers about how Windows Update keeps your device up to date.
Note: If your PC is connected to a network where updates are managed by Group Policy, you might not be able to change settings related to Windows Update. For more info, contact your organization’s technical support.
Open Windows Update by swiping in from the right edge of the screen (or, if you’re using a mouse, pointing to the lower-right corner of the screen and moving the mouse pointer up), select Settings > Change PC settings > Update and recovery > Windows Update. To check for updates manually, select Check now.
An update history is available so you can see which updates were installed, and when. You can also use this list to remove specific updates, although we don’t recommend this unless it’s necessary.
To see your PC’s update history, open Windows Update by swiping in from the right edge of the screen (or, if you’re using a mouse, pointing to the lower-right corner of the screen and moving the mouse pointer up), select Settings > Change PC settings > Update and recovery > Windows Update > View your update history.
We don’t recommend that you remove any installed updates. However, if you must remove an update, you can do so in update history.
Open Windows Update by swiping in from the right edge of the screen (or, if you’re using a mouse, pointing to the lower-right corner of the screen and moving the mouse pointer up), select Settings > Change PC settings > Update and recovery > Windows Update > View your update history.
Select the update you want to remove, then select Uninstall.
Here are a few things to try if you’re having problems installing updates:
Make sure that your PC is connected to the internet. Some updates can’t be installed if you’re using a metered internet connection.
If you’re connected the internet and updates aren’t installed automatically, wait a few minutes and then try to install the updates manually.
See the Fix Windows Update errors guided walkthrough to try to fix the problem.
Support for Windows 7 ended on January 14, 2020
We recommend you move to a Windows 10 PC to continue to receive security updates from Microsoft.
Click the questions below to see answers about how Windows Update keeps your device up to date.


