- Tiny core linux ���������� �������
- About Our Project
- Tiny core linux ���������� �������
- 1. Start the installation
- 2. Browse to the install files
- 3. Formatting
- 4. Bootcodes
- 5. CorePlus installation options
- 6. Tiny Core installation options
- 7. Install
- 8. Testing
- Tiny Core Linux
- Quick & Easy Overview
- 1. Requirements
- 2. Introduction
- 3. Cloud Mode
- 4. USB Stick Mode
- 5. USB Stick Boot Mode
- 6. Installing Applications
- 7. I’m Having Problems
- 8. I Need More Help
- 1. Minimum System Requirements
- 2. Introduction
- 3. Cloud Mode
- 4. USB Stick Mode
- 5. USB Stick Boot Mode
- 6. Installing Applications
- 7. I’m Having Problems
- 8. I Need More Help
- Tiny core linux ���������� �������
- Philosophies
- Frugal install
- Boot codes
- USB and External Storage Devices Special Requirements
- Dependency Checking and Downloading
- Modes of Operation
- The Default Mode: Cloud/Internet
- The Mount Mode of Operation: TCE/Install
- See an overview of the system architecture of this mode.
- The Copy Mode of Operation: TCE/Install + copyfs indicator
- See an overview of the system architecture of this mode.
- See an overview of the system architecture of SCM extensions.
- Backup/Restore and Other Persistence Options:
- Backup/Restore
- Persistent Home
- Bottom Matter
Tiny core linux ���������� �������
The Core Project is a highly modular based system with community build extensions.
It starts with a recent Linux kernel, vmlinuz, and our root filesystem and start-up scripts packaged with a basic set of kernel modules in core.gz. Core (11MB) is simply the kernel + core.gz — this is the foundation for user created desktops, servers, or appliances. TinyCore is Core + Xvesa.tcz + Xprogs.tcz + aterm.tcz + fltk-1.3.tcz + flwm.tcz + wbar.tcz
TinyCore becomes simply an example of what the Core Project can produce, an 16MB FLTK/FLWM desktop.
CorePlus offers a simple way to get started using the Core philosophy with its included community packaged extensions enabling easy embedded frugal or pendrive installation of the user’s choice of supported desktop, while maintaining the Core principle of mounted extensions with full package management.
It is not a complete desktop nor is all hardware completely supported. It represents only the core needed to boot into a very minimal X desktop typically with wired internet access.
The user has complete control over which applications and/or additional hardware to have supported, be it for a desktop, a netbook, an appliance, or server, selectable by the user by installing additional applications from online repositories, or easily compiling most anything you desire using tools provided.
The latest version: 12.0
About Our Project
Our goal is the creation of a nomadic ultra small graphical desktop operating system capable of booting from cdrom, pendrive, or frugally from a hard drive. The desktop boots extremely fast and is able to support additional applications and hardware of the users choice. While Tiny Core always resides in ram, additional applications extensions can either reside in ram, mounted from a persistent storage device, or installed into a persistent storage device.
We invite interested users and developers to explore Tiny Core. Within our forums we have an open development model. We encourage shared knowledge. We promote community involvement and community built application extensions. Anyone can contribute to our project by packaging their favorite application or hardware support to run in Tiny Core. The Tiny Core Linux Team currently consists of eight members who peruse the forums to assist from answering questions to helping package new extensions.
Join us here and on IRC Freenode #tinycorelinux.
Learn. Share. Grow your knowledge of Linux.
Источник
Tiny core linux ���������� �������
The first step before you install any operating system such as Tiny Core is to back up everything on your computer before starting.
Before making the commitment to perform a frugal install you should consider our Quick and Easy Overview. It covers the basics of running Tiny Core from CDROM and/or USB pendrive. Most will find learning Tiny Core the quick and easy way a better starting point.
But for those who are ready to take the plunge to frugal, this guide shows step by step information on how to install TC via the installer. The older instructions for a manual install are still available, but using the installer is recommended.
The guide assumes you’ve either booted the CorePlus CD, or have installed the tc-install extension (tc-install.tcz)
Keep in mind that this guide is basic and that the user may choose to adapt, remove and/or add parts as desired.
The installer is also applicable to USB sticks and other external media.
Note: If you already have a Linux System booting, then you do not need to make a partition for Tiny Core! Tiny Core can run in a single directory in your existing Linux installation. To do so, at step 1, uncheck the option to «Install boot loader». At step 2, select an existing partition, and at Step 3, do not format it. Upon completion you will need to manually configure your existing boot loader.
1. Start the installation
Open the installer:
It can also be started via the shell or Run icon by typing «tc-install».
2. Browse to the install files
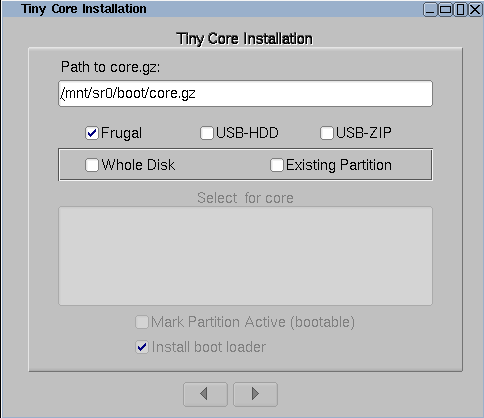
Browse to /mnt/device/boot and select the core.gz file.
With the source selected, pick the desired install type and target. We’re going to install to an empty hard drive.
If using an existing partition, tick the box to mark it active to have it bootable.
3. Formatting
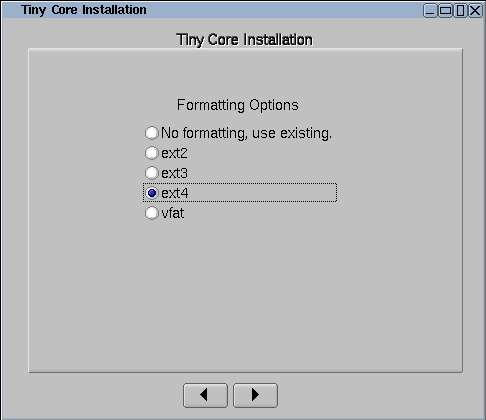
Format the new partition. It’s recommended to pick one of the ext* options to support linux permissions.
4. Bootcodes
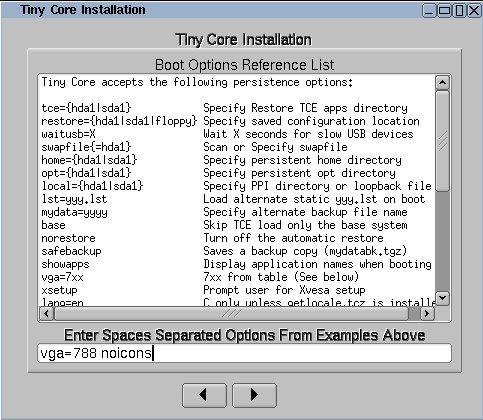
If you want to use additional bootcodes, enter them now. Otherwise leave this blank.
The example bootcodes set a framebuffer resolution and disable wbar icons.
Note that you can edit them any time after the install in the bootloader’s config file, usually extlinux.conf.
5. CorePlus installation options
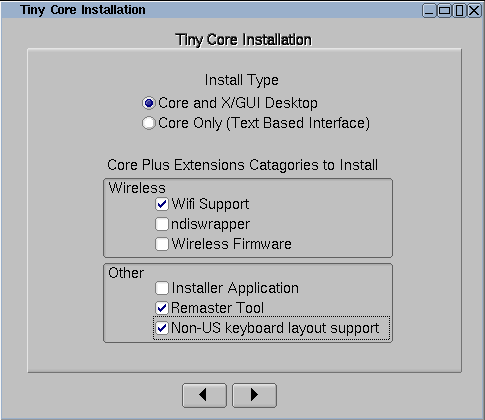
If you are installing from the CorePlus CD you will see an additional screen asking which extensions from CorePlus you would like to install. Note that you will only see this screen if running the installer from a CorePlus CD.
The selected extensions will be installed.
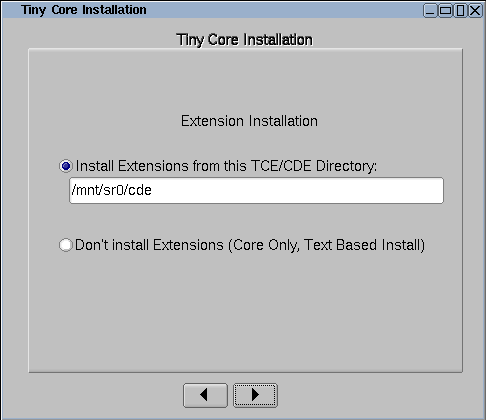
6. Tiny Core installation options
If you are installing from the Tiny Core CD you will see an additional screen asking which directory extensions should be installed from. You should select the cde or tce directory that contains the extensions that you would like installed. For example, if the Tiny Core CD is mounted on /mnt/sr0 you should select /mnt/sr0/cde
Note that you will not see this screen if installing from CorePlus.
All extensions from selected directory will be installed.
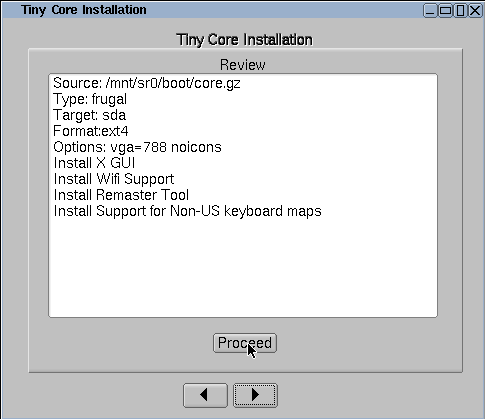
7. Install
If everything’s OK, click on proceed:
The time required will depend on the size of your hard drive.
8. Testing
TC is now installed!
Remove the original CD boot media and reboot.
Note: the system may need to be configured to boot hdX first in the BIOS.
Источник
Tiny Core Linux
Quick & Easy Overview
1. Requirements
2. Introduction
3. Cloud Mode
4. USB Stick Mode
5. USB Stick Boot Mode
6. Installing Applications
7. I’m Having Problems
8. I Need More Help
1. Minimum System Requirements
CPU-i486DX
RAM-48Mb
CD Drive
Wired Internet Connection
TinyCore CD
USB Port
USB Memory Stick, also known as a USB Pen Drive with a known filename on it; this will help you to identify your stick.
2. Introduction
TinyCore is an open system that starts you off with a basic desktop and lets you choose which applications you want to install.
In fact, you can even install applications to a USB stick, that way you can take the CD and USB stick with you, use it in another computer, and still have the same working enviroment.
Applications you may be interested in include web browsers, spreadsheets, video players, and audio editors amongst many others available.
Here are the simplest ways that TinyCore can be run depending on your needs. You should read the following brief paragraphs to determine which one is right for you.
These are just the basics to get you up and running. There are more advanced techniques available in the forums and on the TinyCore Wiki pages.
3. Cloud Mode
Cloud mode is the easiest way to start. Insert the CD and turn on your computer. When you see the TinyCore banner, simply hit the enter key.
After displaying a few messages the desktop will appear. At this point you are free to remove the CD if you wish. Applications installed in this mode will always be put in memory, never on your disk.
This is a good mode to use if you just want to try out applications to see if you like them or to simply surf the web. You will have to reload your applications each time you reset the computer.
4. USB Stick Mode
This is for people who wish to save their applications and prefer NOT to install them on their hard drive, or wish to make them portable.
Plug in a USB memory stick, insert the CD, and turn on the computer. When you see the banner type, «tinycore waitusb=10» without the quotes and hit the enter key.
When the desktop appears you will see the window bar on the bottom of the screen. Single click on the icon that looks like a file cabinet; that will open the file manager program.
In the left pane you will see the directory tree. Look for the directory called «mnt/» and if it is not already expanded, click on the + sign just left of it. This will show you the drives connected to your computer.
Your memory stick should be listed as «sda1». Click on sda1 and make sure the the known filename appears in the panel to the right. If it doesn’t, then try the other drives listed under «/mnt» (but not fd0) until your filename appears.
In the left panel right click on the drive that your stick is listed as and select «Create directory» from the pop up menu; a box will pop up prompting you for a directory name. Type in «tce/» and hit the enter key. You have just created the directory where TinyCore will save any applications, desktop settings, and files you create. The next time you start your computer TinyCore will automatically find this directory and all your applications will be available to run.
When you want to shut down, click on the icon at the left end in the window bar at the bottom of the screen, and a little window will pop up. Under «Backup Options» it should say «Backup» and under that it should list your memory stick as «sda1/tce». Click on «OK» and any new files will be saved. Never just hit the power switch.
5. USB Stick Boot Mode
If your computer is capable of booting off of a USB memory stick you can transfer TinyCore to the stick, allowing you to run without the CD.
READ SECTION 4 FIRST; IT CONTAINS ADDITIONAL INFORMATION.
Plug in a USB memory stick, insert the CD, and turn on the computer. When you see the banner, type, «tinycore waitusb=10» without the quotes and hit the enter key.
When the desktop appears, you will see the window bar on the bottom of the screen. Single click on the icon that has a screwdriver displayed in it. When the Control Panel pops up, click the HD/USB Install button. When the install window pops up, follow the directions in that window.
THIS WILL DELETE THE CONTENTS OF THE MEMORY STICK! BE SURE IT DOES NOT CONTAIN ANYTHING IMPORTANT!
6. Installing Applications
Click on the desktop. When the menu pops up go to ‘System Tools» and click on «AppBrowser».
When the AppBrowser pops up, look to the left of the «Go» button and make sure the dropdown box is set to «OnDemand». Look to the right of the «Go» button and where it says «TCE» make sure it points to your USB memory stick, usually «/mnt/sda1/tce/optional».
If your memory stick is not «sda1» then edit it with the correct location and click the Set button. Now click on the «Connect» button, select an application, click «Go», and your application will be installed.
Be sure to read the text under the «Info» tab; it may contain additional instructions to complete the install.
7. I’m Having Problems
My Applications Are No Longer Available When I Restart The Computer.
You may have a slow USB device. Reboot and try «tinycore waitusb=20».
You installed them OnDemand instead of OnBoot.
Click on the desktop and from the popup menu go to OnDemand and click on your application, if it still does not start, click on the desktop again and select Applications from the popup menu and click on your application.
How Do I Change An Application Between OnDemand And OnBoot?
Click on the desktop and from the popup menu go to SystemTools and select ControlPanel. When the control panel pops up, select AppsAudit.
To change an application from OnDemand to OnBoot, click OnDemand and then Maintenance. From the right panel click the applications you wish to change. Click OnDemand and Exit OnDemand. Now click OnBoot and then Maintenance. From the left panel click the applications you want OnBoot.
When you are done click OnBoot and then Exit OnBoot. Your changes will take effect the next time you reboot.
8. I Need More Help
Check out the FAQ page; there is plenty of useful information listed there. Also check out the Wiki Getting Started page. If you need more help you should first try searching the forums. There is a good chance that somebody else has had the same problem and a solution was found.
You can also sign up for the forum. Just pick a user name, a password, supply your E-mail address, and you’re in! Except for a «Wellcome to TC» message, you will not receive any E-mails you did not request. Be sure to state the nature of the problem and how you arrived at that point. Please also include a brief discription of your hardware.
Источник
Tiny core linux ���������� �������
On behalf of the Tiny Core Team, welcome. Please take the time to read this document and understand the philosophies behind Tiny Core.
One quick user beware: Tiny Core is not a turn-key operating system. At least initially, almost all users will require internet access to the online repository.
Philosophies
As a quick summary, Tiny Core:
Loads itself into RAM from storage, then mounts applications on storage, or installs applications to RAM from storage. See a diagram of the Tiny Core file architecture. — Or view a video overview
Tiny Core is different because users are not encouraged to perform a ‘traditional’, hard-drive installation of the operating system. Sure, a hard drive installation is possible, but Tiny Core is designed to run from a RAM copy created at boot time. Besides being fast, this protects system files from changes and ensures a pristine system on every reboot. Easy, fast, and simple renew-ability and stability is a principle goal of Tiny Core.
Frugal install
Frugal is the typical installation method for Tiny Core. That is it is not a traditional hard drive installation, which we call «scatter mode», because all the files of the system are scattered all about the disk. With frugal, you basically have the system in two files, e.g., bzImage and tinycore.gz whose location is specified by the boot loader. Any user files and extensions are stored outside the base OS.
Boot codes
Depending upon how how Tiny Core is installed (GRUB, LILO, CD, USB stick . ), users have the option to use boot codes on each reboot (CD, etc), or to store those codes in a boot configuration file (GRUB, LILO, etc.).
Boot codes (boot arguments) affect how Tiny Core operates by defining options at boot-time. There are lots of boot codes. To view all the available options, peruse the boot code lists by pressing F2, F3 or F4 at the CD boot prompt.
The boot code base is notable. Use base to simulate Default Mode and skip all application extension installing or mounting. This is a useful tool for trouble-shooting, extension building, upgrading . and just checking out how fast Tiny Core can boot on your hardware.
USB and External Storage Devices Special Requirements
Tiny Core can be instructed to search for data on external devices at boot time:
a USB pen drive, compact flash, or other portable media. Below, the Mode Descriptions discuss Personal Persistent Repositories of extensions (PPR) or Installed applications (PPI) — those are prospects for external storage.
Sometimes, hardware doesn’t wake up fast enough for Tiny Core’s boot sequence, though. If the hardware doesn’t wake up in time, Tiny Core will move on and finish booting without that data.
If you use a PPR or PPI on external media, it may be necessary to use the boot code waitusb=5 or similar. This pauses the pauses the boot process for five seconds, waiting for slow devices to register with the system bus.
Dependency Checking and Downloading
Tiny Core makes application-getting as easy as possible. The Appbrowser provides application details from individual .info files — this is enlightening reading material when choosing applications. Always read the .info files, and re-read them before upgrading to catch changes and concerns.
Dependencies are the pieces (other applications) required for an application. In short, the Tiny Core Appbrowser will take care of downloading and checking dependencies for you.
Modes of Operation
The Modes of Operation mix up how Tiny Core Loads, Mounts, and Installs at boot time (see Philosophies, above, if you want to clarify what those three things mean here). Tiny Core has three main Modes:
- Default Mode: Cloud/Internet
- Mount Mode: TCZ/Install
- Copy Mode: TCZ/Install + copy2fs.flg/lst
Again, some may say there is a «Traditional Mode: Install to Hard Drive», but that’s not really a Mode at all. If you want to do it, go right ahead. It’s just not one of the original goals of the project, so expect the normally slim documentation to be slimmer.
Details on each Mode follow in the «Mode Descriptions» below.
The Default Mode: Cloud/Internet
- Tiny Core boots entirely into RAM.
- Users run the Appbrowser to browse the repository and download applications.
- Application Extensions (downloaded applications) last only for the current session.
- Tiny Core just uses as much RAM as possible.
Since Cloud/Internet Mode operates out of RAM, it runs fast. Cloud/Internet Mode is nomadic and quick-booting. Application extensions are lost on reboot, but only the system files have to be restored.
If you would like applications stored locally and set up on each reboot, then consider the Mount and Copy Modes.
The Mount Mode of Operation: TCE/Install
See an overview of the system architecture of this mode.
Applications are stored locally in a directory named tce on a persistent store, .e..g, a supported disk partition (ext2,ext3.ext4,vfat, or fat)
Unless specified with a boot code of tce=xdyz Tiny Core will searche for and uses the /tce of downloaded extensions. Applications stored in the /tce are optionally mounted at boot time.
Tiny Core uses the Appbrowser to place application extensions in this tce/ and flag them as either «OnBoot» (mount at boot) or «On Demand» (do not mount at boot, but create a special menu section for easy access and display an icon if available).
To establish the tce/ boot with the one time boot code of tce= (see the wiki and forum topics on the tce= boot code.
The Copy Mode of Operation: TCE/Install + copyfs indicator
See an overview of the system architecture of this mode.
- Application Extensions are copied into RAM instead of mounted.
Applications can be RAM-loaded in bulk (copy2fs.flg), selectively loaded into RAM (copy2fs.lst), or mounted.
Copy Mode briefly extends the boot time to gain some of the RAM-run speed of Default Mode and the persistence of a pure Mount Mode.
In Copy Mode, it is important to note that extensions can be either mounted or copied into RAM. The Appsaudit program makes this flexibility possible by keeping track of user selections. directory and only a few symbolic links are created in order to put the extension binaries in the system path and to load a desktop menu item/icon. SCM extensions can easily be unmounted/removed without a reboot.
See an overview of the system architecture of SCM extensions.
Backup/Restore and Other Persistence Options:
Aside from the Mount Mode and the tce directory of application extensions, Tiny Core supports persistent/permanent:
Backup and Restore of personal settings, and
Persistent /home and /opt directories.
Backup/Restore
Tiny Core includes filetool for saving personal settings and data. The text file /opt/.filetool.lst lists files and directories to be backed up at power down and restored at reboot. The list may be changed manually (using vi, nano, etc) or via the scripts in the Tools menu; note that the entry for /opt/filetool.lst should never be removed from the list itself. filetool also supports exclusion of particular files via /opt/xfiletool.lst.
By default, filetool.lst includes the entire home/tc directory, and xfiletool.lst excludes some unnecessary caches and temporary directories.
filetool writes backup mydata.tgz. The location of mydata.tgz can be initially set using the boot option restore=hdXY, restore=hdXY/directory, or, after boot, by selecting Backup/Restore from the Control Panel. If the restore code is no used, Tiny Core will search for mydata.tgz in available root directories at boot. Conversely, the boot option norestore ignores any existing backup files, a useful tool for trouble-shooting and upgrading.
Further settings and configurations are stored or executed using /home/tc/.xsession, /home/tc/.profile, /opt/bootlocal.sh, and /opt. Search the forum and wiki for information on these and other custom settings files.
Persistent Home
Just as Tiny Core offers persistence options for downloaded application extensions, so does it for your home directory. These are set using boot codes/options.
home=hdXY will automatically setup /home/tc to «bind» to /mnt/hdXY/tchome. When using the home boot code, mydata.tgz is not created — personal data backups must occur in a more traditional way. The home boot code lets Tiny Core coexist with other Linux installations by inserting the tc user directory under a pre-existing /home directory. Be careful, as the initial use of the boot code will creat this directory and its content. Also, Tiny Core cannot auto-detect a persistent home directory, so the home boot option is always required.
Bottom Matter
If you have made it this far, congratulations! You’re ready to get Tiny Core and get started. Browse the wiki, the forums, the download pages, and join the community conversation.
Источник

