- Tiny core linux apt
- About Our Project
- Tiny core linux apt
- 1. Obtaining cfdisk and GRUB via Appbrowser
- 2. Open a root shell
- 3. Partitioning
- 4. Formatting
- 5. Copy over TC system files and prepare for PPR mode.
- 6. Installing GRUB
- 7. Testing
- Tiny core linux apt
- 1. Start the installation
- 2. Browse to the install files
- 3. Formatting
- 4. Bootcodes
- 5. CorePlus installation options
- 6. Tiny Core installation options
- 7. Install
- 8. Testing
- Tiny core linux apt
- How do I add/load/install extensions?
- Extensions disappear after booting. How do I keep my extensions?
- How do I update my extensions?
- How do I delete an extension?
- How do I use system menu/taskbar/pager?
- How to use pendrives and other removable devices with Tiny Core?
- How to resolve ‘Failed to load firmware’ error?
- How to setup a proxy with Tiny Core?
- How do I make aterm default to transparency mode?
- How do I mount windows shares?
- How to Cut and Paste?
- How To Set the Timezone?
- How To Clean Up Wbar?
- What Bootcodes does Tiny Core Support?
- Help X does not start. Why does my system boot up to a login prompt?
- How to use framebuffer X server?
- My keyboard is not US. How to add a keymap?
- Help. Not all keys work in browser or openoffice?
- What is the boot architecture?
- How to use startup scripts?
- What are the minimum requirements?
- Can TC be contained in a single directory?
- Can TC boot and be used directly from an ISO file?
- How do I start X apps on boot?
- How do I increase the number of loop devices to support more .tcz extensions?
- How to get flash working?
- How to use/share Virtual Disks (Qemu)?
- Administrator / SuperUser / Root:
Tiny core linux apt
The Core Project is a highly modular based system with community build extensions.
It starts with a recent Linux kernel, vmlinuz, and our root filesystem and start-up scripts packaged with a basic set of kernel modules in core.gz. Core (11MB) is simply the kernel + core.gz — this is the foundation for user created desktops, servers, or appliances. TinyCore is Core + Xvesa.tcz + Xprogs.tcz + aterm.tcz + fltk-1.3.tcz + flwm.tcz + wbar.tcz
TinyCore becomes simply an example of what the Core Project can produce, an 16MB FLTK/FLWM desktop.
CorePlus offers a simple way to get started using the Core philosophy with its included community packaged extensions enabling easy embedded frugal or pendrive installation of the user’s choice of supported desktop, while maintaining the Core principle of mounted extensions with full package management.
It is not a complete desktop nor is all hardware completely supported. It represents only the core needed to boot into a very minimal X desktop typically with wired internet access.
The user has complete control over which applications and/or additional hardware to have supported, be it for a desktop, a netbook, an appliance, or server, selectable by the user by installing additional applications from online repositories, or easily compiling most anything you desire using tools provided.
The latest version: 12.0
About Our Project
Our goal is the creation of a nomadic ultra small graphical desktop operating system capable of booting from cdrom, pendrive, or frugally from a hard drive. The desktop boots extremely fast and is able to support additional applications and hardware of the users choice. While Tiny Core always resides in ram, additional applications extensions can either reside in ram, mounted from a persistent storage device, or installed into a persistent storage device.
We invite interested users and developers to explore Tiny Core. Within our forums we have an open development model. We encourage shared knowledge. We promote community involvement and community built application extensions. Anyone can contribute to our project by packaging their favorite application or hardware support to run in Tiny Core. The Tiny Core Linux Team currently consists of eight members who peruse the forums to assist from answering questions to helping package new extensions.
Join us here and on IRC Freenode #tinycorelinux.
Learn. Share. Grow your knowledge of Linux.
Источник
Tiny core linux apt
Before making the commitment to perform a frugal install you should consider our Quick and Easy Overview. It covers the basics of running Tiny Core from CDROM and/or USB pendrive. Most will find learning Tiny Core the quick and easy way a better starting point.
But for those who are ready to take the plunge to frugal, this guide shows step by step information on how to partition a blank IDE hard drive using cfdisk, copy over the TC operating system files, and install the GRUB bootloader on that drive.
It assumes that TC was booted from a liveCD and is already running on the target system with Internet access.
Keep in mind that this guide is basic and that the user may choose to adapt, remove and/or add parts as desired.
The result: a standard TC PPR installation.
Note: If you already have a Linux System booting via Grub, then you do not need to make a partition for Tiny Core! Tiny Core can run in a couple of directories in your existing Linux Grub installation. Skip to Step 5. You will only need to do Step 5 and add a Grub menu item (title, kernel, and initrd lines) as shown in Step 6.
1. Obtaining cfdisk and GRUB via Appbrowser
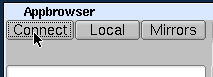
Click on the wbar icon Apps (or access the right-click menu on the desktop and selecting SystemTools/Appbrowser)

Click on Connect
The list on the left side should now be populated. Select cfdisk.tcz from the list.
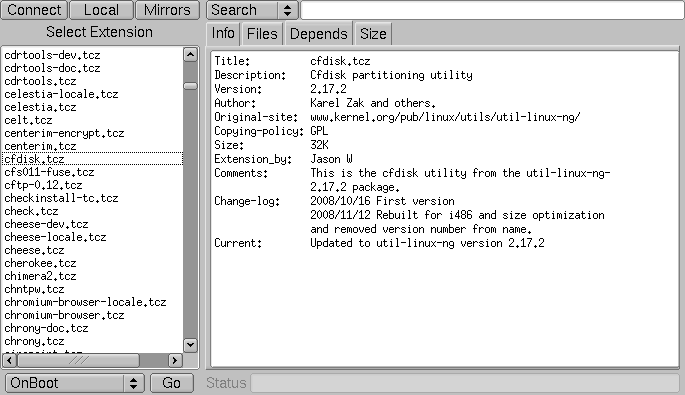
Then click the Go button located in the bottom left corner. It should report that it was installed successfully.

Note: For microcore users, the command-line version of Appbrowser is ab, so you could use ab cfdisk, or to directly download and install, use tce-load -wi cfdisk.tcz
Now repeat this process, by selecting and installing grub-0.97-splash.tcz.
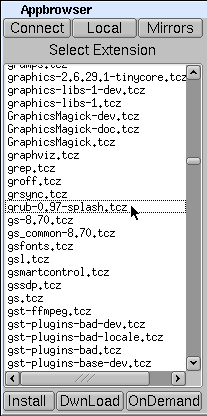
Note: For microcore users, the commnand line version of Appbrowser is ab, so you could use ab grub and select grub-0.97-splash.tcz, or to directly download and install, use tce-load -wi grub-0.97-splash.tcz
2. Open a root shell
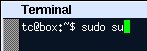
Start a terminal, and type sudo su to make it a root shell:

3. Partitioning
Find a disk you want to install on. The following command will list your disks and their current partitions.
Remember which disk will be used for installation. For the purposes of this guide, /dev/hda will be used.
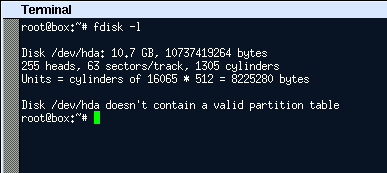
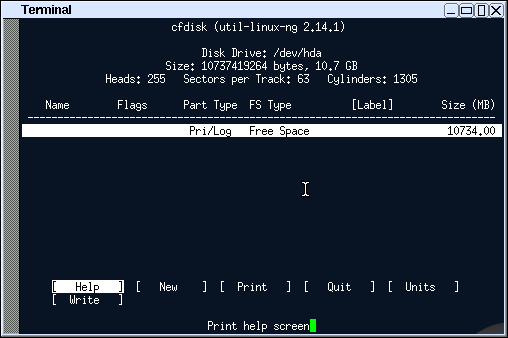
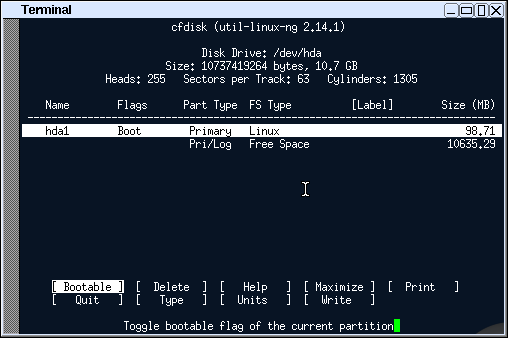
The cfdisk command will be used to partition the hard drives.
Use the left and right arrow keys to navigate the bottom menu, and press Enter to select an option.
Navigate and select [ New ]
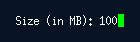
Input the size by entering the numbers you want, or accept the default. Press enter to accept. This demonstration will use 100 MB.
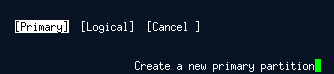
If prompted, choose where to put the new partition.

Set the boot flag on the new partition by selecting [ Bootable ]. Remember this partition as it will be used for installation. This guide will use hda1.
Setup the rest of the disk if preferred, when completed. Adding a swap partition is recommended.

Confirm the write by entering «yes«:


4. Formatting
Format the new partition. This demonstration will use ext3. You may format other partitions here as preferred.
After formatting rebuild the fstab file
Note that if you wish to migrate to ext4, or use grub 2, enable 256-byte inodes by adding -I 256 to the mkfs command above. (capital i)
5. Copy over TC system files and prepare for PPR mode.
Mount the new install partition:
Create directories for TC files and GRUB:
mkdir -p /mnt/hda1/boot/grub
Mount the original boot media. For this guide, TC was booted from an IDE cd-rom drive on the second channel:
Copy over the file:
cp -p /mnt/hdc/boot/* /mnt/hda1/boot/
This will copy over bzImage and tinycore.gz. Ignore any «omitting directory» warnings.
Next setup the tce directory to store application extensions:
mkdir -p /mnt/hda1/tce
Prepare file for backup & restore
6. Installing GRUB
Copy over GRUB files (please note that the grub-0.97-splash.tcz extension will need to be installed as mentioned in step 1):
cp -p /usr/lib/grub/i386-pc/* /mnt/hda1/boot/grub/
The following assumes vi, a console text editor. You can use any other editor instead, for example the «editor» in TC.
Create menu.lst: (note that «lst» contains a lower case ‘L’)
Presss i (enters insert mode)
Enter the following:
default 0
timeout 10
title tinycore
kernel /boot/bzImage quiet
initrd /boot/tinycore.gz
If unsure, copy and paste the above. Note there’s a capital i in bzImage.
Optionally, add other bootcodes now on the kernel line separated by spaces. Note: If you are using a pendrive or other Flash device, be sure to add the boot code of waitusb=5
Press when done. Enter 😡 (saves and quits)
Note that grub uses hd numbers in the form of (hdM,n) and (hdM), instead of hdXy and hdX.
M corresponds to a number from ‘0’, which represents ‘a’ for X.
For every letter after that, add one.
‘b’ is ‘1’, ‘c’ is ‘2’, ‘d’ is ‘3’, etc.
n corresponds to a number from ‘0’, which represents ‘1’ for y.
Subtract 1 from y to get n.
‘1’ becomes ‘0’, ‘2’ becomes ‘1’, ‘3’ becomes ‘2’, etc.
Since this guide is using hda1 for hdXy, this means that (hdM,n) is (hd0,0)
and that the use of hda for hdX means (hdM) is (hd0)
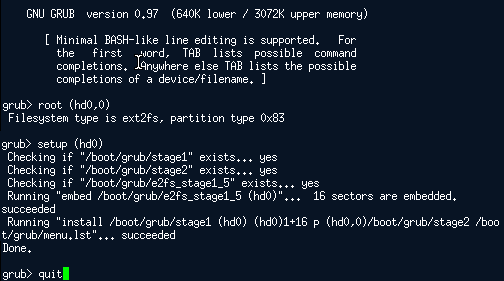
In the grub prompt,
root (hd0,0)
setup (hd0)
quit
Note: you can use tab to auto-complete.
7. Testing
TC and GRUB are now installed!
Remove the original CD boot media:
To test, reboot the system.
Note: the system may need to be configured to boot hdX first in the BIOS.
Источник
Tiny core linux apt
The first step before you install any operating system such as Tiny Core is to back up everything on your computer before starting.
Before making the commitment to perform a frugal install you should consider our Quick and Easy Overview. It covers the basics of running Tiny Core from CDROM and/or USB pendrive. Most will find learning Tiny Core the quick and easy way a better starting point.
But for those who are ready to take the plunge to frugal, this guide shows step by step information on how to install TC via the installer. The older instructions for a manual install are still available, but using the installer is recommended.
The guide assumes you’ve either booted the CorePlus CD, or have installed the tc-install extension (tc-install.tcz)
Keep in mind that this guide is basic and that the user may choose to adapt, remove and/or add parts as desired.
The installer is also applicable to USB sticks and other external media.
Note: If you already have a Linux System booting, then you do not need to make a partition for Tiny Core! Tiny Core can run in a single directory in your existing Linux installation. To do so, at step 1, uncheck the option to «Install boot loader». At step 2, select an existing partition, and at Step 3, do not format it. Upon completion you will need to manually configure your existing boot loader.
1. Start the installation
Open the installer:

It can also be started via the shell or Run icon by typing «tc-install».
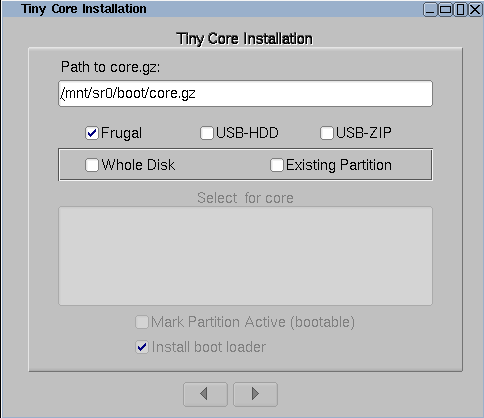
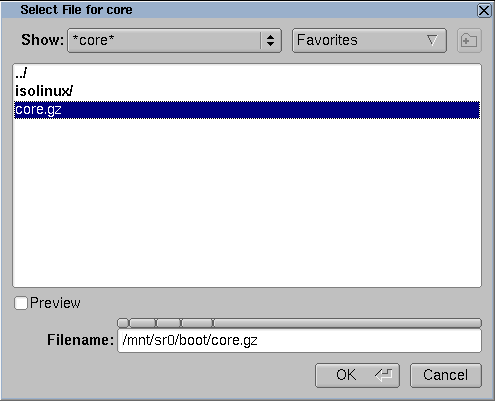
2. Browse to the install files
Browse to /mnt/device/boot and select the core.gz file.
With the source selected, pick the desired install type and target. We’re going to install to an empty hard drive.
If using an existing partition, tick the box to mark it active to have it bootable.

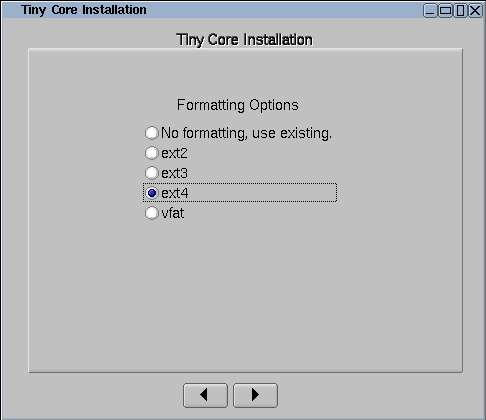
3. Formatting
Format the new partition. It’s recommended to pick one of the ext* options to support linux permissions.
4. Bootcodes
If you want to use additional bootcodes, enter them now. Otherwise leave this blank.
The example bootcodes set a framebuffer resolution and disable wbar icons.
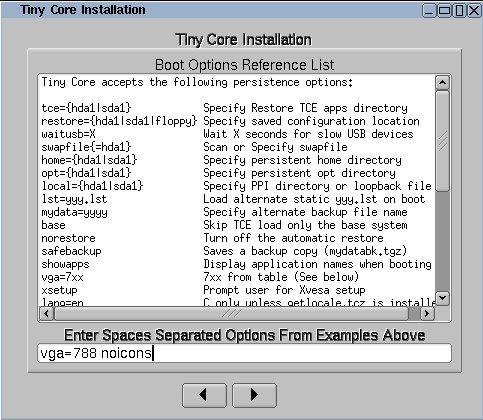
Note that you can edit them any time after the install in the bootloader’s config file, usually extlinux.conf.
5. CorePlus installation options
If you are installing from the CorePlus CD you will see an additional screen asking which extensions from CorePlus you would like to install. Note that you will only see this screen if running the installer from a CorePlus CD.
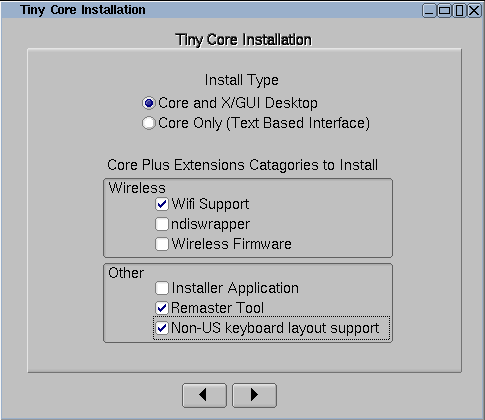
The selected extensions will be installed.
6. Tiny Core installation options
If you are installing from the Tiny Core CD you will see an additional screen asking which directory extensions should be installed from. You should select the cde or tce directory that contains the extensions that you would like installed. For example, if the Tiny Core CD is mounted on /mnt/sr0 you should select /mnt/sr0/cde
Note that you will not see this screen if installing from CorePlus.
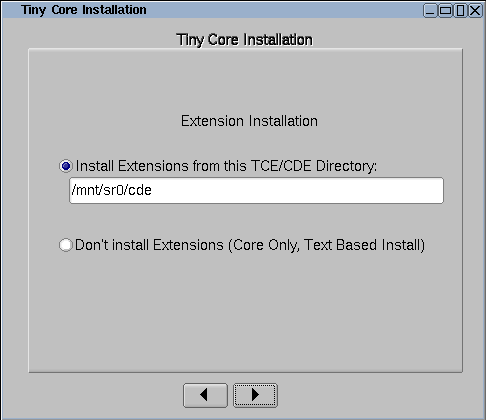
All extensions from selected directory will be installed.
7. Install
If everything’s OK, click on proceed:
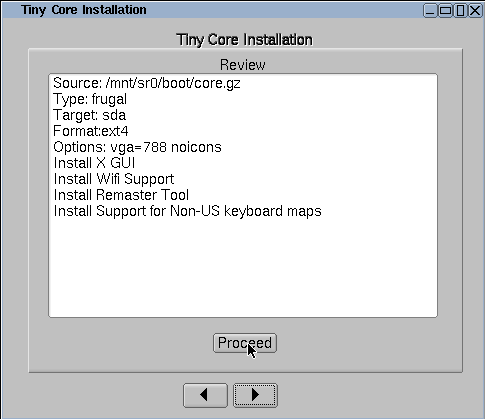
The time required will depend on the size of your hard drive.
8. Testing
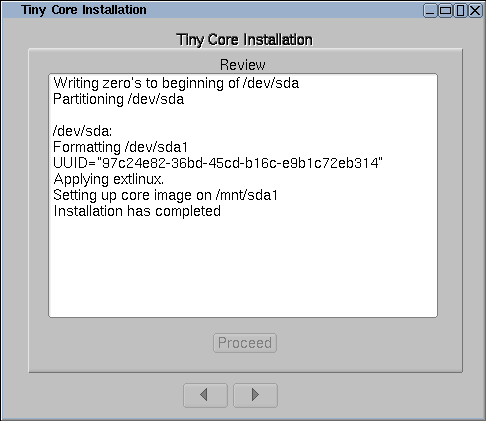
TC is now installed!
Remove the original CD boot media and reboot.
Note: the system may need to be configured to boot hdX first in the BIOS.
Источник
Tiny core linux apt
The Start Button is just a way to bring up the menu. As Tiny Core uses FLWM Window Manager, right click anywhere on the background or window title of the screen to bring up the menu. Then navigate the menus as usual. If you decide not to select anything and want the menu to go away, then left click on the background.
How do I add/load/install extensions?
For best results use the desktop application Appbrowser, it is available from the icon launch bar or the system menu.
Using Appbrowser will fetch the requested extension and all of its required dependencies. See: Downloads Howto
Extensions disappear after booting. How do I keep my extensions?
To make your extensions persistent Tiny Core needs a directory to store them. Do the following:
Boot CD, at first boot prompt press f2. Notice the line «tce=
then at the boot prompt type: tinycore tce=xxyz where xxyz is your drive partition particulars.
Note: This tce= boot option is only needed one time! The System will autoscan for it upon each boot. However for faster booting, add the tce= boot option to your bootloader.
If you forget to boot with this option and are already at the desktop, then from the icon launch bar select Control or the system menu ControlPanel.
Select Set TCE Drive and you will be prompted to select your drive partition for the tce directory.
Note: Drive partition types supported by Tiny Core base are: ext2, ext3, ext4, fat32.
How do I update my extensions?
The safe method to keeping your collection of extensions updated is to boot base norestore
and run tce-update from the command line. This will perform a batch update.
Sometimes, you need a few extensions to access the net, an alternate batch update method is:
From the main system tools menu: ControlPanel->Update Apps.
When run in safe mode (booting with base norestore) you are
assured that no extension will be in use during the upgrade procedure and is therefore recommended.
An alternate selective update method is:
AppsAudit->Updated->Check for Updates
Select an extension for update. The Results panel will update.
After updating your desired extensions, reboot.
AppsAudit->Dependencies->Update .dep files-> (Note this step is optional, but will ensure that all your .dep files are up to date.)
->Build Reporting Database->Display All with Missing Dependencies.
If any extensions are displayed, use AppBrowser to Download + Load them.
How do I delete an extension?
Use appsaudit. See Tools->AppsAudit from the system menu. This is a GUI reporting and deletion tool. This provides a safe method to delete an extension and all unencumbered dependencies. The extensions marked for deletion will be removed during shutdown, ensuring that no extension is in use. Several reports are also available to check on dependencies.
How do I use system menu/taskbar/pager?
How to use pendrives and other removable devices with Tiny Core?
Installing Core to USB pendrives is easily accomplished with Core’s tc-install extension which is provided on CorePlus.
Therefore it is highly recommended to use CorePlus, much work has gone into this to make an easy and effortless installations for both hard drive and USB pendrives with whatever window manager you prefer. See the video provided.
For those users coming from Windows there is now an installation tool just for you. Core2usb is a Windows native program that make it easy to install Core from downloaded iso file to bootable pendrive. Core2usb can be found on Sourceforge.
Note using other third party installation tools, such as, unetbootin is not and cannnot be automatic. Obviously unetbootin does not «know» about our distribution, i.e., not listed in the drop choices. Therefore using unetbootin simply copies the entire iso to target.
On a cdrom we cannot have a tce dir. It would be READ_ONLY and nothing would work insofar as adding extensions. That is why there is a cde directory in the iso! It is also a fact that one cannot have two tce directores in the same partition. Nothing new about that,
It should be obvious that one can use the TinyCore CD or the CorePlus CD READ_ONLY devices to process and access any tce directory on a writable store, i.e., works as expected.
Therefore if one insists on using a third party installation tool and one that does not officially support Core and thereby copies the entirety of the TinyCore iso then you are faced with manual setup of either creating a second partition for your tce dir, or renaming the cde to tce thus indicating that this is not a CD and editing the syslinux.cfg changing cde to waitusb=5 to indicate that is a pendrive.
It is not recommended to have a cde directory on any live working system. The whole point of modularity is the ability to easily upgrade the X/GUI extension separate from the base Core.
Therefore in the case of unetbootin renaming cde to tce is required.
Tiny Core supports UUID and LABELS.
This is most helpful when using pendrives on different machines and you want to «anchor» your Tiny Core boot codes to a specific device.
To find the UUID of a device use the command blkid
blkid -s UUID /dev/sda1
You can mount devices by UUID with the mount command, e.g,
# mount -U 4773-DFE2
The UUID tends to be long, so best to cut and paste into your menu.lst boot options.
You can now specify the device to be used by UUID as follows:
tce=UUID=4773-DFE2 home=UUID=4773-DFE2 opt=UUID=4773-DFE2 restore=UUID=4773-DFE2
Typically this is helpful when using pendrives, be sure to add the waitusb=5 option.
Advanced users may add a specific device to wait for, with the time limit being the maximum time to wait:
waitusb=30:LABEL=tinycore
waitusb=30:UUID=4773-DFE2
You can now also use LABELS. This too is optional.
To write a label on the partition of a pendrive, use the command tune2fs
# tune2fs -L tinycore /dev/sda1
You can check your results with
blkid -s LABEL /dev/sda1
Then you can specify devices by LABEL, e.g.
# mount -L tinycore
For Tiny Core boot options use:
tce=LABEL=tinycore home=LABEL=tinycore opt=LABEL=tinycore restore=LABEL=tinycore
In order to use labels on other filesystems than ext2/3/4, see their respective extensions:
— for fat16/32 dosfstools-3.tcz contains the tool dosfslabel
— for JFS jfsutils.tcz contains the tool jfs_tune
— for XFS xfsprogs.tcz contains the tool xfs_admin
— for reiserfs reiserfsprogs.tcz contains the tool reiserfstune
LABELS and UUID can also be used as follows:
When booting from an iso, e.g., TinyCore-4.6.iso, using the iso boot parameter.
sudo fromISOfile LABEL=»MULTIBOOT» sudo fromISOfile UUID=»6417-C033″
You may combine LABELS and UUID with paths, e.g.,
iso=UUID=»12345_678/images/tinycore.iso» for the iso. and
tce=UUID=»12345_678/tinycore/tce» for normal installation.
How to resolve ‘Failed to load firmware’ error?
When booting Tiny Core 2.x an error like the following appears:
e100: eth0: e100_request_firmware: Failed to load firmware «e100/d102e_ucode.bin»: -2
Boot continues very slowly after the message. Desktop appears but network access is disabled
To resolve many firmware issues see: firmware-2.6.29.1-tinycore.tcz extension.
How to setup a proxy with Tiny Core?
How can I set an http proxy for downloading extensions? I am sitting behind a restrictive firewall and need to go through a proxy to the internet.
export http_proxy=’proxy.domain: port’
Example:
export http_proxy=»http://192.125.196.3:8080″
If a username and password are required:
export http_proxy=»http://username:password@host:port»
How do I make aterm default to transparency mode?
Transparency is not the default in v1.3. The choice to make it default is under the control of the user by editing the .Xdefaults file in the their home directory.
Shading is not 100%. No change was made to the v1.2 of 70%
A simple change from Aterm*transparent: false to Aterm*transparent: true will allow wbar to launch Aterm with transparency.
Current .Xdefaults in v1.3:
Aterm*scrollBar: true
Aterm*transparent: false
Aterm*title: Terminal
Aterm*foreground: white
Aterm*background: black
Aterm*font: fixed
Aterm*cursorColor: green
Aterm*fading: 70
Aterm*shading: 50
Aterm*color12: DodgerBlue1
Aterm*saveLines: 1000
fltk*scheme: gtk+
How do I mount windows shares?
If the sharing computer is at least Windows 2000, you can mount the share with only the filesystems-2.6.29.1-tinycore.tcz extension.
In a root console:
mkdir /mnt/windows
mount -t cifs //9.53.216.11/myshare /mnt/windows -o user=myname,pass=mypassword
Replace the IP with your sharing computer’s IP. If you need to log into a domain instead of the computer, you can add domain=mydomain to the options.
How to Cut and Paste?
To cut and paste in Linux one simply highlights the text with the left mouse button and then press the middle button to paste. If you have a two button mouse you would paste by pressing the left and right button together. Cutting and pasting takes a little practice, but is very efficient after one gets used to it.
Many terminals and apps also support shift-insert to paste.
How To Set the Timezone?
If you live where in an area that has DST then you need to use the full specific ation for the tz variable. Indicating both the begin and end of DST. So for PDT it begins March second Sunday at 2AM and end November first Sunday at 2AM.
For more info see this post on the forums.
How To Clean Up Wbar?
Right click on ‘Wbar’ and that will restart Wbar and clean up any leftovers.
What Bootcodes does Tiny Core Support?
At the boot prompt press [F2] and [F3] [F4]. In addition there are many generic kernel boot parameters.
Help X does not start. Why does my system boot up to a login prompt?
Tiny Core defaults to vga=791 or 1024×768 but your machine may not be able to support that resolution.
At the first boot prompt type:
This boot code creates a selectable table from the Xvesa -listmodes so it is easier to use.
If you get a blinking cursor after the «Xauthority» lines, try hitting ctrl-C to get back to text prompt, then type xsetup.sh and try another screen resolution option.
From text prompt, type: startx
Note: Xvesa -listmodes displays what your video card is capable of, but not necessarily what your monitor is. If your system does not support Xvesa then perhaps the framebuffer extension (see F2 boot screen and below for instructons).
The last resort is to use the Xorg extension.
How to use framebuffer X server?
In order to use framebuffer (Xfbdev) you will need to have a persistent store, e.g., a PPR.
Boot Tiny Core as follows, using an appropriate vga code from the f2 boot help screen and an appropriate disk partition.
boot: tinycore tce=hda1 text vga=788
At the system prompt:
$ tce-load Xfbdev.tce wget install # This is for TC 2.2 and below
$ tce-load -w -i Xfbdev.tcz # This is for TC 2.3 and above
From the X desktop, shutdown with backup. Your Xfbdev X settings will be saved and used on the next boot.
Do not use the text boot code and your framebuffer X server should start successfully.
My keyboard is not US. How to add a keymap?
The extension «kmaps.tcz» was created just for this. It includes all keymaps from the kbd package. Keymaps have to be changed in the console, not in X.
So, for a quick test, load the extension, exit to prompt, and type:
Help. Not all keys work in browser or openoffice?
If the altgr symbols do not work in the browser or openoffice then modify the .xsession file by adding:
sleep 3 && xmodmap -e «clear Mod4» -e «add Mod5 = Mode_switch» &
Or, in later versions, right after waitforX.
What is the boot architecture?
Tinycore always boots to ram. This unique way has several advantages, like 100% functioning usb boot, awesome speed, and being able to boot without having the ability to access the boot device after booting. You’re free to snag out the usb drive right after initrd is loaded, for example.
How to use startup scripts?
The directory /usr/local/tce.installed is where TC keeps track of loaded extensions.
Typically this is a ‘flag’ a zero byte file. Notice that the extension name does not include its file extension.
Now, if you need a startup script then include it in tar file at this location and its name needs to match the extension name. Do make sure that the script works and is executeable. Do not use .sh or any other file extension.
A very simple example is in order:
Take for example the 915resolution.tce extension.
If we want to make a startup script then it would be placed in
/usr/local/tce.installed/915resolution
The actual startup script could be anything that is executeable.
Using the same example, my /usr/local/tce.installed/915resolution is a simple as this:
#/bin/sh
/usr/local/sbin/915resolution 50 1024 600
Note: Be sure to use full paths as during boot no login has occured yet no PATHs are set.
So the final result of a 915resolution.tce with a startup script would contain
What are the minimum requirements?
An absolute minimum of RAM is 46mb. TC won’t boot with anything less, no matter how many terabytes of swap you have.
Microcore runs with 28mb of ram.
The minimum cpu is i486DX (486 with a math processor).
A recommended configuration:
Pentium 2 or better, 128mb of ram + some swap
Can TC be contained in a single directory?
While TC can reside entirely inside a tce directory, placing the boot files in it conflicts with the loading of the core items (Xlibs.gz, Xprogs.gz..) and can result in various errors.
It’s recommended to place the boot files either in /boot, or in a subdirectory of the tce directory.
Can TC boot and be used directly from an ISO file?
Starting with v4.4rc3 it is now possible to load the embedded extensions inside an iso image file. Booting from an iso as supplied by various boot loaders, eg YUMI, the embedded extensions were not readily available.
The new fromISOfile now provides for full X/GUI+ experience.
It can be used as a boot code:
boot: tc iso=sdb1
This short version will scan sdb1 for isos and if one is found will attempt to mount and process it.
Optionally one can use the full path to avoid the scanning delay with:
boot: tc iso=/mnt/sdb1/multiboot/ISOS/TinyCore-4.4.iso
After boot is also supported. If the system booted from an iso file and you are at:
$
then use either the short/scan style or fullpath
$ sudo fromISOfile /mnt/sdb1
$ startx
Once you have it working and you have set your tce directory, tce-setdrive
then you can add fromISOfile to /opt/bootsync.sh as
This will result in the familair X/GUI from a single ISO image file.
How do I start X apps on boot?
Add them to files in /home/tc/.X.d, one per file, backgrounded. Here’s how to start Opera at boot:
How do I increase the number of loop devices to support more .tcz extensions?
Add the cheatcode max_loop=n to your boot line, where n is the number of loop devices you need, up to 255.
Note that this bootcode should not be used with 3.x or newer, unless you know you need it.
How to get flash working?
Short answer: see the getFlash9.tcz extension.
Long answer:
Flash 10 has such steep requirements, it is not supported on TC. The last working version was 10 beta 2, but due to the beta nature of that, using Flash 9 is recommended.
Don’t use Adobe’s installer, copy libflashplayer.so yourself to your browser’s plugin folder.
To have sound in Flash using OSS, you need to copy libflashsupport (included in OSS.tcz) to both /usr/lib and your browser’s plugin folder.
There are two variations of the library in /usr/lib/oss/lib, one only enabling OSS sound, the other enabling that and also playing flash over SSL. You need OpenSSL for the second library.
Depending on if you have OpenSSL loaded and need to use flash over SSL, pick one of the libs, and copy it to both /usr/lib and your browser’s plugin folder, and then rename it to libflashsupport.so in both places.
Requirements: Flash 9 requires GTK+-2.
How to use/share Virtual Disks (Qemu)?
Virtual disk support (tcvd, tiny core virtual disk) is beginning with Tiny Core v1.4
This was primarily setup for Qemu support, but is useful for anyone. It uses the Qemu virtual disk image ext2, a loopback file.
To use first specify the ‘harddisk’ file with the tcvd boot option followed by your regular boot optons using tcvd, examples:
boot: tinycore waitusb=10 tcvd=harddisk.img tce=tcvd restore=tcvd
This will autoscan for the file named harddisk.img in level one directories and setup mount capabilities as device tcvd. The subsequent tce=tcvd and restore=tcvd will use the virtual drive special device.
boot: tinycore waitusb=10 tcvd=sda1/harddisk.img tce=tcvd restore=tcvd
This will look for the loopback file named harddisk on sda1 and setup a special device tcvd used by the other boot opitons.
boot: tinycore waitusb=10 tcvd=sda1/qemu/harddisk.img tce=tcvd restore=tcvd
This is/was the typical Qemu setup that I used in Damn Small Linux. Again a special device tcvd will be setup and then other boot options are able
to use it.
Administrator / SuperUser / Root:
Each system requires some command to be run as the administrator. In Tiny Core, such user is called root. To get root privileges to run a specific command, just proceed the command with the word sudo.
To become the super user, then use the command sudo su. Normally, you should not run your system as root.
Источник


