- Configure Tiny Core Linux as NAT (P-NAT) Router using iptables
- 1. Configure Ethernet0 with Static IP Address and DHCP Server Configuration:
- 2. Install dnsmasq for DNS Cache:
- 3. Enable IP-Forwarding:
- 4. Install iptables:
- 5. Enable NAT using iptables:
- 6. Make the Configuration Persistent:
- 7. Connect the Client Machine and test the P-NAT Connection:
- Установка Tiny Core Linux
- Системные требования
- Подготовка к установке
- Шаг 1. Загрузка образа
- Шаг 2. Запись образа на носитель
- Шаг 3. Настройка BIOS
- Установка Tiny Core Linux
- Шаг 4. Загрузчик образа
- Шаг 5. Загрузка системы
- Шаг 6. Запуск установщика
- Шаг 7. Выбор диска
- Шаг 8. Файловая система
- Шаг 9. Параметры системы
- Шаг 10. Дополнительное программное обеспечение
- Шаг 11. Подтверждение установки
- Шаг 12. Завершение установки
- Шаг 13. Перезагрузка
- Шаг 14. Загрузка Tiny Core
- Шаг 15. Локализация
- Шаг 16. Настройка шрифта
- Шаг 17. Готово
- Выводы
- Configure Tiny Core Linux as an IP Router
- 1. Configure Eth0 with Static IP and DHCP Server Configuration:
- 2. Configure Eth1 with Static IP and DHCP Server Configuration:
- 3. Make the configuration Persistent:
- 4. Configure SSH (Optional Steps):
- 5. Enable Routing (IP Forwarding):
- 6. Test Connections:
- Conclusion:
Configure Tiny Core Linux as NAT (P-NAT) Router using iptables
Pradeep Singh | 28th Aug 2017

Network address translation (NAT) is a method of remapping one IP address space into another by modifying network address information in Internet Protocol (IP) datagram packet headers while they are in transit across a traffic routing device.
In this article, we are going to configure P-NAT. Port Network Address Translation or P-NAT, uses a single outside public address and maps multiple inside addresses to it using different port numbers. It is mainly used for Internet connection sharing on a private IP address space.
Following is the reference topology, I am going to use for this article –

1. Configure Ethernet0 with Static IP Address and DHCP Server Configuration:
Follow the instructions from the following document and configure eth0 with static IP address along with the DHCP Server config using udhcpd –
2. Install dnsmasq for DNS Cache:
As you might have noticed in the article used in the first step, we used the IP Address assigned to eth0 as Gateway as well as DNS Server in the DHCP Server configuration file “/etc/udhcpd.conf“. As we don’t have any DNS proxy on our Tiny Core NAT Router as of now, your DHCP clients wouldn’t be able to resolve the DNS names.
To fix this problem, you can either use public DNS IP Addresses such as “8.8.8.8” and “8.8.4.4“; or you can install a lightweight DNS server such as “dnsmasq“.
If you prefer to go with “dnsmasq“, you can install it with the following command –
After the installation, you should run dnsmasq service using the following command –
Note: The “dnsmasq” process would use “ /etc/resolv.conf” file for the external DNS server IP addresses. If your WAN interface is getting its IP Adress from an external DHCP Server, “/etc/resolv.conf” file will get auto-populated. However, if you are assigning static IP to your WAN interface, you may have to add the details in this file manually. Following is the sample of my”/etc/resolv.conf” file (these entries should work for you too) –
3. Enable IP-Forwarding:
Now you need to enable IP Forwarding. It allows the OS to exchange IP Packets between NIC Cards based on their IP Network targets. By default, IP Forwarding is disabled in most of the Linux based operating systems. You can check IP Forwarding status using the following command –
Enable IP Forwarding using the following command –
Note: You can also use “cat /proc/sys/net/ipv4/ip_forward” command to check the current status of IP Forwarding. Similarly you can use the command “echo 1 > /proc/sys/net/ipv4/ip_forward” to enable and”echo 0 > /proc/sys/net/ipv4/ip_forward” to disable it.
4. Install iptables:
3.1. Install “iptables” package using the following command –
Note: you can also use “tce-ab” command to search and install Tiny Core packages.
5. Enable NAT using iptables:
Enable NAT (PAT) using the following iptables command –
6. Make the Configuration Persistent:
Add the commands to “/opt/bootlocal.sh” so that they can get triggered at the after the system boots up –
Following is the sample “/opt/bootlocal.sh” file contents –
7. Connect the Client Machine and test the P-NAT Connection:
With this your Tiny Core based router is ready. You can connect your client machine with on the Lan network on your Tiny Core based router, and it should be able to browse the internet (On Windows machine you may need to disable firewall in some cases) –

Following console output shows the ethernet interface configuration of my Tiny Core P-NAT router –
Источник
Установка Tiny Core Linux
Tiny Core Linux — это очень необычный дистрибутив, он самый маленький из всех существующих дистрибутивов. Его образ с минимальным набором программного обеспечения занимает всего 12 мегабайт. И при всем этом системой вполне можно пользоваться, хотя и выглядит она соответствующим образом.
Этот очень легкий дистрибутив основан на Damn Small, который, в свою очередь, произошел от Debian. Но от этой системы здесь мало что осталось. Tiny Core использует свежую версию ядра, BusyBox, и оконные менеджеры Flwm. Также здесь есть собственная система управления пакетами и репозитории где можно найти достаточно много программ. И самое интересное, что система работает из оперативной памяти. Последняя версия Tiny Core 7.2 вышла в июле 2016.
В этой статье мы рассмотрим как выполняется установка Tiny Core Linux на жесткий диск компьютера или ноутбука.
Системные требования
Для таких маленьких дистрибутивов системные требования очень важны, чтобы вы могли определить подойдет ли эта система для вашей машины. И, скорее всего, подойдет.
Для запуска системы с графическим интерфейсом будет достаточно 46 мегабайт оперативной памяти, а для облеченной версии и того меньше — 28 Мб. Минимальный процессор — i486.
Рекомендуется использовать процессор Pentium II или лучше, а также 128 мегабайт ОЗУ с файлом подкачки.
Подготовка к установке
Как обычно, сначала нужно подготовить все что понадобится для установки. И в первую очередь скачать и записать образ на носитель для установки.
Шаг 1. Загрузка образа
На официальном сайте доступно три редакции дистрибутива:
- Core — базовая система, поддерживающая только интерфейс командной строки, это система для профессионалов, в будущем сюда можно добавить расширения для получения системы с графическим интерфейсом;
- TinyCore — дистрибутив с графическим окружением на основе FLTK / FLWM, размер — 16 мегабайт;
- CorePlus — полноценный установочный образ размером 100 мегабайт. Здесь содержатся проприетарные модули для беспроводных сетей, раскладки, инструменты для установки на диск, семь оконных менеджеров.
Для установки вам понадобится именно CorePlus, поскольку здесь есть все необходимые инструменты.

Шаг 2. Запись образа на носитель
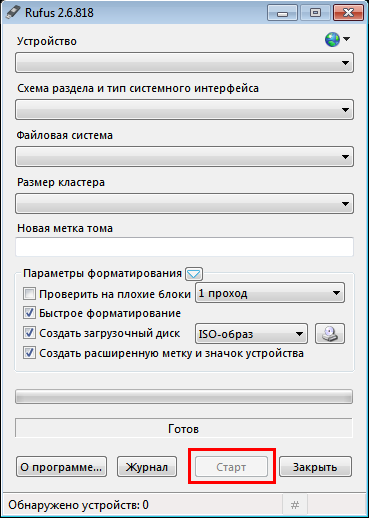
Для записи Tiny Core на диск можно использовать уже привычные нам k3b или brasero в Linux, а также UltraISO в Windows. Что касается записи на флешку, то со своей задачей отлично справится unetbootin в linux:
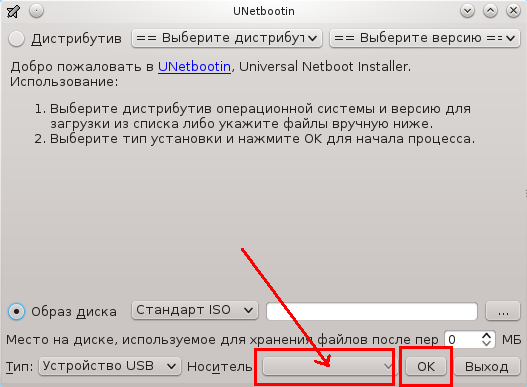
А в Windows можно применить rufus:
Шаг 3. Настройка BIOS
Дальше нам нужно настроить BIOS для загрузки с флешки. Для этого перезагрузите компьютер и во время заставки BIOS нажмите F2, F8, Shift+F2 или Del, чтобы войти в меню. Затем перейдите на вкладку Boot и в разделе Boot Device Priority переместите свое устройство на первое место:
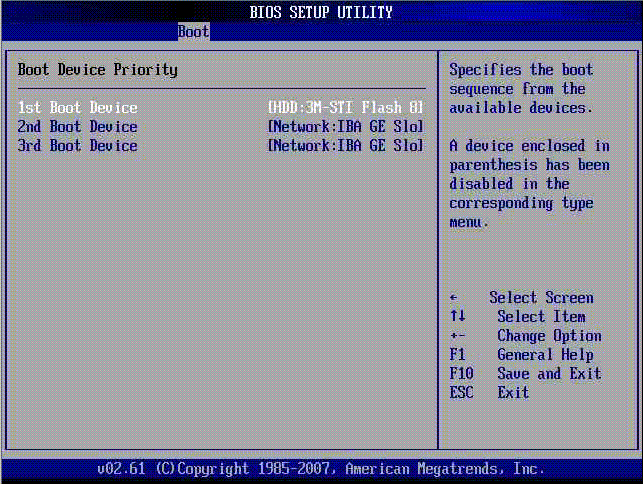
Затем перейдите на вкладку Exit и выберите Exit & Save Changes.
Установка Tiny Core Linux
Шаг 4. Загрузчик образа
В загрузчике вы можете выбрать либо первый пункт с окружением по умолчанию, либо другие шесть окружений рабочего стола и дополнительные драйверы для wifi:

Шаг 5. Загрузка системы
Tiny Core загружается очень быстро. Дождитесь пока система запустится и появится рабочий стол:

Шаг 6. Запуск установщика
Для запуска установщика щелкните по значку с серым кругом, разбитым косой линией на две части:

Шаг 7. Выбор диска
На первом шаге установщика вам предстоит выбрать диск для установки. Чтобы установить Tiny Core Linux на жесткий диск или флешку выберите пункт USB-HDD. Если вы хотите установить систему на несколько разделов, то их нужно было подготовить раньше.

Сейчас вы можете выбрать Whole Disk для установки системы на весь диск или Existing Partition для выбора существующего раздела:

Шаг 8. Файловая система
Выберите файловую систему, в которую будет отформатирован корневой раздел:

Шаг 9. Параметры системы
Очень много параметров Tiny Core настраиваются через параметры загрузки ядра в Grub. Именно в этом окне мы можем их задать. Параметры записываются в строку, разделенные пробелом, значение каждого параметра через знак равенства. Рассмотрим основные параметры, которые вам могут пригодится:
- tce=sda1 — устанавливает корень системы, здесь указывать не нужно, он будет подставлен установщиком автоматически;
- waitusb=5 — ждать пять секунд перед тем, как монтировать файловую систему при загрузке с USB;
- tz=GMT+2 — задать часовой пояс, в нашем случае GMT+2, но вы можете выбрать любой нужный вариант;
- opt=sda2 — задать раздел диска, который нужно подключить в качестве /opt;
- home=sda3 — задать раздел диска, который нужно подключить в качестве home;
- host=TinyPC — установить имя этого компьютера;
- lang=ru_RU.UTF-8 — использовать русскую локаль в системе;
- noutc — использовать формат хранения времени localtime для совместимости с Windows.

Я рекомендую сейчас настроить только часовой пояс, язык и имя компьютера. Все остальное вы сможете изменить позже.
Шаг 10. Дополнительное программное обеспечение
Выберите нужно ли устанавливать дополнительное ПО, например, поддержку X сервера, Wifi, ndiswarapper, инструмент установки и пересборки системы, а также дополнительные раскладки клавиатуры:

Шаг 11. Подтверждение установки
Посмотрите какие компоненты будут установлены и нажмите Proceed, если все было правильно.

Шаг 12. Завершение установки
Дождитесь завершения установки:


Шаг 13. Перезагрузка
Перезагрузите компьютер. Для этого найдите на панели значок Exit, нажмите на него, затем в открывшемся окне выберите Reboot:

Шаг 14. Загрузка Tiny Core
В системе используется загрузчик extlinux, по умолчанию в меню только один пункт, поэтому оно показываться не будет. Просто пойдет загрузка системы:
Шаг 15. Локализация
Установка Tiny Core Linux завершена, но мы рассмотрим еще как добавить в систему поддержку русского языка. Кое-что мы уже сделали, но осталось еще установить несколько пакетов. Откройте терминал и выполните такие команды для установки getlocale и kmaps. Эти пакеты вы можете установить и через приложение apps:
ab getlocale.tcz
$ ab kmaps.tcz
Затем запустите скрипт getlocale.sh и выберите в нем ru_RU.UTF-8:
Осталось нажать несколько раз Enter.
Шаг 16. Настройка шрифта
Далее, для отображения кириллицы символов осталось добавить правильный шрифт. Загрузим шрифт UniCyr_8x16:
cd /opt
$ wget http://ftp.nluug.nl/os/Linux/distr/Mandrivalinux/devel/cooker/ia64/Mandrake/mdkinst/usr/lib/kbd/consolefonts/UniCyr_8x16.psf.gz
$ gzip -d UniCyr_8x16.psf.gz
А эти строки будут загружать шрифт при каждом старте системы:
echo «loadfont > /opt/bootlocal.sh
$ echo «export G_FILENAME_ENCODING=@locale» >> /opt/bootlocal.sh
$ echo «export LC_ALL=@locale» >> /opt/bootlocal.sh
$ echo «opt/UniCyr_8x16.psf» >> /opt/.filetool.lst
Шаг 17. Готово
Вот и все. Установка Tiny Core Linux полностью завершена и теперь вы можете переходить к настройке своей системы:

Выводы
Как видите, установка этого дистрибутива не так сложна, но немного сложнее, чем установка той самой Ubuntu. Но зато он отлично подойдет для старых компьютеров с очень слабым оборудованием. Если у вас остались вопросы, спрашивайте в комментариях!
Видео с процессом установки дистрибутива и небольшой обзор панели управления:
Источник
Configure Tiny Core Linux as an IP Router
Pradeep Singh | 27th Aug 2017

If you need a thin and functional Router for your virtual or physical host devices, you can create your own using Tiny Core (Core) image of Tiny Core Linux. In this article, I would show you how to configure this amazing Linux distro to function as an IP Router.
For this article, I would use the following topology. The Tiny Core based router has three Ethernet interfaces. Two of them (Eth0 and Eth1) are connected to 2 different Network segments (192.168.111.0 and 192.168.222.0) with static IP Address (191.168.111.1 and 192.168.222.1). These two interfaces would also be configured to act as HDCP Server for the respective host devices. Third Ethernet interface is used for out-of-band management and would get its IP Adress from the HDCP Server (192.168.101.254).

Let’s start and make an IP Router –
1. Configure Eth0 with Static IP and DHCP Server Configuration:
1.1 Create an ethernet interface configuration script for eth0 named as eth0.sh (/opt/eth0.sh) with the following contents –
1.2 Add the execute permissions to the eth0.sh script file using the following command –
sudo chmod 777 /opt/eth0.sh
1.3 Create DHCP Server configuration for Eth0 interface named as eth0_udhcpd.conf ( /etc/eth0_udhcpd.conf), with the following contents –
2. Configure Eth1 with Static IP and DHCP Server Configuration:
2.1 Create an ethernet interface configuration script for eth1 named as eth1.sh (/opt/eth1.sh), with the following content –
2.2 Add the execute permissions to the eth1.sh script file using the following command –
sudo chmod 777 /opt/eth1.sh
2.3 Create DHCP Server configuration for the Eth1 interface named as eth1_udhcpd.conf ( /etc/eth1_udhcpd.conf), with the following contents-
3. Make the configuration Persistent:
Execute following commands to make the configuration changes permanent –
sudo echo ‘/opt/eth0.sh’ >> /opt/.filetool.lst
sudo echo ‘/etc/eth0_udhcpd.conf’ >> /opt/.filetool.lst
sudo echo ‘/opt/eth0.sh &’ >> /opt/bootlocal.sh
sudo echo ‘/opt/eth1.sh’ >> /opt/.filetool.lst
sudo echo ‘/etc/eth1_udhcpd.conf’ >> /opt/.filetool.lst
sudo echo ‘/opt/eth1.sh &’ >> /opt/bootlocal.sh
filetool.sh -b
Following are the contents of my “/opt/.filetool.lst” and “/opt/bootlocal.sh” files –
Reboot the system and check the IP Configration. I have eth2 connected with another network and it receives the IP Address from the DHCP Server.
4. Configure SSH (Optional Steps):
You may want to enable SSH on your Tiny Core instance as it will allow you to change the config using ssh session. Following article will explain the details
5. Enable Routing (IP Forwarding):
“IP Forwarding” or “kernel IP forwarding” is a feature of the Linux kernel. It allows the OS to exchange IP Packets between NIC Cards based on their IP Network targets. By default, IP Forwarding is disabled in most of the Linux based operating systems.
5.1 You can check the IP Forwarding status on Tiny Core using the following command –
sudo sysctl net.ipv4.ip_forward
If the value of “ net.ipv4.ip_forward ” is 0, it means IP Forwarding is Disabled.
5.2 You can enable IP Forwarding using the following command –
sudo sysctl -w net.ipv4.ip_forward=1
Note: You can also use “cat /proc/sys/net/ipv4/ip_forward” command to check the current status of IP Forwarding. Similarly you can use the command “echo 1 > /proc/sys/net/ipv4/ip_forward” to enable and”echo 0 > /proc/sys/net/ipv4/ip_forward” to disable it.
5.3 Make IP Forwarding Persistent by adding it into /opt/bootlocal.sh file using the following commands –
sudo echo “sudo sysctl -w net.ipv4.ip_forward=1” >> /opt/bootlocal.sh
filetool.sh -b
Check your routing table using “route -n” command. Your routing table should look something like this –
6. Test Connections:
After enabling IP Forwarding on your Tiny Core machine you can ping the hosts in Network 1 and Network 2 from each other.
Note: If you are using Windows Machines as hosts in Network 1 or Network 2, and facing issues with Ping tests, you may need to turn off Windows Firewall.
6.1 Ping test from Node 1 – Network 1 –

6.2 Ping test from Node 1 – Network 2 –

Conclusion:
With minimal system requirement, Tiny Core can fit into any computer hardware. If you are using virtual infrastructure, you can use this router for Inter VLAN routing too.
Источник


